
Since I’m on a little vacation, I thought it might be a good time to bring home some guest posts that were originally posted on other blogs. This is one of my favorites from this past year (did you see my top 12?) that was posted on Elegance and Elephants for her Knock It Off series. Enjoy!
_______________________________________________________________
I love sewing all sorts of things, but sewing for my daughter is my absolute favorite. I’m also a huge fan of Heidi’s and I think this series is absolutely brilliant – I mean, who doesn’t love a good knock off?!
But I didn’t realize just how hard it was going to be to pin down just ONE thing to knock off! There are soooo many awesome store bought outfits out there just waiting to be made at home. I checked out some of my favorite knock-off inspiration pinboards (here, here, and here) and consulted with my favorite idea girl, Kristin, and with her help FINALLY decided on this Mini Boden Quilted Jacket.
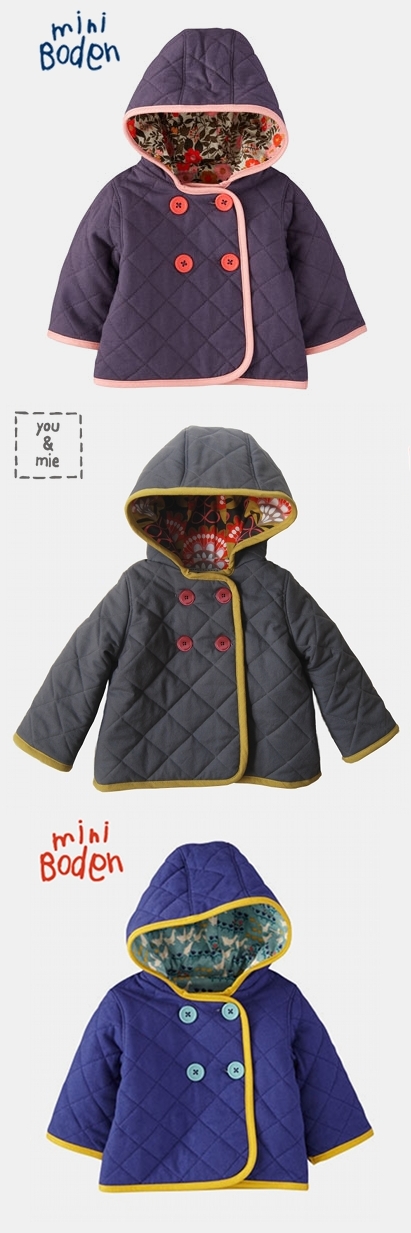

I love that the jacket is super stylish, warm and comfy and the bias tape finishing actually makes the construction really quite simple. I also love unisex patterns AND, get this, it can be reversible!! The most time consuming part is the quilting, but it goes quickly once you get going (or you can buy pre-quilted fabric). So let’s get started!
You’ll need:
– Main fabric
– Lining fabric
– Batting
– Double fold bias tape
– 4 buttons (or 8 if you’re making a reversible jacket)
– Chalk or fabric marking pen
– Coordinating thread
– Walking foot (optional)
Draft your pattern:
To draft your pattern, start with jacket or top that fits well and draft the back piece on the fold. The jacket has a slight A-line shape, so draw a slight slant from the bottom of the armhole to the bottom corner of the pattern.

I need to mention that my jacket turned out quite snug on my daughter and I’m wondering if the batting had something to do with that. I’d suggest giving your pattern some extra wiggle room when you draft it.

To draft the front piece, trace the shoulder, armhole and side and bottom of the back pattern. The neckline should scoop lower and the center should extend past the back piece (mine extended 1.5 inches) and round your edges.

Using your well-fitting jacket, draft a pattern for the sleeves, a 3 piece hood and a pocket.
Cut your fabric:
Here’s what you’ll need to cut . . .

*If you want to make the jacket reversible, cut 4 pockets of the lining fabric as well.*
When I cut my batting, I pinned the main fabric to it and just roughly cut around it in case the batting shifted.


Quilting:
Now, we quilt! We’re only going to quilt the main fabric to the batting. Because I’m sorta anal, I wanted to center my diamonds. So first mark a line down the center of the pattern piece. Then make another line at 45 degrees. I decided to make my lines 1.75 inches apart, so I cut a piece of cardboard of that width to help mark the rest of the lines. Once you have your lines marked, sew along each line, using a walking foot if you have one.

To center your diamonds, draw a 45 degree angle going the other direction making sure to cross a point where the center line intersects with one of the lines you already quilted (red dot). Use your cardboard ruler to mark the rest of your lines and quilt. Trim the excess batting.

Repeat these steps to quilt all of your main/batting pieces.

Construct hood:
With right sides together, pin the curved side of the hood to the center panel and sew. Repeat with the other side. Press seams open.

Top stitch along the inside of your hood seams.

Attach pockets:
Position your pockets (right sides together) on the front and back pieces of the jacket, making sure they line up. Sew along the straight edge. Press open.

Attach shoulder seams:
Pin the front and back pieces right sides together at the shoulder and sew. Press seams open.

Attach hood:
Line up the center of the jacket back with the center of the hood and pin, right sides together. Pin the hood along neckline. You want at least 2-3 inches of the jacket front to extend past the edge of the hood (I had to trim my hood back a little bit for it to fit). Sew the hood on and press seam open.

You’ll have the extra seam allowance along the top edge that extends past the hood. Trim that down and round the edge (I think this will make more sense as you’re sewing).

Attach sleeves:
Pin the center of the sleeve to the shoulder seam and then carefully pin the rest of the sleeve along the armhole, curving the fabric as you go. When sewing, start from the shoulder seam and work your way down to the bottom of the armhole slowly. Then start back at the shoulder seam to sew the other side of the sleeve. Repeat with second sleeve and press.

Top stitch along the inside of the sleeve seam.

Side seams:
Turn your jacket inside out and pin the sleeves, sides and pockets together and sew. Clip corners. Flip your jacket right side out (your pocket will automatically be turned in) and press seams well.
Construct lining:
Follow the same steps to construct your lining, omitting the top stitching (if you are making a reversible jacket, add the pockets as you did previously. If not, skip those steps). This should come together really quickly and easily this time around!

Attach lining:
Once your lining is complete, slip it into the outer layer of the jacket, wrong sides together. Make sure to carefully line up the seams and edges. Pockets should be pointed towards the front of the jacket and be hidden between the lining and jacket. Baste along the outside of the jacket very close to the edge to attach the layers together.

Binding edges:
We’re almost done! To finish the edges, unfold your bias tape and starting from the bottom of the jacket, a few inches from a side seam, pin your bias tape along the edge of the jacket. Make sure to leave several inches of bias tape free before you start pinning. Continue along the entire edge of the jacket, being careful around curves. You should have one continuous long edge starting at the side seam, up the front of the jacket, around the hood, back down the other side and along the bottom. When you get close to where you started, measure where the ends will meet and sew the two ends of the bias tape together.

Sew along the crease of the bias tape closest to the edge. Flip the bias tape over the edge of the jacket and fold the other edge of the bias tape back under. Make sure to cover the stitch line with the edge of the bias tape and pin. From the outside of the jacket, top stitch along the bias tape just next to the seam.

For the sleeve, measure the length around the sleeve and cut two pieces of bias tape one inch longer. Unfold your bias tape and sew the ends right sides together with a 1/2 inch seam allowance creating a tube. Press seam open. Pin the bias tape along the edge of the sleeve and repeat same steps as before to attach binding.

Buttons and buttonholes:
Sew on your buttons and make buttonholes where desired. If you are making a reversible jacket, sew buttons to both sides of the jacket.
And you’re done!


I hope you can make your little one something warm and comfy this season. Please feel free to visit me at you & mie some time and if you make a quilted jacket, please add it to the you & mie flickr group because I love to see your creations!

I love this! It looks so comfy.
Every single time I pop by your blog, I’m inspired. Thank you for that! Wishing you all the best in the New Year 🙂
Aww, thank you! Best wishes to you as well!
ohhh cherie, you and your good ideas. i’m on self-imposed sewing hiatus, but this is tempting me to end it early (esp since my knock off knit project this week was a major bust). SO CUTE.
Thanks for the comment, Ashley!! 😉 I know I owe you an email! Taking breaks are good, but I can’t wait to see what you make next and for sure, let me know if you make this jacket!!
that is so cute!!!!!
This is adorable!
Too Cute!!! Love it!
Absolutely adorable! Makes me wish I had a little girl just so I had a reason to make something so cute :).
Haha! You can make one for a boy. Or for an adult 😉
Such a beautiful jacket! No one would even know it’s a knock off unless they went looking for a tag.
Awesome jacket and tutorial. So so stylish and Y is rocking it!
oh my goodness. I’m not sure how I missed this before, but this is awesome!! I can’t even tell the difference between yours and theirs. WOW!!
your girl has the cutest clothes! I love your style. 🙂
Oh.my.goodness. I just discovered your blog. I LOVE your style and your professional-looking skills. I have a 3 yr old daughter who is going to benefit A LOT from you..haha. Did you use knit fabrics for both sides of the jacket?
Wow – thank you!! That’s the sweetest comment! I did not use knit fabrics – I used two woven fabrics, but looking closer at the original Mini Boden jacket – it looks like it could be knit. I would think though that with the quilting, you would lose all the stretch of the knit, but it would make it nice and soft 🙂 I might try knits if I ever make this coat again.
Pingback: Top 12 of 2012 | you and mie
Pingback: how to make a custom stamp (and a feather stamped pillow) | kojodesigns
wow.
its so great patten.
Baby is so cute and lovely. :>
Too cute! Our readers at FaveQuilts would love this. It looks so cozy. : )
I love this jacket ! I am not an expert im sewing, but I might still give a try… Which fabric did you use, is it regular cotton on the outside ? And what is this lovely colorful lining fabric ? Thaks a lot, our blog is awesome !
Hi! I did use regular cotton for both the outside and inside, though I think a nice knit fabric would have been nice as well (it wouldn’t have been stretchy because of the quilting, but a little softer I think). I don’t know what the lining fabric is, but I know I got it at Joann’s. it’s a shame though because its really gorgeous – I wish I could look it up! Anyways, best of luck to you!!
This is freaking BRILLIANT! You are so talented!
I love this! Absolutely beautiful! I was wondering what material did you use for the outer layer?
I used a bottomweight fabric from Joann. The stuff that you can use to make pants. Not super stiff, but a little more weight than quilting cotton. I think you can use almost anything though since the batting and lining will give it plenty of thickness.
Pingback: Copycat Mini Boden Quilted Jacket | Copycat Crafts
Pingback: Quilted Jacket tutorial - Sewing 4 Free
merci beaucoup explications faciles à suivre
Pingback: Jaquetinha acolchoada fofa | Maryshow
I love this jacket it is soo cute, I’m wondering if you could use fleece to make it a bit warmer?
Yes, I think that would work really well! I’d probably omit the batting since it would be thick enough with the fleece.
Love this jacket! Going to attempt it for my niece. She is currently in a 4T, but when jacket weather comes around, I’m sure she’ll need it to be a bit bigger. Hoping you could provide me with fabric requirements (main, batting & lining) and suggestions (main & lining.) I’m still an amateur when it comes to how much fabric I will need for a project and what fabrics will work best. Thanks!
And how much bias tape?
Hi Melissa. I realize that this is super late and I apologize. I can only estimate how much fabric and such you’ll need – honestly, I’m just guessing myself. 1.5 yards each of the main fabric, batting and lining should be sufficient. I think you can use almost any fabric – quilting cotton, corduroy, even a sturdy knit. I’m not sure how much bias tape you’d need. You would have to measure the outside edge of the jacket, plus the sleeve cuffs to get a good idea. I’m guessing one pack of the store bought stuff would be enough, but I can’t guarantee that. Sorry I can’t be more helpful! Good luck!!
Hi !! I’m totally in love with this super cute jacket ! I would love to make one for my daughter … Is there any printable pattern that goes with the tutorial?
Thanks for your inspiring blog ! I love it !
Lily (From France) !
Thanks! No, there’s no pattern – the tutorial instructs you to use a piece of clothing to trace in order to create your own pattern. If you’re interested in a pattern, some have mentioned that this style is really similar to the Figgy’s pattern, Nituna, though I’ve never used it so I can’t say much about the pattern itself. Best of luck!
Pingback: Mini Boden Knockoff Jacket | Natalie M. Art
Pingback: Free Childrens Quilted Jacket Sewing Pattern - Singleys Homestead
Pingback: My Favorite Oliver + S Pattern: Allie From Crozette | Blog | Oliver + S
Any tips on drafting for a keen beginner?
Amei, vou tentar fazer, muito obrigada por nos mostrar.
Love your jacket. I’m working on a hacked version of the Violette Fields Threads Molly for my daughter and am looking to line it with batting. Could you tell me what type you used and how it turned out warmth wise?
I’ve been wanting to make this pattern for my daughter for ages, but lacked the confidence to draft my own pattern. Now I’ve just found out that Bruda make a pattern that’s almost identical–the primary difference is a two-panel hood instead of three. It’s “Quilted Baby Coat 09/2013 #143”.
So now I get to put off the scary task of drafting for a little longer… Though I guess I should use this as a learning opportunity for altering patterns; I’ll make it three panels.
Thanks so much for this tutorial. I ended up using a Burda pattern for a quilted baby jacket, but your notes were really helpful as the pattern was scarce on details. One question: did you use knit binding or woven for this? I used knit, but I find whenever I use bias binding, it always ends up wiggly on the inside. Probably just poor technique, but I don’t know if I’m missing something.