

It’s June! Can you believe it? Summer is upon us and that means it’s time to bust out the sundresses. Melissa from Melly Sews is running her series, (30) Days of Sundresses, for the second time. All month – 30 sundresses! For girls and women – it’s really quite fun!
Last year I made a beach maxi for my sister (and a matching dress for my daughter), and this time I decided to try make something for me! I’m not sure why but I’ve been really motivated to make clothes for myself recently. I’m not sure if it’s the pregnancy and the fact that I don’t fit into my clothes anymore and the selection at stores seems so limited, or maybe because Yuki refuses to wear anything but t-shirts and sweat pants and that seems boring to me, but I have all these ideas and a sudden urge to try sewing for me! I’ve already made 4 things already and I have plans for a handful more, so this dress is just the start of a lot of maternity wear up in here!

So I made a knit dress that was inspired by this dress from Old Navy . . .

Dress by Old Navy (no longer available) via ChildMODE
I wanted to try and make a floral neckline like the original version, but I didn’t have any fabric that was suitable, and I didn’t feel like painting any at the time. So I just picked some fun fabric from my stash, On Point in Golden from the Cloud 9 Simpatico line, to add the accented neckline.
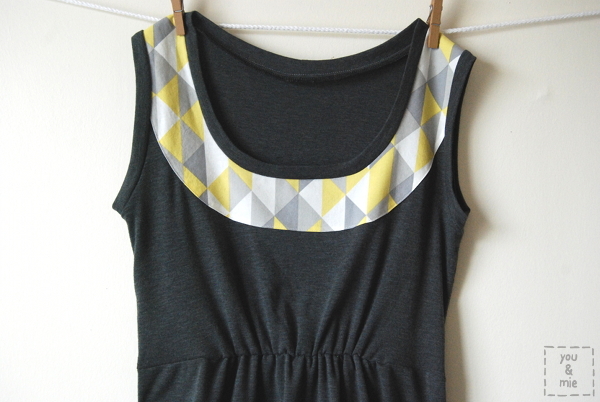
So the dress is made to fit and flatter a pregnant body, but I’m guessing this could look good on other body types too, especially if you lower the waistline. I’d love to see some non-maternity versions of this dress too!
Alright, so you ready to start?
What you’ll need:
- 2 yards of knit fabric
- a scrap or fat quarter of accent fabric
- paper backed (double sided) fusible web (I use Pellon 805 Wonder-Under)
- 1/4 inch elastic (about 14 inches)
First you need to draft your pattern for the bodice. So find a knit top that fits well, not too tight, but not baggy either. I used a combination of Kristin’s free Scoop Top pattern and a tank top of my own. Measure where you want the bodice to hit and add 1/2 an inch to the bottom.

To draft the accent neckline, place your front bodice on a piece of paper and trace the neckline, shoulder seam and half of the arm hole (see picture on the left). Remove the bodice pattern piece and decide how wide or what shape you want your accent neckline to be. I made mine a solid 2.5 inches around. Then add a 1/4 inch along the bottom of the curve for folding under.

Cut out your dress pieces – one front bodice piece on the fold, one back bodice piece on the fold and the accent neckline on the fold.

You’ll also need to cut a piece of fusible web from the neckline pattern piece, but without the added 1/4 inch along the bottom curve.
For your skirt, you’ll want 2 pieces of fabric – the length will be determined by the measurement from the bottom of the bodice to the desired length. Make sure to add about 2 inches for hemming and seam allowance. I cut my skirt at a slight A-line, the top of the skirt pieces should be about the same width as the bottom of your bodice.

You’ll also need long strips of your main fabric to finish the armholes and neckline. Cut strips that are 2 inches wide and make sure you cut them in the direction in which the fabric stretches. I like to cut them as long as I can and then trim them down later, but for rough estimates, I ended up needing two strips that were 2″ x 15″ for the armholes and one strip that was 2″ x 28″. Cut them a few inches longer at least to make sure you have enough.
Fuse the fusible web to the wrong side of the accent neckline lining up the shoulder seams and neckline (the bottom curve will have a 1/4 inch without fusible web).
 Remove the paper backing. And here’s a trick I learned from sewing from Oliver + S patterns . . . Sew a basting stitch along the bottom 1/4 inch seam allowance.

Press the curve towards the wrong side along the basting stitch. Remove the basting stitch. Fuse the neckline to your front bodice piece following the fusible web directions and sew along the bottom curve close to the edge.

Next we’re going to attach the elastic to the bottom of the bodice pieces. Cut your elastic into two 7 inch strips (approximately). Find the center of the front bodice and pin or baste the center of the elastic strip on the wrong side of the fabric along the bottom edge of the bodice. Because this elastic will be part of the seam allowance, I placed elastic close to the bottom of the bodice.

Sew the elastic to the bottom of the bodice with a zig zag stitch stretching the elastic as much as you can, but being careful not to stretch the knit fabric.

It should look like this on the wrong side . . .

And like this on the right side . . .

Repeat with the back bodice piece.
To attach the bodice to the skirt, line up the bottom of the bodice and the top of the skirt with right sides together. I didn’t photograph this part, so I hope this makes sense. As you sew the pieces together, I like to use the slanted zig zag stitch because it allows for stretch.

When you sew the bodice and skirt together, pull the elastic section of the bodice tightly without pulling the skirt piece so that it’ll gather. The elastic should be within the seam allowance so that it won’t be visible on the finished dress. So right along the inner edge of the elastic. The sections on either side of the elastic should be sewn without stretching any fabric. When finished it should look like this . . .

Repeat with the back side of the dress, sewing the back bodice and skirt pieces together the same way.
Place the front and back right sides together and pin and sew the shoulder seams and the side seams of the dress.
To finish your armholes and neckline, you’ll need your 2″ strips of fabric. To measure the length you need, leave 1/2 an inch for seam allowance and then pin the strip to the armhole. Slightly stretch the strip as you go around the entire armhole and leave another 1/2 an inch for seam allowance when you get back to where you started. It’s important to stretch it slightly because you don’t want a loose, baggy or limp finishing, it should be slightly smaller than the armhole to create a finished band that hugs your body. Once you’ve found the length you need, trim off any access and remove the strip from the armhole. Sew the short edges right sides together with a 1/2 an inch seam allowance to create a circle.

Press that seam open, then fold the loop in half lengthwise wrong sides together, so that raw edges should line up and the seam allowance is hidden inside. Press.

With the dress right side out, pin together the raw edges of the armhole finishing with the armhole. Start by lining up the seams and pin all the way around stretching the band slightly and evenly as you pin.

Sew along the raw edge using the slanted zig zag stitch. Finish edges if desired. Press well and top stitch, again, if desired.
Repeat with other armhole and neckline as well.

Hem the dress and you’re done!! With knits, I like to serge the edge and then fold it up once about an inch and sew close to the serged edge with either a double needle or the slanted zig zag stitch. That way the hem doesn’t get too thick with a double fold.

So here I am at 26 and a half weeks. This is a very comfortable dress with a pop of fun, that I hope will take me through my entire pregnancy.

Be sure to check out Melly Sews every day this month for a new sundress from these awesome bloggers:


This is absolutely lovely. Personally I’m glad you didn’t have any floral fabric as that geometric pattern is just perfect!
You look so so so pretty 🙂 good luck! 🙂
I’m so glad you did a maternity dress! I’m pregnant too, and I am going to have to make one of these for myself!
What a great dress…it looks great on you too, and super comfy!
Awesome dress!! I’m not pregnant, but I want one too. I just made a tova dress out of madras plaid for summer, it could probably be pregnantized too 🙂 Thanks for the inspiration!
Haha – pregnatized!! Thanks for the suggestion, I’m totally going to try the Tova now!
That’s a fab-looking dress, especially with the geometric pattern. I wish my talents on the sewing machine were more advanced than they are, as the sun has come out with a vengeance here in Birmingham (UK) and I’m also pregnant! Maybe I should be brave and just give it a go 🙂
Yes, give it a go! Just start out with some cheap fabric that you don’t mind tossing if it doesn’t work out. It’s taken me some time to get the hang of sewing for myself.
Ah, any excuse to buy fabric!! 🙂
LOOOOOOOOOOOVE this! You look totally beautiful in it. I love mixing a bit of woven fabric with knits…so many options! You are amazing!
Awww, Mie – that is so sweet, especially coming from you!! You’re my sewing idol! 🙂
Awesome dress, and thank so much for participating!
This is a really a great dress on you. you look adorable in it and it’s so easy to understand.
Yay Cherie — this is fabulous!! I need to make one:). So, if I’ve never actually made a dress before, would you say this is still something I could do? I do love a bit of a challenge! Also, I’m sure I missed this somewhere along the way, but when are you due? Can’t wait to see the rest of your maternity makes — so inspiring!!
YES. I think you’ve got to start somewhere! Just start out with some cheapo fabric in case it doesn’t turn out quite right 😛 Or, start with an actual pattern – that’s a bit easier than drafting your own. I’m due in mid September.
You are gorgeous and it’s beautifully sewn. Great tutorial!
Beautiful!!
Such a cute dress! Love the accent fabric you used. I think you’re right about this working as a non maternity dress and I think I need to test that theory! Thanks for sharing!
Please do! And I’d love to see it, if you make one!
What a great dress! You look fabulous and I love the neck detail. Your tutorials are always so awesome, too. I’m inspired to make a non- maternity version for me!
Beautiful! Love that neckline detail, it’s the perfect touch to make a simple dress awesome. Thanks for the tute!!
Pingback: Tutorial: Maternity t-shirt dress · Sewing | CraftGossip.com
You look beautiful! Love the accent detail.
Wow you look so pretty in this dress! I love it! Great tutorial. I’m no longer pregnant but next time, will keep this in mind to make:) btw: I’m having a Threads Magazine Giveaway on my new sewing blog!! Please share with your followers and come by and enter to win! http://mysewinghabit.blogspot.com/2013/06/threads-magazine-junjul-2013-giveaway.html
Reyna
http://www.MySewingHabit.blogspot.com
http://www.Facebook.com/MySewingHabit
Tweet @MySewingHabit
Instagram, Youtube, Pinterest: @reynalay
so adorable! love it!
gorgeous! I plan on making myself one … just wanted to check, you added the elastic at the bottom of the back bodice, also? thanks for the great tutorial.
**runs to go dig through “the stash” to find suitable fabric**
I made the back the same as the front, in terms of the elastic. In hindsight though, I probably should have made the back fit without the elastic. So it’s a personal preference.
Pingback: Tutorial: Maternity t-shirt dress | Sewing Patterns
My daughter’s expecting and this looks comfy as well as chic…..I just got back into sewing and think this will be a SUPER project for me to tackle. BTW….Terrific tutorial directions!
Turned out amazing! I love the neckline. It would be so cute on so many things.
It’s fabulous. I love the combo of knit and woven. You look great in it. P.S. I want your hair!
I love this! What a great way to use a fun print on a knit dress. And you look so beautiful!
Pingback: Washi in Blue 2! | you and mie
The dress is stunning, and you look wonderful 🙂
CHERIE!! This dress is perfect. I’m super impressed with you now and want to awkwardly rub your belly. Love ya girl!
you are looking fantastic ❤ . Thank you for sharing this ❤
How much wider was your bodice than your actual measurements? I’m pregnant and have NOTHING that fits, and I’d love to make a dress like this, but I’m not sure how wide to cut the top/skirt to make enough room for a growing belly.
This dress is great! I’m currently pregnant and can’t seem to find a thing to wear. I’ve been making some of my own clothes, which helps! I was wondering, how much wider is the bodice/skirt measurement than your actual measurement? I’d love to make a dress similar to this, but I’m afraid of making it too slim (no space for growing belly) or too roomy (looking like a walking tent). Thanks so much!
I think the key is to use a nice stretchy knit fabric, so there will be room to grow no matter what. I don’t know exactly how much wider I made the bodice than my actual measurements, but probably about 6 extra inches in both the front and back? The elastic really helps to bring it in right under the bust (and avoid the walking tent look), and the knit fabric allows for room for the tummy to grow. Err on the side of fitted though, and let the fabric stretch for the belly – you don’t want the dress looking baggy at all. I hope this helps!!
Pingback: McCall’s Patterns M6107 Misses’/Men’s Lab Coat, Dress, Top, Pull-On Pants, Hats and Tie Belt, Size Z (XLG-XXL) | WWW.DBESTREVIEW.COM
this is so gorgeous and i also totally agree with you on ‘selfish sewing’ from one of your previous posts! you are right on, sister! 🙂
Pingback: Looking Back and Looking Forward | you and mie
Pingback: Fluttering Fields Sundress {tutorial} | you and mie