
Last month, Kristin shared a tutorial for a foldover doily clutch that was so super cute and seemed like the perfect gift for the upcoming holiday season. Then I saw Vanessa‘s hand stamped foldover clutch with a block of vegan suede which was damn near perfection. Which made me think of Delia‘s lil leather shoes that she’d make out of thrifted belts and purses. Basically I just steal other people’s ideas and mix them all together into something a little different, because that’s how I came up with my go to Christmas gift for this year, the . . .
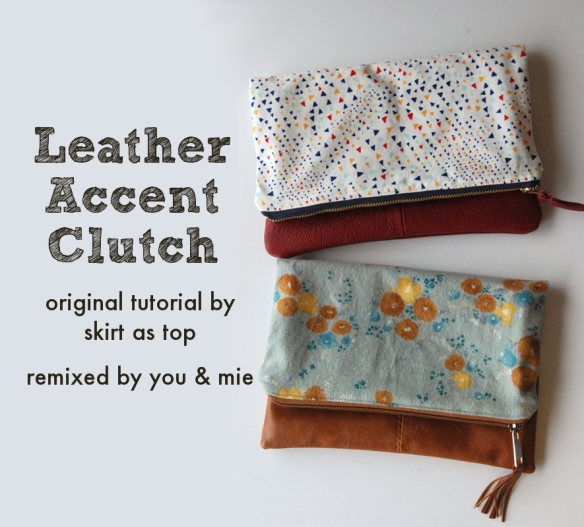
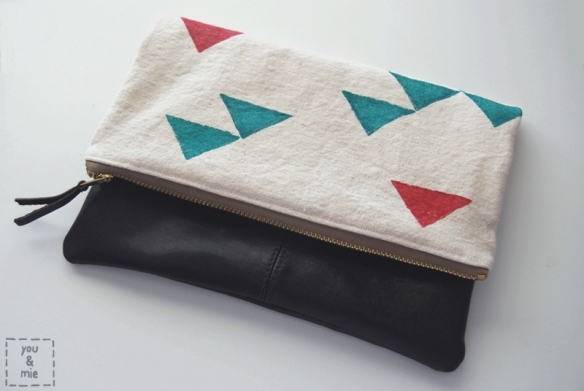
I basically took Kristin’s tutorial and added faux-leather to the bottom. For the large triangle clutch, I hand stamped my own fabric. So there are a bunch of ways you can mix it up, or you can go with the original doily clutch just as it is – regardless, the tutorial is FANTASTIC. Really simple, very clear and well written and so cute and practical – I highly recommend it.
So I started by going to the thrift store and looking for some cheap purses in great colors and with enough material to cut into rectangles for the bottom of these clutches. If you are going with faux-leather, you can pick one up for just a couple bucks.
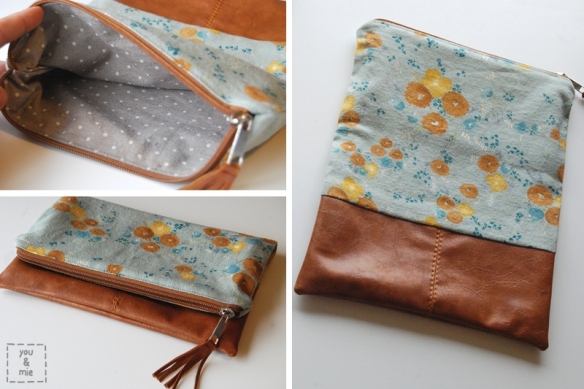
For this clutch, I busted out some Nani Iro Little Letter Flannel in sage green that I bought from Miss Matatabi because it matched soooo perfectly with this light brown leather I found. I actually used the zipper from the original purse as well, which is why it matches so perfectly! And I decided to go a little fun and funky with a tassel zipper pull 😛 The lining is a Japanese double sided gray and white fabric that I used in Yuki’s nursery. These materials just came together so beautifully and I love the combo so much it really hurt to give this clutch away! But it’s headed to someone who I know will appreciate it, so that makes me happy.
Anyways, I’m going to give you some tips that I learned about sewing with leather and show you how to remix Kristin’s foldover clutch to make a leather accented clutch. It’s easy!
Leather sewing tips:
– Look for leather that is not too thick or hard (it’s obviously harder to sew with and your seams won’t press flat)
– Use a denim or leather needle – you’ll need something heavy duty that will hold up sewing two layers of leather
– Lengthen your stitch (so as to not perforate the leather)
Also, when choosing your fabrics, pick something in similar weight to your leather. If you’re using a thick heavy leather, don’t use a flimsy fabric – it just won’t work. You can use canvas or duckcloth, or add interfacing to your fabric. Likewise, if your leather/faux leather material is very thin, a regular cotton will probably be perfect.
Alright, let’s get started! If you’re using an old purse, carefully cut out the largest panels of material possible. Also feel free to cut and save any other hardware you might want to keep (zippers, buckles, etc).
 The rectangles of fabric in the original tutorial are 10×12 inches, so you’ll want to cut your leather 10 inches wide. The height will depend on how large you want your leather block to be (and how much you have). Be sure to add 1/2 an inch for seam allowance to the height. Cut 2.
 To figure out the size of your coordinating fabric for the outside of the clutch, you’ll want to take 13 and subtract the height of your leather piece. That number will be the height and your width will be 10 inches. The reason for this is that you want your finished piece to be 12 inches and you’ll need 1/2 an inch on each piece for seam allowance. So for example, if I cut my leather piece at 10 inches by 4.5 inches, my fabric will need to be 10 inches by 8.5 inches (because 4.5 + 8.5 = 13).
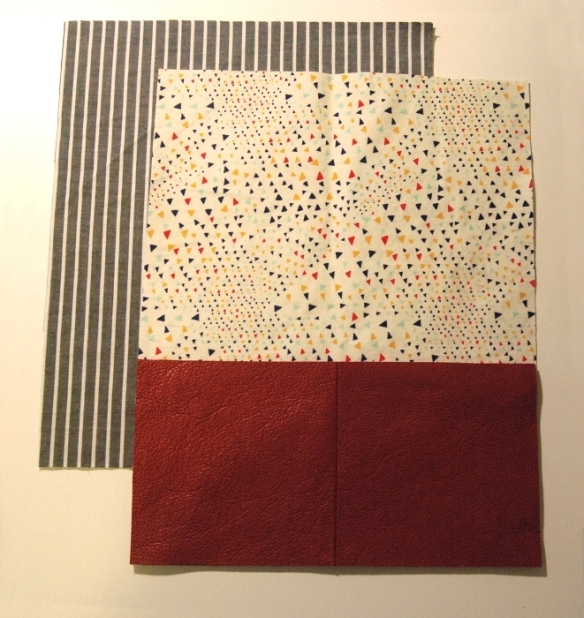 Cut your lining fabric according to the tutorial directions. You should have 2 of everything.
Sew your leather to your outer fabric by placing them right sides together, holding them in place with paper clips or binder clips (you don’t want to/won’t be able to pin the leather). Sew them together with a 1/2 inch seam allowance.

Press your seam flat (but be careful pressing the leather – use a low heat and test it out on a scrap piece of leather first).
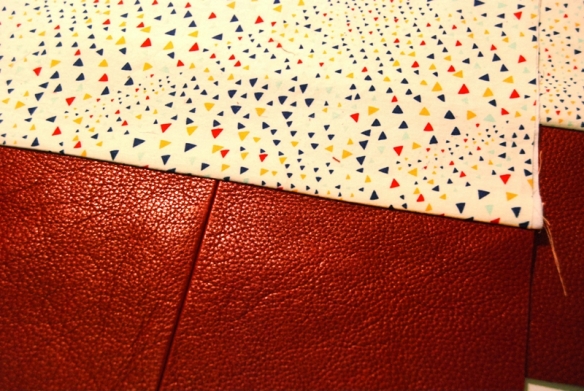
From here you can follow the original tutorial exactly! The only part that is a little different is when you are sewing the front and back together, you’ll have to take some extra steps switching your needle and thread colors. I like to sew the leather first and then the regular fabric. If your leather is pretty thick, you may want to round your bottom corners instead of trying to make them square.
 Be sure to clip your corners.
 And that’s it. Kristin’s tutorial will walk you through the rest!

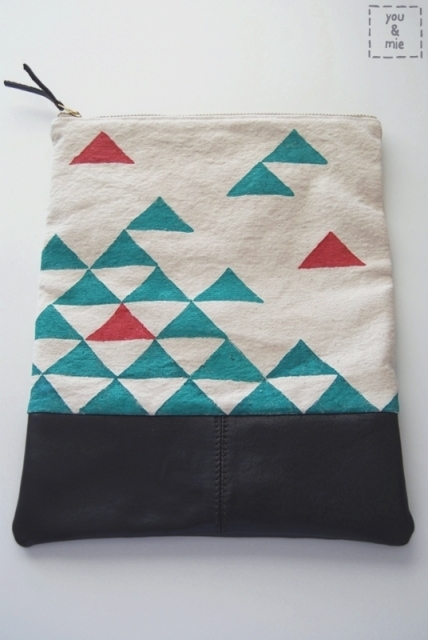
The hand stamped version required an extra few steps, but was totally worth it. I carved a simple triangle shape and used fabric paint to make a fun pattern on canvas.
 (testing on paper)
 Once it’s dried and set, you can cut and assemble as instructed above!

I had so much fun sewing these up these last couple of weeks and even more fun watching friends receive them. It’s been a big hit, so if you’re looking for a last minute gift to sew up for someone stylish and special, definitely go check out Kristin’s foldover clutch tutorial. You won’t regret it!
So are you still working on some last minute gifts or other holiday projects or are you all done? Truth is, I’m so behind that I know I’ll be working past Christmas. Better late than never right? 😛

Reblogged this on Howdy doo!.
Absolutely beautiful! I love the fabrics and how well the leather offsets them. It’s a great tutorial thank you – pinned! My plan for new years is to get my sewing machine out and relearn how to use it (haven’t done anything since childhood!) I have so many things I want to make!
Oh, by the way, any tips on where you get your fabric from? Any good online places? I’m in UK and still researching! Tips welcome, thanks 🙂
I’m so excited for you! I hope you love sewing as much as I do! Honestly, I don’t do much online fabric shopping – I usually just go to brick & mortar stores. Once in awhile I’ll order something from an Etsy shop if I know the fabric is good. Sorry I can’t be of more help there!
I’m going to DO this!!! THANK YOU!
Those fabrics – GAH! Love.
you’ve made such gorgeous clutches!! the recipients are lucky lucky lucky 🙂
i love your idea of reusing old leather/pleather bags, too. so clever!
Thanks!! Oooh, pleather! Is that the word I was looking for? I said “faux leather” like 50 times! Hahah, anyways, it wasn’t my idea to reuse old bags, but it really is a great one – it’s so affordable and came out great!
Ummmmm I love these. I love them x 1,000,000. So glad you were able to take my tutorial and spin it into something so awesomely you! Totally want to add leather to mine now; if I can every pull myself away from doily mania. 😉
Haha – to doily or not to doily . . . : P
Thanks for the awesome tutorial.
These are so lovely, Cherie! I love making pouches and clutches as gifts and in fact am working on a few faux leather ones myself :-). Great tutorial!
Oooh, can’t wait to see yours!
This was the best. present. EVER. Thank you so much Cherie, and I love that you made a tute for them! So fantastic!!!
I’m so glad you liked it! It’s such a fun thing to make too – so win win 🙂
Yay!! I’m so glad you posted this!! I was pulling out my materials to try and use Kristin’s tutorial to replicate your awesome fold overs and thought I’d check first to see if you posted the tutorial. You did!! I’m making one for my sis-in-law right now, but sshh, don’t tell. 😉
Ooh, good timing! 🙂 I won’t tell your SIL! Haha, hope she likes it!
These are awesome, Cherie! You have quite the eye for fabric combos, so I can’t decide which is my favorite. But… I must. Have. Some of that gorgeous nani iro flannel. Yum.
Aw, thanks Robin! Yes, that nani iro flannel is heaaavenly!! Get it! 🙂
Love, love, love these so much, Cherie! Thrifting purses to use is a brilliant idea and your choice of colours is perfect. Thank you also for mentioning my shop, you sweet thing!
Thank you for continuing to feed my fabric addiction 😛
these are SO CUTE.
Seriously amazing! I made Kristin’s clutch, too, and it wasn’t super sturdy, so I love the idea of suede. And your hand-stamped stuff is to die for amazing! Maybe you should be a fabric designer!
Ooooh, thanks Vanessa! I keep wanting to try my hand at a fabric design on Spoonflower, but I don’t know how to do the computer part of it. So hand stamping and painting fabric is where I’m at for now. 🙂
These are gorgeous. Just gorgeous.
Oh and love how you reused the zippers and the tassels. Brilliant.
Cool!!
Pingback: Top 12 of 2012 | you and mie
Just found your blog and I love what you do. What do you use for fabric paint? and the stamps? Love that idea, want to combine that with some machine embroidery. Thanks for sharing your fabulous ideas!
Thanks!! I use Speedball Speedy Carve for my carving block and for paint, I usually just use whatever fabric paint they sell at the fabric store! Would love to see your version, with machine embroidery!
I wish I could sew!!! I want one of these so bad! Do you sell your stuff?
Thank you! It’s not too hard to learn 😉 But no, I’m sorry, I don’t sell my stuff.
wow it’s great! I have to try it!!
Pingback: Academia Craft | Artesanato e artes para relaxar | 10 Passo a passos de necessaires e clutches
i LOVE this and your blog in general! I have just found it, and have really enjoyed seeing all of your projects. This post in particular inspired me and I have made my own version – I hope I haven’t butchered it too much and that you like it 🙂 Thanks for the inspiration
http://ourseasidesanctuary.blogspot.co.uk/2013/05/diy-zippered-pouches.html
Oh my goodness – yours are beautiful! Thanks for sharing the link here!!
Pingback: What's in my Bag? - The Sewing Rabbit
Pingback: Clutch de tecido com couro | Crafts aqui e acolá!
Pingback: 10 great DIY clutches | By Wilma
Pingback: { DIY: getting creative with tonic living fabric} | The Sweet Escape
Pingback: last minute tutorial roundup | skirt as top
Hi there! I’m finding this so late in the game but this is so awesome! I especially love that burgundy color you have. I recently got into sewing and I’m definitely adding this to my long list of to-dos.
One quick question: what was the height of the leather when you cut it? I’m assuming you did a 1/2″ seam allowance as well on that?
Thanks for the great tutorial!
Also! How did you do that effect on the bottom leather piece in the middle area?
Thanks again!
Hi Carla. I’m not sure what my measurements were (I gave these clutches away as gifts, so I don’t have them to measure), but looking at the pictures I’d guess that I cut the leather piece to 5.5 x 10 inches and the fabric to 7.5 x 10 inches. With a 1/2 inch SA, the total height would be 12 inches after it’s sewn together. I cut these pieces from old purses that I picked up at the thrift shop and several of them had that seam in the middle. I didn’t do anything except make sure to cut my piece with that seam running down the middle. Hope this helps!!
Pingback: foldover clutch tutorial |
Pingback: I love nani IRO! | you and mie
Pingback: Welcome to the jungle | Sweetpepper
Pingback: thank you foldover clutch | skirt as top
Pingback: Christmas Crafting 2014 | Life by Ky
Pingback: X-Mas Gift Ideas! | Design By Lindsay
Pingback: buffalo plaid and gold foldover clutch | HeySup
Pingback: liberty and leather foldover clutch | HeySup
Pingback: Pregunta al Dr. Slow #2 | Directorio Moda Sostenible
Pingback: 60 Leather Craft Ideas You Probably Never Thought Of
Pingback: Christmas clutch | Mie Made Memories
Pingback: Pregunta al Dr. Slow #2 | SlowFashionNextSlowFashionNext
Pingback: Posy Garden Blog Hop – A Little Patchwork
Pingback: Welcome to the jungle