Watermelon Pouches {Tutorial and Free Pattern}

Watermelon Pouch Tutorial and Free Pattern by you & mie

Woohoo – finishing up with the last watermelon project today!  Last week I shared a couple of projects from Yuki’s Watermelon Party: the watercolor invitations and a hand stamped dress.  I was hoping to share this last one last week as well, but you know, tutorials take time.  And I’m guessing that no one was sitting on the edge of their seat waiting for this last watermelon post, but if you were, I apologize!  😛

My last watermelon project was a stack of felt pouches to pack up the party favors.

Watermelon Pouch Tutorial and Free Pattern by you & mie Continue reading

Another Elsa Dress

I know, I know, the last thing the world needs is another Elsa dress!!  But here’s one for ya anyways 😛

So a month ago, my family and I traveled across the country to Florida for a reunion.  We stayed in Fort Lauderdale for the first part of the trip, but we figured we might as well hit up Disneyworld while we were all the way out there!  I knew there was a good chance that we wouldn’t be going back out to Florida any time soon and we also knew that Yuki would have an absolute blast.

But I kept hearing horror stories about the Florida’s heat and humidity.  So between the unavoidable heat and all the fun activities we were going to be doing, I came up with a sewing list that was ridiculously long.  Then I had my very own Kids Clothes Week and though I didn’t even get through half my original list, I did make 7 pieces of clothing in about a week or so!  I’ll be sharing them throughout the next couple of weeks.  First up, Elsa’s summer dress.

Elsa's Summer Dress by you & mie

Continue reading

Making it Sleeveless {tutorial}

Ack!  I can’t believe it’s the last week of July – where has the summer gone!?!  *sniff sniff*  So I’ve actually been suuuuper busy sewing and having all sorts of fun.  Did you catch my weekend getaway on Instagram?  Ridiculously fun times were had with some very awesome people.  You should check out our hashtag #seamripcity.  Anyways, I’ve got so much to share, but I’m still lagging with my blog posts.  So here’s a tutorial on making a sleeveless bodice from a sleeved pattern that originally appeared on the Oliver + S blog as part of their “customizing” series.  This top (made with super vintage nani IRO fabric that you can read more about here) is absolutely one of my favorite things I’ve made for Kaya so far.

***

Hi! I’m going to show you how to modify a sleeved pattern to a sleeveless version and finish the armholes with bias tape. I am using the Lullaby Layette Shirt pattern (View B) in this example, but you can do this with pretty much any pattern!

Floral Lullaby Layette Dress by you & mie

Sleeveless Armhole Finishing Tutorial by you & mie Continue reading

Fluttering Fields Sundress {tutorial}

Fluttering Fields Sundress Tutorial // you & mie

Fluttering Fields Sundress Tutorial // you & mie

I’m so excited to be posting as part of Melly Sews’ (30) Days of Sundresses Series for the THIRD time (see my previous tutorials here and here)!  A new sundress tutorial every day this month!  Keep up with them all on Melly Sews.

30 Days of Sundresses Button // Melly Sews

I’m pretty excited about sharing this project because it was one of those things that I had a vision of, but didn’t know if or how it’d work.  But then it ended up exactly how I pictured it and I’m thrilled!

Fluttering Fields Sundress Tutorial // you & mie

Fluttering Fields Sundress Tutorial // you & mie

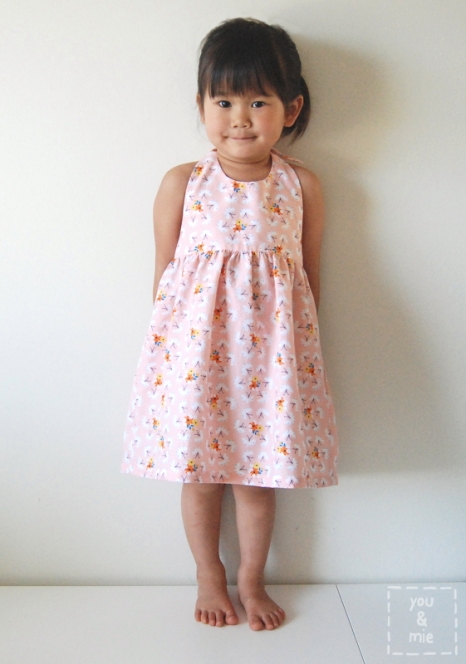
The dress is a halter-style dress with two ties in the back, a skirt that is gathered in the front and elastic in the back and, of course, pockets.  It’s super summery and perfect for the beach or picnics or parties, or whatever else you’ll be up to this season!  Just be sure to slather on the sunscreen because this baby shows a lot of back (but not that kind of back).

Fluttering Fields Sundress Tutorial // you & mie

This is currently Yuki’s favorite dress and she requests to wear it as often as possible.  We’ve also gotten tons of compliments on it, which is due in great part to the adorable fabric.  It’s part of Cloud9’s Lotus Pond Collection by Rae Hoekstra and it’s called Fluttering Fields, which is where I got the name of the dress (thanks Rae)!  I love this fabric – high quality, organic, lovely to sew and lovely to wear (I basically live in my Lotus Pond pajama pants).

Fluttering Fields Sundress Tutorial // you & mie

Here is Yuki cracking herself up after sticking her tongue out at me.  She thinks she’s hilarious . . . 😛

Do you want to make a Fluttering Fields Sundress!?  It’s really not very difficult at all!  Full disclosure here though – when I sew, I kind of make things up as I go and hope it comes out ok.  I often make changes along the way and later wish I did things differently or wonder if I did them the “right” way.  Luckily, things worked out pretty well with this project, but it certainly isn’t perfect and I’m going to tell you what things I discovered along the way or would do differently if I were to do it again.  It’s all about learning here, right?

Ok, here’s what you need:

  • Fabric (1-2 yards depending on the size)
  • Basic front bodice pattern
  • 1/4 inch wide elastic

For your fabric, I recommend a light to mid-weight woven fabric like quilting cotton, shirting, chambray, linen blend, double gauze, etc.  I’m pretty sure you could even use a stable knit, but I haven’t tried.

I started from a basic bodice pattern that I already had (from the Geranium Dress), but you can also draft your own from a shirt or dress that fits your child or use a different dress bodice pattern.

Fluttering Fields Sundress Tutorial // you & mie

Taking your front bodice pattern piece as a starting point, I’m going to show you the edits I made to form the new bodice pattern for this halter style dress.  Some of this will depend on personal preference and the specific bodice pattern you’re starting with though.

Fluttering Fields Sundress Tutorial // you & mie

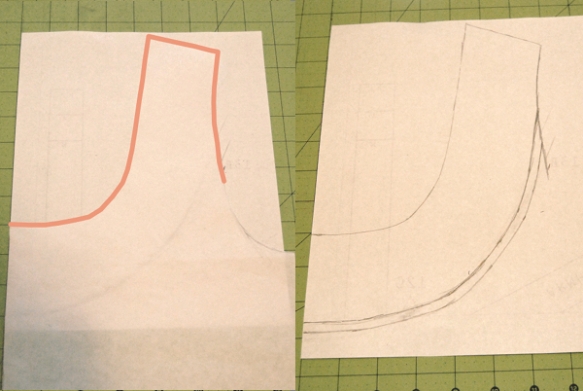
First I dropped the neckline slightly and created a new curve to meet the original neckline.

Now here is where what I did and what I wish I did start to differ.  I lowered the bottom of the armhole by about 1/2 an inch.  In hindsight, I probably didn’t need to do that.  What you need to know here is that whatever the measurement of the side of your bodice is (marked in turquoise), is going to be the width of your ties plus your seam allowance.

Mistake #2: I used a 1/4 inch seam allowance, which works out fine, but I do find it easier to work with at least 3/8 of an inch seam allowance.  So in all the pictures and directions, I’ll refer to a 1/4 inch seam allowance, but at the pattern drafting stage, I recommend you work in a larger seam allowance.  It’ll make the construction a little easier and when you construct yours, remember to substitute your seam allowance measurement whenever I say a 1/4 inch.  Got it?

So measure down about 2 inches from your armhole and if you need to shorten your bodice, do so.  The Geranium bodice is quite short as is, so I didn’t adjust the length.

That measurement you took (the turquoise line), that is going to be the same as your shoulder seam measurement (magenta line).  It just makes it easy to have all of your ties be the same width.  Rather than angling down, the shoulder seam needs to angle up so that your neck ties will point inwards.  Make a slightly curved line from the outer tip of your shoulder to the bottom of the armhole to create a halter shaped bodice.  The other thing I would change here is the depth of this curve.  You can see in the finished dress that the bodice cuts in quite a bit, so if you want more coverage, make the line straighter.

Phew!  Are you still with me?  Trust me, that was the hardest part!

Fluttering Fields Sundress Tutorial // you & mie

Next, we need to create the pattern for the ties.  You will use the same tie pattern piece for both the neck ties and the back ties.  In my second version of this dress, I followed the formula, but the back ties were too short.  I’m updating the directions, but I haven’t tested it out yet.  If I make a third dress, I’ll let you know if this works.

To determine the length of the neck ties, I calculated 3/4 of the total bodice width.  To do that, first measure the bottom edge of your bodice pattern then multiply that in two, since that pattern is only half a bodice.  For example, say your bodice pattern measures 6 inches across the bottom, that means the entire bodice will measure 12 inches.  Take that number and multiply it by .75 to calculate 3/4 of the width.  In my case, that is 9 inches.

For the back ties, take the length you just calculated (9 inches, in my case) and add 2 inches.  So your neck ties will be 9 inches long and your back ties will be 11 inches long.

*I have not tested this formula with any other sizes than this one, so I can’t guarantee this will be the right length, but I’m fairly certain that it should work.*

The width of your tie pattern will be the same measurement as that turquoise and magenta line up there, somewhere around 2 inches (mine is narrower because of the small SA).  Cut out a strip of paper with your measurements, fold it in half lengthwise and taper one end starting 2 inches from the tip.  I drew and cut one side, then folded it in half to trace the other side so that it is symmetrical.

Fluttering Fields Sundress Tutorial // you & mie

Here’s what my pattern pieces looked like.  Ignore that middle one because it ended up being too short 😛

Did I tell you that I was working things out as I went along?

Fluttering Fields Sundress Tutorial // you & mie

Skirt pieces!  You’ll need two rectangles for your skirt front and back.  To determine the width of a gathered skirt, I usually take the child’s waist measurement and then use that for one skirt panel.  For example, if the waist measurement is 20 inches, then my skirt panels will each be 20 inches, for a total of 40 inches, that will then be gathered to just the right amount of fullness (in my opinion).  You can add or subtract width according to your preference.  The length will depend on the desired length of the dress.  Be sure to leave room for seam allowance at the top, hemming at the bottom, and I throw in an extra inch just in case (you’ll need to trim the skirt front to match the back in a later step).  Set one of your skirt panels aside.

Fluttering Fields Sundress Tutorial // you & mie

For the back skirt panel, I added a slight curve along the top edge.  Fold your fabric in half (so the side seams are lined up) and cut a subtle curved line from the raw edge (side of the skirt) toward the folded edge, 1 inch down from the top.  I wanted to create a slight opening in the back, but knew that the weight of the elastic and fabric would pull the skirt down, so this cut can be very minimal and possibly eliminated altogether.

Fluttering Fields Sundress Tutorial // you & mie

So here are my cut pieces.  You need:

  • 2 bodice pieces
  • 4 pocket pieces (I just drew this shape to create my own pocket pattern)
  • 8 ties
  • 2 skirt panels (one rectangle and one with a lowered top edge)

In this lovely picture you can see another X.  I accidentally cut my first set of ties too long.  I used them anyways, but I would have been better off using a shorter tie (in the pictures, the back ties are triple knotted and still too long for my taste).  So ignore the different length tie pieces – all 8 of yours should be the same length.

We’re finally ready to sew!!!
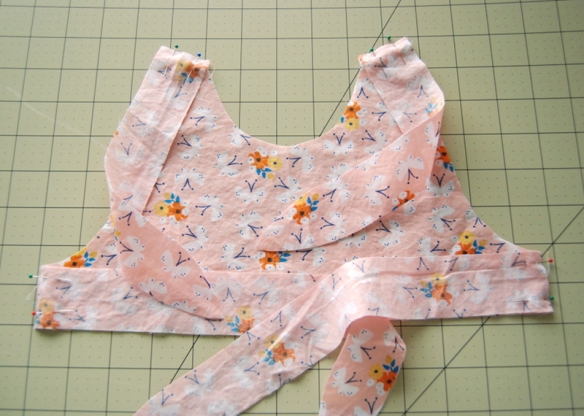
Fluttering Fields Sundress Tutorial // you & mie

Pin the ties to the bodice sides and shoulders, right sides together.

Fluttering Fields Sundress Tutorial // you & mie

*VERY IMPORTANT* When you sew the sides, do NOT sew all the way to the bottom.  Stop a 1/4 inch from the bottom (If you are using a 3/8 seam allowance, stop 3/8 inch from the bottom).  Be sure to back stitch at each end.

Sew shoulder seams all the way across.

Fluttering Fields Sundress Tutorial // you & mie

Press your seams open.

Fluttering Fields Sundress Tutorial // you & mie

Your side seams should look like this, with a little opening at the bottom.  Repeat with the other bodice and tie pieces.

Fluttering Fields Sundress Tutorial // you & mie

Place your two bodice pieces with right sides together and pin all the way around starting from the side seam (pink arrow) and going all the way around all four ties and the bodice, back to the other side seam (other pink arrow) and sew.  Do not sew the bottom of the bodice during this step.

Fluttering Fields Sundress Tutorial // you & mie

This is what it should look like, with your stitching beginning and ending at each side seam.

Fluttering Fields Sundress Tutorial // you & mie

Cut notches in the curved sections of the seam allowance and cut off the excess fabric at the tips of each tie so it will look nice and flat when you turn it right side out.

Fluttering Fields Sundress Tutorial // you & mie

Turn the bodice and ties right side out (I like to use a mechanical pencil or chopstick to get those ties turned and the tips nice and pointy).  Give it a gooooood press.  Fold the bottom edge of one of the bodice pieces towards the wrong side by a 1/4 inch (or whatever your seam allowance is) and press.  This side is now your bodice lining.

Fluttering Fields Sundress Tutorial // you & mie

Take your back skirt panel, the one with the curved edge, and create a casing for the elastic by folding it a 1/4 inch and pressing, then 3/8 inch and pressing again.  Pin and sew along the folded edge.

Fluttering Fields Sundress Tutorial // you & mie

To determine your elastic length, take the waist measurement and divide it in half and subtract one inch.  So if the waist measurement is 20 inches, divide that in half to get 10 inches, then subtract 1 and your elastic length is 9 inches.  You don’t want to err on the side of excess length here.  If your elastic is too long then the back of the dress will gape open and hang too low.  You want this to be nice and snug against the back.

Thread your elastic through the casing (a safety pin is super helpful here).  As the end of the elastic is about to pass through the opening, pin and sew it in place so it doesn’t slip into the casing.  Continue to pull the elastic through to the other side and pin and sew it in place.  Trim any elastic that is sticking out of the ends of the casing.

Fluttering Fields Sundress Tutorial // you & mie

If desired, finish the curved edge of each pocket piece.  On your front skirt panel, place one pocket, right sides facing, 2 inches down from the top edge.  Pin in place.  Repeat on the other side.
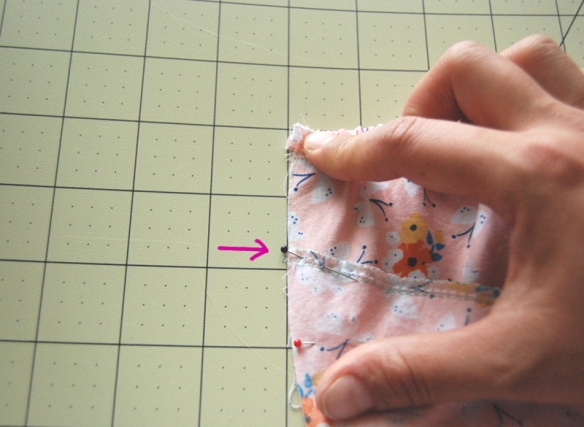
Fluttering Fields Sundress Tutorial // you & mie

You’ll do the same for the back skirt piece except you’ll place your pocket pieces a 1/4 inch higher (or your seam allowance measurement) lower.  So while my front pocket pieces are placed 2 inches from the top, my back pocket pieces are 1 and 3/4 inch from the top.
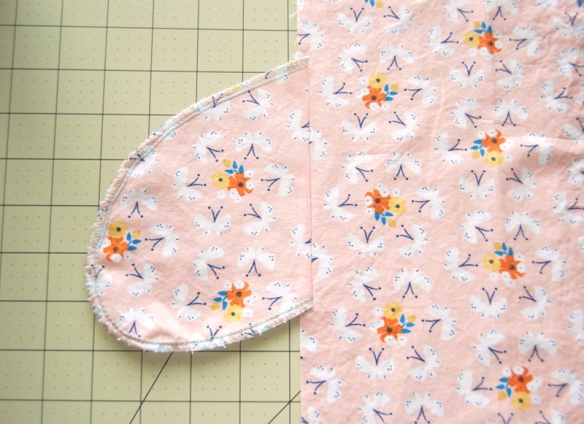
Fluttering Fields Sundress Tutorial // you & mie

Sew the pocket to the skirt (you can finish the edges of the skirt here if you want) and press the pocket out.  Repeat with the other 3 pocket pieces.

Fluttering Fields Sundress Tutorial // you & mie

Place the skirt front and back right sides together with pockets lined up.  The front skirt piece will extend a 1/4 inch higher than the back.

Fluttering Fields Sundress Tutorial // you & mie

Sew the sides of the skirt together going around the pocket (pink line).  Press the side seams toward the front of the dress.  Turn right side out and press.

Fluttering Fields Sundress Tutorial // you & mie

Next we’ll gather the front of the skirt.  With a basting stitch (set your stitch length to the longest setting, do not back stitch and leave a tail of thread at the end), stitch two rows along the top edge of the skirt from one side seam to the other.  I find that I get the nicest looking gathers when I have one row of basting stitches above the seam allowance line and one below.  So I stitched my basting rows about 1/8 inch and 3/8 inch from the top.
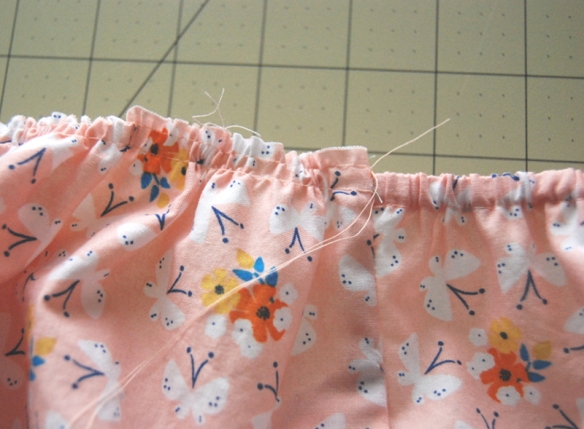
Fluttering Fields Sundress Tutorial // you & mie

Pull one thread from each row to gather the skirt until it is the same width as the bodice.  Distribute the gathers evenly.

Fluttering Fields Sundress Tutorial // you & mie

Pin the bodice to the gathered front skirt piece, right sides together.  Be sure the bodice lining and back of the skirt are pulled aside when you sew.  The seam allowance from the sides of the skirt should be folded inwards toward the gathered skirt and will be sewn during this step.  Sew bodice and skirt together.

Fluttering Fields Sundress Tutorial // you & mie

Press bodice and seam allowance up and remove thread from the basting stitches.  Woohoo!  It’s looking like a dress!

Fluttering Fields Sundress Tutorial // you & mie

You can attach the bodice lining one of two ways.  The first is to hand sew the lining in, enclosing the seam allowance and stitching the lining to only the top layer of fabric.  This takes more time, but creates a clean look with no visible stitching.

The second method is to pin the lining down so that it covers the previously stitched line and then, from the right side of the dress, top stitch along the bottom of the bodice.  While you’re at it, you can top stitch along the bottom and all the way around the ties and neckline, if you want to.  It’s purely up to your personal/aesthetic preference.  I opted for the hand sewing.

Fluttering Fields Sundress Tutorial // you & mie

Now all you need to do is hem!  The front of the dress is going to be a little longer than the back because I didn’t take into consideration the difference the casing would make.  Yeah, oops again.

Fluttering Fields Sundress Tutorial // you & mie

Even out the lengths and fold twice towards the wrong side to your desired length and sew along the folded edge.  And you’re DOOOOONE!!

Fluttering Fields Sundress Tutorial // you & mie

Fluttering Fields Sundress Tutorial // you & mie

Gahhhh!  Love this little sun-kissed back!

Yuki’s worn this dress a bunch already and I’ve had to wash it a few times.  The only problem is that the ends of the ties have come out of the wash wrinkled, but luckily it’s just that part of the dress and it’s very easy to press (it takes one minute).

I realize that this tutorial is long and possibly hard to follow along, so if you have any questions, feel free to leave me a comment and I’ll do my best to help you!  I really hope that some of you give this a try because I’d LOOOOVE to see your versions!  Be sure to share them with me via email or load your pictures into the you & mie flickr pool!

Thanks so much for stopping by and be sure to check in at Melly Sews for a new sundress tutorial every day of this month!


Panda Raglan Tee {tutorial}

Yes!  I did it!  I finally made something for Yuki that she really likes!

Panda Raglan Tee Tutorial by you & mie

Panda Raglan Tee Tutorial by you & mie

I have to admit, I’m pretty psyched about this project.  A couple of months ago I saw a little toddler wearing a tunic that was similar and definitely had an “I can make that!” moment.  Well the idea has been rolling around in my head since then and I just needed the time to do it.  Isn’t that what KCW is all about!?

Panda Raglan Tee Tutorial by you & mie

The theme for this Kid’s Clothes Week is “Mini Me” so I decided to make one for little sister as well.  Yuki loved that she and Kaya had matching shirts!  Unfortunately, Kaya wasn’t really feeling the photo shoot.  But I have a feeling she really loves the shirt too 😛

Panda Raglan Tee Tutorial by you & mie

Yuki says, “Can you see my panda ears?”  The 3D ears are definitely the most fun feature of these shirts.  And though these are pandas, you can really make this shirt into almost any animal!  Want to make one for your favorite animal lover?  I made a tutorial!

Here’s what you’ll need:

  •  a raglan t-shirt pattern (I used the Oliver + S Field Trip Raglan T-shirt Pattern, but you can use any, or draft your own)
  • knit fabric (refer to your pattern for amounts) and coordinating thread
  • scraps of fabric for the ears (knit or woven)
  • freezer paper
  • precision knife/scissors
  • iron
  • fabric paint and brush (be sure to read all the directions on your fabric paint before you begin your project)

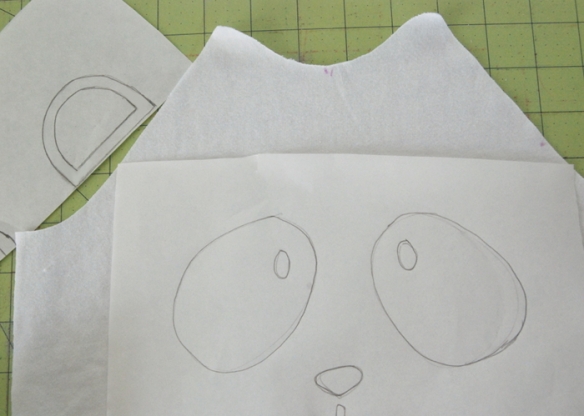
To get started, cut out all your shirt pieces as your pattern directs (shirt front, back, two sleeves and a neckband).  Lay out the front shirt piece and place your freezer paper on top, shiny side down.  Sketch your animal face.

Panda Raglan Tee Tutorial by you & mie

Make a pattern piece for the ears.  We will add a small pleat to the ear, so add a little width to the base and also 1/4 around for seam allowance.

Panda Raglan Tee Tutorial by you & mie

Carefully cut out your stencil, making sure to keep any small pieces you need to place on the inside of your stencil, like the eyes.

Panda Raglan Tee Tutorial by you & mie

Place your stencil where you want on the shirt (shiny side down) and iron it on using a high heat setting.  Be sure to press well especially around the edges of the design.

Panda Raglan Tee Tutorial by you & mie

Put your fabric on cardboard or paper, in case the paint seeps through.  Apply the fabric paint in a thin and even coat.  Try not to paint towards the edges of the stencil to avoid sweeping paint under the stencil.  Wait till the paint is mostly dry (30 minutes) and apply another thin and even coat.

Panda Raglan Tee Tutorial by you & mie

Allow the paint to dry completely before peeling off the stencil.

Panda Raglan Tee Tutorial by you & mie

What a fun (and slightly nerve wracking) moment 🙂

Now for the sewing part.  Cut out 4 ear pieces.

Panda Raglan Tee Tutorial by you & mie

Place two ear pieces right sides together and pin.  Repeat for other pair.

Panda Raglan Tee Tutorial by you & mie

Sew along the curved edges with a 1/4 inch seam allowance.  Leave the bottom open.  Trim the curved edge to 1/8 inch.

Panda Raglan Tee Tutorial by you & mie

Turn right side out and press.  Add a small pleat to the center of the ear (the two ears should have pleats going the opposite direction).  Pin and sew pleat in place.

Panda Raglan Tee Tutorial by you & mie

Trim the bottom edge so it is straight again.

Panda Raglan Tee Tutorial by you & mie

Figure out where you want your ear on the shirt front and align the raw edges, right sides together.  Pin and baste the ear in place 1/8 inch from the edge).

Panda Raglan Tee Tutorial by you & mie

Panda Raglan Tee Tutorial by you & mie

Now we will attach the sleeve to the shirt front.  Align the raw edges of the shirt front and the sleeve front, right sides together.  The ear should be sandwiched in between.  Pin and sew according to the pattern directions.

Panda Raglan Tee Tutorial by you & mie

Finish edge if desired.  Press the seam allowance towards the shirt and the ear pointing “up” towards the sleeve.  On the right side of the shirt, top stitch the ear to the sleeve close to the seam.

Panda Raglan Tee Tutorial by you & mie

Repeat on the other side with the second ear.

Panda Raglan Tee Tutorial by you & mie

Now finish the shirt as directed in your pattern and voila!  An awesome panda shirt for your little one!

Panda Raglan Tee Tutorial by you & mie

Trust me, I reeeeeally think they’ll like it!

Now I’d seriously love to see what other animals you guys can make into shirts!!  If you use this tutorial to make a fun animal shirt, please let me know!  You can add a picture to the you & mie flickr group or just leave me a comment or email me.  I imagine a whole zoo of fun animal shirts 🙂

It was so great to just make something fun, not for a specific project.  Thanks for the motivation Kid’s Clothes Week!  Hope you’ve been able to make something fun too!

Adding Ruffle Sleeves {tutorial}

Ruffle Sleeve Tutorial by you & mie

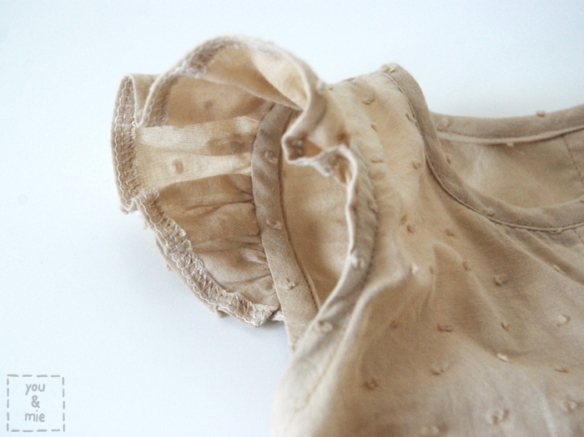
Last week I shared my daughter’s new baby bodysuit from the Oliver + S Lullaby Layette pattern set and one of the biggest modifications I made to the pattern was adding ruffle sleeves.  Ruffle sleeves are a fun and feminine touch for any spring or summer top or dress.  Super sweet especially on little ones.

When I was trying to figure out how to attach the sleeves, I looked for a tutorial online, but couldn’t find what I was looking for.  I’ve attached ruffle sleeves or flutter sleeves when there was a bodice lining (like in the Geranium pattern), but there was no lining for the body suit.  I wanted the ruffle to only cover the top of the arm hole, so I knew I’d need a way to finish the rest of the arm hole with bias tape.  Took me awhile to figure out, but it’s so simple, I wonder why I never knew how to do this in the first place!

Ruffle Sleeve Tutorial by you & mie

So some of you might think, “duh, Cherie!”  But hey, if I wanted a tutorial like this to be out there in blogland, there must be others needing the same thing, right?!  So anyways, here’s the tutorial on how to add ruffle sleeves to any unlined bodice pattern.

If you are starting with a pattern that is meant to have sleeves, the first step is to reduce the width of the shoulder.  You can either do this to the pattern before you cut your fabric, or you can do it after.  I didn’t remember to do it until after I had cut the fabric and sewed the shoulder seams together.  Not a problem.

Ruffle Sleeve Tutorial by you & mie

Trim off from the outer edge of the shoulder seam.  The amount is up to you, I trimmed about 1/2 an inch from the shoulder and then gradually curved my line to meet back with the original arm hole.  Your finished arm hole will be folded under 1cm (3/8 in), so take that into consideration when deciding how much to trim off.

If you haven’t already, go ahead and cut your front and back bodice pieces and assemble them as you wish/as directed by your pattern up to the point when they are sewn together at the shoulder seams.  Side seams should not be sewn yet.

Ruffle Sleeve Tutorial by you & mie

Next, cut your ruffle sleeves.  Size will depend on the size of your garment and your preference.  I cut my sleeve to be about 3 times longer than the desired size of my finished ruffle.  For the height, you can make it however long you want the sleeve to be at the shoulder (longest point) plus about an 3/4 of an inch for seam allowance and hemming.  By the way, none of this is very exact, but ruffle sleeves are pretty forgiving like that. 😛

Ruffle Sleeve Tutorial by you & mie

To cut these pieces, cut 2 rectangles in your measurements.  Mine were about 2.25 x 13 inches.  Fold the rectangle in half widthwise and starting from the center fold, draw an arc to the corner.  Cut that out and use it to cut your second ruffle sleeve in the same shape.

You will also need to cut two 1″ strips of fabric on the bias.  Measure your armhole and add a couple of inches to that number to determine the length.  My armholes were about 9 inches, so I cut 12 inch long strips that were 1″ wide.

Ruffle Sleeve Tutorial by you & mie

Mark the center of the sleeve along the curved edge.  This will help later with placement.

Finish the straight edge of the sleeve piece.  You can do this in a number of ways.  You can hem it by folding it towards the wrong side a 1/4 inch and pressing, then another 1/4 inch encasing the raw edge and sewing it down.  You can do a zig zag stitch or serge the edge for a rougher, but cute finish like the Geranium flutter sleeve.  I went with something in between by serging the edge and then pressing it under and stitching it down.  It looks finished from the right side and you can see the serged edge from the wrong side.  This will make it easy to distinguish the right and wrong side in the rest of the pictures.

Ruffle Sleeve Tutorial by you & mie

Now to ruffle that sleeve!  Set your machine to widest stitch possible and sew a basting stitch along the curved edge a 1/4 in from the edge.  Do not backstitch at either end and leave a couple inches of thread when clipping.  Carefully pull on one of the threads (either the top or the bottom) to gather the fabric.  Gather the fabric to the length and ruffleness you desire.  Make sure the gathers are distributed evenly.

Ruffle Sleeve Tutorial by you & mie

Pin your gathered sleeve to your bodice, right sides together and raw edges aligned, lining up the center mark on your sleeve with the shoulder seam.  Baste the sleeve on with a 1/4 inch seam allowance.  Repeat with the other sleeve.

Ruffle Sleeve Tutorial by you & mie

Take your bias strip and fold it into thirds and press.  If you want to be really exact, you should fold it in 1/4 in. on one side and 3/8 in. on the other side (the center section will be 3/8 in).  Really though, when we start talking an 1/8 of an inch of a difference, I’m not sure if it matters that much.

Ruffle Sleeve Tutorial by you & mie

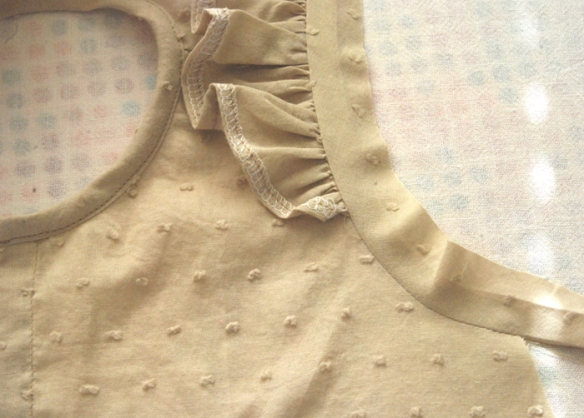
Pin your bias tape right side down (facing the wrong side of the ruffle sleeve) along the edge of the armhole.  This should sandwich the sleeve between the bias tape and the bodice pieces.  If you are going with the exact measurements, you want the 3/8 inch fold to be along the edge (right side in this picture).  Stitch along the crease closest to the edge.

Ruffle Sleeve Tutorial by you & mie

Fold the bias away from the garment and press.

Ruffle Sleeve Tutorial by you & mie

Flip the garment wrong side up and fold the bias tape in once, then again towards the wrong side.  The ruffle sleeve should flip out and the raw edge should be encased.  Press carefully and pin.

Ruffle Sleeve Tutorial by you & mie

Sew along the folded edge of the bias tape and trim off excess.  Almost done!

Ruffle Sleeve Tutorial by you & mie

Sew side seams of the bodice, right sides together and finish edges as desired.  Press seam towards the back.  Tack the top of the seam down with a few stitches, if desired.  You can see the tacking in the picture below, though it’s hardly noticeable when being worn.

Ruffle Sleeve Tutorial by you & mie

Finish the rest of the garment as directed in your pattern and you’re done!

Oliver + S Lullaby Layette Summer Bodysuit // by you & mie

Enjoy those little arms in those little ruffles!

*As with all my tutorials, this was written extremely late at night when already sleep deprived, so if something doesn’t quite make sense and you need clarification on any part, please don’t hesitate to ask.  It’s probably my fault, not yours.*

Happy Sewing!  😛

Folding Floor Cushion {tutorial}

Phew, this week is flying by! Today’s project is one of many on a list of home improvement projects that I tend to put off. But I’m so glad I got this one done and I love how it turned out!

FloorCushionTutorial

Recently, we bought Yuki the popular Ikea Kura bed, which can either be a low or high bed.  If you choose the lofted bed, it creates a nice space underneath which can be used as another bed, or you can use the space for something else.  Eventually, we imagine we’ll put another mattress underneath for Kaya, like a bunk bed, but until then, we wanted to use the space for some of Yuki’s things like her dresser and books.

So we created a little reading nook for her!  And no nook would be complete without some sort of comfy cushion situation.  Hideko and I brainstormed a few ideas, but liked the idea of something long and versatile, so I made this folding floor cushion with 4 standard pillows inside.

Floorcushion9

It’s certainly not an original idea – I remember this post circulating around awhile back.  The idea was to sew several pillow cases together as an easy way to create this folding floor pillow.  Well, I wanted to make one that was from one continuous piece of fabric, so I made an almost-as-simple tutorial for doing that.  Trust me, it’s really easy and your kid will LOOOOVE it.  In fact, I love it.  It’s the perfect size for me to snuggle up with the girls and a good book or two (or 5 if Yuki is really trying to evade bedtime).

Floorcushion11

Ok, so here’s what you need . . .

  • 2 yards of fabric that is 60″ wide (more about fabric type below)
  • coordinating thread
  • the sewing essentials, but especially some sort of fabric marking pen or chalk that is removable since we’ll be marking the right side of the fabric.
  • 8 buttons (optional)
  • 4 standard pillows (try and find really full and fluffy ones, since they flatten quickly with use)

You can really use any type of fabric that you want, but I chose a heavier home dec fabric.  I think it helps to keep the shape of the pillows and will withstand plenty of wear.  But any fabric will do!  And if you don’t have fabric that is 60 inches wide, you can sew two coordinating fabrics together for a fun “reversible” look.

I got this striped fabric at Ikea a couple of years ago and used it as a table cloth for a party.  It’s been sitting in my stash since then and every once in awhile Yuki would point to it and say that she really liked it.  But since it wasn’t suitable for clothing, I didn’t know what to do with it.  This turned out to be the perfect project for it!

Ok, let’s get started!  Wash, dry and press your fabric.  Fold it in half lengthwise, right sides together (along the gray line in the diagram).

Floorcushion1

Pin and sew one of the short edges with a 1/2 inch seam allowance.  Trim seam allowance to 1/4 inch and finish edges as desired (pinking shears, zig zag stitch or with a serger).

Floorcushion2

So here’s where I did some of the measuring work for you 😉  Standard pillows are 20″ x 26″.  Since I wanted my pillows to remain a little fluffed, as opposed to completely flat, I tested out some measurements, but decided on making each pillow sleeve 17″.  Since there are 4 pillows, I multiplied 17 by 4 and got a finished length of 68 inches.  Measure 68 inches from your first seam and mark with your fabric pen.  Pin the two layers of fabric together before sewing to prevent any shifting.  After you sew along the line, trim and finish the edges.

The next step is to hem the entire length of the opening.  Fold the fabric toward the wrong side by 1/2 an inch and press.  Fold again 1.5 inches, press and pin.  Do this along the entire length of the opening and then stitch close to the folded edge.

Floorcushion3

So you now have a suuuper long pillow case.  The next step is to top stitch lines to create separate sleeves for the pillows.

Turn your pillow right side out and press.  With your fabric pen mark every 17 inches and draw vertical lines.

Floorcushion4

*HINT – Since you are working with a long piece of fabric, you want to sew closer to the right side and let the fabric hang off the left side of the machine.  So measure 17 inches from the right and draw one line, then flip your cover over and repeat.  For the center line, you can sew on either side of the cover since the fabric is the same length on either side.

Make sure to pin the two layers of your fabric together before sewing to they don’t slip.  Stitch along the lines that you drew and reinforce the stitching at the opening by backstitching several times.  Since the opening will receive the most stress, you want to make sure this stitching does not come undone!

Floorcushion5

And that’s it!  You can stop here with the sewing, stuff your pillows and be done!

If you want to add buttons along the edge to fully enclose the pillows, then there are just a few more steps.

Floorcushion6

Measure and mark where you want your buttonholes to be.  Since each opening is 17 inches, I measured 5.5 inches in from each side.

Floorcushion7

Repeat for all 4 openings and sew your buttonholes.  To figure out where to sew on your button, cut your buttonhole open and use your fabric pen to mark the center of your hole on the fabric underneath it.  Sew eight buttons on the inside of your cover and you’re done!

Floorcushion8

Stuff it with pillows and enjoy!

Floorcushion12

Floorcushion13

It’s easy to remove the pillows and throw the cover in the wash, or switch out for new pillows if you need.  I know this will get so much use for years to come.

We still have a lot of work to do to finish the girls’ room, but we got this nook finished and it really felt like a mini victory!  Gotta celebrate those too, right!?

Floorcushion10

And this.  *sigh*  These two are adorable together.  Yuki insisted that her sister be in the photos with her.  Love it!

Now onto the other 387 home improvement projects on my list 😛

Black and White Infant Mobile

As I prepare for my own newborn, I thought I’d bring back this guest post/tutorial that I did a loooooong time ago.  It’s the perfect project for a newborn’s nursery – a stimulating black and white infant mobile.  Just last week I got the sweetest email from a reader living in Dubai who has made a few of these for friends.  She says that both the mamas and the babies love them and she loves making them too!  It was seriously such a heartwarming email to read and it made me feel so happy to share these kinds of tutorials with you.  Thanks Julie!

I made this mobile forever ago and I’m excited that we’ll finally have a little one to enjoy it.  I mention this in the post, but please note that I used a slightly older than newborn model for my pictures.  But this mobile is recommended for newborns, not toddlers.  Enjoy!

___________________________________________________________________

Projects for newborns have a special place in my heart because the arrival of my daughter (Yuki) is what really catapulted me into the world of sewing.  And now I can’t imagine my life without either!  Today I’m going to show you how to make a stimulating Black and White Mobile for your baby’s changing table.

Out of aaaaall of the things that I made for my daughter when she was an infant, the one that was the most loved and the most used was a mobile similar to this.  She. Loved. It.  She was so mesmerized by the high contrast designs – we actually called it “the babysitter” for awhile because she could just lay there and stare at it forever!

 Not a newborn anymore, but the only model I had on hand – and she was still pretty intrigued!

Studies say that newborns can best register black, white and red in high contrasting patterns.  These designs stimulate their eyes and promote brain development.  This is probably most beneficial during the first 3-4 months of life, though my daughter loved hers well past her first birthday (we had to keep adjusting the height so she couldn’t reach it)!  Because these designs stimulate (not soothe), this mobile would be best
placed over a changing table or play area as opposed to a crib.

So let’s get started!  Here’s what you’ll need:
– An embroidery hoop (10 inches)
– Paint and paint brush
– White and black felt (I like wool or wool blend)
– Embroidery floss

I bought this 10 inch hoop at Joann’s and at full price it was $1.50.  You can use polyester felt, but I prefer wool or wool blend felt because it’s thicker and will make the squares stiffer.

I bought 1/8 of a yard in white and black.  Luckily I had the rest of the supplies at home already, so between the felt and the hoop (and a couple of coupons), I only spent about $3.50.  Not bad . . .

So the first step is to separate the two hoops.  One has some hardware on it and you can toss that in your “stuff I swear I’ll find a purpose for someday” pile (please tell me you have one too).  The other hoop should have nothing on it.  Paint your hoop with acrylic paint or spray paint.  A couple of coats will ensure a nice opaque finish.  I went with black because I thought the dark circle against the white ceiling would add another visual element of interest.  But you can paint it whatever you color you want!

Set the hoop aside to dry and cut your felt into 4×4 inch squares.  You’ll need 6 white ones and 4 black ones.

Let’s also cut your embroidery floss.  The lengths I give here are based on what I needed (determined by the height of my ceiling and my changing table), so you may need to make adjustments.  I used one piece that was 90 inches and 4 pieces that were 50 inches.

Sketch out some designs for your mobile pieces.

These were my original sketches, though some of the designs came out different.  I’m going to walk you through the 5 designs I made, but you can be as creative as you want!

1. Cut out strips of white felt  and lay them down diagonally on a black square.

2. Cut a piece of white felt 4 inches long.  Draw 4 wavy lines, cut them out and lay them on a black square.

3. Draw nine circles on some black felt (trace a coin).  Originally I made them all the same size, but before I sewed them on I decided to make 4 of them smaller.  A nickel and a dime might be about right.

4. Draw concentric circles about 1/2 inch apart on black felt and create a target design on a white square.

5. This is probably the most complicated one.  First cut two black 2×2 inch squares.  Keeping in mind that 2 of the sides of the square will be part of the seam allowance (dashed line), draw a small square in the “middle.”  Carefully cut the square out, repeat with the other black square and arrange as shown.  Don’t forget that you’ll lose a 1/4 inch on all four sides!

Now top stitch all the felt designs on and trim anything extra felt hanging off the edge of the square.  Take your time with the circles and curved shapes.

Here’s what they should like at this point:

(Notice the change I made in the 9 circles design)

Put those aside while we prep the other 5 squares, which will be the back pieces.  Felt doesn’t generally have a right and wrong side, but I’ve labeled them just in case you’re using something that does.

Use a ruler to find the center of the square and mark it on the wrong side.  Measure about a 1/2 cm to either side of the center to make a 1 cm line.

You’ll need to decide which of the designs you want in the center of the mobile.  That design will get the longest (90 inch) piece of thread.  For the other 4 designs you’ll use the shorter pieces of embroidery floss.
Thread your needle and enter from the right side on one end of the centimeter long mark and then push the needle back through at the other end of the centimeter long mark (geez, did that make sense?).
Now pull the threads till they are even lengths and the felt square hangs parallel to the ground.  Flip the square over and tie a simple knot close to the square.  You don’t want to tie it so tight that the square puckers.  Make sure that it lays flat and it’s ok if there is a little sliding room.
Wind up the thread and lay it in the center of the square so it’ll be out of the way when you sew the two sides of the square together.  Repeat with the other 4 squares (remember to use the longest piece of thread for your center square).
To sew the square front and back pieces together, lay your patterned squares on top of the back square pieces, right sides together.  Pin and sew them together with a 1/4 inch seam allowance, making sure to leave an opening on one side.
Trim the corners and flip them right side out.  Use a chopstick to poke out the corners and press.  Top stitch all the way around with a 1/4 inch seam allowance making sure to sew the opening shut.  As you top stitch, make sure to move the embroidery floss aside so you don’t sew over it.
Now you should have 5 felt coaster-like squares with thread coming out the back side.
Decide how long you want each square to hang from the hoop and tie a simple knot at that mark.
Separate the two pieces of thread and place the hoop in between them.
With the two pieces of thread back together, tie a knot above the hoop as close to the hoop as possible.
Now repeat this with the other 3 squares that will hang from the hoop.  Place them exactly 90 degrees apart from each other.  Pull all the thread to the center above the hoop in one hand.
For the center square, add the loooong threads to the bunch in your hand and adjust the length of the thread depending on where you want the center square to hang.  Make sure the hoop is parallel to the ground.  If it is tilted, you need to adjust the lengths of the thread.  Tie a knot with all of the strands of thread about 6-7 inches about the hoop (the thread should measure at least 8 inches from the hoop to the knot – this will help for the next step).
Trim the
short threads to a 1/2 inch above the knot.  Be sure not to cut the two
long threads!!!  You’ll need those to hang the mobile.
Cut out 2 circles about 1.75 inches in diameter.
Place them wrong sides together and top stitch around half of the circle.
Slip the circle over the knot and top stitch the rest of the circle making sure to sew over the thread so the circle doesn’t slide up and down.  If you can’t machine sew this because the hoop gets in the way, you can hand stitch it.
And you’re basically done!!  I just tied a loop at the end and used a ceiling hook to hang it.
Done!  Now give it a little spin, sing a song and watch how your baby becomes mesmerized by these handcrafted designs.  Can you see the synapses firing??  Well, maybe not, but I’m pretty sure you’ll see the intrigue in their eyes.
Baby’s eye view
Again, I used my toddler in these pictures because I didn’t have a newborn on hand.  I don’t actually recommend this (or any) mobile over a changing table for toddlers, mostly because it’ll end up looking something like this:
Anyways, thanks for letting me share this tutorial with you.  I hope you give this project a try and that your little one loves this mobile as much as mine did!
Hope you all have a great week!

Pretty Pink Pinafore {tutorial}

You guuuuuuuys!!  Thanks so much for all of the wonderful well wishes after my last post.  It has been truly heartwarming reading each comment, hearing some of your own stories and feeling the love you’ve sent my family’s way.  I really appreciate it!  You guys rock 🙂

Pinafore21

So last week, I did a guest post for sewpony‘s series “When We Were Young” and I shared an outfit that I made for my daughter that was inspired by an outfit that I wore when I was young!  I also mentioned that I’d post a tutorial for the simple pinafore, so here I am, being true to my word.

Here is the original next to the version I made for Yuki:
PinkPinafore7I did a lot of guessing and “winging it” when making this little pinafore, but it came together pretty simply so I wanted to share how I did it in case you wanted to try it too!  But I have to warn you, this tutorial is not about exact measurements or precise directions.  It’s just a basic how-to.  Since I was just making it up as I went along, you may have to be a bit flexible and daring and wing it too.  Hope that’s ok!

PinkPinafore6

PinkPinafore5

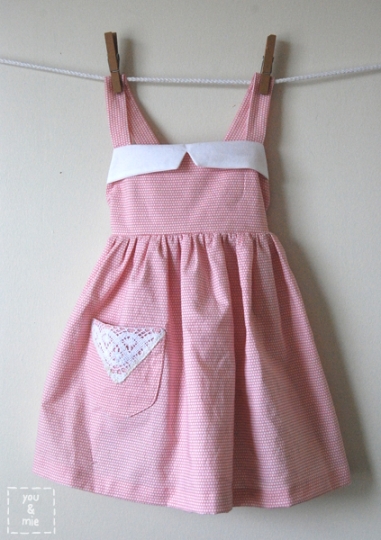
The jumper has a bib bodice in the front and is open in the back with criss cross straps.  The skirt is gathered in the front and has elastic in the band for easy comfort and fit.  Really, it looks a lot like an apron.  There is a cute notched “collar” (clearly, it’s not a real collar, but I wasn’t sure what else to call it), and a crocheted lace detail on the pocket.  It’s perfect for hot summer days, but can easily be layered as we transition into fall.

What you’ll need:

  • Main fabric (1-2 yards depending on what size you’re making)
  • Contrast fabric (1/4 yard)
  • Crocheted doily or lace
  • Lightweight interfacing
  • 1″ wide elastic
  • 2 buttons

To draft your pattern, measure the child’s chest and divide that by 4.  That will be the width of your bodice pattern piece (since it’s drawn on the fold).  You can also measure across the front of a dress or shirt and divide that in two.  When I drafted my piece, I added seam allowance, but my bodice ended up being just a little too wide.  So I’d just stick with the measurement and not add seam allowance and then the bodice will be just smaller than the chest width, which I think will fit better.

Pinafore1

The height of your pattern piece will depend on how long you want the bodice to be.  Measure from the point you want the bodice to start on their chest and down to where you want the skirt to begin.  Add a 1/2 inch seam allowance on both the top and bottom (1 inch total).  I also cut the top corner a bit to allow room for arms.  I eyeballed this, but for my 3T-ish pattern, I made a mark about 1 inch in on the top and 2.5 inches down and drew a diagonal line connecting the two and then cut.  You can place your pattern on your child or on a shirt to see if it’s about the right size/angle (remember to take into account the 1/2 inch seam allowance).  Sorry people, I don’t have an exact formula – like I said, I usually just wing things around here.

To draft the collar, I placed some tracing paper on top of the bodice piece and traced along the top section of the bodice pattern.  Decide how long you want this collar piece to be and cut straight across, remembering to add seam allowance.  I used a 1/2 inch SA to sew along the outside edge of the bodice, but only a 1/4 inch SA along the bottom of the collar piece.  To add the notch, draw a diagonal line along the fold line of your pattern piece the size and angle you want your notch to be.  Then draw a second line a quarter inch over (towards the fold line) and cut.

Pinafore2

You’ll also need a pocket pattern piece, which you can make whatever size/shape you want.

Now you’re ready to cut your fabric.  From your main fabric, you’ll need 2 bodice pieces, 2 pocket pieces and 2 strap pieces.  Your straps should be 2.5 inches wide and whatever length you’ll need to reach from the top of the bodice, over the shoulder and to their waistline on their back.  My 3T straps were 14.5 inches long.

From your contrast fabric, you’ll need 2 collar pieces.  If desired, add lightweight interfacing on the wrong side of one of the collar pieces.

Pinafore3

 You’ll also need to cut 2 rectangles for the skirt front and skirt back from your main fabric.  I used one of Yuki’s dresses to determine how wide to cut the rectangle (by measuring the width of the bottom of the skirt then adding 1 inch for seam allowance) and the length will depend on how long you want the skirt to be, plus added length for seam allowance and hemming.  For the skirt back piece, add one inch to the length to create casing for the elastic.  My skirt pieces were 27×14 inches for the front and 27×15 inches for the back.

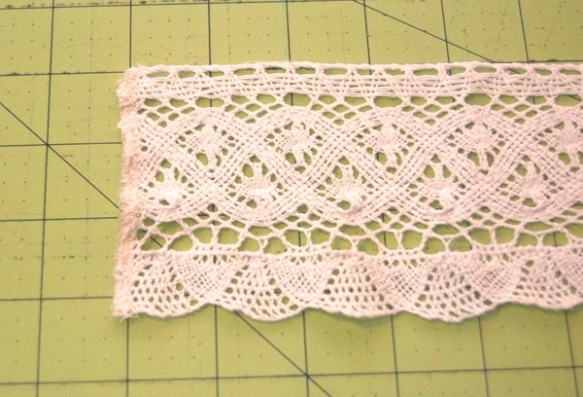
First we’re going to add the decorative lace to the pocket piece.  Depending on what shape lace doily you have, you can probably just leave it as is and sew it on to one of your pocket pieces.  A square or strip can be placed across the top edge of the pocket.  Or a circular piece can be cut in half so that a curved edge lays across the top half of the pocket.  Play around with whatever shape or look you want and sew the lace down onto the right side of one of your pocket pieces.

Pinafore4

Because I was trying to replicate the pocket in the original photo, I needed a triangular piece.  I cut my lace into a triangle and then serged the edges to finish them.  I did kind of a crappy job.

Pinafore5

After you top stitch along the outer edge of the lace to attach it to one of your pocket pieces, lay the other pocket piece on top, right sides together and pin around the edges.

Sew all the way around the pocket leaving about a 1.5 inch opening.

Pinafore6

Clip corners, flip the pocket right side out and press.   Sew this pocket onto the front skirt piece.

To prepare your straps, fold them in half lengthwise (right sides together) and press.  Then sew along the long edge and one of the short edges with a 1/4 inch seam allowance.  Be sure to leave one short edge open.  Trim the corner.

Pinafore7

Repeat with the other strap and then turn the straps right side out and press.

Pinafore8

Place your collar pieces wrong sides together and pin along the bottom (notched) edge.  It may help to mark the line you want to sew along, for the notched portion, to assure you get a nice even and centered notch.  Sew just along the bottom edge of the collar.

Pinafore9

Trim corners and carefully clip your notch as close to the stitching as possible – but don’t snip the stitching!

Pinafore10

Flip your collar right side out, use a chopstick or something to push all the corners out and press.

Lay the collar on top of one of your bodice pieces, right sides facing up and baste the collar to the bodice.

Pinafore11

Place the raw edge of one of your straps along the top edge of your bodice – measure a 1/2 inch down and a 1/2 in and pin.  Do the same with the other strap on the other side of the bodice.

Pinafore12

I didn’t photograph the next step, but place the other bodice piece on top, right sides together (with straps and collar sandwiched in between) and pin.  Sew the bodice pieces together along the sides and top of the bodice (leaving the bottom edge open) using a 1/2 inch seam allowance.  Trim seam allowance down to a 1/4 inch and clip corners.  Flip right side out and press.

Gather the skirt front piece by sewing two basting lines along the top edge of the skirt.  To baste, set your machine on the longest stitch and do not backstitch at the beginning or end.  Leave the threads long and pull carefully to gather the skirt.  You want the width to be 1/2 an inch longer than the bodice on each side.  Leave that 1/2 inch ungathered.

Pinafore13

Pin the bottom edge of the bodice to the top edge of the front skirt piece with right sides together.  There should be 1/2 an inch of ungathered skirt sticking out on either side of the bodice.

Pinafore14

Sew the skirt and bodice together with a 1/2 inch seam allowance.  Finish this raw edge with your serger or a zig zag stitch.  Press the bodice up and the seam allowance down.

Pinafore15

To make the casing for the back skirt piece, fold and press the fabric just less than 1/2 an inch down along one of the long edges.  Fold the fabric down again just over one inch – you’ll want the casing to be slightly wider than the 1″ elastic.  Sew very close to the folded edge.

Pinafore16

Using a safety pin, pull the elastic through the casing.  Sew the elastic in place 1/2 an inch in from one side and then continue pulling elastic through to the other end.  The skirt back piece should match the width of the skirt front piece, or be just a little bit smaller for a snug fit.  Sew the other end of the elastic in place 1/2 an inch in from the end.  Trim excess elastic.

Pinafore17

Place the skirt front and back pieces together (right sides facing in) and pin along the side edges of the skirt.  Sew together using a 1/2 an inch SA, trim and finish edges using a serger or zig zag stitch.

Pinafore18

We’re almost done!  Just a few more finishing touches.  On the inside of your back skirt piece, hand sew two buttons to attach the straps to.

Pinafore19

Then sew buttonholes on the ends of your straps.

Pinafore20

Pinafore21

Done!

Pinafore22

Pinafore23

PinkPinafore10

Hooray!  A sweet vintage frock for your sweet little one!

Please remember to add any of your you & mie inspired creations to the flickr pool!  Oh and let me know if you have any questions or corrections.  I wrote this when I was really sleepy 😛

I hope you’re all doing well.  I seriously can’t believe how quickly this summer is going by!  It’s already AUGUST!  And I went from having no real sewing agenda, to a list of about 15+ projects that I want to get done before the baby comes in a couple of months!  I better get to it!  What have you been working on?

Maternity Geo Dress: 30 Days of Sundresses

GeoDress1

It’s June!  Can you believe it?  Summer is upon us and that means it’s time to bust out the sundresses.  Melissa from Melly Sews is running her series, (30) Days of Sundresses, for the second time.   All month – 30 sundresses!  For girls and women – it’s really quite fun!

Last year I made a beach maxi for my sister (and a matching dress for my daughter), and this time I decided to try make something for me!  I’m not sure why but I’ve been really motivated to make clothes for myself recently.  I’m not sure if it’s the pregnancy and the fact that I don’t fit into my clothes anymore and the selection at stores seems so limited, or maybe because Yuki refuses to wear anything but t-shirts and sweat pants and that seems boring to me, but I have all these ideas and a sudden urge to try sewing for me!  I’ve already made 4 things already and I have plans for a handful more, so this dress is just the start of a lot of maternity wear up in here!

GeoDress4

So I made a knit dress that was inspired by this dress from Old Navy . . .

Dress by Old Navy (no longer available) via ChildMODE

I wanted to try and make a floral neckline like the original version, but I didn’t have any fabric that was suitable, and I didn’t feel like painting any at the time.  So I just picked some fun fabric from my stash, On Point in Golden from the Cloud 9 Simpatico line, to add the accented neckline.

GeoDress22

So the dress is made to fit and flatter a pregnant body, but I’m guessing this could look good on other body types too, especially if you lower the waistline.  I’d love to see some non-maternity versions of this dress too!

Alright, so you ready to start?

What you’ll need:

  • 2 yards of knit fabric
  • a scrap or fat quarter of accent fabric
  • paper backed (double sided) fusible web (I use Pellon 805 Wonder-Under)
  • 1/4 inch elastic (about 14 inches)

First you need to draft your pattern for the bodice.  So find a knit top that fits well, not too tight, but not baggy either.  I used a combination of Kristin’s free Scoop Top pattern and a tank top of my own.  Measure where you want the bodice to hit and add 1/2 an inch to the bottom.

GeoDress5

To draft the accent neckline, place your front bodice on a piece of paper and trace the neckline, shoulder seam and half of the arm hole (see picture on the left).  Remove the bodice pattern piece and decide how wide or what shape you want your accent neckline to be.  I made mine a solid 2.5 inches around.  Then add a 1/4 inch along the bottom of the curve for folding under.

GeoDress6

Cut out your dress pieces – one front bodice piece on the fold, one back bodice piece on the fold and the accent neckline on the fold.

GeoDress7

You’ll also need to cut a piece of fusible web from the neckline pattern piece, but without the added 1/4 inch along the bottom curve.

For your skirt, you’ll want 2 pieces of fabric – the length will be determined by the measurement from the bottom of the bodice to the desired length.  Make sure to add about 2 inches for hemming and seam allowance.  I cut my skirt at a slight A-line, the top of the skirt pieces should be about the same width as the bottom of your bodice.

GeoDress8

You’ll also need long strips of your main fabric to finish the armholes and neckline.  Cut strips that are 2 inches wide and make sure you cut them in the direction in which the fabric stretches.  I like to cut them as long as I can and then trim them down later, but for rough estimates, I ended up needing two strips that were 2″ x 15″ for the armholes and one strip that was 2″ x 28″.  Cut them a few inches longer at least to make sure you have enough.

Fuse the fusible web to the wrong side of the accent neckline lining up the shoulder seams and neckline (the bottom curve will have a 1/4 inch without fusible web).

GeoDress9Remove the paper backing.  And here’s a trick I learned from sewing from Oliver + S patterns . . . Sew a basting stitch along the bottom 1/4 inch seam allowance.

GeoDress10

Press the curve towards the wrong side along the basting stitch.  Remove the basting stitch.  Fuse the neckline to your front bodice piece following the fusible web directions and sew along the bottom curve close to the edge.

GeoDress11

Next we’re going to attach the elastic to the bottom of the bodice pieces.  Cut your elastic into two 7 inch strips (approximately).  Find the center of the front bodice and pin or baste the center of the elastic strip on the wrong side of the fabric along the bottom edge of the bodice.  Because this elastic will be part of the seam allowance, I placed elastic close to the bottom of the bodice.

GeoDress12

Sew the elastic to the bottom of the bodice with a zig zag stitch stretching the elastic as much as you can, but being careful not to stretch the knit fabric.

GeoDress13

It should look like this on the wrong side . . .

GeoDress14

And like this on the right side . . .

GeoDress15

Repeat with the back bodice piece.

To attach the bodice to the skirt, line up the bottom of the bodice and the top of the skirt with right sides together.  I didn’t photograph this part, so I hope this makes sense.  As you sew the pieces together, I like to use the slanted zig zag stitch because it allows for stretch.

GeoDress16

When you sew the bodice and skirt together, pull the elastic section of the bodice tightly without pulling the skirt piece so that it’ll gather.  The elastic should be within the seam allowance so that it won’t be visible on the finished dress.  So right along the inner edge of the elastic.  The sections on either side of the elastic should be sewn without stretching any fabric.  When finished it should look like this . . .

GeoDress17

Repeat with the back side of the dress, sewing the back bodice and skirt pieces together the same way.

Place the front and back right sides together and pin and sew the shoulder seams and the side seams of the dress.

To finish your armholes and neckline, you’ll need your 2″ strips of fabric.  To measure the length you need, leave 1/2 an inch for seam allowance and then pin the strip to the armhole.  Slightly stretch the strip as you go around the entire armhole and leave another 1/2 an inch for seam allowance when you get back to where you started.  It’s important to stretch it slightly because you don’t want a loose, baggy or limp finishing, it should be slightly smaller than the armhole to create a finished band that hugs your body.  Once you’ve found the length you need, trim off any access and remove the strip from the armhole.  Sew the short edges right sides together with a 1/2 an inch seam allowance to create a circle.

GeoDress18

Press that seam open, then fold the loop in half lengthwise wrong sides together, so that raw edges should line up and the seam allowance is hidden inside.  Press.

GeoDress19

With the dress right side out, pin together the raw edges of the armhole finishing with the armhole.  Start by lining up the seams and pin all the way around stretching the band slightly and evenly as you pin.

GeoDress20

Sew along the raw edge using the slanted zig zag stitch.  Finish edges if desired.  Press well and top stitch, again, if desired.

Repeat with other armhole and neckline as well.

GeoDress21

Hem the dress and you’re done!!  With knits, I like to serge the edge and then fold it up once about an inch and sew close to the serged edge with either a double needle or the slanted zig zag stitch.  That way the hem doesn’t get too thick with a double fold.

GeoDress3

So here I am at 26 and a half weeks.  This is a very comfortable dress with a pop of fun, that I hope will take me through my entire pregnancy.

GeoDress2

Be sure to check out Melly Sews every day this month for a new sundress from these awesome bloggers:

And I hope you’re ready for more maternity wear starting next week because I’ve been busy sewing for me!
Wishing you a beautiful weekend . . .
GoTo Sew Kitschy Coo Occasionally Crafty Naptime Crafters Sew Country Chick You and Mie Flamingo Toes Googiemama Delia Creates Melly Sews The Mother Huddle sewVery Alida Makes Sugar Bee Crafts Seamingly Smitten Boy, Oh Boy, Oh Boy! Sumo's Sweet Stuff Craftiness is Not Optional Elegance & Elephants Sew A Straight Line Kojo Designs Caila Made Family Ever After Mama Says Sew Simple Simon & Co. Little Kids Grow A Couple of Craft Addicts Image Map