
Phew, this week is flying by! Today’s project is one of many on a list of home improvement projects that I tend to put off. But I’m so glad I got this one done and I love how it turned out!

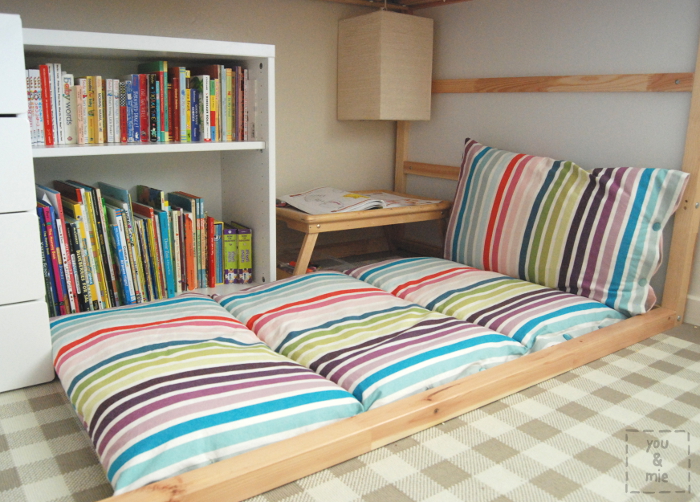
Recently, we bought Yuki the popular Ikea Kura bed, which can either be a low or high bed. If you choose the lofted bed, it creates a nice space underneath which can be used as another bed, or you can use the space for something else. Eventually, we imagine we’ll put another mattress underneath for Kaya, like a bunk bed, but until then, we wanted to use the space for some of Yuki’s things like her dresser and books.
So we created a little reading nook for her! And no nook would be complete without some sort of comfy cushion situation. Hideko and I brainstormed a few ideas, but liked the idea of something long and versatile, so I made this folding floor cushion with 4 standard pillows inside.
It’s certainly not an original idea – I remember this post circulating around awhile back. The idea was to sew several pillow cases together as an easy way to create this folding floor pillow. Well, I wanted to make one that was from one continuous piece of fabric, so I made an almost-as-simple tutorial for doing that. Trust me, it’s really easy and your kid will LOOOOVE it. In fact, I love it. It’s the perfect size for me to snuggle up with the girls and a good book or two (or 5 if Yuki is really trying to evade bedtime).

Ok, so here’s what you need . . .
- 2 yards of fabric that is 60″ wide (more about fabric type below)
- coordinating thread
- the sewing essentials, but especially some sort of fabric marking pen or chalk that is removable since we’ll be marking the right side of the fabric.
- 8 buttons (optional)
- 4 standard pillows (try and find really full and fluffy ones, since they flatten quickly with use)
You can really use any type of fabric that you want, but I chose a heavier home dec fabric. I think it helps to keep the shape of the pillows and will withstand plenty of wear. But any fabric will do! And if you don’t have fabric that is 60 inches wide, you can sew two coordinating fabrics together for a fun “reversible” look.
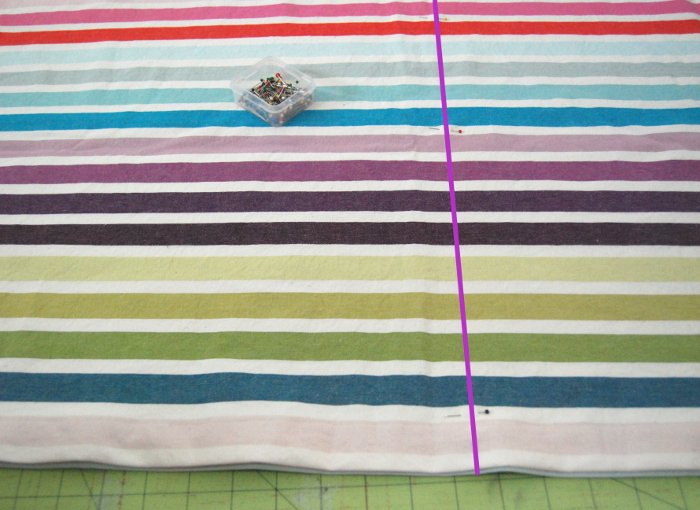
I got this striped fabric at Ikea a couple of years ago and used it as a table cloth for a party. It’s been sitting in my stash since then and every once in awhile Yuki would point to it and say that she really liked it. But since it wasn’t suitable for clothing, I didn’t know what to do with it. This turned out to be the perfect project for it!
Ok, let’s get started! Wash, dry and press your fabric. Fold it in half lengthwise, right sides together (along the gray line in the diagram).

Pin and sew one of the short edges with a 1/2 inch seam allowance. Trim seam allowance to 1/4 inch and finish edges as desired (pinking shears, zig zag stitch or with a serger).

So here’s where I did some of the measuring work for you 😉 Standard pillows are 20″ x 26″. Since I wanted my pillows to remain a little fluffed, as opposed to completely flat, I tested out some measurements, but decided on making each pillow sleeve 17″. Since there are 4 pillows, I multiplied 17 by 4 and got a finished length of 68 inches. Measure 68 inches from your first seam and mark with your fabric pen. Pin the two layers of fabric together before sewing to prevent any shifting. After you sew along the line, trim and finish the edges.
The next step is to hem the entire length of the opening. Fold the fabric toward the wrong side by 1/2 an inch and press. Fold again 1.5 inches, press and pin. Do this along the entire length of the opening and then stitch close to the folded edge.

So you now have a suuuper long pillow case. The next step is to top stitch lines to create separate sleeves for the pillows.
Turn your pillow right side out and press. With your fabric pen mark every 17 inches and draw vertical lines.

*HINT – Since you are working with a long piece of fabric, you want to sew closer to the right side and let the fabric hang off the left side of the machine. So measure 17 inches from the right and draw one line, then flip your cover over and repeat. For the center line, you can sew on either side of the cover since the fabric is the same length on either side.
Make sure to pin the two layers of your fabric together before sewing to they don’t slip. Stitch along the lines that you drew and reinforce the stitching at the opening by backstitching several times. Since the opening will receive the most stress, you want to make sure this stitching does not come undone!
And that’s it! You can stop here with the sewing, stuff your pillows and be done!
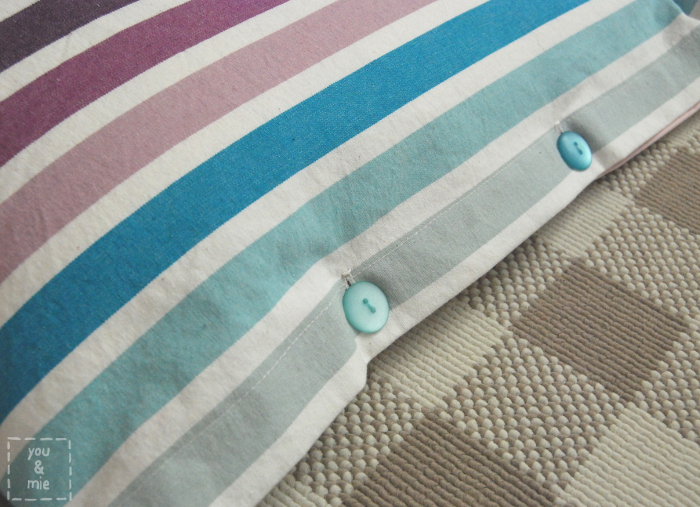
If you want to add buttons along the edge to fully enclose the pillows, then there are just a few more steps.

Measure and mark where you want your buttonholes to be. Since each opening is 17 inches, I measured 5.5 inches in from each side.

Repeat for all 4 openings and sew your buttonholes. To figure out where to sew on your button, cut your buttonhole open and use your fabric pen to mark the center of your hole on the fabric underneath it. Sew eight buttons on the inside of your cover and you’re done!
Stuff it with pillows and enjoy!


It’s easy to remove the pillows and throw the cover in the wash, or switch out for new pillows if you need. I know this will get so much use for years to come.
We still have a lot of work to do to finish the girls’ room, but we got this nook finished and it really felt like a mini victory! Gotta celebrate those too, right!?

And this. *sigh* These two are adorable together. Yuki insisted that her sister be in the photos with her. Love it!
Now onto the other 387 home improvement projects on my list 😛

thats a really good idea 🙂 I think I might try it
What a great idea! I will have to put this on my list, too… Thanks for sharing.
This is really cool!!! In the photographs it looks like you have some kind of wooden frame around the cushions, is that necessary to stop them shifting?
Hehe, no, that’s just part of the bed frame. I really wish it didn’t have that, makes it much harder to lounge in that area.
I will definitely try this, thank you for putting the instructions up.
I love reading your blog, your girls are beautiful and the things you make for them are lovely!
This is great! I love smart and useful projects like this. I’m adding this to my home improvement project list — which in my case is also a long list, and never seems to be quite as accomplished as my clothing project list. 🙂
Haha – I can totally relate! 🙂
Love this little nook you created! Julian has that same bed. Is Yuki already sleeping on the high version? If so, do you have any tips for helping them not fall off?
Thanks Amy! Yeah, Yuki sleeps up top and I don’t have any concerns about her falling off the bed when she’s sleeping because there is about 7.5 inches of “wall” above the mattress all the way around except for the ladder opening, so there is no way she could roll off. Getting up and down the ladder easily (and in the dark) took a little time to master, but she’s good now. When we first set up the bed, she wanted to sleep below so we threw her old crib mattress underneath to sleep on and she’d climb up top to play and sleep there maybe twice a week. We did a slow transition and now that we converted the bottom into this nook and put the crib mattress in the crib for Kaya, she sleeps up top every night and loves it 🙂 Hope this helps! Good luck!
Wonderful made!
what a fun idea. and your daugther are just too precious!
this is so cute and fun. And, of course the girls are adorable together. I just love yuki’s bangs and her blue nail polish. So posh!
Those girls!! So sweet together! I love this pillow idea, thank you 🙂
Oh I wish I had the floor space to do this (just bought a non bunk style new bed for the bigger kid). it looks fantastic!
And there is nothing more adorable than a small can’t-quite-sit-yet baby propped up being read to by her big sister who probably can’t quite read yet! Very cute!
Hahaha – yes, it’s a little ridiculous, but Yuki IS very good at telling stories and she has several of her books pretty well memorized 🙂 And her sweet baby sister is just captivated by everything she does!
Pingback: Tutorial: Kid’s folding floor cushion | Sewing | CraftGossip.com
I love it!! I’ve linked to your tutorial on Craft Gossip: http://sewing.craftgossip.com/tutorial-kids-folding-floor-cushion/2014/02/22
–Anne
Thanks Anne!!
Reblogged this on heArtsonnet blog and commented:
Beautiful creative affordable DIY cozy comfort home decor project ❤
this is so great! i will definitely try this! we are trying different DIY’s on our blog http://www.featherandmane.wordpress.com. just starting, but would love for you to have a look
I love this project! And your little girls are just so precious together! I was thinking of this being made longer for an adult size(maybe adding another pillow or two?) or do you think that would be too cumbersome?
I think it could definitely be done! 5 pillows would probably be a great length. It would be a lot of fabric to deal with when sewing, but certainly not impossible – I say go for it!
Love the first photo. Your kids look so adorable!
Love those cute girls snuggling! Pinned this project.
so clever, wish i was more artistic. a colleague of mine has been making sundresses for children in The Gambia, from old pillow cases. See her creations on my blog called Someone Else’s Shoes – http://www.someoneelsesshoesblog.com
This is great, Cherie!! Adorable photos and I might make one as a gift for my sister; they’ve got a massive playroom in need of some comfy reading nook seating. Shhhhh don’t tell her. 😉
So great! My kids need not see this because I def don’t have time for them to be begging for one right now. Hahaha
This is brilliant! I am in the process of building a window seat, and one of these would look fabulous on it! Thanks so much for the DIY 🙂
Pingback: Cuscinone per angolo lettura | Milena crea
Hi would like to ask where did u get the chest drawer frm? Issit frm ikea? Its really nice setting there. And ur design of cushion is a great idea!
Thanks! They are from Ikea, I think it’s called Stuva? It’s so nice and compact 🙂
I’ve been thinking of doing an easy “mattress” for my deck chair (which can be opened flat and turned into a sort of bed) and i had thought of something like that, but I never made it because i didn’t quite have the final idea. And this is just it!!! Thanks for sharing! I’ll be sure to mention you as my inspiration source when I show my folding cushion.
This is the best and easiest explanation of this project I have ever seen! I’m deleting the one I have saved and replacing it with yours! And I must say that last picture of the children, each with a hand on the book, is absolutely precious!
Thanks for sharing the tutorial. Wonderful idea.
I’m sooooooo happy I found this! We have two these beds for each of our kids! I love the under space but a lot of it is “unused” so I been wanting floor pillows or something similar to create a lounging area! Thanks so much for this plan!
Pingback: 52 Pillows - #39 - Outdoor Grouping - TiffinyDesigns
Pingback: Handmade Holidays Nov. 30: Gifts for Kids | Sew Mama Sew | Outstanding sewing, quilting, and needlework tutorials since 2005.
Pingback: Folding Floor Cushion Tutorial | Go To Sew
Pingback: Favorites from 2014 | you and mie
Pingback: 20 Amazing DIY Poufs & Pillows - Little Red WindowLittle Red Window
Pingback: 13 Cool Floor Seating Ideas You Will Surely Love | Interior Design Blogs
Where did you get the cute fabric from?
It was from Ikea, but from over 3 years ago . . .
How simple! My niece wants me to make floor pillows for her two girls and all the other nieces and nephews for Christmas–eight total! I may have to do this one. Thanks for sharing.
Pingback: 13 cosy reading nooks for bookworms | Mum's Grapevine
Pingback: Folding Floor Cushion {tutorial} - Plushie Patterns
Pingback: 10+ DIY Giant Floor Pillows
Pingback: 15 Awesome DIY Floor Cushions and Pillows – Cool DIYs
Pingback: 7 Comfy DIY Giant Floor Pillows – Cool DIYs
Pingback: 22 Easy DIY Giant Floor Pillows and Cushions That Are Fun And Relaxing - DIY & Crafts
Pingback: besten dekorations ideen 13 stilvolle und super bequeme DIY riesige Bodenkissen - besten dekorations ideen
Pingback: 12 Ideas to Adding a Fun Reading Nook for Children – LittleProjectforKid
Pingback: 10 Weird Ways Bed Pillows Can Solve Your Problems – PushUP24
Pingback: How to Create a 'Yes Space' Outdoors (When You Don't Have a Yard) - Janet Lansbury
Pingback: How to Create a 'Yes Space' Outdoors (When You Don't Have a Yard) |
Pingback: DIY Floor Pillows - The Scrap Shoppe
Pingback: MHCT&M: DIY Floor Pillows to Sew – A Glimpse Inside
Pingback: How to Create a ‘Yes Space’ Outdoors (When You Don’t Have a Yard) | Finding Miracle
Pingback: DIY Un matelas dans une chambre d'enfants. (Floorcushion) (youandmie.com/...) - Best Mattresses and Reviews
Pingback: Floor Cushion From Pillows (aka pillow mattress) youandmie.com/… | 1000 – Modern
Pingback: Folding Floor Cushion {tutorial} – Modern
Love it! My almost 16-year-old daughter really likes Korean and Japanese cultures! She’s creating a Japanese style lounge area in her room. We are going to use your project to create cozy seating for her and her friends!
Pingback: Kids’ Reading Nook Ideas That Will Knock You Off Your Feet
Pingback: 5 DIY Floor Cushions to Sew - Sewing With Scraps