The Sweetheart Dress is a pattern I’ve had my eye on for a long time, and what better time to sew one up than just in time for Valentine’s Day!? What, you may ask, is so “sweetheart” about this dress?
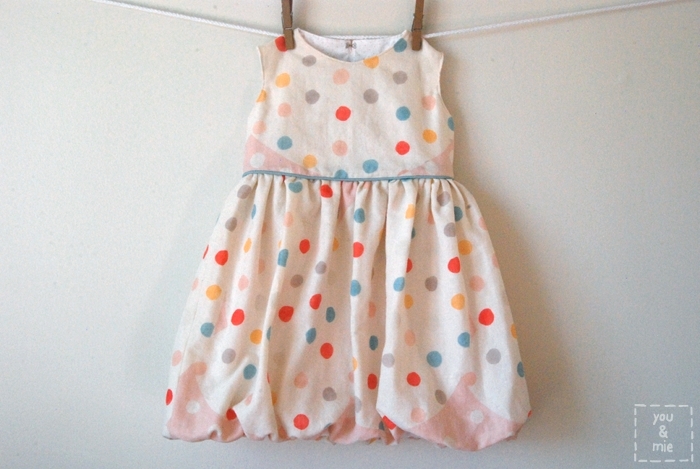
 Well what is NOT sweetheart about this dress? It’s seriously adorable from the front and then BAM! – that heart cutout in the back is just pure sweetness!
The Sweetheart Dress pattern is designed by the super kind and talented Shannon of luvinthemommyhood. If you ever go around her blog, you know that she is such a warm person and not only does she sew, but she’s a crazy amazing knitter too!
This pattern is a relatively quick sew, probably appropriate for an intermediate beginner. It is a PDF pattern, so you can download it to your computer and print it out at home. The pattern has very few pieces to cut and none that have to be taped together, so that made things even simpler and quicker!
 The way Shannon instructs you to construct the bodice was completely new to me. I like learning new and different ways to do things. Though I have to say, I had some trouble getting my arm holes top stitched nicely and looking clean. It’s probably my least favorite part of the dress (I know you probably can’t tell from here, but if you looked close up, you’d see some slightly wonky stitching).

There are a couple of modifications I made to the pattern. The most obvious change was making it into a bubble dress! I know bubble hems have been popular for a long time now, but I never really had any desire to make one until I saw this dress by An of StraightGrain (she has a free pattern for a bubble skirt)! After I saw the Sweetheart Dress pattern and picked the fabric, it seemed like it was just begging to be a bubble dress! I’ll explain more about how I did it below.
The other things I did differently was to sew the skirt to the outside of the bodice with piping and then I hand stitched the bodice lining to the inside of the dress. I just knew that with the double gauze fabric, it would probably look cleaner without the extra top stitched line.
 For the closure at the back of the dress, instead of doing a button with a loop, I hand stitched hook & eye closures to the inside of the dress. Great idea, in theory. It looks nice, but because the back of the dress is so open, it moves around a bit and the closures kept coming undone. Soooo, probably don’t try that one folks. I ended up adding a fabric covered button and button loop the way Shannon instructs (after these pictures were taken) – which looks just as nice. Shoulda just listened in the first place . . .
EDIT! Veronica from SewVery said that she used hook closures and it worked beautifully! You can see her dress here. Maybe I should have just used some pliers to close up the hooks a little.
 So to make my Sweetheart Dress into a bubble dress, I used An’s tutorial for reference. You’ll want to cut your main skirt piece exactly the way the Sweetheart Dress pattern instructs you to. Then you’ll need to cut a lining skirt piece.
 (like my awesome graphic?)
Basically, I cut 2 isosceles trapezoids with the following measurements. The bottom of the skirt lining was 10 inches less than my main skirt pieces. So since my main skirt piece was 29″ wide, the base of my skirt lining was 19 inches. The height was just one inch less than the height of the my main skirt. The main skirt piece was 15″, so my lining piece was 14″. The width at the top, is the same as your bodice piece, so use that for reference. Here’s what my lining pieces looked like:
 (disclaimer: these measurements worked for me, but I do not guarantee that this formula will work for other sizes. sorry!)
Once you have your pieces, sew up the dress using Shannon’s directions for the bodice and An’s directions for the bubble skirt. Pretty easy modification – super cute results!
 I made this dress in size 2T. It fits wonderfully when on, but the bodice is a bit snug getting her into it. Because of the design of the dress, I’m not sure how you can open up the bodice any deeper. Maybe place the heart cutout lower? Otherwise, it looks great on.
The fabric I used is Nani Iro Pon Pocho. It is double gauze and I loooooooooove it. I picked it up during my trip to Japan over the summer. I still have quite a bit left, so I’m excited to use it again. Doesn’t it just kinda make the dress? The only thing that I’m a little baffled by is that after washing and drying the dress, everything just looked flat and smushed (look at the very first and second photos up top – see the difference?) Is this normal? Does it have to do with the fabric? Any way to get it to fluff back up??
ANYWAYS. This dress is perfect for Valentine’s Day which is coming up SOON. And not just that, but it’s an adorable party dress, so I’m sure your little one could get plenty of use out of it all through spring and summer.
 If you’re ready to buy the pattern and sew it up right now, head over here to purchase the Sweetheart Dress.
OR if you want to try and win a copy of this pattern for FREE, Shannon is so generously offering the Sweetheart Dress pattern to THREE lucky winners.
TO ENTER: {GIVEAWAY CLOSED – find out if you’re a winner here}
- Leave a comment on this post. You can leave a comment about anything, but if want a prompt, how about: Who do you want to sew this dress for and what kind of fabric will you use?
- One entry per person.
- Winner will be picked at random.
- Open to US and International residents.
- Giveaway will be open until Sunday, February 10 at 11:59pm PST. Winners will be announced on Monday, February 11.
So go ahead and buy your fabric this weekend, then come back on Monday to see if you’re one of the winners!
 Wheeeee!
This pattern was given to me for this review. All opinions are my own.
I am an affiliate of Go To Patterns.
 I chose the
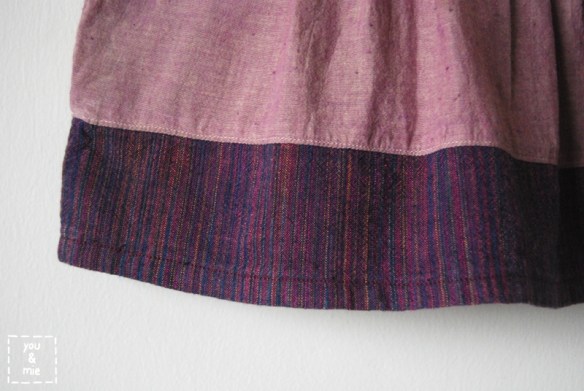
  I just think it’s adorable and I’ve thought so since I first saw the pattern come out. I love the colorblocking, the curved pieced bodice, the little cap sleeves, the pleats – I love how stylish it is, but still so appropriate for kids (
 The Maggie Mae can be made as a tunic or a dress (the version I made is the tunic) and comes with inseam pockets and buttons in the back.
  This project is a good intermediate beginner pattern. The construction is fairly simple even with the curved bodice piecing. You’ll have to do some pleating and of course buttonholes, but if are comfortable with those things, you can sew one of these up in a snap. Despite that, this project was a little bit of a nightmare for me to sew up (at no fault of the pattern – purely my own stupidity). I just wanted to share the story with you so you know that I have really bad sewing days too. Because this pattern is pretty simple, I was excited to get it done quickly. Well I was finishing an edge with my serger, which I’m still learning how to use, when a corner of the bodice was gobbled up into the serger with the slicing blade on, so SNIP! Off goes a small corner of the bodice. 😦 Then, it literally took me forever to get my pleats looking good – centered, evenly sized and spaced. Unfortunately, there are no pleat markings on the pattern, so you have to figure it out yourself and I don’t know why it took me so long – but I must have pleated, pinned, basted and torn them out 5 times before I got it just right. When I was just about done, I accidentally hemmed the tunic up in a thread that stood out a lot more than I expected and I didn’t like it. As I was tearing the hem out with a seam ripper to do over, I tore a small hole in the front of the dress at the hem line. WTF – is this project trying to kill me!? Have you ever had a project like that? Where everything goes wrong? And to top it all off, I had meant to make this a dress and didn’t realize until I put it on my daughter and her booty was hanging out the bottom that I had used the tunic measurements instead!!! Haha, seriously, I was having issues that day. BUT, despite all that, I still looooooove the way it came out. So all of that to say, even if you’re a complete knuckle head like me, you can still make this adorable top/dress (just make sure you’re reading the appropriate measurements off the chart depending on whether you want to make a skirt or a tunic).
  I made the size 2T for my 2 year old and it fits her pretty well. The only thing that I would change if I make it again (and I’m sure I will), is to lengthen the top bodice piece just a little bit to make the armhole a little roomier. It fits her just perfectly, if not a little snug there. Otherwise, the sizing seemed just right.
  I love that there are sooooooo many possibilities with this dress depending on what coordinating fabrics you choose. I’m already dreaming up combinations for the next one. What colors/prints would you choose? Well lucky for you, you have a chance to win an amazing giveaway prize and trust me, you’re gonna want to win this. {CLOSED}