Franklin Dress by Brooklyn Pattern Co.

Franklin Dress by you & mie

Recently, I was contacted by Erin, the designer behind Brooklyn Pattern Company, to review her debut pattern.  Erin had worked as a pattern maker and draper for 15 years on Broadway, and in the ballet, theater and circus.  After the birth of her second child, she launched her new indie sewing pattern company and the Franklin Dress for kids is her first pattern.

I have to admit, when I first got the email from Erin, I was hesitant to accept the offer.  I’m all about promoting indie designers, but I’ve sewn patterns from many people and companies, and some of them are just not very good and have been frustrating to sew (and blog about).  So knowing that this was her first pattern, I was worried about the quality and that I may not have a positive experience.  But I liked the style of the dress and after taking a look at her website, (I was drawn to the clean design), and skimming through her professional looking pattern, I decided to give it a go.  And I’m glad that I did!  It turned out to be a fun project that gave me just the break I needed from my crazy Halloween costume to do list. Continue reading

Advertisement

A Joey Dress

**I just heard that Toni is having a HUGE sale on all Make it Perfect patterns – 50% off!  You’ve got about a day left to take advantage of the sale!**

Joey Dress by you & mie

Awhile back, Toni of Make it Perfect contacted me and asked if I wanted to try out one of her new patterns, the Joey dress for girls.  I dunno if you’ve noticed, but Yuki is aaaaall about the knit dresses so I was excited to add another knit dress pattern to my collection – and this one is so cute!  I love that kangaroo pocket and the different sleeve lengths, making this pattern great for all seasons. Continue reading

Alder Shirtdress for All the Seasons

Plaid Alder Shirtdress by you & mie

Happy Saturday!  This past week has been Selfish Sewing Week, a week to focus your sewing energy on things for yourself!  I love this idea, because though I have a huge list of things I’d love to sew for myself, those things usually get pushed aside to make things for the kids.  This year Rachael of Imagine Gnats invited me to be a Featured Stitcher for Selfish Sewing Week which was great because, honestly, if she hadn’t, I probably wouldn’t have sewn anything for me!  I had also just bought the latest Grainline Studio pattern, the Alder Shirtdress and needed the push to actually make it instead of joining the epic “to do” pile. Continue reading

Cosi Swimsuits For Two!

Besides the summery “Elsa” dress, I made 6 other garments for the girls before our trip to Florida and they are all MATCHING outfits (3 things for each girl)!  Haha.  Didn’t really think that I was the type to go all crazy with matching sibling outfits, but I can’t help it – it’s just too cute!  I hadn’t made anything matching since their panda shirts, but Yuki really gets a kick out of it, and whenever she’s wearing her outfit, she usually wants Kaya to put on hers too.

Cosi Swimsuits for Two by you & mie

Anyways, these projects are also exciting to me because they are SWIMSUITS.  I don’t know about you, but sewing swimsuits has been on a different level of sewing in my head.  Something a little more intimidating than regular kids clothes, it just seemed complicated and tricky.  The fabric, the elastic, the fit . . . I was nervous to try it, but since I love learning new skills, I was also really excited to try it.

Continue reading

Color Blocked Soleil Dress

Color Blocked Soleil Dress // you & mie
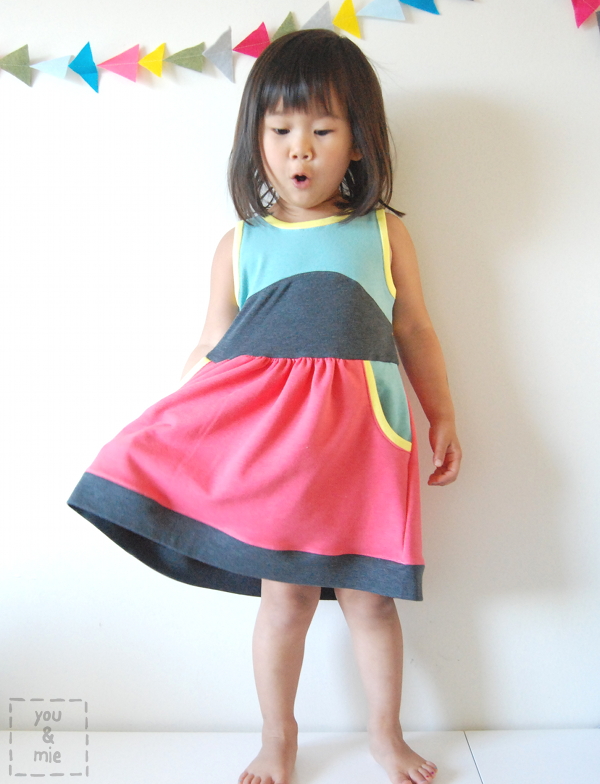
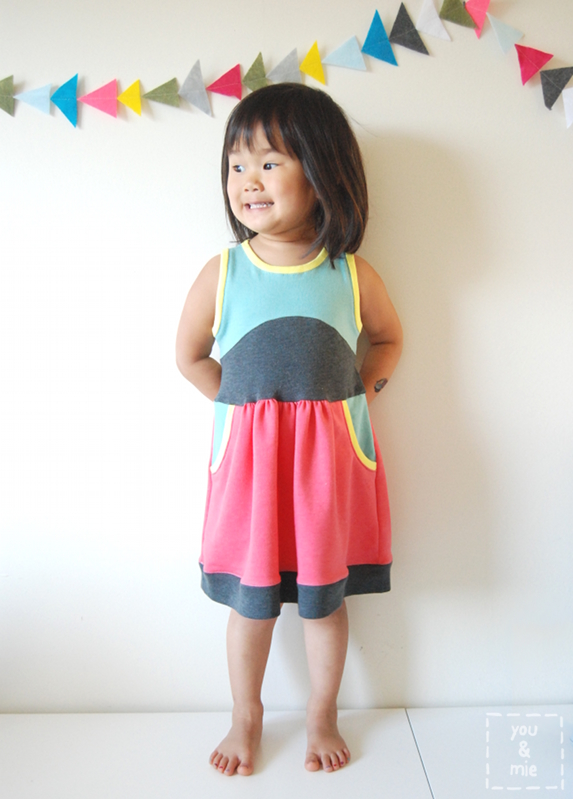
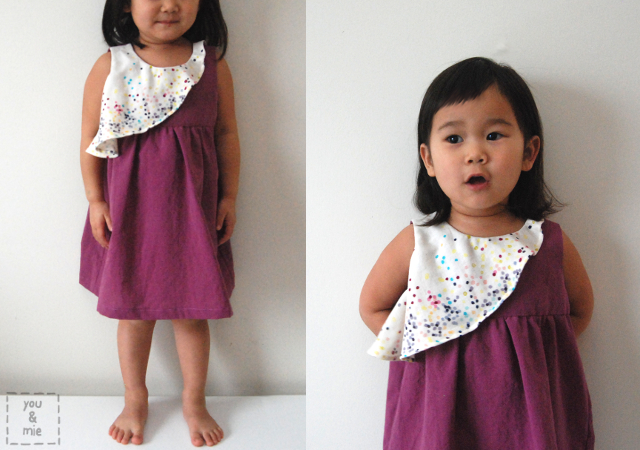
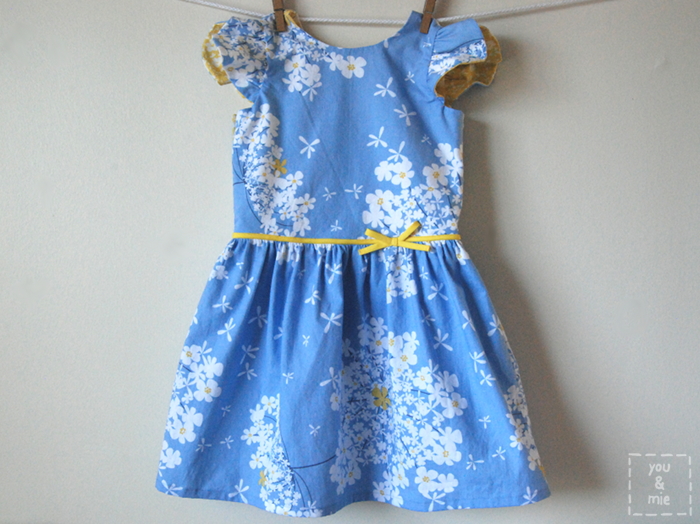
A month or two ago, I would have said that another dress is the last thing this girl needs.  But recently, she’s been choosing dresses more often, especially the knit ones, and she was thrilled to add this one to her wardrobe.  She already wore it on Monday and asked me if she could wear it again today (but it was in the laundry).  The pattern is the Soleil Dress by Selvage Designs/Lauren Dahl.

Color Blocked Soleil Dress // you & mie

A few things that I love about the pattern . . .

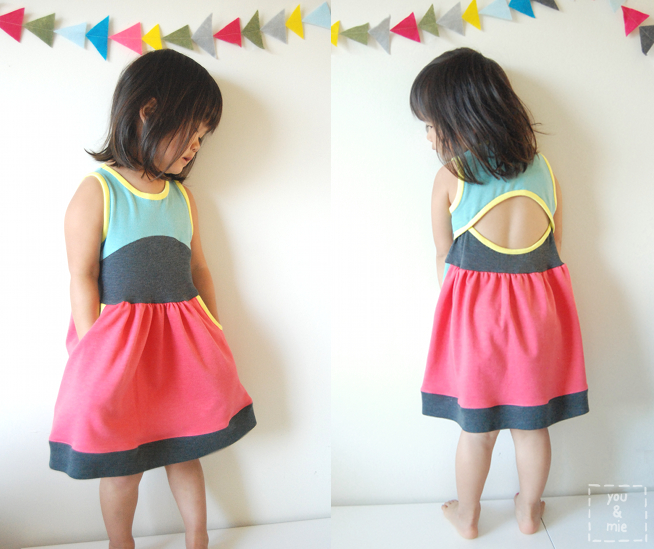
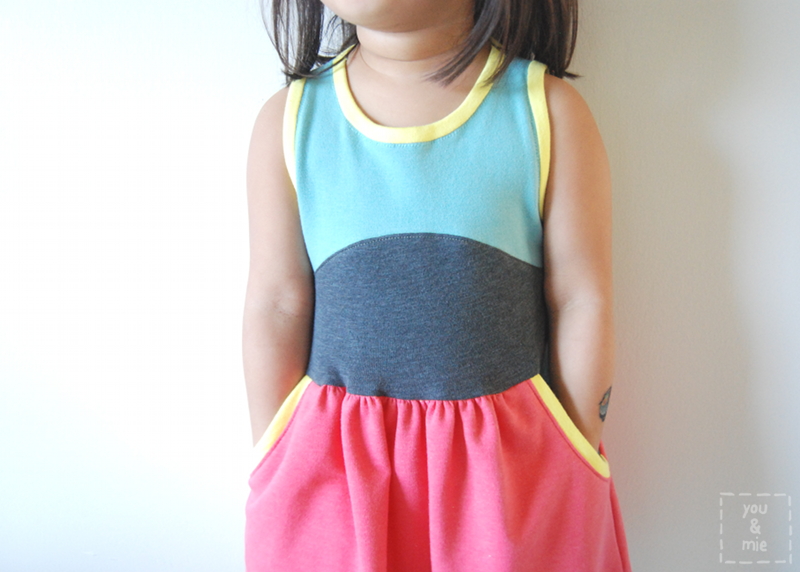
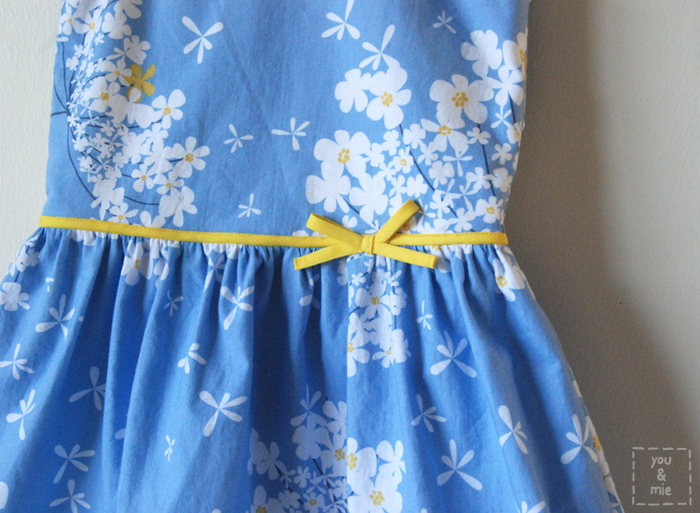
The design.  I think the dress is adorable.  I love that it’s knit – comfy and easy for my daughter to put on and take off herself.  I think the cut-out back is cute and unique (though a closed back option is also available).  I love the contrast binding and the opportunity to play with different fabrics in one dress.  I just think that this dress is perfect for the summer!  Just remember to put sunblock on your kid’s back if they’ve got the cut-out!

The pattern itself.  Lauren has recently released an online course called Pattern Workshop to teach people how to create PDF patterns.  So I was very curious to see how her pattern was – ya know, being a teacher and all, I would hope it was good.  Well, it’s good.  It’s quite beautiful, actually.  It’s super clear and organized and easy to look at.  The charts are neat, the diagrams are neat, the pages print neatly and all the pieces fit together neatly.  It’s just kind of a sigh of relief for someone who’s a bit anal, like me.  And though I didn’t try it, apparently the pattern comes in layers so you can print out just the size you want!  So you don’t have to carefully track which dotted-dashed line or shade of blue is the one in your size.  It’s all explained in the directions.  If only I had bothered to read those beforehand . . .

The size range.  The pattern starts at 12 mo. and goes all the way up to 12.  That’s a HUGE range.  This pattern will last you forever.

Color Blocked Soleil Dress // you & mie

I made a few modifications to the pattern to add some extra color blocking.  First I took the front bodice pattern piece and drew a curved line that mimics the curve in the back.  Then I cut the pattern in two and added a 1/4 inch seam allowance to attach the two pieces.  I also added a band along the bottom because I didn’t have enough of the pink fabric for the length I wanted.  Adding the band also means no hemming!  Bonus.  Unfortunately, the band was a little short and I had to stretch it to fit the bottom of the skirt, so you may notice it’s narrower than the skirt.  Oh wells.

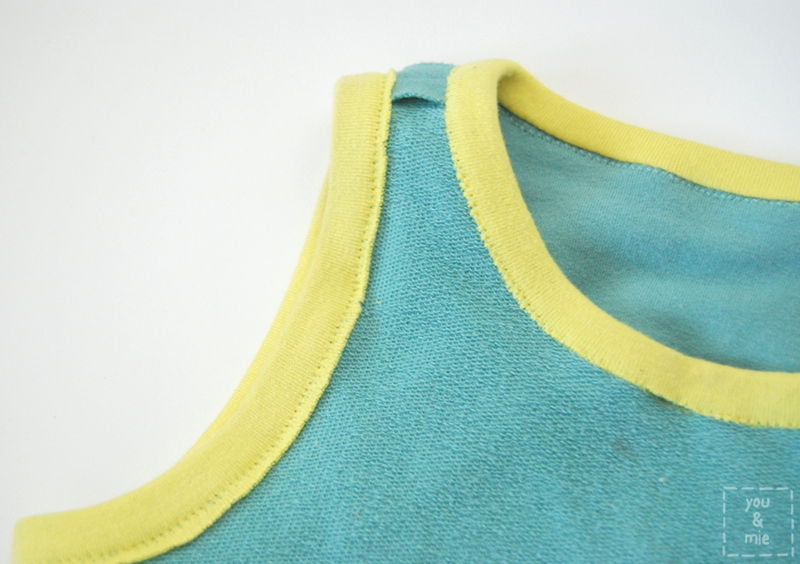
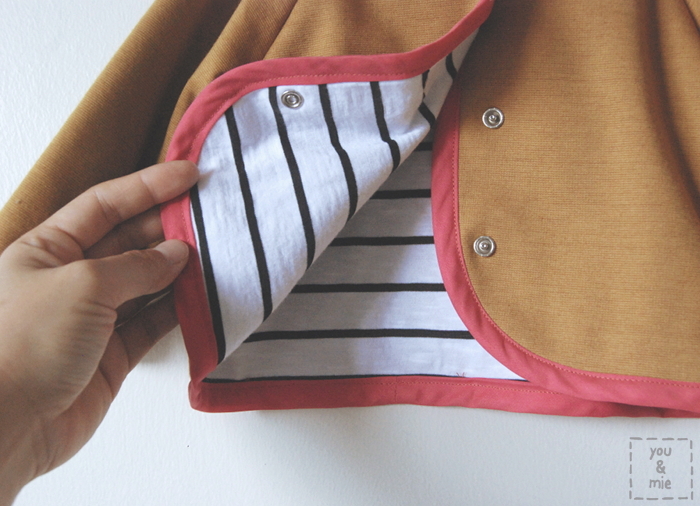
I also used a regular knit jersey fabric for the binding instead of the ribbing or fold over elastic that is recommended.  This was a little bit of a gamble, but I stretched it a lot while sewing to make sure that it would not be saggy.  It worked pretty well and think it’s fine for this dress, but I don’t think it has as much elasticity as the recommended fabrics, so I’d probably stick with those for future dresses.

Color Blocked Soleil Dress // you & mie

A couple of extra notes . . .

The directions in the pattern are clear, but in some places I feel like they are a little brief.  I guess I’m the kind of person who likes thorough descriptions and if you’re a beginner, there isn’t a lot of hand holding.  I think this pattern can be for beginners, but if you’ve never sewn with knits before, be sure to read up on some of the great knit tutorials available online first for helpful tips on how to sew with knits.

*SEE ADDED SECTION BELOW!*
The tricky part for me, was attaching the binding to the wrong side of the dress.  This may have had something to do with the fact that I used jersey instead of the recommended fabrics, I’m not really sure, but when I flipped my binding to the wrong side of the garment and top stitched below the binding like directed, I had a really hard time catching the fabric, even when pulling it quite a bit.  I’m thinking that what happened is that when I stretched the binding, it lost some of it’s width, making it harder to wrap around.

Color Blocked Soleil Dress // you & mie

So you can see in the picture above, the neckline just barely was caught by the top stitching line and in some places didn’t make it at all, so there are a few places where it’s not attached.  I tried a couple of times and then gave up.  I’m hoping those sections are small enough that they won’t make a difference.  So when I did the armholes, I made my binding wider by 1/2 an inch and then trimmed it after sewing.  I’m curious if anyone else had this problem, or if it was just me.

*AHHH!  I did this step wrong!!  Heidi kindly explained to me that I was supposed to fold the binding in half lengthwise (this part is stated in the pattern) and then sew the folded binding, with both raw edges to the edge of the dress and then flip that open and sew the seam allowance down.  THIS CHANGES EVERYTHING.  I went back to the pattern and honestly, it’s kind of unclear the correct way to do it, since the directions are minimal, but I I’m pretty sure Heidi is right.  The reason why this changes everything is because I’m actually missing about a half an inch of fabric on all edges (arm, neck and back cut-out) since I enclosed the seam allowance in the binding instead of adding width of the binding, if that makes sense.  I really wish I had done it the correct way!  Well, now you know . . .

Color Blocked Soleil Dress // you & mie

This is what I got when I asked for a smile.  Despite her lack of enthusiasm for modeling, she really does love this dress.  When I asked what her favorite part was she said, “the pink and yellow and all the colors” and “the back pocket” which of course is the cut-out that she kept trying to stick her hand through.  Yeah, didn’t get any pictures of that unfortunately.  I think she loves that it’s knit and comfy and those pockets!  Who doesn’t love deep pockets!?  She actually tried to smuggle about a million mini hair rubber bands to school that day, so I suppose I don’t love deep pockets. 😛

I think this pattern would be fun to hack into a bathing suit or leotard! Maybe a future project??

Thanks Lauren for providing me with this pattern to review!  And if you’re interested in seeing other versions of this dress, Lauren has been doing round ups of Soleil dresses being made by other bloggers and you can find them on her blog.

And don’t forget to enter the giveaways currently open.  You have until Friday evening!
Four Seasons Pillow Cover Giveaway
Quilter’s Delight Fabric Bundle Giveaway

Lullaby Layette Summery Bodysuit

Oliver + S Lullaby Layette Summer Bodysuit // by you & mie

I’m back with another project from the new Oliver + S Lullaby Layette Pattern Set!  This time I made the bodysuit (View A) and went in a totally different direction from the cozy jacket in modern colors.  I really wanted to make something sweet, vintage-inspired and summery for the upcoming months.  Before you ask, no, the ruffle sleeves are not part of the pattern, BUT I have a tutorial for those coming up next week!  They are really quite simple and can be added to pretty much any bodice pattern.

Oliver + S Lullaby Layette Summer Bodysuit // by you & mie

But back to this sweet number . . . the bodysuit features a snap placket at the neckline and also at the bottom for easy diaper changes.  It has a cute pleat in the front and back and elasticized leg openings.

Oliver + S Lullaby Layette Summer Bodysuit // by you & mie

The bodysuit is really cute alone because it is quite roomy at the bottom.  But you can easily pull pants over it as well and let the extra fabric hang over the pants like a top.  Or, if you prefer it, this same pattern can be made as a top.  And it has short and long sleeve options.  Before I made this bodysuit, I actually made the shirt version (View B), but because of a poor fabric choice on my part, it didn’t come out that great.  More on that later . . .

I don’t think I really need to say much about the quality of the pattern, do I?  You all already know how awesome Oliver + S patterns are, right?  Ok, good.  I’ll just leave it at that.

Oliver + S Lullaby Layette Summer Bodysuit // by you & mie

Besides the ruffle sleeves that I added, there were a few other changes I made.  Remember how I mentioned I had some difficulty attaching the snaps to the jacket?  Well, this pattern called for snaps at the neck and bottom and while it would have been totally doable, I wanted to test out some other options for those who prefer to avoid snaps.

Oliver + S Lullaby Layette Summer Bodysuit // by you & mie

For the front closure, I decided to add buttons instead of snaps.  My machine makes pretty neat buttonholes, so this was an easy option for me.  Another option, which I tried for the first shirt I made, was to simply sew the bottom portion of the placket closed.  I wanted to leave enough room for baby’s head to fit through, but not leave the shirt hanging wide open.  So I measured how far up the placket I should sew shut (by testing it on my baby) and left just a few inches open at the top.  Easy to do and easy to put on – nothing to open or close!

Oliver + S Lullaby Layette Summer Bodysuit // by you & mie


For the bottom of the bodysuit, snaps are really a must.  So I sewed on a strip of this twill tape that already has snaps attached to it.  You can find it at most fabric stores – I bought mine at Jo-Ann.  If I remember correctly, it’s a bit expensive, but definitely comes in handy when you don’t want to attach your own snaps.  I also think it was a good choice for this particular fabric, which even with interfacing, is very thin and delicate.

Oliver + S Lullaby Layette Summer Bodysuit // by you & mie


The fabric is a very lightweight swiss dot cotton that I bought at Discount Fabrics.  I originally bought it to make myself a Staple Dress, which I almost finished, but abandoned because I didn’t think it was very flattering on me.  I found the unfinished dress recently and I think with a few modifications, it might work, so maybe I’ll try and work on that for the spring.  But I had enough left in my stash for this little number.  And I think it’s perfect!

The fabric is so thin that it is a little sheer.  Perfect for hot weather and appropriate for babies, since they don’t really have to worry much about modesty.  Because it’s so thin, it’s very comfortable.  The problem with the first shirt that I made was that I had used a quilting cotton that was a bit too stiff for a baby’s shirt.  I would recommend sticking with lightweight fabrics and knits, especially for the wee littlest ones.  I also chose a crazy print that ended up looking kind of like a miniature bad Hawaiian shirt.  😛

Oliver + S Lullaby Layette Summer Bodysuit // by you & mie


This is pretty much how Kaya felt about the photo shoot.

The only thing I would do differently next time is add a little length to the elastic for the leg openings.  It’s hugging Kaya’s chubby thigh already and otherwise she’d be able to fit into this for awhile.  And she’s not even a particularly chubby baby!  Oh, I made the 3-6 mo. size again and it’s perfect.

Oh, I can’t wait to hit the beach and park with this cutie in her new bodysuit!  And us lucky ducks in California don’t really have to wait any longer.  Today was gorgeous and in the mid-70s!

Ok, so next week I’ll have the tutorial for the ruffle sleeve, so look out for that!  And until then, have you seen the other two new Oliver + S patterns?  There’s the Garden Party Dress + Blouse which three of my bloggy buddies all made – check out Kristin’s, Gail’s and Jessica’s.  And then, my favorite of the new patterns, is the Hide-and-Seek Dress + Tunic.  Can’t wait to sew that one up!  What’s your favorite?

*This pattern was generously given to me for this review, but all opinions are, as always, 100% my own.*

Lullaby Layette Baby Jacket

Oliver + S Lullaby Layette Jacket // by you & mie

Did you hear?  The new Oliver + S spring patterns have been released!  There are two adorable spring dresses/tops, and a baby/toddler layette pattern set.  I’m so excited to help roll out these patterns by sharing a couple of things I made.  I looove the dresses, but was eager to give the Lullaby Layette patterns a try first.  The set comes with 4 views – a bodysuit, a shirt, pants and a jacket and covers sizes 0-24 months.

Oliver + S Lullaby Layette Jacket // by you & mie

The first thing I made was the raglan style, reversible jacket (View D).  I’m always looking for cute outerwear for Kaya.  She’s got plenty of onesies, but it can get chilly in all seasons around here, so a jacket is always a must.  The pattern calls for wovens, but says knits can be used too.  So I definitely wanted to give the knits a try – it just seems like it’d be warm and cozy.

I made size 3-6 months for Kaya who is approaching 6 months.  I debated whether I should go with the 6-12 month size for longer wear, but the smaller size still has plenty of room to grow.

Oliver + S Lullaby Layette Jacket // by you & mie

The pattern, as you can expect from all Oliver + S patterns, is wonderful.  I love the glossary of sewing techniques that they include at the beginning of every pattern – you can learn a lot just by reading that part alone!  But then this set includes 3 separate patterns (one that can be made in 2 ways) and each has well written directions with great diagrams.  You always get really professional quality clothes when you use O+S patterns and you learn a ton of great sewing skills.

The construction of this jacket is pretty simple and it comes together quickly.  It is raglan style, with a simple pleat in the shoulder.  You make the jacket and the lining in the exact same way and then attach them together (in a seemingly) seamlessly way that doesn’t require any flipping inside out and hand stitching closed.  The hardest part of the whole process was attaching the snaps.  I had a helluva time with them, until I realized I was doing it wrong.  Once I figured it out it went a little better, but I had one fall off after I thought I was all done.  I used the “Easy Attacher” (affiliate link) which actually helped a lot, but Kristin said that the snap fastener pliers (affiliate link) are even better.

Oliver + S Lullaby Layette Jacket // by you & mie

One of my goals for 2014 was to try use more fabric from my stash, and though I haven’t stopped buying new fabric completely, I am trying to search through what I have before I buy more fabric and notions.  And it’s been fun finding old fabrics and giving them new life when paired with something unexpected.  Both this jacket and the bodysuit that I’ll share later this week were completely made with stuff I already had at home!  Yay me!  😛

Oliver + S Lullaby Layette Jacket // by you & mie

The mustard knit is from Stonemountain and Daughter in Berkeley and I bought it awhile back to make Yuki a cardigan.  I cut it out and everything, but it never got made.  I don’t even know what happened to those pieces, but hopefully I’ll find them again in time for Kaya to wear.  Anyways, there was enough fabric left to cut out this jacket!  It seemed perfect for baby outerwear – a sturdier, thicker knit, but still had some stretch.  Someone on Instagram asked me if it was “ponte,” and I don’t actually know what that is!  But I looked it up online and the description seems to match pretty closely.  Anyone else have a guess?

Oliver + S Lullaby Layette Jacket // by you & mie

The other side is a white/black striped knit that I’ve also had forever and used for the shirt in this outfit.  It’s pretty thin, so it was nice to be able to pair it with the thicker mustard knit.  And the pink bias tape was originally going to be used to bind a baby blanket/quilt that never happened.  I do love this kinda funky and modern combination of colors.

Oliver + S Lullaby Layette Jacket // by you & mie

So now Yuki – eek, Kaya!  I honestly just typed Yuki’s name.  Do you guys mix up your kids names all the time too!?  Anyways, Kaya has a new jacket for this transition into spring.  Oh and yes, spring!  It’s coming, can you feel it!?  Soooo exciting!

I’ll be back with a truly springy/summery bodysuit for Kaya later this week.  What are you sewing for the spring?

*This pattern was generously given to me for this review, but all opinions are, as always, 100% my own.*

Figgy’s Ethereal Dress

EtherealDress1

Have you seen the new Heavenly Collection by Figgy’s?  The collection is made up of 7 super unique and stylish patterns for kids and some of them for young adults.  When Shelly contacted me about being a part of the Heavenly Tour, I jumped on board immediately.  I was drawn to the Ethereal Dress & Blouse.

EtherealDress6

And what a sweet little dress this is!  The construction is a very standard bodice with a gathered skirt – the frill is what makes it so special.  It can be made in shirt, tunic or dress length and with long sleeves, short sleeves or no sleeves.  The dress came together really easily and adding the frill was pretty straightforward.  The pattern directions were clear and easy to understand and produces such a unique little piece for your kiddo’s wardrobe.

EtherealDress3For the sleeveless and short sleeved version, the bodice is fully lined and is finished with a technique that looks great, but might be a little confusing if you’ve never done it before.  Shelly has broken it down a little bit more in this post here and Rae of Made by Rae has a fantastic video for lining a Washi dress bodice that is the same technique.  I recommend checking those out if you’ve never finished a lined bodice like the pattern instructs.  Super helpful!

EtherealDress2

And what fabric could be more ethereal than some Nani Iro double gauze??  You might recognize this Nani Iro Melody Sketch from this A-line tunic I made a couple years ago and I said it then, and I still think even now, that this is my favorite fabric ever.  I have a little bit leftover from the tunic, but not enough for a whole dress, so I used it for just the frill.  The rest of the dress is made from a really lightweight shot cotton that I used on a dress for Sanae’s daughter for the clothing swap last year.  I love these fabrics together – both so airy and soft, yet  clean and crisp.

EtherealDress4

*Edited – I wanted to mention that I decided to do some understitching along part of the front neckline.  Understitching is a line of stitching attaching the bodice lining or facing to the seam allowance and prevents the lining/facing from rolling up and becoming visible.  This helps give any garment a clean and polished look and was especially important here since the bodice and the frill are different fabrics.  Without the understitching, the bodice lining was rolling up and I could see it at the neckline.*

I’ve found that Figgy’s patterns run pretty large, so be sure to check the size chart and not just choose the size by the kid’s age.  I made the 18 month size for my 3 and a half year old and made the “full length” dress version but shortened it by a few inches.  It fits great and the bodice even has a little room for her to grow into!

The back has an opening with a button and loop closure.  So simple and so sweet!

EtherealDress5

The Ethereal Dress & Blouse pattern can be purchased individually or with the entire collection.  I like a lot of the patterns in the collection, but I definitely want to sew up the Stellar Tunic/Dress next!

Shelly is also hosting a huge giveaway on the Figgy’s blog with the prize including fabric, sewing supplies and the entire Heavenly pattern collection.  Check out all the details and entry information here!

Thanks for stopping by and be sure to visit the other stops on the Heavenly Pattern Tour throughout the month of February.

Can you believe Valentine’s Day is this week!?  Doing any special sewing for the lovely holiday?

*This pattern was generously given to me for this review, but all opinions are, as always, 100% my own.*

KCW Day 5 – Burnout Raglan Tee

Ok, so technically today is Day 6, but this tee was made mostly on Day 4 and finished and photographed yesterday, so we’re calling it Day 5, ok?  OK!

BurnoutRaglan1

The pattern is the Oliver + S Field Trip Raglan T-shirt which is now available as an individual PDF pattern!  I’ve had my eye on this raglan shirt pattern for awhile, but couldn’t fork over the cash for the set, knowing I’d probably never make the cargo pants.  But Oliver + S have started offering some of their basic pieces as separates!  And a good raglan pattern seems like a staple for any collection.  This one doesn’t disappoint and I already have several ideas for more raglans and remixes that I can’t wait to try.

BurnoutRaglan4

I made the shirt in size 3T and it is a little large for Yuki, which isn’t much of a surprise considering her petite size.  I probably could have gone down a size, but this is great because I know it’ll fit her for awhile.  It’s definitely a looser fitting shirt than the Flashback Skinny Tee, which, of course, is supposed to be a skinnier/tighter fit.  I had to shorten the sleeves a bit.

BurnoutRaglan3

The biggest adjustment I made to the pattern was adding color blocking to the sleeves.  It was super simple to do and I love the finished look.  I also decided to finish the sleeves and bottom with bands/cuffs instead of just hemming it and omitted the pocket.

BurnoutRaglan2

The main fabric is a suuuuper thin and soft heather red knit.  It’s so heathered that it looks pink.  I bought it from the remnant bin at Discount Fabrics awhile back.  I picked it out because it is really soft and comfortable, but I don’t think I realized just how thin it is.  I wasn’t sure if it’d be stable enough or opaque enough for a shirt, but it worked out fine, it just isn’t very warm.  But definitely soft and comfy.  The color blocked shoulder, neckband and arm cuffs are actually two layers.  An ever MORE suuuuuuuper thin and see through, burnout tissue knit in white on top of the heather red knit.  I don’t even know why I bought this burnout knit since it’s pretty impractical on it’s own (unless you can pull off the see through top look, which unfortunately, I cannot).  I actually had thrown it in my “get rid of” pile because I didn’t think I was going to use it, and then fished it out for this.  Turns out, it looks great layered!

BurnoutRaglan6

You can kind of see how see through the top is here, over Yuki’s striped leggings.

I knew that these knits, being as thin as they are, were going to be a bit of a challenge to sew.  In fact, they were a challenge to cut!  They are so stretchy that if you’re not really careful, your pieces can come out a little misshapen.  I tried the stretch stitch with a ballpoint needle and my walking foot, but even with all that, the fabric was getting sucked into the machine and stretched out.  I probably could have busted out the tissue paper trick and been fine, but instead I switched over to my serger and it sewed up so easily.  So I constructed the entire top using only my serger – this is my first time doing that – and I loved it!  The only time I used my sewing machine was to topstitch the neckband down with a stretch stitch.  I would have used it to hem the sleeves and bottom, but since I finished those with cuffs instead, I didn’t need it.  SO EASY.

BurnoutRaglan5

Doing a color blocked shoulder panel/sleeve is a very simple pattern adjustment, but if you’re not sure how to do it, I’ll tell ya!

First, I cut out my sleeve pattern in the appropriate size.  Then I drew a line horizontally across the sleeve where I wanted to add the contrast fabric.  My line is 1/2 an inch below the bottom of the armhole.

colorblocksleeve1

Place a piece of tracing paper on top of your sleeve pattern piece and trace the top of the pattern up to the line you created.  You’ll want to add a 1/4 inch for seam allowance.

colorblocksleeve2

On a separate piece, you’ll need to do the same for the bottom part of the sleeve.  Trace around the bottom of the sleeve up to the line you created and then add a 1/4 inch for seam allowance above the line.  Now you have your two sleeve pieces!

The first thing I did after cutting out my fabric was sew the two sleeve pieces together with a 1/4 inch seam allowance and press.  Then I followed the rest of the pattern instructions as directed!  An easy alteration that makes a pretty big statement 🙂

BurnoutRaglan7

This Oliver + S pattern, like all Oliver + S patterns, is really well written, with clear directions and diagrams and helpful tips.  I can never speak highly enough of their patterns.  They are just so reliable and . . . GOOD.  The shirt comes together really quickly and is a great first-knit-project, if you’re looking for something to get you started.  It’s a great basic for boys and girls and now that it’s offered as a separate pattern, there’s no reason NOT to get it.

So that’s a wrap for my Kids Clothes Week.  I made two things, this and the Knit Baby Vest.  Back in the day I might have tackled 6 projects, but I’m just not that same young sprightly thing I used to be!  😛  I love both of the things I made and that makes me feel happy.

How did your week go?  I haven’t actually had a chance to do much browsing of other people’s projects unfortunately, but maybe that’s what I’ll do today and tomorrow.  But if you sewed along, leave me a link to your favorite project from your week and I’ll be sure to check it out!

*This pattern was generously given to me for this review, but all opinions are 100% my own.*

Hanami Dresses and a whole lot of thanks

Hey friends!!  How are you doing?  I gotta say, I totally miss being here.  I definitely miss sewing, but I’ve been able to sneak some in here and there.  Blogging is fun because I get to share with you, hear what you’re up to, and get your feedback – I’ve been missing the community!

I celebrated Thanksgiving with my family last week and took some time to reflect on all the things I’m thankful for.  There are so so many things that I’m grateful for, I consider myself a truly lucky person.  This year I’m especially thankful for our newest addition, Kaya, and that both of our girls are so happy and healthy.  But I also wanted to take a minute to acknowledge how blessed I feel to be able to do the things that I love, like sewing and blogging, and that I get to be part of such an amazing community of inspirational and awesome people!  I’ve made such great friends here, and even to those of you who I don’t know – I appreciate you just stopping by!  This blog would be nothing without you readers.  So thank you!

Like I said, I’ve been able to get a little sewing in recently, but first I wanted to share a couple of dresses that I made back in August.  Yes, over 3 months ago.  Don’t ask me why it took so long to blog these, because I really like them!  The pattern is the Hanami Dress/Top by Straight Grain.

Hanami1

Back in July, An of Straight Grain put out a call for pattern testers and after seeing the adorable versions that she had made, I jumped at the opportunity!  The pattern comes with several variations – crossed back or invisible zipper, flutter sleeve, tulip sleeves, peter pan collar and, of course, length – either dress or top.  I love a pattern with endless possibilities!

blue hanami

I signed up to test the pattern in size 3T since Yuki was about to turn three and had recently started wearing 3T store bought shirts.  But after looking at the measurements, I knew it’d be too big, which is really no surprise because Yuki is super petite for her age.  But I went ahead and made the dress in size 3 and had a friend’s daughter try it on for the testing.  I chose the unique crossed back and tulip flutter sleeves and used Wild Carrot Blue, by Violet Craft for Michael Miller.  I picked this up from the remnant section of Britex.

The name of the pattern, Hanami, is a Japanese word meaning “flower viewing.”  In Japan it is a custom for people to gather and picnic under the blooming cherry blossoms and enjoy their short lived beauty.  It was something I got to experience when I lived there.  So with that name in mind, I couldn’t shake the image of flowers so naturally when I went to my stash to pick fabric, they both ended up being florals.

blue hanami2

I made one addition to the dress which is a bias tape “belt” around the waistline.  I just wanted to add a little contrast to the dress and thought this finished it off quite nicely.

So after I made the first dress in size 3, I really wanted one that would fit Yuki, so I made another Hanami in size 2 and it fit her perfectly.  I chose this watercolor floral fabric that I bought at Ikea awhile back and I love the way it came out!  I decided to do the regular flutter sleeves, but stuck with the crossed back that I love so much.  But do you notice anything interesting about these pictures?

Hanami2

Hanami3

She’s wearing the dress backwards!!  When I was making the dress, I was trying to be thoughtful about which parts of the fabric I was cutting for each piece, but when it was all done I realized that I liked the back better than the front.  So when I put it on Yuki I tried it on backwards to see how it’d fit her and I loved it.

Hanami4

I added a strip of thin black bias tape around the waist again for a little contrast (no bow this time) and I really like how it separates the bodice from the skirt.

Hanami5

The pattern is great.  Well written step-by-step directions with color photos for every step.  These two versions of the dress I made are very spring/summer appropriate, but if you are looking to make a holiday dress, this would be a great pattern to use as well.  In fact, if I have time, I’m hoping to make a holiday version for Yuki later this month.  If you’re interested, you can buy the pattern HERE along with An’s other great patterns.  And if you want to check out my absolute favorite Hanami of all time, see Stitched Together’s version.  You won’t regret it 🙂

I hope you are all doing well.  I’ll be back later this week to share a fun new book with a giveaway!

Miss ya!