
My second make for Kids Clothes Week was a Charlie Dress for Yuki in some beautiful new nani IRO double gauze. I love it. I really do.

My second make for Kids Clothes Week was a Charlie Dress for Yuki in some beautiful new nani IRO double gauze. I love it. I really do.

Recently, I was contacted by Erin, the designer behind Brooklyn Pattern Company, to review her debut pattern. Erin had worked as a pattern maker and draper for 15 years on Broadway, and in the ballet, theater and circus. After the birth of her second child, she launched her new indie sewing pattern company and the Franklin Dress for kids is her first pattern.
I have to admit, when I first got the email from Erin, I was hesitant to accept the offer. I’m all about promoting indie designers, but I’ve sewn patterns from many people and companies, and some of them are just not very good and have been frustrating to sew (and blog about). So knowing that this was her first pattern, I was worried about the quality and that I may not have a positive experience. But I liked the style of the dress and after taking a look at her website, (I was drawn to the clean design), and skimming through her professional looking pattern, I decided to give it a go. And I’m glad that I did! It turned out to be a fun project that gave me just the break I needed from my crazy Halloween costume to do list. Continue reading
**I just heard that Toni is having a HUGE sale on all Make it Perfect patterns – 50% off! You’ve got about a day left to take advantage of the sale!**

Awhile back, Toni of Make it Perfect contacted me and asked if I wanted to try out one of her new patterns, the Joey dress for girls. I dunno if you’ve noticed, but Yuki is aaaaall about the knit dresses so I was excited to add another knit dress pattern to my collection – and this one is so cute! I love that kangaroo pocket and the different sleeve lengths, making this pattern great for all seasons. Continue reading

A month ago, I talked about a bunch of clothes I had made a month before that, and well . . . I still haven’t blogged half of it. So two months later, but here are some dresses I made. 😛
The fabric may be familiar to you . . . it’s from Heather Ross’ Briar Rose Jersey Knits line. It came out about a year ago and it was all over the place at the time – I feel like everyone was making cute things with them! Strawberries! Knit fabric! Cute! But since I’m not one to follow the crowd (*cough* I’m actually just super lame), I decided to sew with this fabric when it’s not so popular and no longer available. Haha. Continue reading

I’m so excited to be posting as part of Melly Sews’ (30) Days of Sundresses Series for the THIRD time (see my previous tutorials here and here)! A new sundress tutorial every day this month! Keep up with them all on Melly Sews.

I’m pretty excited about sharing this project because it was one of those things that I had a vision of, but didn’t know if or how it’d work. But then it ended up exactly how I pictured it and I’m thrilled!

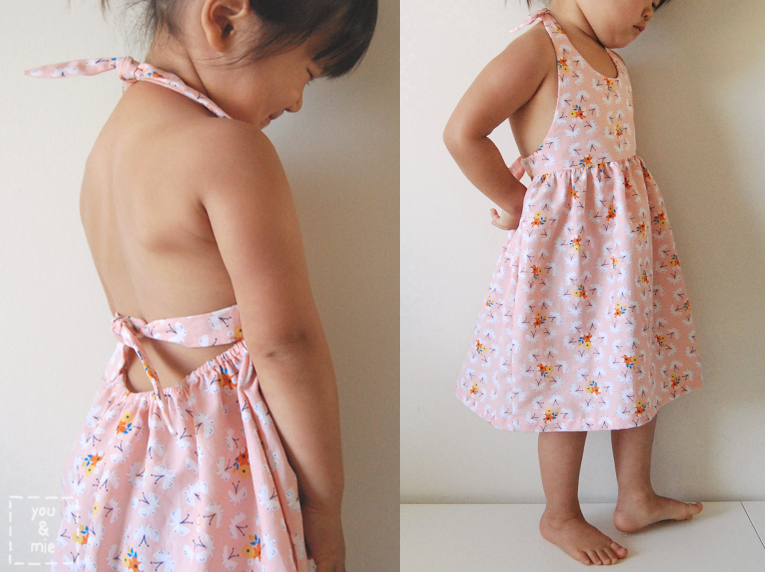
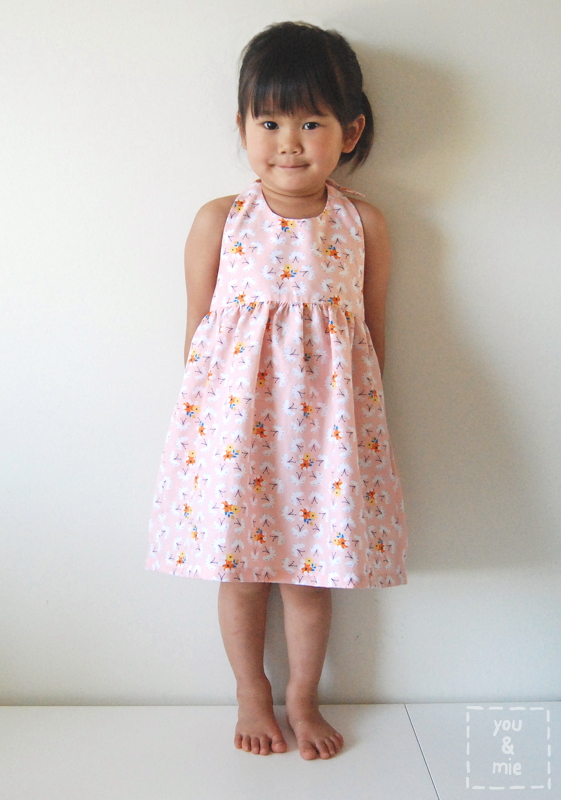
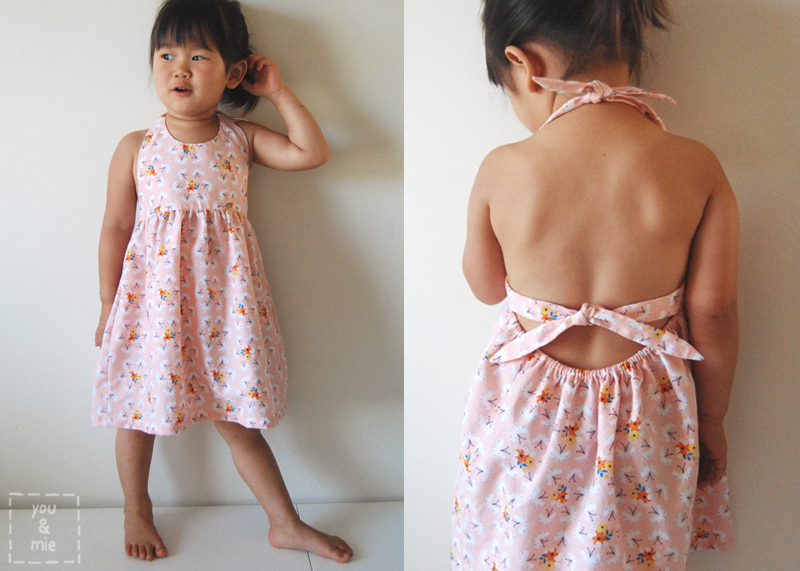
The dress is a halter-style dress with two ties in the back, a skirt that is gathered in the front and elastic in the back and, of course, pockets. It’s super summery and perfect for the beach or picnics or parties, or whatever else you’ll be up to this season! Just be sure to slather on the sunscreen because this baby shows a lot of back (but not that kind of back).

This is currently Yuki’s favorite dress and she requests to wear it as often as possible. We’ve also gotten tons of compliments on it, which is due in great part to the adorable fabric. It’s part of Cloud9’s Lotus Pond Collection by Rae Hoekstra and it’s called Fluttering Fields, which is where I got the name of the dress (thanks Rae)! I love this fabric – high quality, organic, lovely to sew and lovely to wear (I basically live in my Lotus Pond pajama pants).

Here is Yuki cracking herself up after sticking her tongue out at me. She thinks she’s hilarious . . . 😛
Do you want to make a Fluttering Fields Sundress!? It’s really not very difficult at all! Full disclosure here though – when I sew, I kind of make things up as I go and hope it comes out ok. I often make changes along the way and later wish I did things differently or wonder if I did them the “right” way. Luckily, things worked out pretty well with this project, but it certainly isn’t perfect and I’m going to tell you what things I discovered along the way or would do differently if I were to do it again. It’s all about learning here, right?
Ok, here’s what you need:
For your fabric, I recommend a light to mid-weight woven fabric like quilting cotton, shirting, chambray, linen blend, double gauze, etc. I’m pretty sure you could even use a stable knit, but I haven’t tried.
I started from a basic bodice pattern that I already had (from the Geranium Dress), but you can also draft your own from a shirt or dress that fits your child or use a different dress bodice pattern.

Taking your front bodice pattern piece as a starting point, I’m going to show you the edits I made to form the new bodice pattern for this halter style dress. Some of this will depend on personal preference and the specific bodice pattern you’re starting with though.

First I dropped the neckline slightly and created a new curve to meet the original neckline.
Now here is where what I did and what I wish I did start to differ. I lowered the bottom of the armhole by about 1/2 an inch. In hindsight, I probably didn’t need to do that. What you need to know here is that whatever the measurement of the side of your bodice is (marked in turquoise), is going to be the width of your ties plus your seam allowance.
Mistake #2: I used a 1/4 inch seam allowance, which works out fine, but I do find it easier to work with at least 3/8 of an inch seam allowance. So in all the pictures and directions, I’ll refer to a 1/4 inch seam allowance, but at the pattern drafting stage, I recommend you work in a larger seam allowance. It’ll make the construction a little easier and when you construct yours, remember to substitute your seam allowance measurement whenever I say a 1/4 inch. Got it?
So measure down about 2 inches from your armhole and if you need to shorten your bodice, do so. The Geranium bodice is quite short as is, so I didn’t adjust the length.
That measurement you took (the turquoise line), that is going to be the same as your shoulder seam measurement (magenta line). It just makes it easy to have all of your ties be the same width. Rather than angling down, the shoulder seam needs to angle up so that your neck ties will point inwards. Make a slightly curved line from the outer tip of your shoulder to the bottom of the armhole to create a halter shaped bodice. The other thing I would change here is the depth of this curve. You can see in the finished dress that the bodice cuts in quite a bit, so if you want more coverage, make the line straighter.
Phew! Are you still with me? Trust me, that was the hardest part!

Next, we need to create the pattern for the ties. You will use the same tie pattern piece for both the neck ties and the back ties. In my second version of this dress, I followed the formula, but the back ties were too short. I’m updating the directions, but I haven’t tested it out yet. If I make a third dress, I’ll let you know if this works.
To determine the length of the neck ties, I calculated 3/4 of the total bodice width. To do that, first measure the bottom edge of your bodice pattern then multiply that in two, since that pattern is only half a bodice. For example, say your bodice pattern measures 6 inches across the bottom, that means the entire bodice will measure 12 inches. Take that number and multiply it by .75 to calculate 3/4 of the width. In my case, that is 9 inches.
For the back ties, take the length you just calculated (9 inches, in my case) and add 2 inches. So your neck ties will be 9 inches long and your back ties will be 11 inches long.
*I have not tested this formula with any other sizes than this one, so I can’t guarantee this will be the right length, but I’m fairly certain that it should work.*
The width of your tie pattern will be the same measurement as that turquoise and magenta line up there, somewhere around 2 inches (mine is narrower because of the small SA). Cut out a strip of paper with your measurements, fold it in half lengthwise and taper one end starting 2 inches from the tip. I drew and cut one side, then folded it in half to trace the other side so that it is symmetrical.
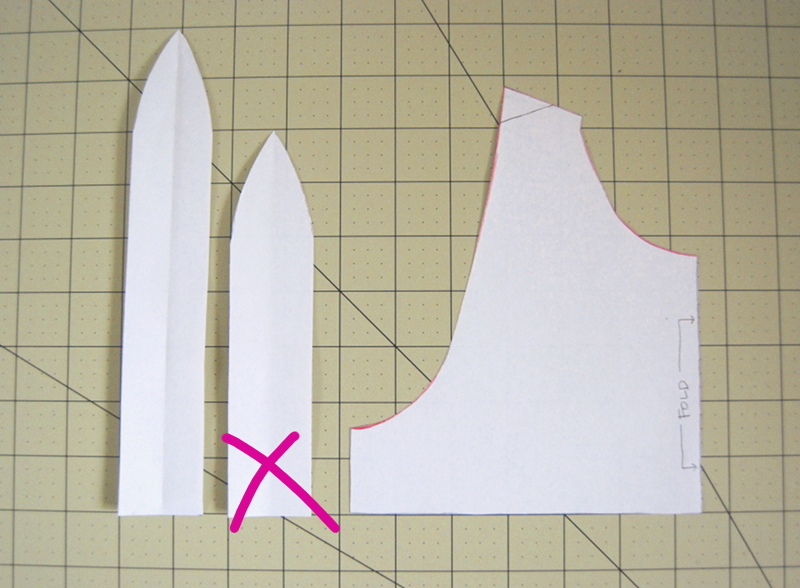
Here’s what my pattern pieces looked like. Ignore that middle one because it ended up being too short 😛
Did I tell you that I was working things out as I went along?

Skirt pieces! You’ll need two rectangles for your skirt front and back. To determine the width of a gathered skirt, I usually take the child’s waist measurement and then use that for one skirt panel. For example, if the waist measurement is 20 inches, then my skirt panels will each be 20 inches, for a total of 40 inches, that will then be gathered to just the right amount of fullness (in my opinion). You can add or subtract width according to your preference. The length will depend on the desired length of the dress. Be sure to leave room for seam allowance at the top, hemming at the bottom, and I throw in an extra inch just in case (you’ll need to trim the skirt front to match the back in a later step). Set one of your skirt panels aside.
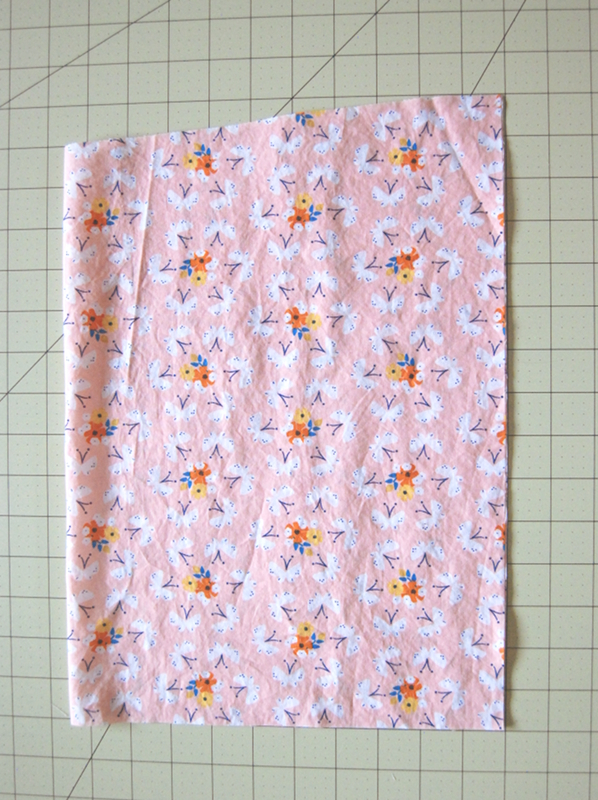
For the back skirt panel, I added a slight curve along the top edge. Fold your fabric in half (so the side seams are lined up) and cut a subtle curved line from the raw edge (side of the skirt) toward the folded edge, 1 inch down from the top. I wanted to create a slight opening in the back, but knew that the weight of the elastic and fabric would pull the skirt down, so this cut can be very minimal and possibly eliminated altogether.

So here are my cut pieces. You need:
In this lovely picture you can see another X. I accidentally cut my first set of ties too long. I used them anyways, but I would have been better off using a shorter tie (in the pictures, the back ties are triple knotted and still too long for my taste). So ignore the different length tie pieces – all 8 of yours should be the same length.
We’re finally ready to sew!!!
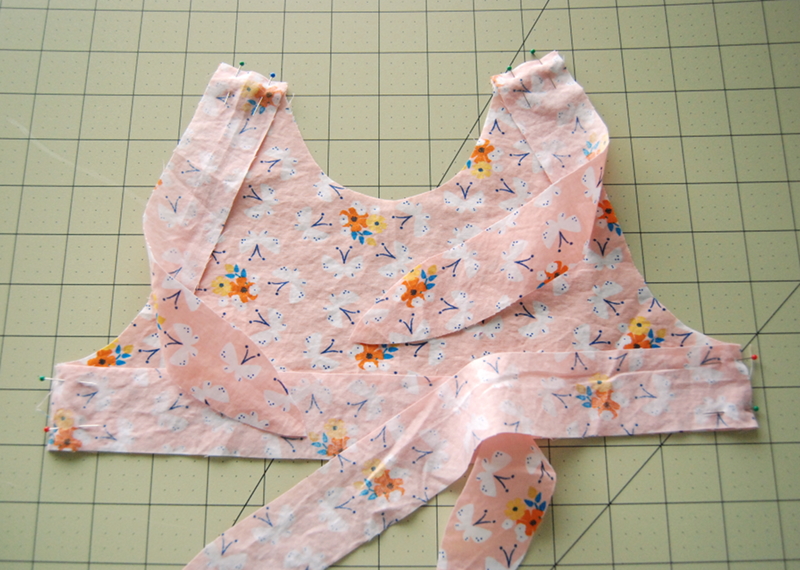
Pin the ties to the bodice sides and shoulders, right sides together.

*VERY IMPORTANT* When you sew the sides, do NOT sew all the way to the bottom. Stop a 1/4 inch from the bottom (If you are using a 3/8 seam allowance, stop 3/8 inch from the bottom). Be sure to back stitch at each end.
Sew shoulder seams all the way across.

Press your seams open.

Your side seams should look like this, with a little opening at the bottom. Repeat with the other bodice and tie pieces.

Place your two bodice pieces with right sides together and pin all the way around starting from the side seam (pink arrow) and going all the way around all four ties and the bodice, back to the other side seam (other pink arrow) and sew. Do not sew the bottom of the bodice during this step.

This is what it should look like, with your stitching beginning and ending at each side seam.

Cut notches in the curved sections of the seam allowance and cut off the excess fabric at the tips of each tie so it will look nice and flat when you turn it right side out.

Turn the bodice and ties right side out (I like to use a mechanical pencil or chopstick to get those ties turned and the tips nice and pointy). Give it a gooooood press. Fold the bottom edge of one of the bodice pieces towards the wrong side by a 1/4 inch (or whatever your seam allowance is) and press. This side is now your bodice lining.

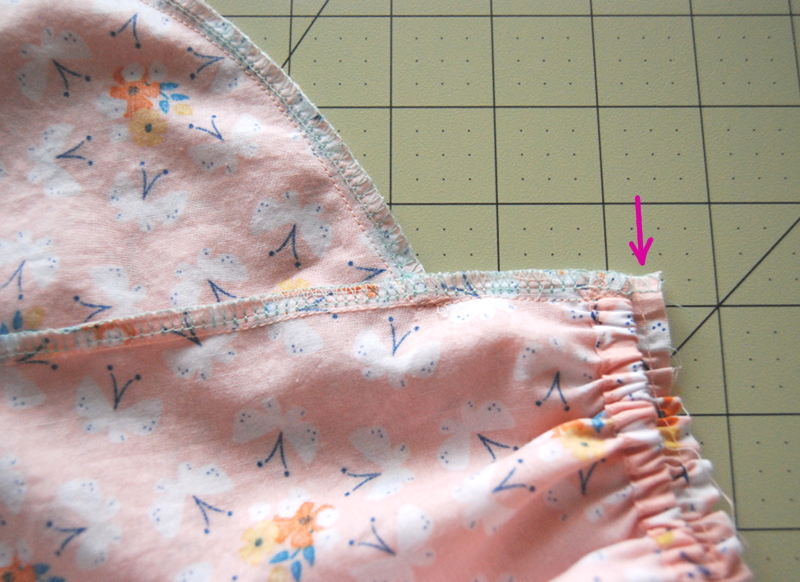
Take your back skirt panel, the one with the curved edge, and create a casing for the elastic by folding it a 1/4 inch and pressing, then 3/8 inch and pressing again. Pin and sew along the folded edge.

To determine your elastic length, take the waist measurement and divide it in half and subtract one inch. So if the waist measurement is 20 inches, divide that in half to get 10 inches, then subtract 1 and your elastic length is 9 inches. You don’t want to err on the side of excess length here. If your elastic is too long then the back of the dress will gape open and hang too low. You want this to be nice and snug against the back.
Thread your elastic through the casing (a safety pin is super helpful here). As the end of the elastic is about to pass through the opening, pin and sew it in place so it doesn’t slip into the casing. Continue to pull the elastic through to the other side and pin and sew it in place. Trim any elastic that is sticking out of the ends of the casing.

If desired, finish the curved edge of each pocket piece. On your front skirt panel, place one pocket, right sides facing, 2 inches down from the top edge. Pin in place. Repeat on the other side.

You’ll do the same for the back skirt piece except you’ll place your pocket pieces a 1/4 inch higher (or your seam allowance measurement) lower. So while my front pocket pieces are placed 2 inches from the top, my back pocket pieces are 1 and 3/4 inch from the top.

Sew the pocket to the skirt (you can finish the edges of the skirt here if you want) and press the pocket out. Repeat with the other 3 pocket pieces.
Place the skirt front and back right sides together with pockets lined up. The front skirt piece will extend a 1/4 inch higher than the back.

Sew the sides of the skirt together going around the pocket (pink line). Press the side seams toward the front of the dress. Turn right side out and press.

Next we’ll gather the front of the skirt. With a basting stitch (set your stitch length to the longest setting, do not back stitch and leave a tail of thread at the end), stitch two rows along the top edge of the skirt from one side seam to the other. I find that I get the nicest looking gathers when I have one row of basting stitches above the seam allowance line and one below. So I stitched my basting rows about 1/8 inch and 3/8 inch from the top.

Pull one thread from each row to gather the skirt until it is the same width as the bodice. Distribute the gathers evenly.

Pin the bodice to the gathered front skirt piece, right sides together. Be sure the bodice lining and back of the skirt are pulled aside when you sew. The seam allowance from the sides of the skirt should be folded inwards toward the gathered skirt and will be sewn during this step. Sew bodice and skirt together.

Press bodice and seam allowance up and remove thread from the basting stitches. Woohoo! It’s looking like a dress!

You can attach the bodice lining one of two ways. The first is to hand sew the lining in, enclosing the seam allowance and stitching the lining to only the top layer of fabric. This takes more time, but creates a clean look with no visible stitching.
The second method is to pin the lining down so that it covers the previously stitched line and then, from the right side of the dress, top stitch along the bottom of the bodice. While you’re at it, you can top stitch along the bottom and all the way around the ties and neckline, if you want to. It’s purely up to your personal/aesthetic preference. I opted for the hand sewing.

Now all you need to do is hem! The front of the dress is going to be a little longer than the back because I didn’t take into consideration the difference the casing would make. Yeah, oops again.
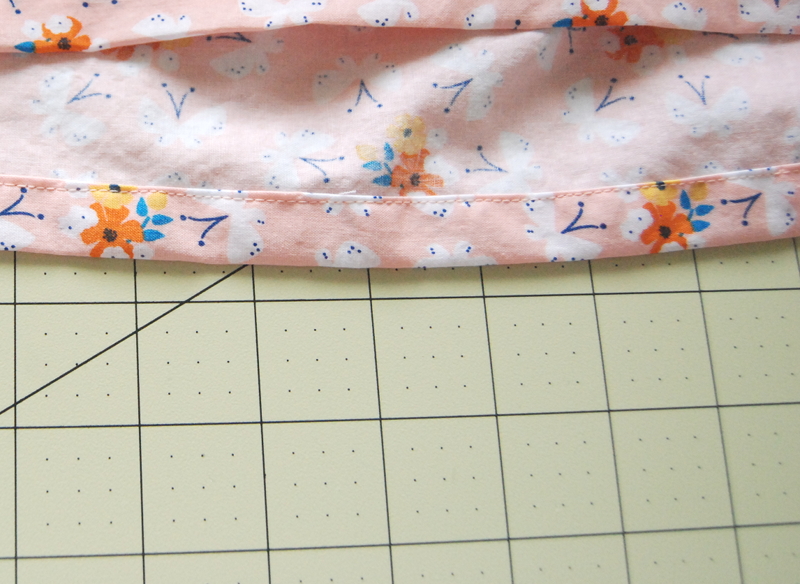
Even out the lengths and fold twice towards the wrong side to your desired length and sew along the folded edge. And you’re DOOOOONE!!

Gahhhh! Love this little sun-kissed back!
Yuki’s worn this dress a bunch already and I’ve had to wash it a few times. The only problem is that the ends of the ties have come out of the wash wrinkled, but luckily it’s just that part of the dress and it’s very easy to press (it takes one minute).
I realize that this tutorial is long and possibly hard to follow along, so if you have any questions, feel free to leave me a comment and I’ll do my best to help you! I really hope that some of you give this a try because I’d LOOOOVE to see your versions! Be sure to share them with me via email or load your pictures into the you & mie flickr pool!
Thanks so much for stopping by and be sure to check in at Melly Sews for a new sundress tutorial every day of this month!

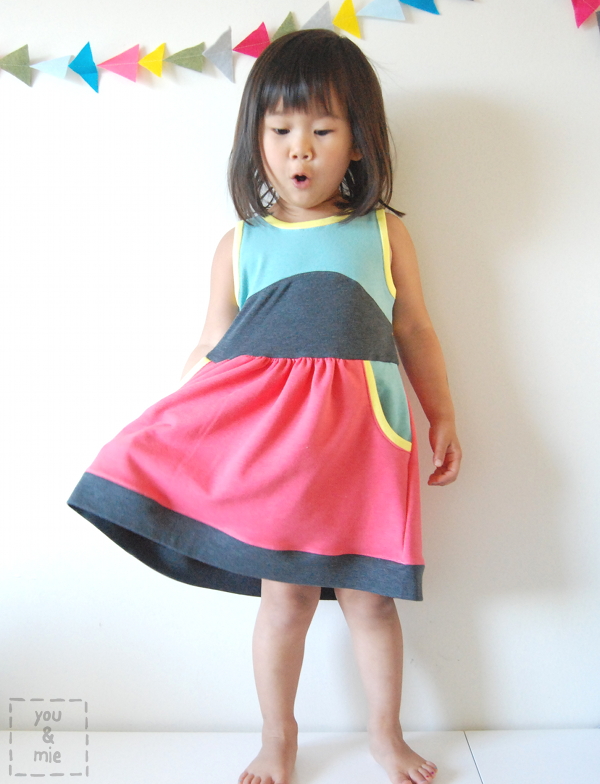 A month or two ago, I would have said that another dress is the last thing this girl needs. But recently, she’s been choosing dresses more often, especially the knit ones, and she was thrilled to add this one to her wardrobe. She already wore it on Monday and asked me if she could wear it again today (but it was in the laundry). The pattern is the Soleil Dress by Selvage Designs/Lauren Dahl.
A few things that I love about the pattern . . .
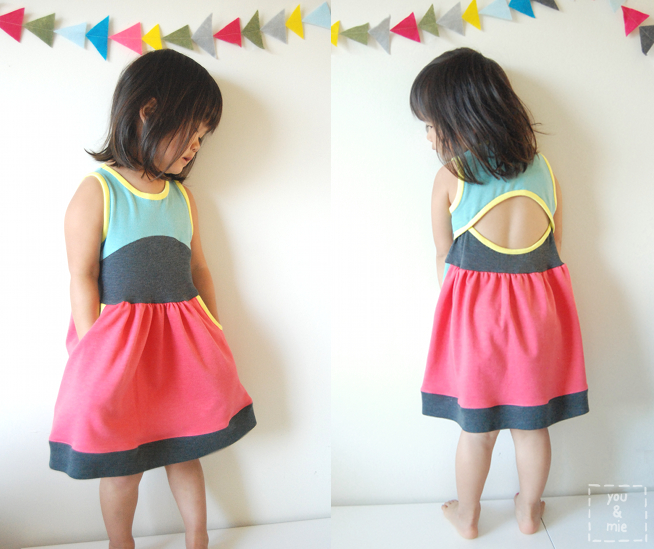
The design. I think the dress is adorable. I love that it’s knit – comfy and easy for my daughter to put on and take off herself. I think the cut-out back is cute and unique (though a closed back option is also available). I love the contrast binding and the opportunity to play with different fabrics in one dress. I just think that this dress is perfect for the summer! Just remember to put sunblock on your kid’s back if they’ve got the cut-out!
The pattern itself. Lauren has recently released an online course called Pattern Workshop to teach people how to create PDF patterns. So I was very curious to see how her pattern was – ya know, being a teacher and all, I would hope it was good. Well, it’s good. It’s quite beautiful, actually. It’s super clear and organized and easy to look at. The charts are neat, the diagrams are neat, the pages print neatly and all the pieces fit together neatly. It’s just kind of a sigh of relief for someone who’s a bit anal, like me. And though I didn’t try it, apparently the pattern comes in layers so you can print out just the size you want! So you don’t have to carefully track which dotted-dashed line or shade of blue is the one in your size. It’s all explained in the directions. If only I had bothered to read those beforehand . . .
The size range. The pattern starts at 12 mo. and goes all the way up to 12. That’s a HUGE range. This pattern will last you forever.
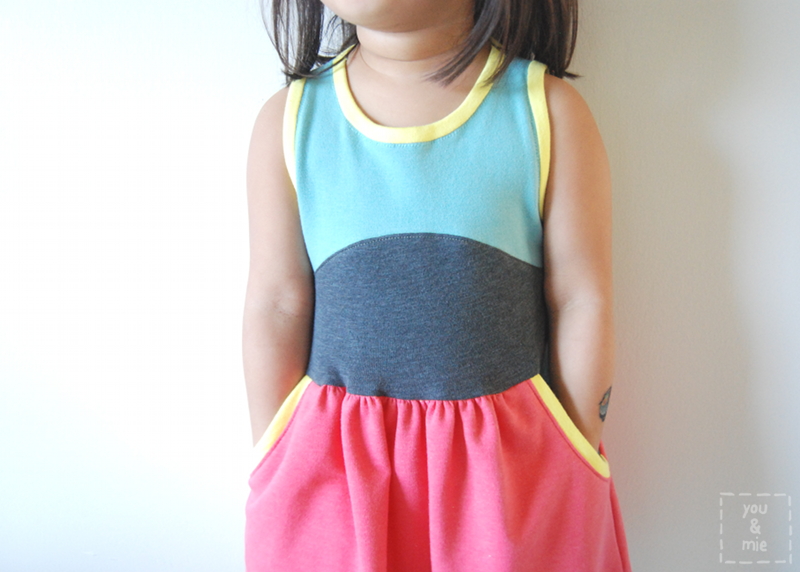
I made a few modifications to the pattern to add some extra color blocking. First I took the front bodice pattern piece and drew a curved line that mimics the curve in the back. Then I cut the pattern in two and added a 1/4 inch seam allowance to attach the two pieces. I also added a band along the bottom because I didn’t have enough of the pink fabric for the length I wanted. Adding the band also means no hemming! Bonus. Unfortunately, the band was a little short and I had to stretch it to fit the bottom of the skirt, so you may notice it’s narrower than the skirt. Oh wells.
I also used a regular knit jersey fabric for the binding instead of the ribbing or fold over elastic that is recommended. This was a little bit of a gamble, but I stretched it a lot while sewing to make sure that it would not be saggy. It worked pretty well and think it’s fine for this dress, but I don’t think it has as much elasticity as the recommended fabrics, so I’d probably stick with those for future dresses.

A couple of extra notes . . .
The directions in the pattern are clear, but in some places I feel like they are a little brief. I guess I’m the kind of person who likes thorough descriptions and if you’re a beginner, there isn’t a lot of hand holding. I think this pattern can be for beginners, but if you’ve never sewn with knits before, be sure to read up on some of the great knit tutorials available online first for helpful tips on how to sew with knits.
*SEE ADDED SECTION BELOW!*
The tricky part for me, was attaching the binding to the wrong side of the dress. This may have had something to do with the fact that I used jersey instead of the recommended fabrics, I’m not really sure, but when I flipped my binding to the wrong side of the garment and top stitched below the binding like directed, I had a really hard time catching the fabric, even when pulling it quite a bit. I’m thinking that what happened is that when I stretched the binding, it lost some of it’s width, making it harder to wrap around.
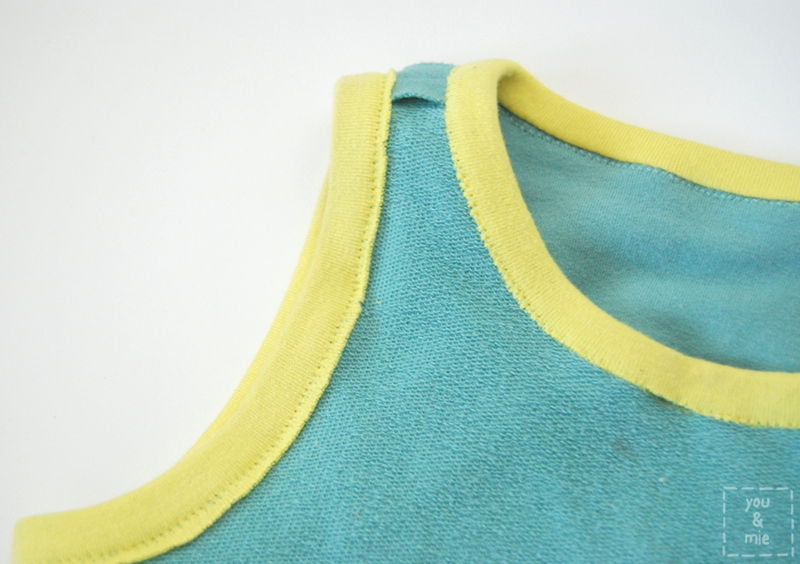
So you can see in the picture above, the neckline just barely was caught by the top stitching line and in some places didn’t make it at all, so there are a few places where it’s not attached. I tried a couple of times and then gave up. I’m hoping those sections are small enough that they won’t make a difference. So when I did the armholes, I made my binding wider by 1/2 an inch and then trimmed it after sewing. I’m curious if anyone else had this problem, or if it was just me.
*AHHH! I did this step wrong!! Heidi kindly explained to me that I was supposed to fold the binding in half lengthwise (this part is stated in the pattern) and then sew the folded binding, with both raw edges to the edge of the dress and then flip that open and sew the seam allowance down. THIS CHANGES EVERYTHING. I went back to the pattern and honestly, it’s kind of unclear the correct way to do it, since the directions are minimal, but I I’m pretty sure Heidi is right. The reason why this changes everything is because I’m actually missing about a half an inch of fabric on all edges (arm, neck and back cut-out) since I enclosed the seam allowance in the binding instead of adding width of the binding, if that makes sense. I really wish I had done it the correct way! Well, now you know . . .
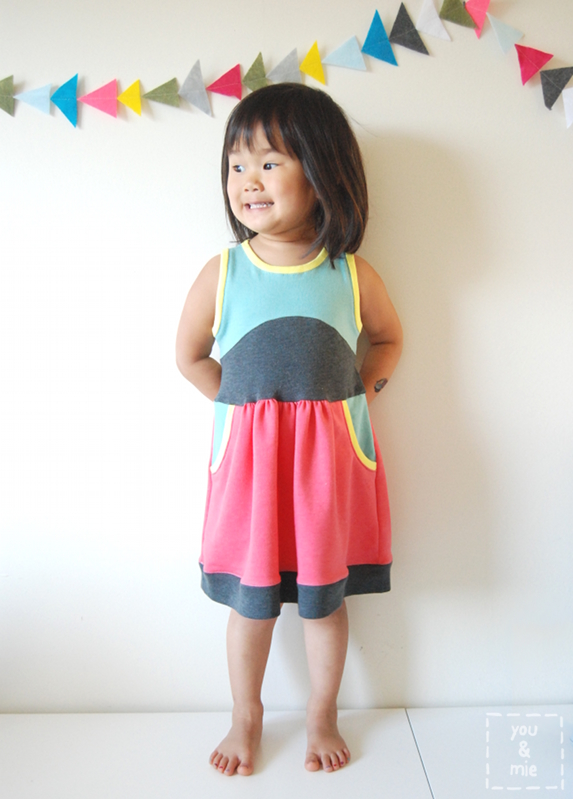
This is what I got when I asked for a smile. Despite her lack of enthusiasm for modeling, she really does love this dress. When I asked what her favorite part was she said, “the pink and yellow and all the colors” and “the back pocket” which of course is the cut-out that she kept trying to stick her hand through. Yeah, didn’t get any pictures of that unfortunately. I think she loves that it’s knit and comfy and those pockets! Who doesn’t love deep pockets!? She actually tried to smuggle about a million mini hair rubber bands to school that day, so I suppose I don’t love deep pockets. 😛
I think this pattern would be fun to hack into a bathing suit or leotard! Maybe a future project??
Thanks Lauren for providing me with this pattern to review! And if you’re interested in seeing other versions of this dress, Lauren has been doing round ups of Soleil dresses being made by other bloggers and you can find them on her blog.
And don’t forget to enter the giveaways currently open. You have until Friday evening!
– Four Seasons Pillow Cover Giveaway
– Quilter’s Delight Fabric Bundle Giveaway
Today I’m sharing a tutorial on the Oliver + S blog on how to alter a shirt pattern with sleeves to a sleeveless shirt! I modified the Lullaby Layette Shirt pattern for the tutorial, but you can use this method for pretty much any pattern.

Head over to Oliver + S to check out the full tutorial!

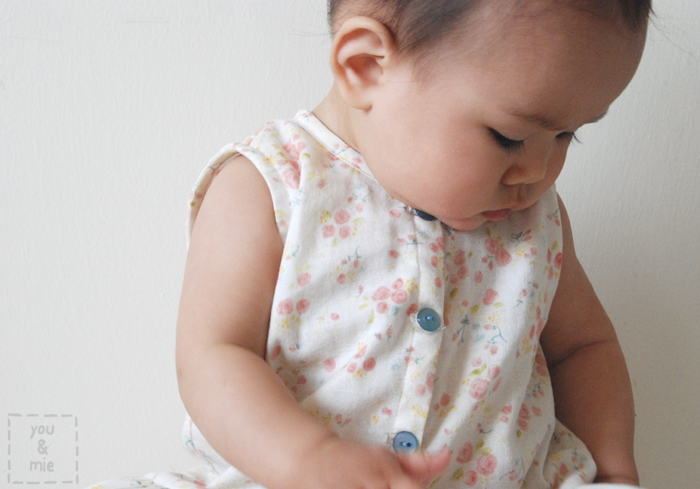
I made the Lullaby Layette Shirt pattern (View B in the 3-6 month size), but I made a few modifications. Besides making it sleeveless, I decided to add a little gathered skirt. It was actually supposed to be more of a peplum top, but I made the skirt so long that it became a dress! But that’s ok, I think this will actually fit her for awhile!

Before adding the skirt, I shortened the bodice by a couple of inches and also took the sides in a bit, so it was less A-line. I was too nervous to add snaps to this amazing fabric (the chances of me messing up and tearing a hole in the fabric was too high), plus there’s something so sweet and more vintage-y about buttons, so I went with these light blue ones. I think I made the right call.

This fabric! It was a gift from my good friend, Frances, AKA Miss Matatabi. It’s a nani IRO double gauze and it says “Fuwari Fuwari” on the selvage, but I didn’t recognize it, so I knew it must be older than a couple years. Well after I cut into it I asked Frances about it and it turns out it’s a super rare print from 2006! VINTAGE NANI IRO (yes, 2006 is vintage when it comes to a fabric line). I suddenly felt mortified that I had just cut into it!

But Frances said that it was probably a good thing that I was able to use the fabric without the pressure of having to create something “worthy,” and I think she’s right. This fabric probably would have sat in my stash forever and ever, and at least this way it was used to make something special for my daughter and maybe someday it’ll get passed on or something. Random question – do you save your handmades? When they are outgrown, do you give them away? Store them? Toss them?
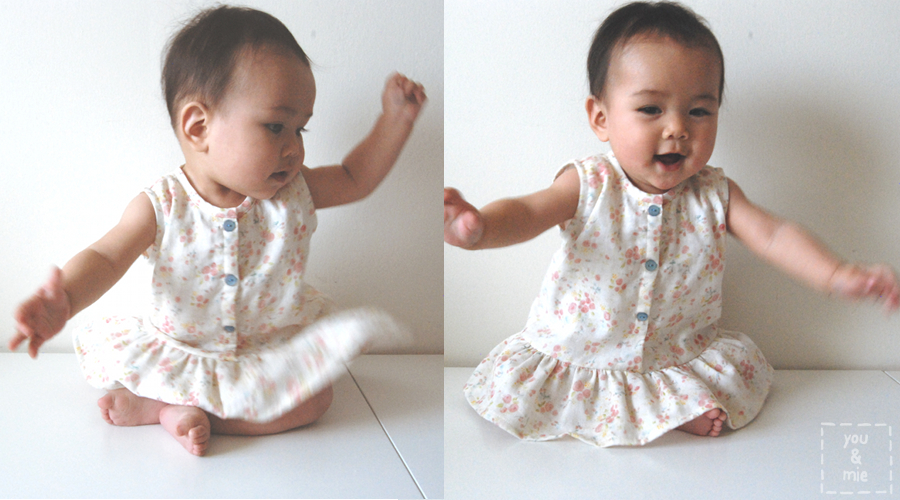
In other news, Kaya is getting harder and harder to photograph. That window of time when she could sit up, but not move has been too brief. She’s already getting ready to crawl and I can barely get her to sit still for a few seconds. Oh boy!
Anyways, I’d love it if you headed over to the Oliver + S blog to check out my tutorial. It’s my first time posting over there! 🙂
Happy Monday!

Have you seen the new Heavenly Collection by Figgy’s? The collection is made up of 7 super unique and stylish patterns for kids and some of them for young adults. When Shelly contacted me about being a part of the Heavenly Tour, I jumped on board immediately. I was drawn to the Ethereal Dress & Blouse.
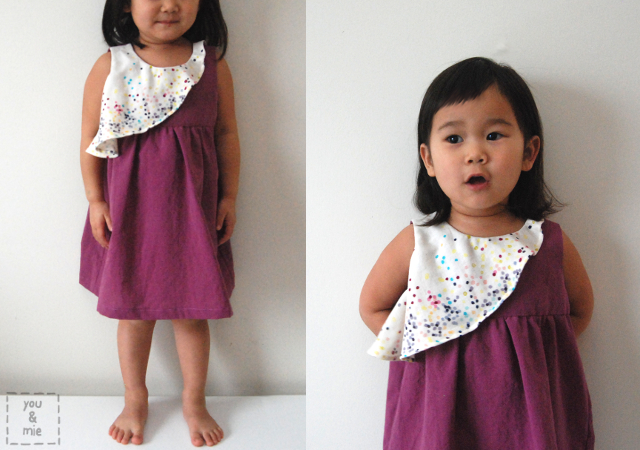
And what a sweet little dress this is! The construction is a very standard bodice with a gathered skirt – the frill is what makes it so special. It can be made in shirt, tunic or dress length and with long sleeves, short sleeves or no sleeves. The dress came together really easily and adding the frill was pretty straightforward. The pattern directions were clear and easy to understand and produces such a unique little piece for your kiddo’s wardrobe.
 For the sleeveless and short sleeved version, the bodice is fully lined and is finished with a technique that looks great, but might be a little confusing if you’ve never done it before. Shelly has broken it down a little bit more in this post here and Rae of Made by Rae has a fantastic video for lining a Washi dress bodice that is the same technique. I recommend checking those out if you’ve never finished a lined bodice like the pattern instructs. Super helpful!

And what fabric could be more ethereal than some Nani Iro double gauze?? You might recognize this Nani Iro Melody Sketch from this A-line tunic I made a couple years ago and I said it then, and I still think even now, that this is my favorite fabric ever. I have a little bit leftover from the tunic, but not enough for a whole dress, so I used it for just the frill. The rest of the dress is made from a really lightweight shot cotton that I used on a dress for Sanae’s daughter for the clothing swap last year. I love these fabrics together – both so airy and soft, yet clean and crisp.

*Edited – I wanted to mention that I decided to do some understitching along part of the front neckline. Understitching is a line of stitching attaching the bodice lining or facing to the seam allowance and prevents the lining/facing from rolling up and becoming visible. This helps give any garment a clean and polished look and was especially important here since the bodice and the frill are different fabrics. Without the understitching, the bodice lining was rolling up and I could see it at the neckline.*
I’ve found that Figgy’s patterns run pretty large, so be sure to check the size chart and not just choose the size by the kid’s age. I made the 18 month size for my 3 and a half year old and made the “full length” dress version but shortened it by a few inches. It fits great and the bodice even has a little room for her to grow into!
The back has an opening with a button and loop closure. So simple and so sweet!

The Ethereal Dress & Blouse pattern can be purchased individually or with the entire collection. I like a lot of the patterns in the collection, but I definitely want to sew up the Stellar Tunic/Dress next!
Shelly is also hosting a huge giveaway on the Figgy’s blog with the prize including fabric, sewing supplies and the entire Heavenly pattern collection. Check out all the details and entry information here!

Thanks for stopping by and be sure to visit the other stops on the Heavenly Pattern Tour throughout the month of February.
Can you believe Valentine’s Day is this week!? Doing any special sewing for the lovely holiday?
Just a quick post today of a dress I made for Kaya a couple of weeks ago. Remember when we had some family pictures and the girls needed something to wear in purple/gray? Well Yuki got her Skater Dress, but Kaya needed something too. I didn’t want her to show up in onesie or something when I knew everyone else was going to look nice. But it was the night before pictures and I still had to make Yuki’s dress, so I tried and tried and tried NOT to sew up something new for Kaya, especially since she’s a baby and does not need a new dress. But in the end, I couldn’t NOT do it! You guys understand, right?
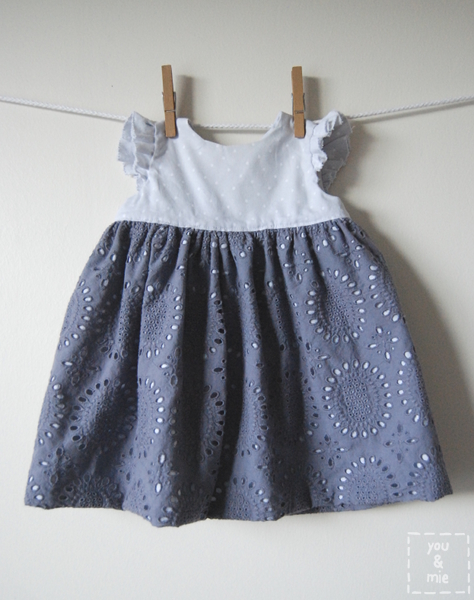
So I made her a Geranium. The perfect pattern for a quick and cute dress. This is my fifth Geranium! I know this pattern. I trust it. It never fails me.
Anyone recognize the skirt fabric??

Well, if you said it’s from the first Geranium I ever made, the Geranium in Eyelet, you’d be right! And you’d have an impressive memory! 🙂 I had a piece that was just the perfect size leftover from that first dress. And that was back when I tested this pattern over a year ago! The fabric is a dusty purple color, though it looks gray in all of these pictures 😦

The bodice fabric and skirt lining is Dear Stella’s Polka Dot in Gray from their Mercer Line. I love the new Mercer Line and I’ve got some fabric just begging to be sewn up soon!! I just can’t seem to decide what it wants to be yet . . .

The pattern calls for buttons in the back, but since I was running short on time/feeling lazy/making this for a baby who spends so much time on her back, I decided to go with velcro instead. May not look as nice, but it’s sooo easy to put on and I imagine, more comfy for baby too!

So that’s it. Another dress for Kaya. She was able to wear it to a bridal shower recently and hopefully it’ll fit for another month or two. And then maybe I can pass it on to another baby, so it doesn’t go to waste. I don’t think I need to go into details about how great this pattern is – you already know I love it right? If you want to see the others I’ve made, here are #1, #2, #3 and #4.

I’m trying to clear out some of my fabric stash and I have a small cut of this eyelet fabric that I’m thinking about selling as part of a destash sale. I haven’t worked out the details (how, when, where) yet, but I’ll be sure to fill you in if you’re interested in helping me get rid of some of my fabric. I’ll probably do a giveaway too. So stay tuned!
Can you believe it’s February already!?
Hey friends!! How are you doing? I gotta say, I totally miss being here. I definitely miss sewing, but I’ve been able to sneak some in here and there. Blogging is fun because I get to share with you, hear what you’re up to, and get your feedback – I’ve been missing the community!
I celebrated Thanksgiving with my family last week and took some time to reflect on all the things I’m thankful for. There are so so many things that I’m grateful for, I consider myself a truly lucky person. This year I’m especially thankful for our newest addition, Kaya, and that both of our girls are so happy and healthy. But I also wanted to take a minute to acknowledge how blessed I feel to be able to do the things that I love, like sewing and blogging, and that I get to be part of such an amazing community of inspirational and awesome people! I’ve made such great friends here, and even to those of you who I don’t know – I appreciate you just stopping by! This blog would be nothing without you readers. So thank you!
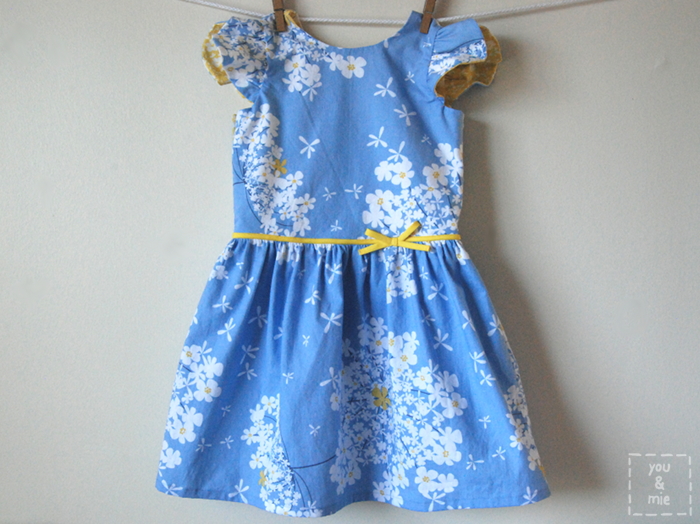
Like I said, I’ve been able to get a little sewing in recently, but first I wanted to share a couple of dresses that I made back in August. Yes, over 3 months ago. Don’t ask me why it took so long to blog these, because I really like them! The pattern is the Hanami Dress/Top by Straight Grain.

Back in July, An of Straight Grain put out a call for pattern testers and after seeing the adorable versions that she had made, I jumped at the opportunity! The pattern comes with several variations – crossed back or invisible zipper, flutter sleeve, tulip sleeves, peter pan collar and, of course, length – either dress or top. I love a pattern with endless possibilities!
I signed up to test the pattern in size 3T since Yuki was about to turn three and had recently started wearing 3T store bought shirts. But after looking at the measurements, I knew it’d be too big, which is really no surprise because Yuki is super petite for her age. But I went ahead and made the dress in size 3 and had a friend’s daughter try it on for the testing. I chose the unique crossed back and tulip flutter sleeves and used Wild Carrot Blue, by Violet Craft for Michael Miller. I picked this up from the remnant section of Britex.
The name of the pattern, Hanami, is a Japanese word meaning “flower viewing.” In Japan it is a custom for people to gather and picnic under the blooming cherry blossoms and enjoy their short lived beauty. It was something I got to experience when I lived there. So with that name in mind, I couldn’t shake the image of flowers so naturally when I went to my stash to pick fabric, they both ended up being florals.
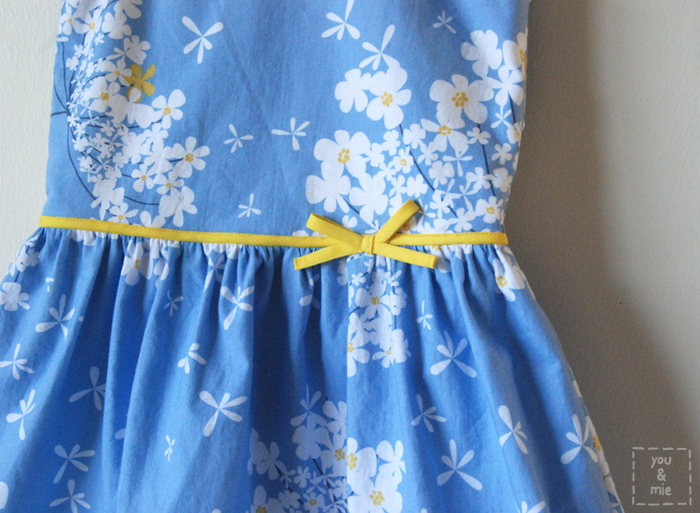
I made one addition to the dress which is a bias tape “belt” around the waistline. I just wanted to add a little contrast to the dress and thought this finished it off quite nicely.
So after I made the first dress in size 3, I really wanted one that would fit Yuki, so I made another Hanami in size 2 and it fit her perfectly. I chose this watercolor floral fabric that I bought at Ikea awhile back and I love the way it came out! I decided to do the regular flutter sleeves, but stuck with the crossed back that I love so much. But do you notice anything interesting about these pictures?


She’s wearing the dress backwards!! When I was making the dress, I was trying to be thoughtful about which parts of the fabric I was cutting for each piece, but when it was all done I realized that I liked the back better than the front. So when I put it on Yuki I tried it on backwards to see how it’d fit her and I loved it.

I added a strip of thin black bias tape around the waist again for a little contrast (no bow this time) and I really like how it separates the bodice from the skirt.

The pattern is great. Well written step-by-step directions with color photos for every step. These two versions of the dress I made are very spring/summer appropriate, but if you are looking to make a holiday dress, this would be a great pattern to use as well. In fact, if I have time, I’m hoping to make a holiday version for Yuki later this month. If you’re interested, you can buy the pattern HERE along with An’s other great patterns. And if you want to check out my absolute favorite Hanami of all time, see Stitched Together’s version. You won’t regret it 🙂
I hope you are all doing well. I’ll be back later this week to share a fun new book with a giveaway!
Miss ya!
