

It’s here! We are FINALLY starting the sew-along! Are you pumped? I know I am!
First of all, it was brought to my attention that in my original sew-along announcement, I said that the deadline to enter your pull-over pictures into the Flickr group was June 30, instead of June 23. Unfortunately, I listed the wrong date and I’m soooo sorry if this caused an inconvenience to anyone! 😦 The correct date is next Monday, June 23. Of course, you can enter pictures into the Flickr group anytime, even if you can’t finish it by next week! But if you’d like it included in the drawing for the prize or our round-ups, your pictures will need to be uploaded by next Monday. Sorry again!
Today we are going to be locating our pattern pieces, tracing and adding seam allowance. Honestly, these first few steps are often the most confusing and intimidating for me when I use a Japanese sewing book – even more than the actual sewing steps! Using the English version helps A TON here, but it can still be a little confusing since it’s so different from using a PDF pattern, for example. So I’m going to walk you through the steps and the great news is, this will help you with not only this book and pattern, but you can apply these tricks and skills to any Japanese sewing book since they basically follow the same format!
Anyways, let’s get started.
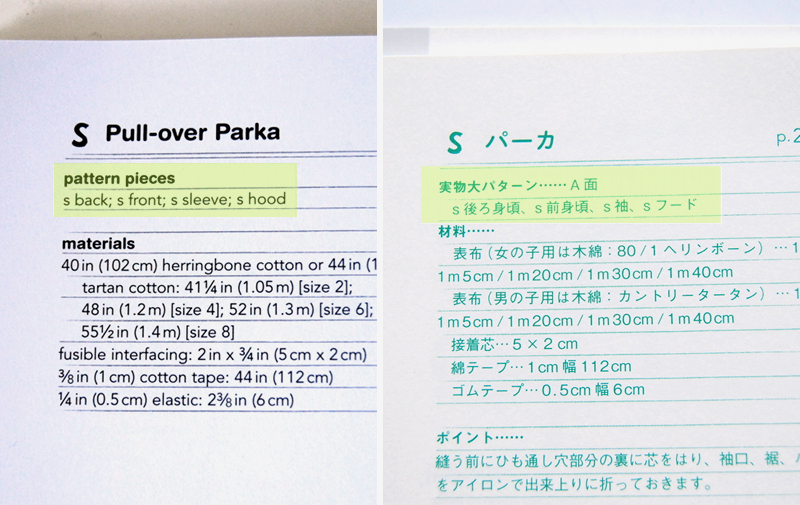
On the directions page for the pull-over parka, it’ll list all the pattern pieces you’ll need. For this pattern there is the back, front, sleeve and hood and the pattern label is “s.” That letter is going to help us locate everything we need for this pattern. First I’m going to go through all the steps using the English version of the book since I think that’s what most people are using. But if you’re using the Japanese version of the book, I’ll help you locate the pattern for that book at the end of this post.

Pull out your pattern sheets. There will be two double-sided sheets labeled Pattern Sheet 1, 2, 3 and 4. Each has a table of contents, if you will. And you’ll see that the pattern pieces for “S” are scattered, one piece per sheet. The back piece is on sheet 1, the front piece is on sheet 2, the hood is on sheet 3 and the sleeve is on sheet 4.

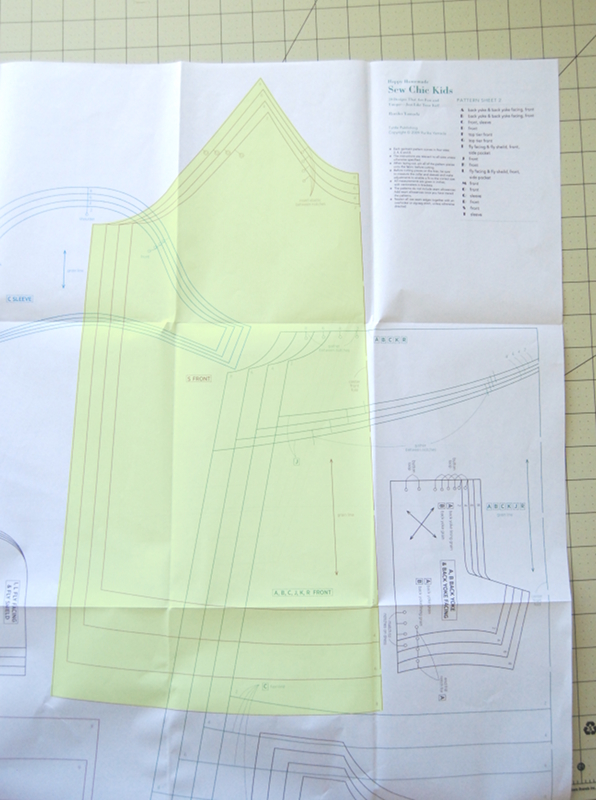
I’m going to show you the front piece as an example. That is located on Pattern Sheet 2.
Unfold the sheet and you should be able to find the “S FRONT” pattern right next to the table of contents. The lines are burgundy and all the S pattern pieces will be in that same color, which will make it easier to find and distinguish from the other overlapping patterns. Congrats! You’ve completed step one – finding your pattern piece!
Now before you begin tracing, take a look at this diagram that is on the directions page of your book (below). This little picture has a ton of important information and you’ll find yourself referring to it quite a lot.
Super crucial note – Japanese patterns DO NOT INCLUDE SEAM ALLOWANCE. You must add it yourself!
Even though I know this and have known this forever, I still forget sometimes. I can’t tell you how many times I’ve traced my pattern pieces super close together or close to the edge of the paper only to realize that I need to add seam allowance and have no room. LEAVE ROOM FOR SEAM ALLOWANCE!

Take a look at “front” pattern piece on the diagram. It’s on the bottom right corner and you can see that it is placed on the fold. The other edges will need seam allowance added. The standard seam allowance is 3/8 in or 1 cm. If there is no number specified in the diagram, you can assume that the seam allowance is 3/8 in (1cm). Looking at the front piece, the only edge that has a different seam allowance is the bottom edge where it says 1 1/4 in (3cm). Be sure to leave room for seam allowance when you trace your pattern piece.
There are several ways you can add seam allowance to your pattern. Some people like to do it while tracing. Meg shared a SUPER awesome and simple tip on one way to do that in her post during the Japanese Sewing Book Series. There are also some tools that add seam allowance as you’re cutting. I just do it the old fashioned way of tracing the pattern first, then measuring the seam allowance and drawing those lines separately.

Trace your pattern! I lined up the edge of my tracing paper with the edge of my front pattern piece that is on the fold, since that side does not need added seam allowance. Making sure I had room on the other sides for adding SA, I traced the lines for size 2. Be sure to trace any markings from the pattern as well.

Use a ruler to measure 3/8 in (1cm) from the side seam and draw a line.

For curved edges, I measure and mark the seam allowance every centimeter or so and then connect the dots.
 Be sure to label your pattern with the name of the pattern, which piece it is, what size and also label any edges on the fold and trace any other markings.
Woohoo! One pattern piece down, three more to go! Follow these steps for the rest of your pieces.

The other night, I got an email from Gail asking specifically about the sleeve pattern piece. At the bottom of the sleeve, it tells you to add 1 1/4 in (3cm), but the seam allowance flares out at an angle. The pattern doesn’t give you any information about how to determine that angle or why you’re doing it that way. Since I was pretty stumped, I consulted my Japanese pattern gurus, Sanae and Frances to find out more. Frances located this helpful link and like a light bulb, it suddenly all made sense. That site is in Japanese, so I decided to make my own little diagram to help explain . . .

If you add seam allowance to your pattern piece and it continues to angle inwards at the bottom, when you fold it up to hem, you won’t have enough width. Your hem will be narrower than the sleeve and you’ll have trouble sewing that hem down without stretching or some pleating of fabric. No good!
Instead, you want the excess fabric at the bottom of the sleeve to angle outwards so that when it’s folded up, it is at the same angle as the sleeve. That way you’ll have enough width to reach the edges of the sleeve and hemming will be a breeze!
Does that make sense?
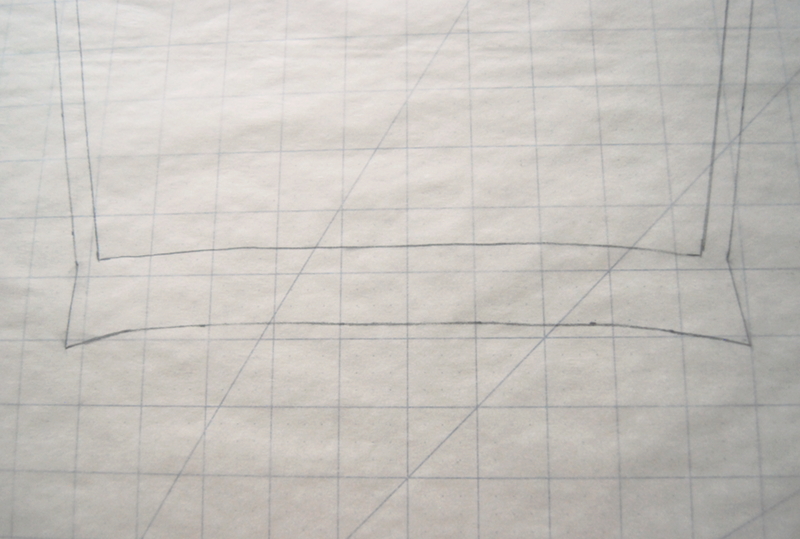
Still, it doesn’t tell you exactly how to create these lines and honestly, I just eyeballed it. You could fold the paper at the bottom of the sleeve to trace the sides (the bottom edge is slightly curved, but I think you could ignore that and it’d still be fine. Either way, I wouldn’t stress about it too much, just do your best 🙂
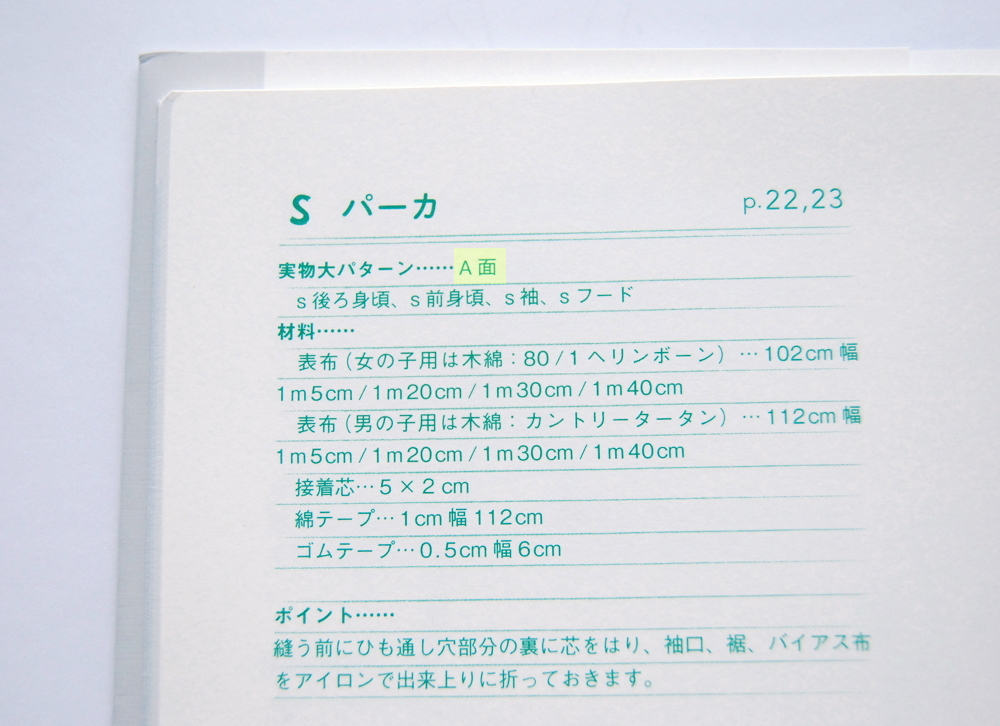
If you’re using the Japanese version of the book, all the steps are exactly the same, the only difference is that the pattern sheets are a little crazier and finding the pattern pieces you need is more difficult.
Up at the top of the directions, it tells you where you can find your pattern pieces. In this case it’s on “side A.”

Side A of the pattern sheet lists the four “S” pieces you’ll need – back, front, sleeve and hood.

This is what that crazy mess of a pattern sheet looks like. Look for the letter “s” and you’ll notice that all the S pattern pieces are green. Others are black and some are shaded in green – this will help you tell the patterns apart. Dig around – you’ll find all your pieces!

Yay, there they are!
Then follow the rest of the steps above.
Once you’ve traced your 4 pattern pieces, added your seam allowance and labeled the pieces, go ahead and cut them out and lay them aside for Day TWO! Also, if you haven’t yet, be sure to wash, dry and iron your fabric so you’ll be all ready to cut and prep for sewing tomorrow.
Be sure to share any in progress photos on Instagram (#happyhomemadesewalong) or the Flickr group and if you have any questions, leave a comment! Can’t wait to see yours as it comes together!
Tomorrow’s post will be up on Meg’s blog. See you there!

See the rest of the sew-along posts here:

Yep, I made that sleeve error on the first one of these I sewed! Got it right second (and subsequent) time(s).
Pingback: Happy Homemade Sew-along – Day 1! | Snippet
your diagram is perfect! also, i’m really glad i read this, because i almost added 3 inches of seam allowance to my sleeve. that’s why sew-alongs are so great! 🙂
Haha, that would have been a looooong seam allowance! 😛 I’m sure you would have figured it out though. How’s your hoodie coming?
Pingback: elsie marley » Blog Archive » happy homemade sew-along: day two
Pingback: elsie marley » Blog Archive » happy homemade sew-along: day one
Pingback: Happy Homemade Sew-along // Day Three | you and mie
I’m so glad I read this before cutting out my pieces! I’d traced the sleeve hem incorrectly. Guess it pays to do the sew along as it goes and not get ahead! Thanks for all the great hints. I’m catching up on Days 3 and 4 right now.
Oh I’m glad that this helped! Good luck with the rest! Can’t wait to see when it’s done 🙂
Pingback: Happy Homemade Sew-along // Day Four | you and mie
Pingback: Happy Homemade Sew-along // Day Five | you and mie
This was really helpful. What was difficult was for me to stop tracing and move to step 2. There are so many things in this book and in Carefree Clothes for Girls that I’ve been wanting to make but the tracing was too daunting:)
Pingback: Sewing Along « Rosemary Mornings
Pingback: Happy Homemade Sew-along // Finished hoodie | you and mie
Pingback: Happy Homemade Sew-along // round-up, winner and many thanks! | you and mie