
 Welcome to Day 4 of the Japanese Sewing Book Series! Remember the invaluable little layout picture (see above) that Meg kept referring to yesterday? Well, today we’re going to break that down for you a bit more and here to help us with that is Frances of Miss Matatabi.
I already introduced Frances a bit last week during her giveaway, but if you missed it, she runs an awesome online fabric shop, Miss Matatabi, that features gorgeous Japanese fabrics that are often very hard to find elsewhere. Go check out her shop and some of my personal favorites (although it really is too hard to choose, they are all so beautiful)! If you buy something from her shop, you know that it’s coming from a person who loves fabric as much as you do. She’s got great customer service, her packages always arrive promptly and packaged so nicely – it really is such a treat to get fabric from her!
On her blog, she shares some of the things she sews, like this adorable Geranium dress for her daughter, or this amazing Washi dress with 3/4 sleeves. And I REALLY want this scarf for myself! She’s got impeccable taste and we obviously share a love for Nani Iro, but beyond that I’ve found a true friend in Frances. She’s incredibly smart, kind and thoughtful and I’ve really loved getting to know her the last few months. And I’m so excited to have a friend in Tokyo to shop with next time I visit!
Speaking of which, I’m lucky to help introduce a big project that Frances has been working on with her friend, Angela! It’s called the Tokyo Craft Guide and it showcases some of the best craft shops around Tokyo. With over 50 shop listings organized by neighborhood, they have curated a series of craft-shopping-excursions complete with illustrated walking maps, shop highlights, favorite cafe spots, and even some Japanese-inspired project tutorials. An e-book will be available next month, but in the meantime they will be offering additional shop profiles, events, and interviews on their blog. You really should go check it out!
Here’s Frances . . .
***
Hello! I’m absolutely thrilled to be here for the Japanese Pattern Book series. Thank you for inviting me to participate, Cherie! I’m Frances, an Australian living in Japan and I blog about my sewing adventures at Miss Matatabi. I have been sewing from Japanese pattern books for about 5 years and I especially enjoy Japanese sewing patterns for children. The styling is wonderful, they are great value for money, and I love being able to think in centimeters rather than inches!

Kids Clothes Sewing Lesson Book ISBN 978-4-529-05076-0
One good thing about Japanese sewing pattern books is that they usually include a diagram showing the pattern layout. This gives you a clear idea of how your yardage will be used and therefore eliminates any guesswork. This is helpful if you cannot read Japanese. However, there are some terms that will be useful to know which will make your sewing project go even smoother. Japanese Sewing Books has an extensive list of translated sewing terms here.
Today I’m going to talk about how to lay out your pattern pieces and translate the terminology on the pattern diagram. I have chosen two projects from Kids Clothes Sewing Lesson Book (子供服ソーイング LESSON BOOK) and another from Easy to Understand Baby and Kid’s Clothes (いちばんよくわかる赤ちゃんと小さな子の服) to show you.
Let’s talk about the basics of the pattern diagram starting with this very simple pair of shorts from Kids Clothes Sewing Lesson Book.

Pattern A : Kids Clothes Sewing Lesson Book ISBN 978-4-529-05076-0
If you are new to Japanese patterns and want to try a simple project these shorts are a good place to start. Let’s have a look at the pattern layout.

Pattern A : Kids Clothes Sewing Lesson Book ISBN 978-4-529-05076-0
The numbers (in cm) running down the left of the diagram indicate the yardage needed for each size. For example, 50cm of fabric for size 100cm, 60cm for size 110cm, and so on. The number along the bottom shows the width of the fabric. The rest of the markings on the diagram are particular to each pattern, although there will always be some overlap of terms.
I made a size 100cm and so the pattern called for 50cm of fabric. As you can see there are only two main pattern pieces and two pockets. The main pattern sheet has only one pattern piece for the shorts and one for the pockets, as they are identical. Take care when tracing patterns to make sure you make enough copies of each piece. The diagram shows you to place the fabric right side up and cut without anything on the fold. Easy! Please keep in mind that if you are using a directional print or stripes and want the left and right side to match, you may need to use more fabric than the pattern calls for. I wanted to match the print I used so I prepared around 65cm of fabric.
As Meg mentioned yesterday, you are going to need to add the seam allowances to your pattern. The numbers along the edge of the pieces refer to the seam allowance, for example the waist has 4cm seam allowance. Where there are no numbers a standard 1cm seam allowance is required. Some people like to trace the pattern as is, then add the seam allowance directly on to the fabric. I prefer to add the seam allowances when I am tracing the pattern. You can choose which way works best for you.

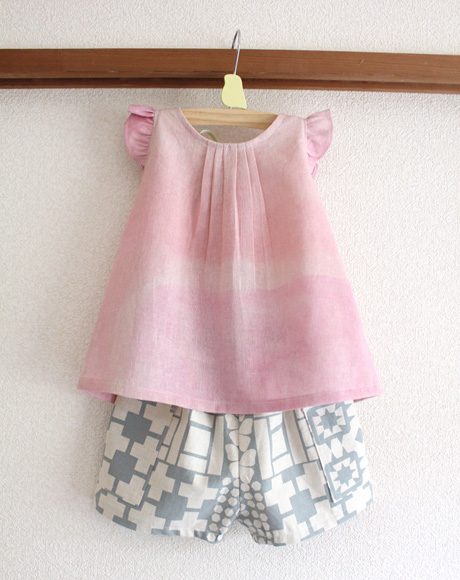
Pattern H-1 : Kids Clothes Sewing Lesson Book ISBN 978-4-529-05076-0
Next is a ruffle sleeve blouse, which is a little step up in terms of difficulty and pattern layout wrangling.

Pattern H-1 : Kids Clothes Sewing Lesson Book ISBN 978-4-529-05076-0
The fabric is arranged right side up here, and the selvedges are folded underneath to meet at the back. The main blouse pieces are cut on the fold, while the ruffle sleeves, arm facings, and back opening are not. Lay your main blouse pieces on the fabric as shown in the diagram and then cut them both on the fold. You will need to cut 2 fabric tab pieces. There is only one pattern piece so cut that on the double layer, although not on the fold. Unfold the fabric to cut the other pieces on a single layer of fabric. The back facing piece has diagonal stripes in the diagram which indicates that you need to cut one from fabric, and another from interfacing. Be sure to transfer any markings on the pattern, like pleat marks, to your fabric too.
This book is unique in that it includes patterns for pieces which are simple squares or rectangles. Many Japanese sewing books require you to draft your own. Don’t worry though, it is very easy to do but also important to know which measurements you need for the size you are making. Let’s have a look at a baby shirt pattern from Easy to Understand Baby and Kid’s Clothes (いちばんよくわかる赤ちゃんと小さな子の服).

Pattern B : Easy to understand baby and kids clothes ISBN 978-4-529-04842-2
The top diagram shows a very similar layout to the patterns mentioned above. The fabric folded around to the front so wrong sides are together and the main pattern pieces cut on the fold. You can see here too that no extra seam allowance needs to be added to the neck and arm lines. The bottom diagram shows the pocket and front opening facing both of which are pieces provided on the pattern sheet. The front opening facing has shading which indicates that you need to cut one piece out of interfacing. A pattern piece which requires interfacing is most often shown with diagonal stripes or shading. The loop, armhole facing, and neck facing are pieces you will need to make yourself. They are cut on the bias and have the measurements written beside each one. The shirt comes in sizes 70cm to 100cm and the numbers next to the facing pieces reflect the measurements for each size. If you are making size 70cm you need to cut two armhole facing strips 4.4cm wide x 27cm long. For the neck facing you need one strip measuring 4.4cm wide x 37cm long. The loop is the easiest! Cut a piece 2cm wide x 6cm long and you are all done!
Sorry to interrupt Frances’ post, but I wanted to add just a couple things that I thought might be helpful to know along with all of the great information provided above. Some of this has been touched on already, but sometimes another graphic is helpful 😛
 (click image for a larger size)
- The line along the bottom of the image shows you how to lay your fabric. If it’s just a straight line, you lay your fabric out flat. If it has a curve in it (like this one), you’ll need to fold your fabric. The dots on either end of the line represent the fabric selvedges. One edge of the fabric is lined up with the dot on the right and then the fabric is folded under where the line curves. The dot that is about 1/3 of the way in is where the other fabric selvedge should end. That way the sleeves, pockets, yoke and other small pieces are all cut on a single layer of fabric, while the dress front and back are cut on the fold.
- わ ‘wa’ means fold. You’ll see it a lot in these layout diagrams and also on the pattern pieces. Be sure to place these pieces on the fold of your fabric.
- 枚 ‘mai’ is a Japanese counter for thin, flat objects like paper or a piece of fabric. There will always be a number in front of it like 1枚 or 2枚, which tells you that you need to cut 1 or 2 of that pattern piece from the fabric.
- Frances already mentioned this above, but when you see shading or diagonally striped pieces, that indicates that those pieces need to be cut from the fabric and also need interfacing.
Ok, back to Frances 🙂
How do you feel about all that? Please let me know if you have any questions. I hope you are going to try sewing from Japanese pattern books. Don’t let any language barrier put you off. Enthusiasm is more important than being able to understand each word in the pattern so jump in and give it a go. You can do it!
If you are interested in seeing a cheeky monkey wearing the above outfit come say hi to us over at Miss Matatabi today.
Thank you so much, Cherie!
***
Oh that outfit she made for her daughter is SO cute! Thank you, Frances, for all the amazing information and for sharing it with us today! Definitely stop by her blog and her shop for more gorgeous goodies and don’t forget to check out the Tokyo Craft Guide!

Can you believe tomorrow is that last day already!? Join us for the fantastic conclusion to the series and . . . oh yeah, did I say something about a giveaway!? Hmm . . . guess you better check back for more details 😛


What a wonderful article!!!!! I want to buy all those books now! Thank you for the amazing detailed post!
Great series! I’m sure that the first time I try one of these patterns I’m going to have to keep coming back here as a reference, but I finally feel like it would be possible for me to make the attempt. (And how cute is that outfit?)
Hi Cherie,
This is my last contribuition: http://www.flickr.com/photos/mybabylittlefeet/8598247258/
Once again, thank you so much for this series, it really inspired my to sew some new garments for my daugther’s wardrobe. You are the best 🙂
Carla
Wonderful to see a whole post on the Pattern Layout diagrams, they contain so much important information.
It is always great to read what you have guessed and also having some clouds of misunderstanding cleared away. Those posts will be very helpful as a come back on what-does-that-mean-again moments !
I have one question : I am a big fan of the japanese patterns but my sons are now big (9 and 13 years old) and I can’t seem to find any japanese books for teenagers or big kids. Do you have any titles that I could check out???
Thank you again for this great week !
Hello! So I put the question out to some of my Japanese pattern sewing buddies and here is what Sanae said:
I’ve been asked the same question before, and I’ve been looking around with no luck so far. I’m guessing this is probably because almost all kids in Japan start wearing uniforms starting middle school?
There’s a Japanese pattern company called Tamanegi-Kobo (http://tamanegikobo.ocnk.net/) that has a very limited selection for kids sizes 140-160cm. They also seem offer their patterns in English, though I’ve never used them personally.
I think for older and teenage girls, adult Japanese pattern books could be used since the sizes tend to run quite petite.I don’t know of any boy-specific pattern books, though some of the designs for women are pretty androgynous.
Hope that helps a little! Good luck!
That is a big help. And you’re right I could also check out some of the women patterns that could suit boys too.
Thank you for taking time to answer and thanks again for this great week.
Pattern Label make boy’s patterns up to size 150cm.
http://www.pattern-label.com/product-list/24
I also agree with Cherie. Adult sizes do tend to run small so adult patterns might be worth looking at too 🙂
I love this series – it’s been so helpful! My first Japanese pattern book arrived this week, and it’s on my “spring break to-do” list. I also ordered some beautiful double gauze as motivation – although I”m not going to use it on the first go with a pattern:)
Pingback: Japanese Sewing Book GIVEAWAY! | you and mie
Oh my GOSH! This series has been amazing. Thank you so much for sharing.
Thanks, Frances!!! Sometimes pieces on those layout sheets have me totally scratching my head. No longer! 🙂
Pingback: Japanese Sewing Book Series Wrap-up! | you and mie
just find that series! bought the lesson book and with that post i think i can manage to make some beautiful dresses for my daughters – thanks to all of you for tips and translation!
This series is wonderful. I read through every post carefully, and it made me feel that I might actually be capable of making something from the Kids’ Clothes “Lesson Book.” With a printout of these posts beside me (I cut and pasted them all into a big Word document), I managed to make the dress at H-2 for my daughter — the dress version of the pretty ruffled blouse featured above. I am ridiculously proud and excited about it and am dying to make more.
The one big problem I had was the pocket. I’m embarrassed to say that I couldn’t figure out the pocket instructions for that piece at all. So I ended up sewing the pocket in a different way (the way I’ve done simple pockets in the past), and it came out all wonky. So I wanted to ask (and I know this is an annoyingly, selfishly specific question) — would you be able to point me to anything that might help me figure out the pocket step? Or would you (or one of your readers) be able to provide a quick outline of steps for the pocket for that piece? I imagine this same kind of pocket construction will come up in other patterns from the Japanese sewing books, and I feel like an idiot for being completely stumped by it.
I like your article so that I read all of your articles in a day. Please continue and keep on writing excellent posts.