
 It’s the last day of the series! *sniff sniff* I really hope you’ve enjoyed all the posts my guests have put together for you. Are you beginning to feel like you can tackle these patterns on your own? Well today’s guest, Robin from nested in stitches, is going to walk you through all the steps of constructing two garments. Now this is really helpful if you want to make these specific garments, but you’ll also learn a whole bunch of useful tips and things to look for that you can apply to any pattern!
Robin is another awesome sewing wizard who hails from the Pacific Northwest (seems like there are a lot of them up there!). She is also a jack of all crafty trades – she sews, she knits, she quilts, she enjoys all things you make with needles apparently. Her blog is filled with adorable clothes that she’s made for her daughter, like this O+S dress, this apron, and these skirts. She also occasionally sews for herself and check out this modern crosses quilt!
My absolute favorites though, are the Moonrise Kingdom outfits she made for film petit. I LOVE that movie and I LOVE Robin’s inspired outfits – she really nailed it!! You’ve got to check out the 2 outfits she made and the awesome photos of her daughter in them. Seriously awesome.
I’ve recently been lucky enough to see some of Robin’s handy work up close and not only is it stylish, but the workmanship is gorgeous and high quality. It looks straight out of an expensive boutique. And on top of all that, Robin is also just a total sweetheart. She’s always willing to help out – in fact, during my last sewing project from a Japanese pattern, I got stuck on step ONE. I felt like an idiot, but she totally helped me figure it out and she’s been a huge help to me with this series too. So without further ado, here’s Robin to close out the JSBS guest posts . . .
***
Hello you & mie readers! I am so excited to be here today to help guide you through sewing with Japanese patterns. This series has been so awesome and has provided tons of invaluable information that will help you decipher these patterns. I started sewing from Japanese pattern books several years ago, and once I learned a few basics, I figured out how to muddle my way through. I do not speak or read a bit of Japanese, so if I can do it, you can too!
Before I get started, I want to offer my four main pieces of advice for sewing with Japanese patterns.
- Know the Japanese characters for back: 後ろ. Google translator says this translates as “behind, back, rear”. I look for that character that looks like a 3 on instructions and pattern pieces. This helps me navigate the instructions a ton.
- Remember the seam allowances. As Meg showed you on Wednesday, you need to add seam allowances to all your pattern pieces. The standard seam allowance is 1 cm, but look for places that indicate you should add more. I always add my seam allowances in inches, since my machine has seam allowance demarcations in inches but not centimeters. Whenever I’m supposed to add the standard 1 cm seam allowance, I add 3/8 inch. It just seams like a good standard number to me, so that’s what I do. The main thing is to add whatever seam allowance is easiest and makes the most sense for you, and do it consistently.
- Google translator is your friend. If you need help in understanding what the text says, type in what you think it might be in English and see if the Japanese characters match.
- My biggest advice to you? Rely more on your own knowledge of garment construction than on specifics of the instructions.While I do follow the instructions, if something is confusing, I ask myself: what would Liesl do? Just trust yourself. After all, you can always use your seam ripper!
The nice thing about so many of the patterns in these books is that they are pretty simply constructed. If you want to start sewing with these patterns but are still feeling a bit unsure, definitely start with some of the more straightforward patterns- a pillowcase dress, simple top, basic pants or a skirt.
Let’s start with a simple skirt from my personal favorite, A Sunny Spot.

 Turning to the pattern instructions on page 62, this is what you see.
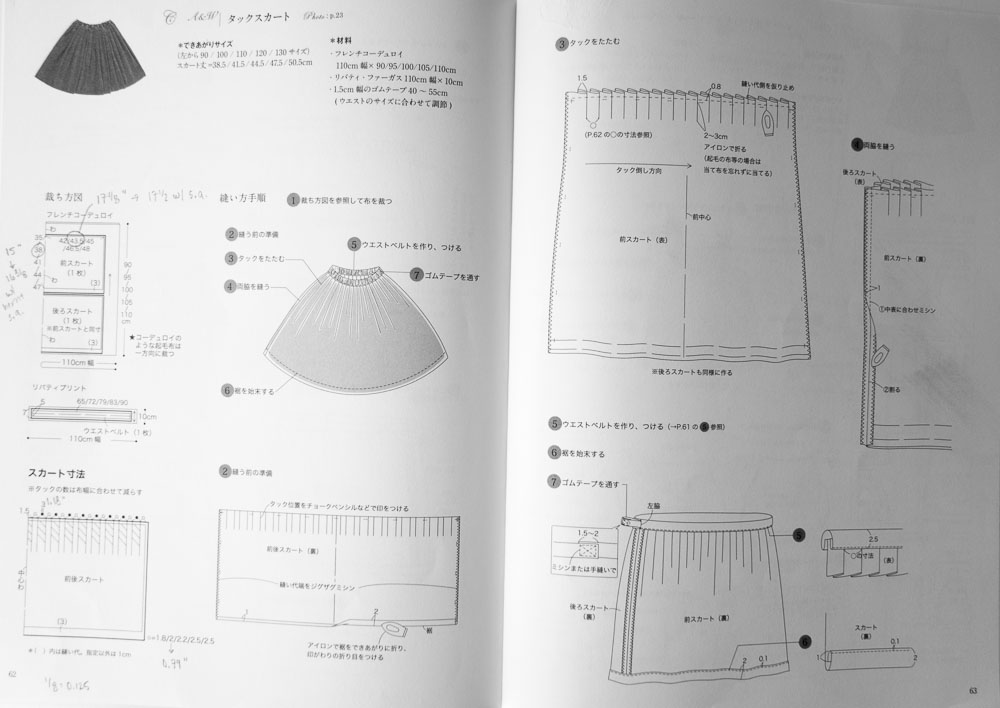
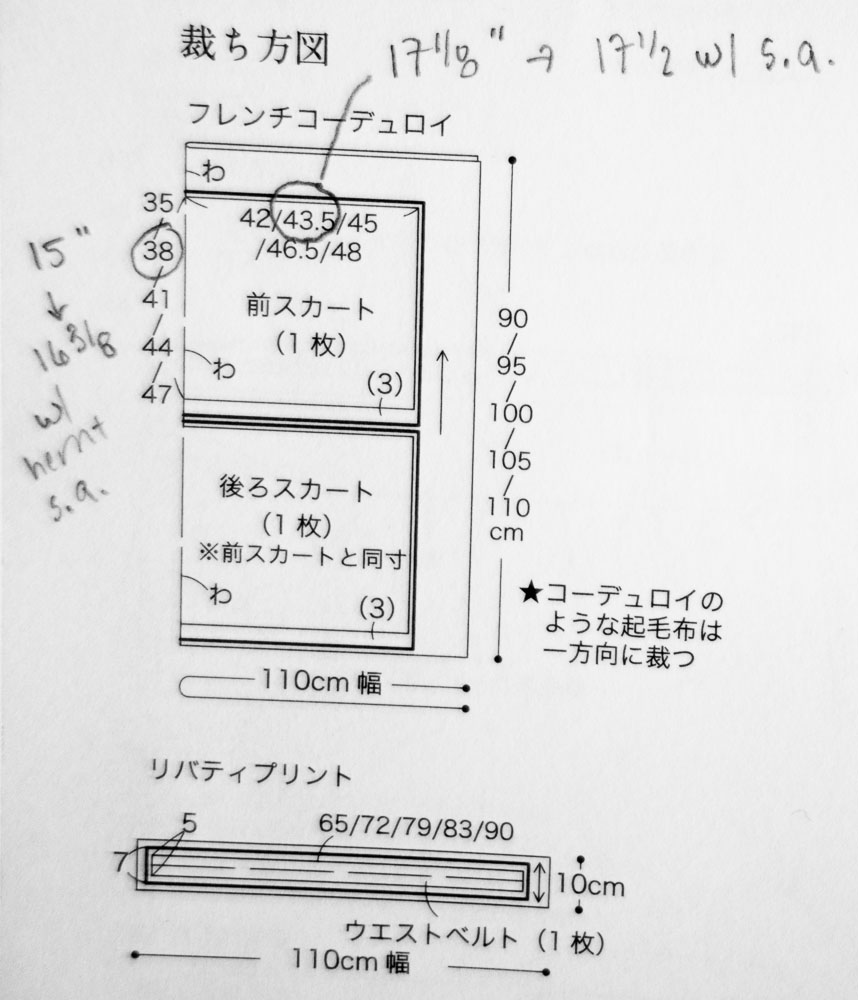
First things first, here is your pattern layout. We’ve got two rectangle skirt pieces cut on the fold, plus one waistband piece that measures 5 cm tall (7 cm with added seam allowances) and 65/72/79/83/90 cm wide for sizes 90/100/110/120/130.
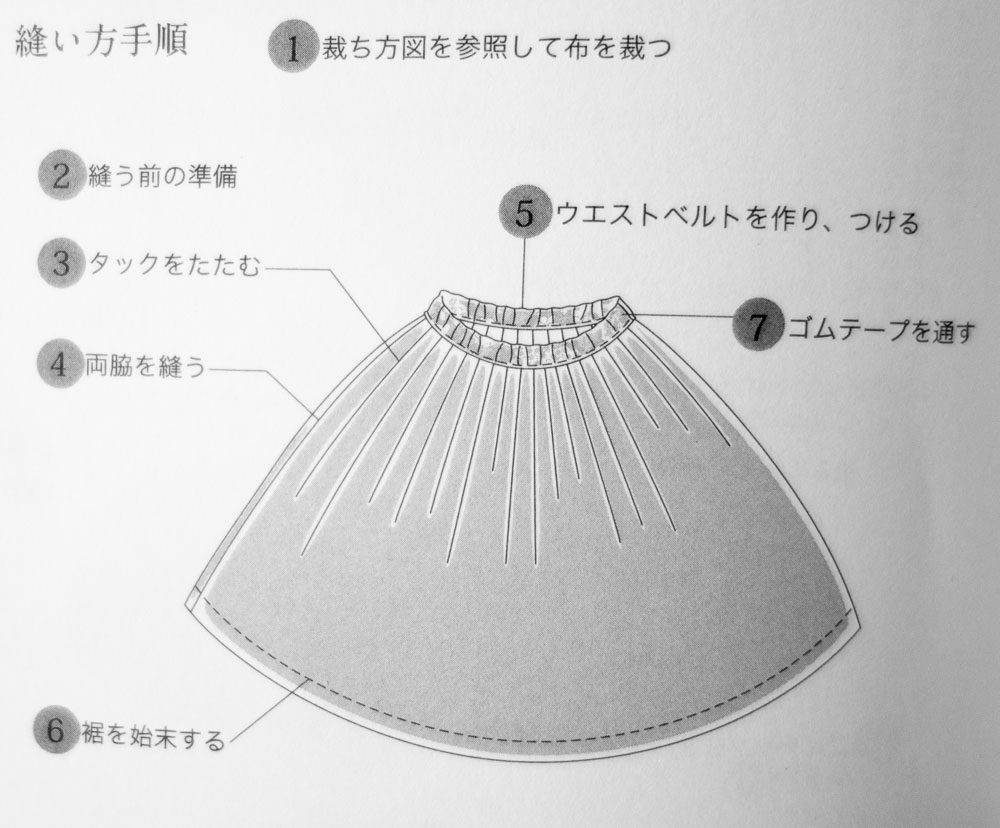
And you’ll notice the handy dandy graphic that shows what the final skirt looks like. This is the money image- it tells you the order in which the skirt is constructed.
Step 1: Using the layout diagram measurements, draft the skirt pieces.
(This is from Sanae. Since there were no images associated with step 1, I had no idea what it meant. Turns out I didn’t really need to.)
Step 2: Prepare the skirt pieces.
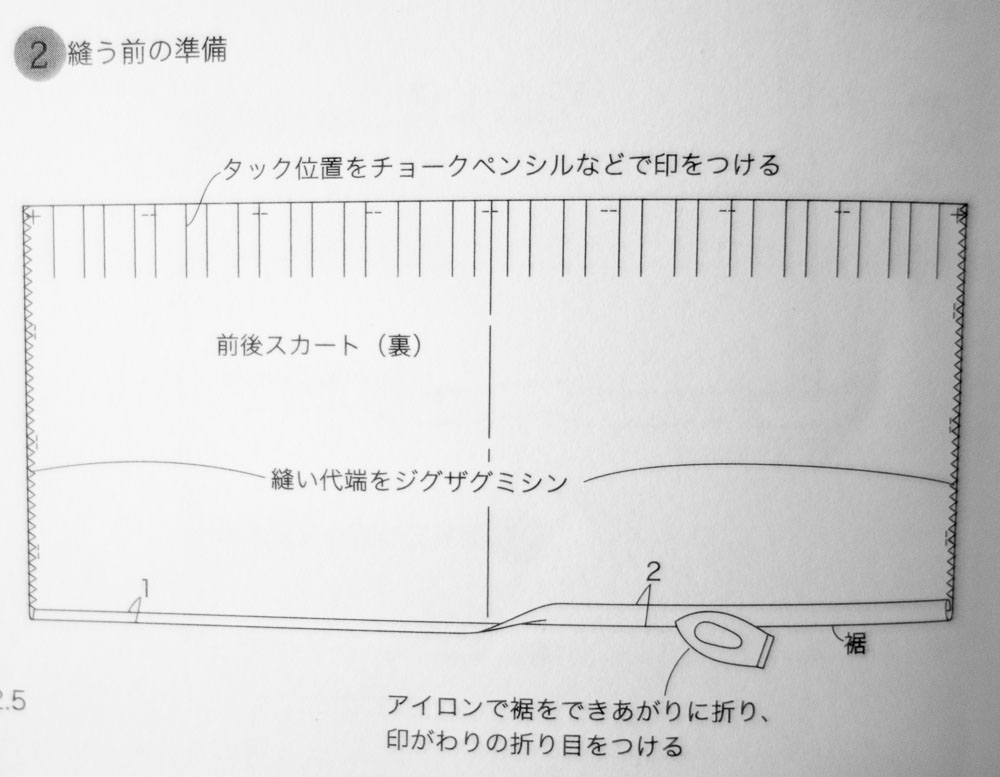
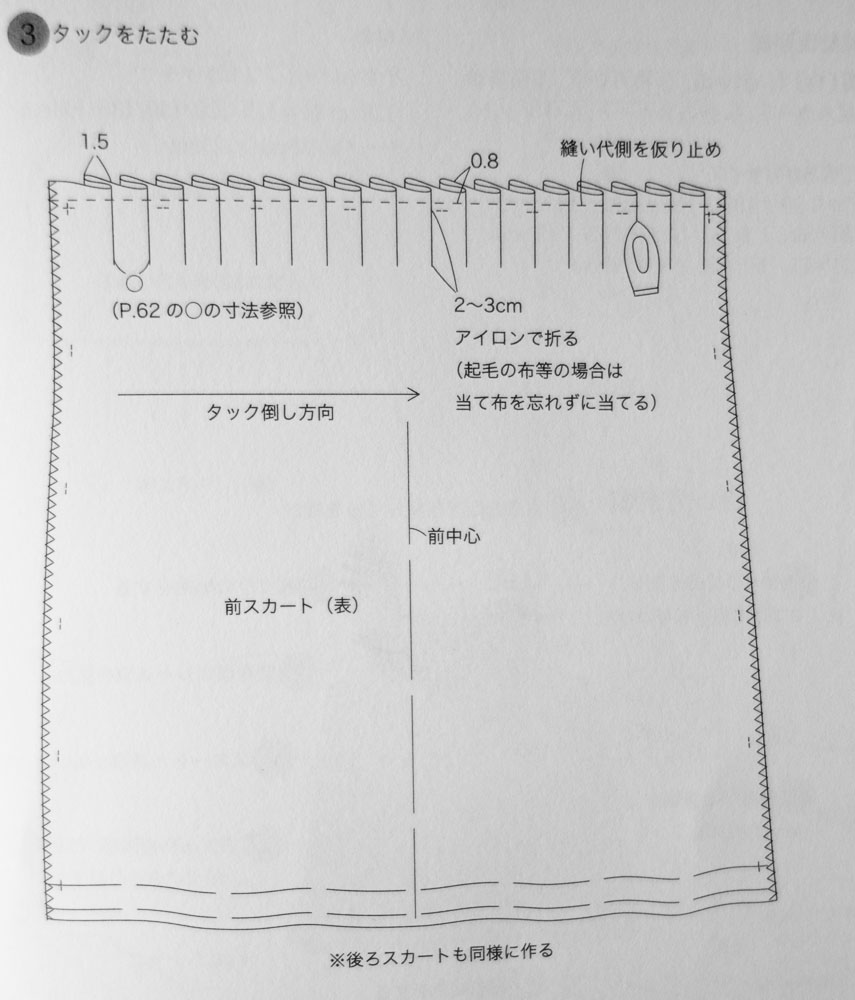
- Press the skirt hem into place: Looking back at the diagram of the pattern pieces, you’ll see that the skirt has a 3 cm hem allowance. First fold the bottom edges up 1 cm, press, then fold up again 2 cm, and press again.
- Finish the side seams- of course, you want to avoid cutting into your seam allowance when you do this, since you haven’t sewn the pieces together yet.
- Prepare the pleats by marking the top skirt pieces as indicated and press the pleats into place. There is a graphic next to this step that shows you the measurements to use. Following this from left to right along the top, mark the first pleat line 1.5cm in from the fold. You’ll see an open circle that indicates the distance to the next pleat line- this corresponds to 1.8/2/2.2/2.5/2.5 cm for sizes 90/100/110/120/130. Next, there is a dark circle indicating that the distance to the next pleat line is 3 cm. Continue marking the pleats as indicated. The hatched lines indicate that this is where you will fold the pleats.

Step 3: Press and sew the pleats in place using a seam allowance of 0.8cm.
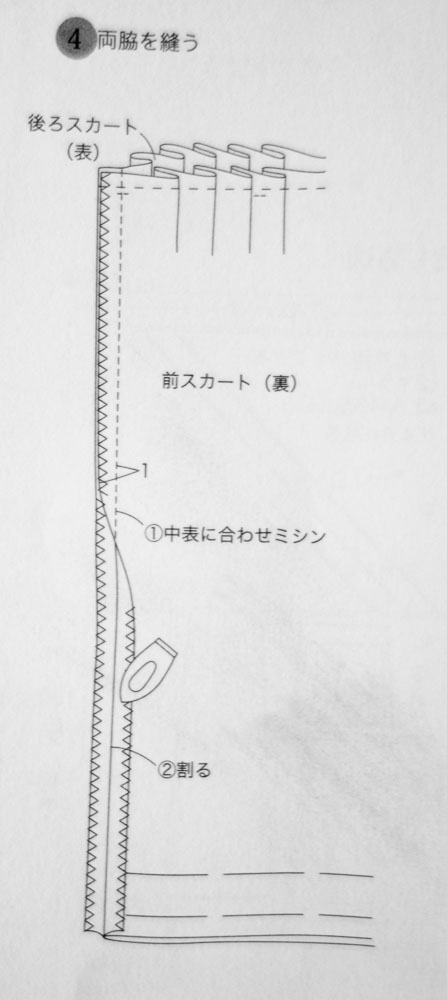
Step 4: Sew the front and back skirt pieces together at the side seams, press seam allowances open.
 Step 5: Sew the waistband pieces together. (Notice that here there is text only in the original pictures, which refers you to step 5 on page 61, shown here.)

- There is a 1 cm seam allowance, and notice you want to leave a 2.5 cm opening to insert the elastic in the middle.
- Now pin the waistband in place along the top of the skirt right sides together, and sew with a 1 cm seam allowance. How do I know it’s right sides together? The waistband has 裏 in parentheses, which means “wrong side”, while the skirt piece has 表 in parentheses, which means “right side”. So the right side of the skirt faces out, and the right side of the waistband faces in.
- Fold the unsewn edge of the waistband piece up 1 cm and press. (This would of course be done more easily before you sew the waistband on!)
- Turn the skirt wrong side out (see the 裏 in parentheses?), fold/press your waistband up and then over to the wrong side. Topstitch in place.
Steps 6 and 7: 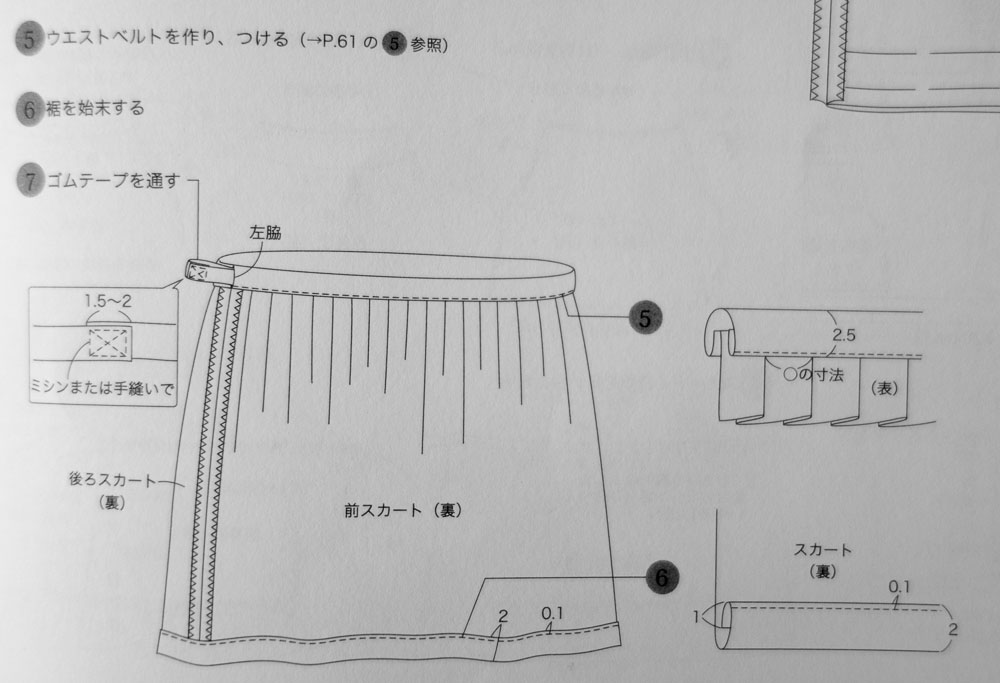
Step 6: Hem the skirt. You had folded and pressed it into place in earlier steps. Topstitch.
Step 7: Insert elastic into the waistband. Stitch the ends together as shown.
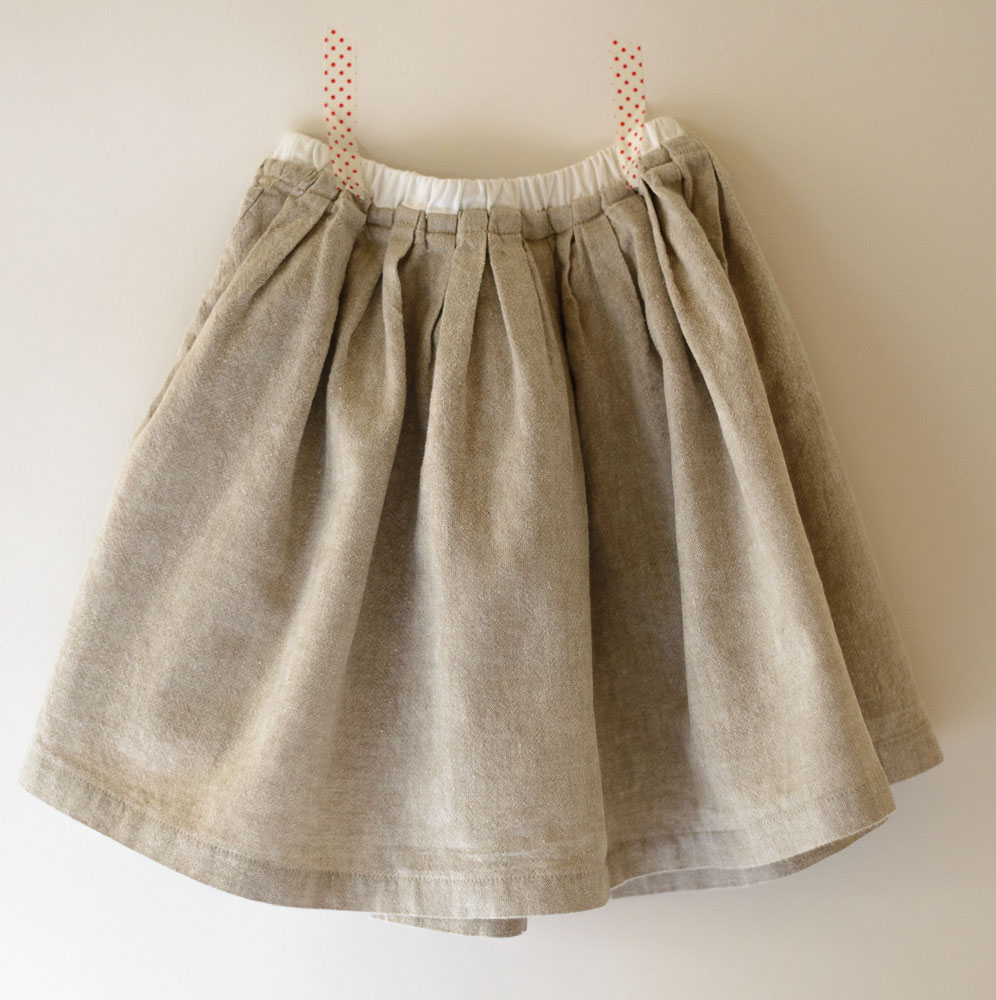
And done! You have a skirt!
Let’s look at another, slightly more complicated pattern. Since Happy Homemade volume 2 has a lot of good basics for girls and boys, I think it’s a great book to start out with. So I’ll walk you through the pattern that Meg posted about on Wednesday. It’s a straightforward piece, but there are definitely more details than some of the even simpler pieces will have. I also want to point out that while I had Sanae check my translation, nearly everything I am providing below is taken using my four pieces of advice plus a little graphic studying.
 For more detailed steps on how to get to the point at which you’re ready to sew, be sure to check out the previous posts in this series. Sanae gave info on the basics for this book in her post, which is super helpful.
Once you’ve got all your fabric pieces cut out and everything else is ready to go, direct your eyes to this diagram- like the one from A Sunny Spot, this provides a nice visual overview of the steps and the order in which you will construct the garment.
 Before we delve in, take a moment to think about how this pattern would be constructed using the pieces you’ve cut out. We’ve got a lined front and back bodice, a back that closes with buttons and button loops, and a gathered skirt. Pretty familiar, right? Let’s dive in.
Step 1: Construct the button loops.
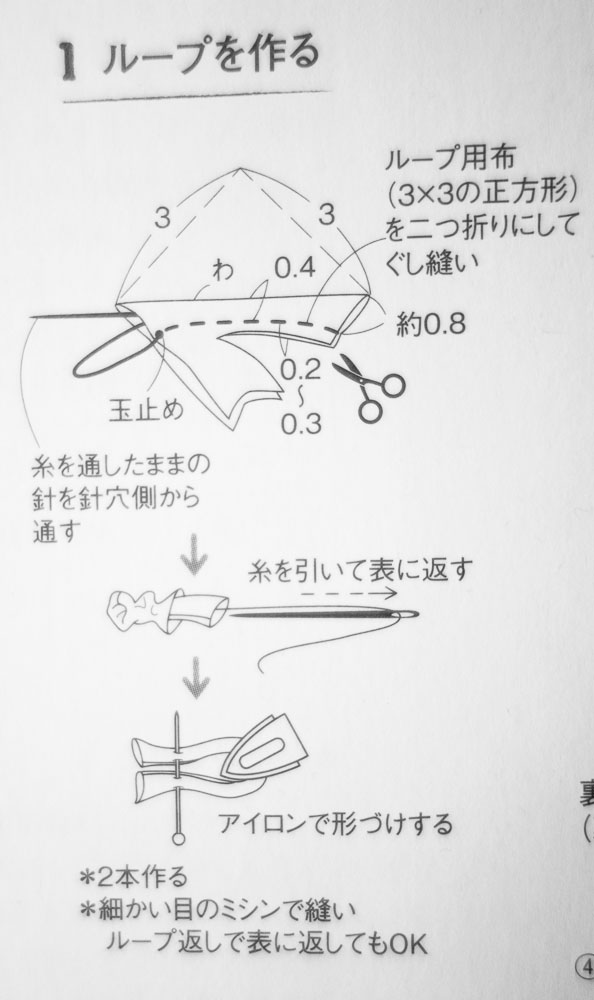
- Sew the two bias button loops from 3x3cm squares, noting the slightly curved seam line.
- Trim the seam allowance to 0.2 cm.
- Using a needle and thread, flip that puppy right side out.
- Press.
- Make 2.
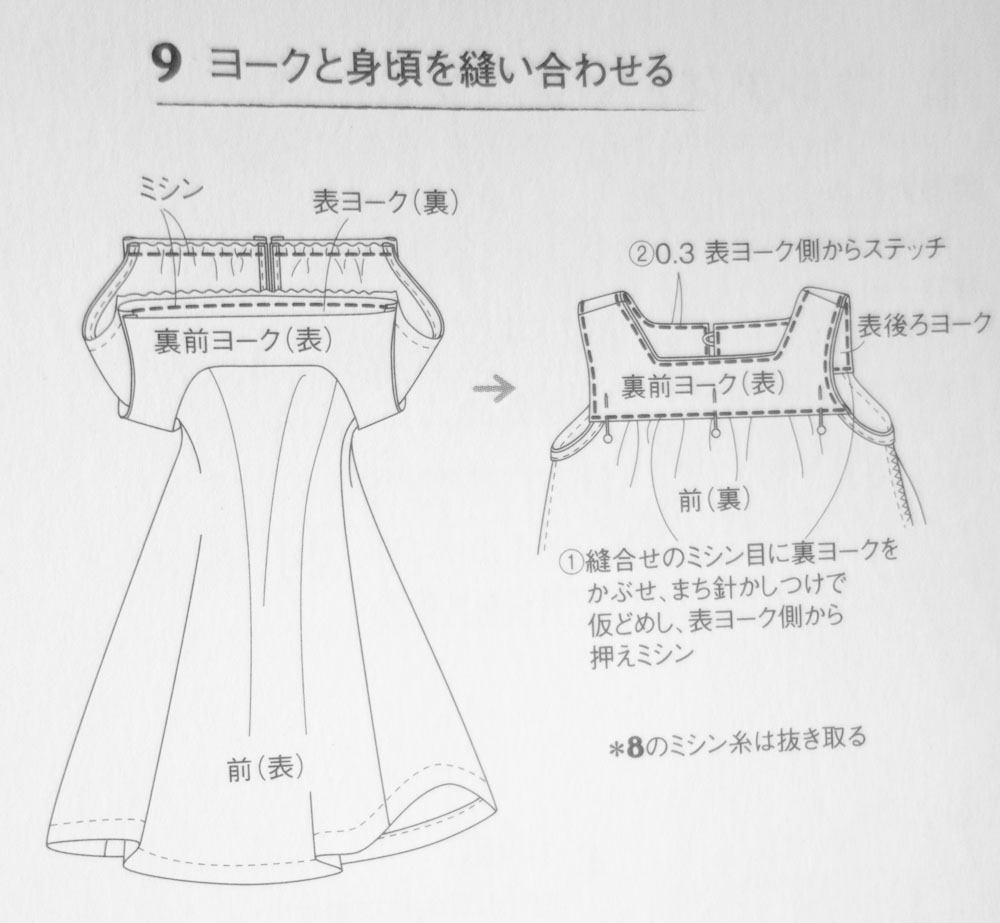
Steps 2 & 3: Construct the bodice (yoke).
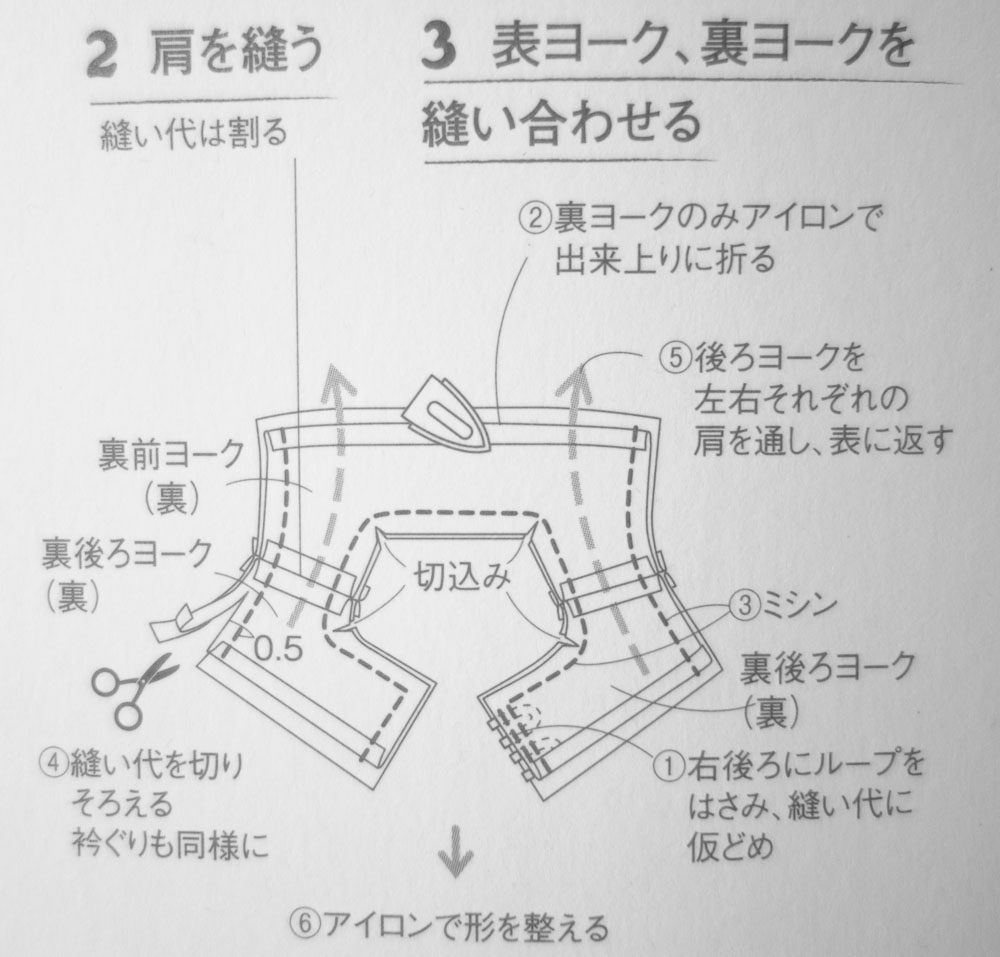
Step 2: Sew the shoulders.
- Sew the front and back bodice pieces together at the shoulder. Remember, these pieces have the standard recommended seam allowance of 1cm (~1/4 inch), so sew these pieces together with that seam allowance. Of course, you’ll want to finish your edges using your preferred method. See how the diagram shows that the seams are pressed open? Press those seams open.
- There’s a lot of text in this pic. Again. Focus on the pictures and your knowledge of garment construction. It’s easy to feel frustrated that you can’t understand every last bit of the instructions. Don’t be! You know what you’re doing!
Step 3: Sew the front and back bodice (yoke) pieces together. Notice… there’s a lot of substeps here.
- Base the button loops to the right side of the back bodice piece so that when you put the outer and inner bodice pieces right side together, it will be sandwiched as shown.
- Press the inner front and back outer bodice pieces up along the bottom edges. I don’t see any specific measurements noted here, so I would just press up the seam allowance of 1 cm.
- Sew the with right sides facing. Sew along the dashed lines with the 1 cm seam allowance.
- Trim the seam allowance in half (from 1 cm to 0.5 cm) along the arm edges. Also clip the curves of the neckline as shown.
- Turn the sewn bodice right side out.
- I don’t know what this means. But I know how to construct a bodice, and so do you. So I’m gonna go with pressing the bodice. 🙂
Step 4: Finish back opening/slit with bias strip (I’m not even entirely sure what this means, but we’re going to look at the pictures to figure it out. See that 後ろ? That means we’re looking at the back. Also, the picture looks like a skirt piece. Let’s take a closer look…)
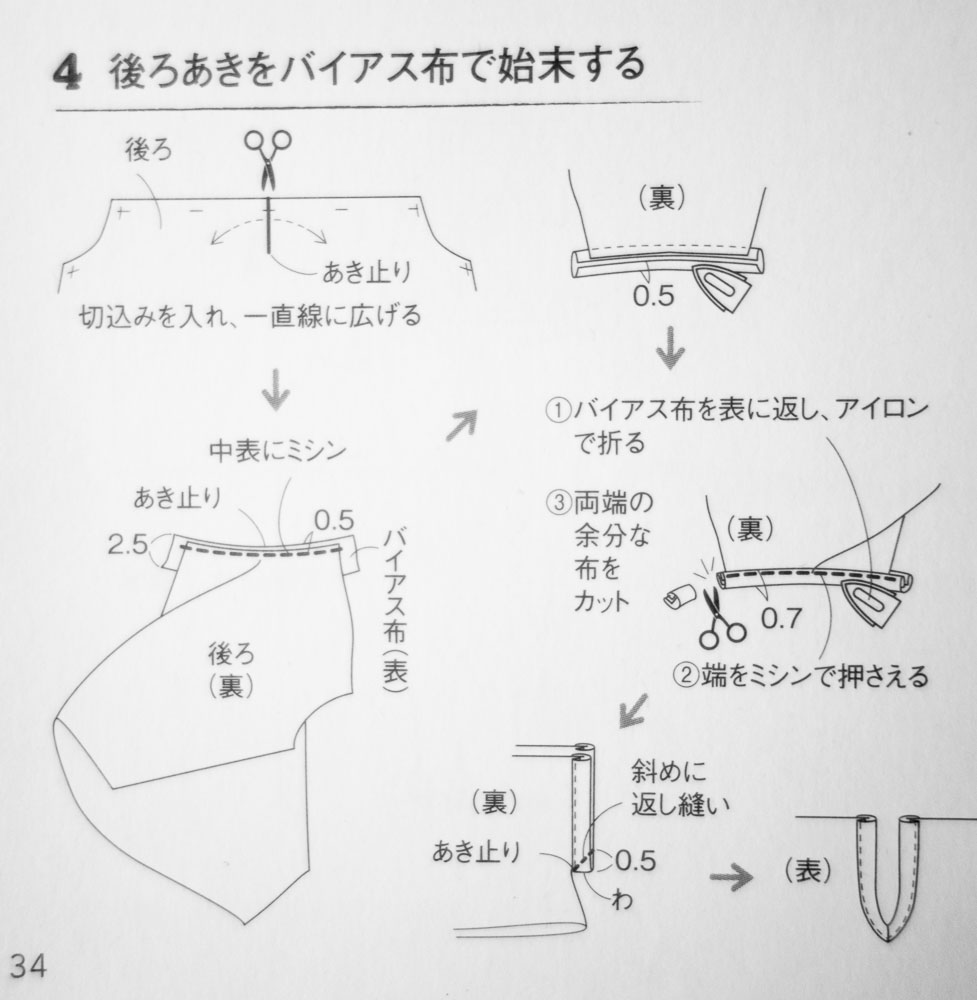
- Cut the back skirt piece. Your pattern piece has a mark indicating how far down you should make this cut. Spread the piece apart along the cut line, following the arrows out.
- Moving down, you’re looking at the back skirt panel again- the top part is the slit you just cut spread as horizontally as possible. Here you’ll want to sew one of your 2.5 cm wide bias strips to the right side of the skirt with a 0.5 cm seam allowance. (That character on the skirt in parentheses? 裏 indicates wrong side).
- Back up to the top right graphic, you see to press the bias strip first out, then press the edge up 0.5 cm.
- Next, press the whole shebang to the right side and topstitch. Trim the edges.
- Fold your skirt piece in half and stitch along the bottom of the bias strip on the diagonal as indicated.
- Turn your piece out… press to the wrong side.
Step 5: Sew your skirt side seams. Finish your edges as desired, press. (see below for pic.)
Step 6: Finish the armholes on the skirt.

- Right sides facing (see the 表 in parentheses in the middle pick? That indicates its the right side), sew the bias strips to the each armhole on the skirt piece. Trim the seam allowance in half.
- Turn the bias strip out, press, then turn the unsewn edge in and press.
- Press and pin the bias strip in place, topstitch.
Step 7: Hey, there is no illustration for step 7! A look back at the general sewing diagram indicates that here you’ll finish your hem. You should have added 4 cm or so to your skirt pieces for the hem allowance. Press the edge up 2 cm, then again another 2 cm. Topstitch.
Step 8: Sew gathering stitches on the front and back skirt pieces.

Step 9: Assemble the dress.
- Gather your skirt pieces to match the width of the bodice. Sew the gathered skirt pieces to the outer bodice piece using the standard seam allowance.
- Flip that bodice up, press, and topstitch as indicated. Here you’ll catch that folded edge of the bodice pieces, stitching it closed will allow you to enclose the top of the skirt.
Step 10. Attach buttons. You have a dress! High five.
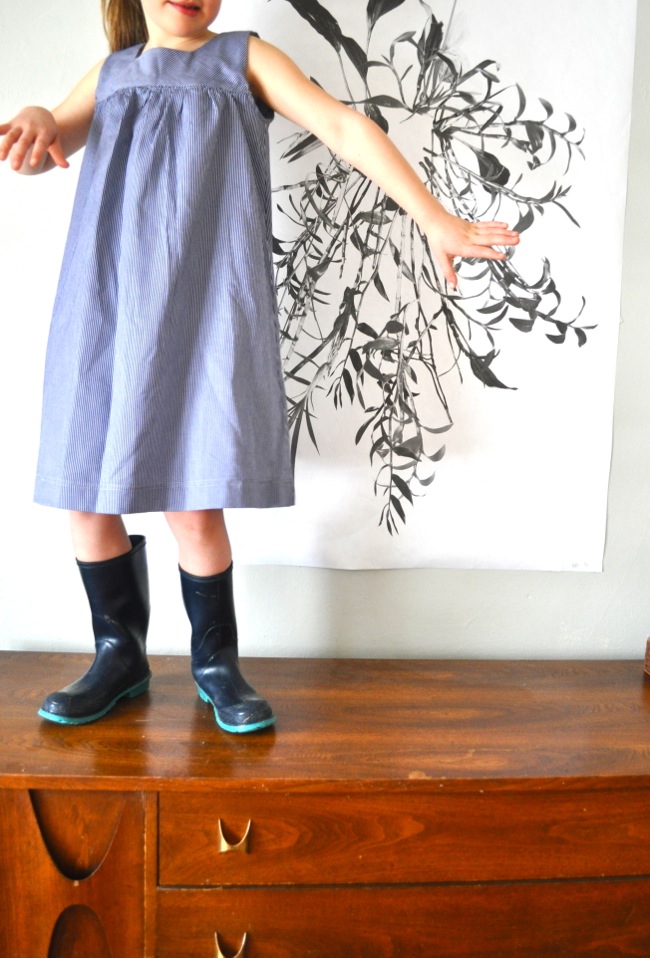 Dress and photo by Meg of elsie marley
***
Thank you, Robin, soooo much for walking us through two patterns and all your helpful hints! If you’d like to see more of Robin’s awesome creations from Japanese sewing patterns, head over to her blog to check out her round-up! Along with all her other beautiful work . . .
 And a big thank you to all five of my guest bloggers who have shared such an amazing wealth of knowledge with us this week! Thank you Kristin, Sanae, Meg, Frances and Robin – this week would have been nothing without you!
We may have wrapped up the guest posts, but the series hasn’t quite wrapped yet. After all these amazingly informative posts, I think you’re ready to dive into Japanese sewing books, right? Well check back in later today for the chance to win a Japanese sewing book of your own to dig right into!
Thanks for stopping by!


Thank you so much for this incredible series. I have so many Japanese sewing books and haven’t really sewed anything from it ( 1 or 2 things) but I’m always looking for inspiration in them. I finally bought some Nani Iro fabri (today!) a first for me and I’ve decided I would only sew something from my books with them. Your series is what really got me motivated- thanks to everyone who’s participated. My kids will have the best summer wardrobe ever!!!
Noooo! It can’t be over! I really loved this series, Cherie. Thank you ladies for your awesome posts!!!!!
Awesome series! I’m excited to dig into one of these books soon!
This was a wonderful series! I haven’t considered using Japanese sewing books before (the language barrier is a bit daunting), but I see how it’s really quite simple as long as you keep your head. Thanks to everyone who posted! You’ve really helped me out!
Another great post and I love Robin’s 4 main pieces of advice. No. 4 is especially true – relying on your own sewing knowledge rather than trying to translate every single word.
Ahahaha “What would liesl do.” That cracked me up! Thanks for the tips too 🙂
Another excellent post. I really wish you’d been my next door neighbour when I was making my first Happy Homemade hoodie!
SO helpful, Robin, thank you!! I had figured out some of this stuff on my own, but it’s nice having confirmation and clarification that I’m “doing it right” too, you know? I’ll definitely refer back to this one whenever I’m stumped!!
thanks robin! thanks cherie! when i win one of those japanese pattern books from the giveaway i’m gonna make something amazing with all these great tips!!
Pingback: Japanese Sewing Book Series Wrap-up! | you and mie
Dah seminggu saya cuba cari bahan untuk assigment … last2 dapat kat blog nie…
terima kasih di atas artikel yang amat bermanfaat kepada saya nie…
🙂