Four Corners Nursing Blouse

One thing I tend to do is buy up new fabric prints and then hang on to them forever and never make anything with them.  Then they aren’t really cool anymore.  Or, the print might still be awesome, but everyone has already seen them and sewn with them and moved onto something else, so I feel like I missed the boat.  I bought some Washi to make a Washi dress with and never did.  I bought some and old lace to make myself shorts with and never did.  I won a charm pack of Briar Rose and had a quilt planned out, but . . . well, you get the picture.

When one of my favorite artists, Leah Duncan, released her Tule fabric line, I carefully chose two fabrics to order with a few possible projects in mind, but nothing definite.  This gorgeous Meadow Vale Dark is exactly the type of fabric that I’d hoard forever, constantly changing my mind about what I wanted to do with it and then never using it in the end.  But what’s the point of having such beautiful fabric if all it’s going to do is sit on the shelf?

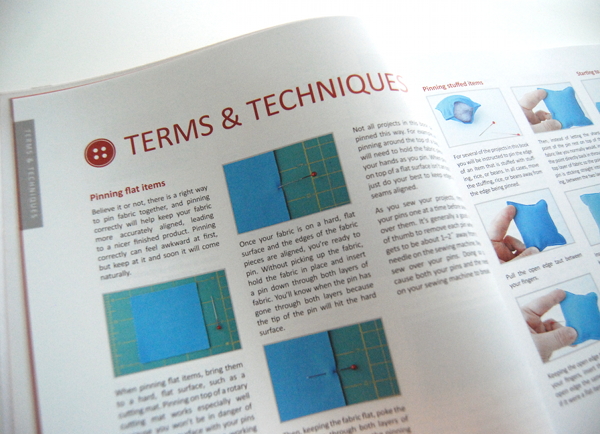
I was looking through Anna Maria Horner’s Handmade Beginnings (affiliate link), the same book I used to make this nursing top, and was intrigued by the other nursing top included, the Four Corners Blouse.  I wasn’t convinced that it was my style or that it would be flattering on me, but I wanted to give it a try anyways since I’m trying to find ways to give my nursing wardrobe some variety.  I debated whether or not I should use my precious Meadow Vale fabric or not.  What if I didn’t like the top and ended up wasting the fabric?

Well in the end I decided to just go for it because letting it sit on my shelf would be a waste as well.

Tule Nursing Top1

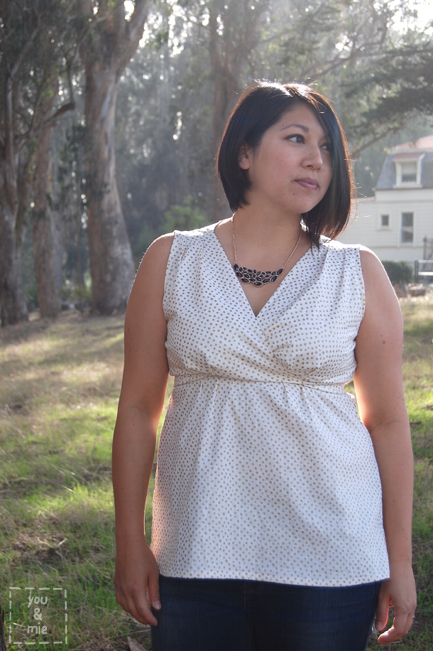
The construction of the top is really quite interesting – all the pieces (and there are quite a few) are rectangles!  So there are no pattern pieces to trace, only rectangle measurements.  I made some obvious changes to the pattern, 1. I omitted all the buttons and button loops.  They are purely decorative anyways and I like to keep it simple.  2. Instead of using a contrasting fabric for the placket (in between the boobs), I used the main fabric to avoid drawing more attention to the chest area.

Tule Nursing Top3

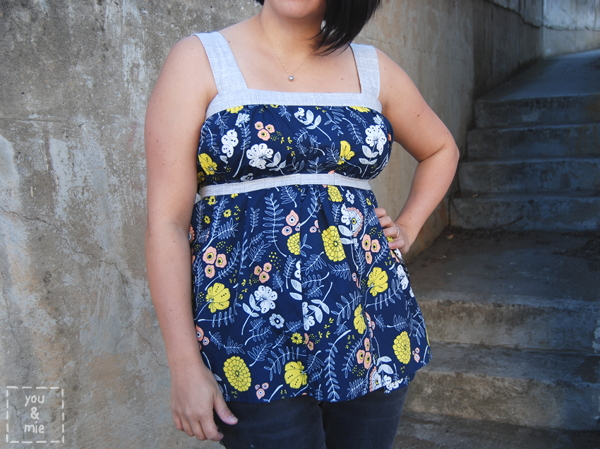
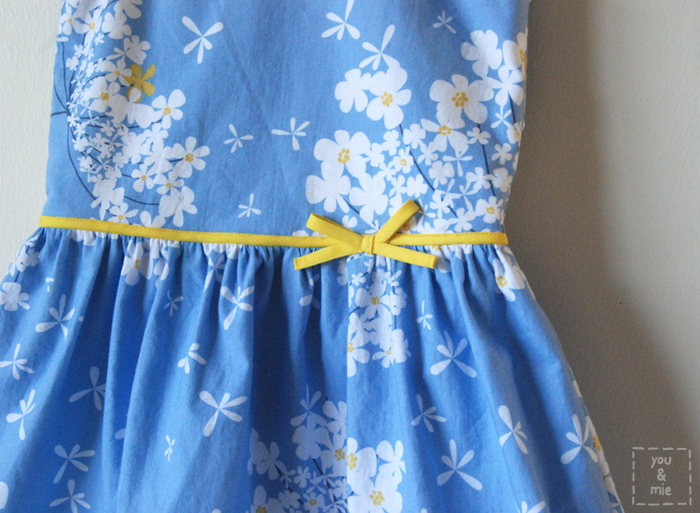
I also made the straps narrower and lengthened the top and made a few other changes here and there.  This top is made with a panel in the front that acts as a nursing cover that opens up when you untie the ties.  Pretty creative and sneaky!

Tule Nursing Top4

The downside though, is because the front panel isn’t connected to anything at the sides, I noticed that when I was picking up things, say, children for example, it would flip up easily and expose my tummy.  Not good.

Tule Nursing Top2

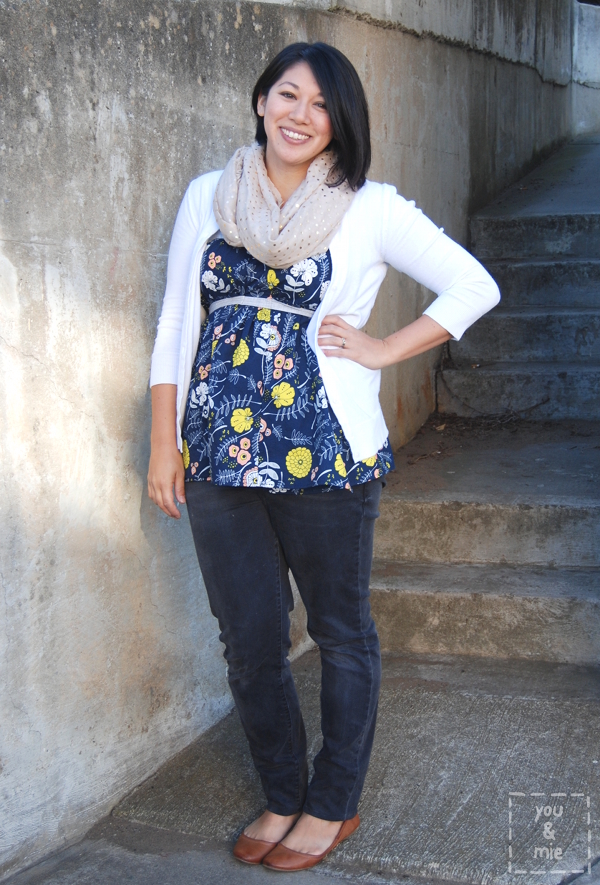
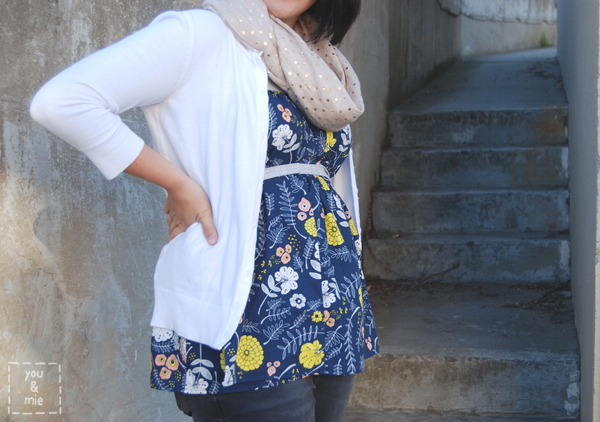
I can’t say that I love this top, but I am glad that I gave it a try and I will definitely wear it. Mostly layered up like this to give me a bit more coverage.  I think this fabric might have been better as something simple like a Wiksten Tank or an Everyday Skirt, but knowing that I probably would have just let it sit in my stash indefinitely makes me feel like using it was the right decision.  And I do love opening up my closet and seeing this lovely fabric begging me to put it on 🙂

Do you have any favorite nursing top patterns?  I’m trying to sew more for me, but need to keep it breastfeeding friendly so I feel like my choices are pretty limited.  I have a few nursing hacks in mind, but I’d love to hear your suggestions as well!  And if you have some fabric in your stash that you are saving away for a special occasion, I dare you to just use it in your next project!  You might be really glad you did!!

Have a great weekend!

Looking Back and Looking Forward

2013 was a huge year for me.  Around this time last year I found out I was pregnant and that ended up shaping the whole year for me.  Sewing and blogging slowed down as my energy waned and priorities shifted.  I watched my baby sister get married.  I got to go to Spring Quilt Market and LA Fabric Shopping Weekend/Girls Night Out and hang out with some of the most awesome sewists and bloggers around and now I get to call them my friends.  I got married.  Then I gave birth to a beautiful and amazing little girl and I’ve been enjoying her snuggles and smiles for the last 3 months (3 months already!??  How did that happen?).  And I’ve watched my little toddler turn into a little girl – more talkative and spunky than ever, and oh-so-sweet in her new role as a big sister.  I feel so very lucky.

2013events

So, like I said, the blog took a bit of a back seat in 2013 and though I’ve missed it, I’ve obviously had good reasons.  Last year I did a recap of my favorite projects from 2012 with the intention of doing it again this year. Well it wasn’t quite as easy with a limited number of posts, but I did want to look back at some favorites from the past year.  First up are the 6 posts from 2013 with the most views.

2013ReaderFavs

1. Reversible Spring Coat Tutorial
2. Announcing the Japanese Sewing Book Series
3. Maternity Geo Dress {tutorial}
4. Colour Pop Top Knock Off {tutorial}
5. Pretty Pink Pinafore {tutorial}
6. Fanfare Baby Blanket

Seems pretty clear that you guys like tutorials! 🙂

And these are my personal favorites from the past year . . .

2013MyFavs

1. My Wedding Dress
2. Fanfare Baby Blanket
3. Sweetheart Bubble Dress
4. All My Friends Are Dead T-shirt
5. Japanese Sewing Book Series
6. K’s Outfit for Handmade Kids Clothing Swap

As we dive into a new year, I’m hoping to get back into sewing and blogging regularly.  There are just so many things that I want to sew!  It’s hard to know for sure what this year will look like, but I’m setting some goals for myself that will hopefully help me shape it into a productive and fun year.  I stopped at 10, though I probably could have kept going – but here they are, in no particular order . . .

1. Sew more for me.  Last year I started sewing a lot more for me and I’d really like to continue.  It’s a bit tricky with my constantly changing body, but I guess that just means I have a lot of sewing to do to keep up, right? 🙂

2. Another series.  I had such a great time with the Japanese Sewing Book Series last year and I’d love to do another series of some sort.  Either a continuation of the Japanese Sewing Book Series?  Something completely different?  You have any ideas?

3. More tutorials!  Clearly you guys love tutorials and I love making them, even though they are a ton of work.  So I’m hoping to continue rolling those out once in awhile and finally update my super outdated tutorial page while I’m at it.  Eek!  Any tutorials you’d like to see here?  Let me know!

4. More collaborations.  Last year I loved working with other bloggers on the Japanese Sewing Book Series and the Handmade Kids Clothing Swap.  And I LOVED meeting and hanging out with all the amazing people at Quilt Market and Fabric Shopping Weekend/Girls Night Out.  Working together and collaborating with other creative types is why I love blogging so much in the first place so I’d love to find more ways to connect with others and bring new and fresh ideas to blogland.

5. Sew my stash/sew my patterns.  My fabric stash is growing faster than I can sew and so is my pattern collection.  I’m going to make an effort to sew from what I’ve got before buying new stuff.  Though the constant flow of new and amazing fabrics and patterns makes it very VERY difficult to resist!

6. Sew smarter.  I often find myself sewing things that are impractical.  I sew dresses for Yuki even though she lives in t-shirts and yoga pants 99% of the time.  I make myself a dress or skirt that I’ll only wear once.  Sometimes that’s ok, but I need to be smarter and more creative about sewing things that’ll actually get worn.

7. Balance my time better.  This one is quite huge and hard to measure, but I’m pretty bad a time management, so I’d love to find ways to be more efficient.  With blogging, it’s not just sewing and writing, but there’s planning and shopping and sewing and photographing and uploading/editing photos, and writing and reading other blogs and comments and emails and pinterest and on and on.  I love doing it all, but it’s a lot and I’d like to find a way to keep my time organized and balanced.  Tips are welcome.

8. Reorganize my sewing area.  I’m a naturally messy person and my work space has gotten out of control.  Plus my fabric stash and sewing paraphernalia have grown out of my current space, so it needs some fixing up.  It’ll be an ongoing project, but I’ll be sure to share it here along the way or when I’m done.  I love seeing other people’s work spaces, don’t you?!

9. Finish projects on my to do list.  Not a particularly exciting one, but I have a a ton of things that I’ve been meaning to get to forever.  Super late gifts I’ve been meaning to make, pants I’ve been needing to hem, clothes I need to mend, etc.  Not glamorous stuff, but things I need to get done!

10. Revamp the blog.  This one will be tough.  I don’t know how to build a blog or design logos or anything like that, but I feel like this space needs a new and fresh look.  Won’t happen soon or quickly, but hopefully I can make at least some small changes to update this space over the next year.

Think I can do this?  We’ll check in on these again in a year and see!  What about you?  Any sewing, crafting, blogging related goals?  I’d love to hear them!

Happy New Year!

Just popping in to wish you a very very happy new year.  2013 was a BIG year for me and my family and because of that, things slowed down a little bit here on the blog.  But I’m really looking forward to jumping back into things in the new year and I’m hoping you’ll join me!  Until then, I just wanted to say thanks for an awesome 2013 and here’s to a beautiful and even more amazing 2014!

Family2013_1


Happy New Year from our family to yours!

Mariposa Top for Me! (Confetti Sparkle for the Holidays – Part 3)

GoldSparkleMariposa1Ok, so am I a little obsessed with Dear Stella’s Confetti Sparkle line?  Yes, maybe I am.  This is the last of 3 projects I’ve made (so far) with their beautiful metallic gold dot fabric, and look at that, it’s for me!  (see Yuki and Kaya’s holiday dresses here)

The pattern is from Anna Maria Horner’s book, Handmade Beginnings: 24 Sewing Projects to Welcome Baby (affiliate link).  The book has lots of sewing projects for little ones, but it’s also got its fair share of patterns for expecting and nursing moms.  This top is called the Mariposa Dress and Tunic and is perfect for breastfeeding.  It can be made as a maternity top/dress or not.  I’d been looking for some tops that worked well for nursing and was excited to try this one, especially after seeing this beautiful dress by Miriam of Mad Mim and this fun top by Meg of Sew Liberated.

GoldSparkleMariposa2I thought it would be fun to make something dressy enough for the holidays but casual enough to wear comfortably while caring for (and nursing) my baby.  The glamorous Confetti Sparkle in Cream as a Mariposa tunic turned out to be the perfect combination.

I generally stuck to the pattern in size medium/large, but made some adjustments for fit.  I ended up taking the bodice in a little and adding some tiny gathers to the front skirt piece.  The top crosses in front and wraps around and ties in the back.  A bit of elastic in the back also helps bring the top in under the bust.  You can also tie it in the front, but I prefer it in the back.

GoldSparkleMariposa3There is a modesty panel as well that makes nursing, well, more modest.  Somehow my modesty panel doesn’t fit perfectly – mostly because of the adjustments I made to the bodice – but it also seems a bit long, so if I make this top again, I’ll have to shorten the “straps” of the panel.

GoldSparkleMariposa4I haven’t actually tried nursing in this top, but I imagine it will work quite well.  I love that I can feel dressy and comfortable at the same time.

As Christmas quickly approaches I feel like my “to do” list is getting longer and longer.  I hate how this season sometimes ends up feeling a bit stressful, but it’s always worth it.  I’m looking forward to a lot of fun family time, which is really the best part of the holiday season for me.  Whether you celebrate Christmas or not, I wish you all peace and love as we close out another year.  I’m very much looking forward to a new year – new adventures with my family and more sewing and more blogging!  Very best wishes to each and every one of you!  What are you looking forward to in 2014?

Confetti Sparkle for the Holidays (Part 2)

Last week I shared Yuki’s Confetti Sparkle Hanami Dress and I mentioned I had sewn something for Kaya and myself in Confetti Sparkle fabric too.  Well today I’m back to share Kaya’s holiday dress along with a few more pictures of Yuki’s dress.

Holiday Girls

For Kaya, I went with the always adorable Geranium Dress pattern in size 0-3 months.  I used Confetti Sparkle in Cream for the skirt and some leftover shirting from the lining of my wedding dress for the bodice.  I used the same Berry piping around the waistline as Yuki’s dress, but it looks dark brown or maroon in these pictures.

Holiday Geranium1

Holiday Geranium2

I’ve sewn this pattern up many times before and it’s always fun and fast.  You’d think an itty bitty dress would be even faster, but since I was only getting about 5-10 minutes of sewing time here and there, it took me forever!  And something about the shirting I used for the bodice, or the small size, or the way I sewed – I dunno!? – but I couldn’t get the bodice to press totally flat.  So the neckline and armholes aren’t crisp.  It totally bugs me when I look at these pictures, but I have to tell myself that really no one is going to care, right!?  Especially when the model is this darn cute!  😛

Holiday Geranium3

Happy baby!

So that’s Kaya’s dress.  She is totally in drool and spit up mode over here, so the best part about this dress is that it doesn’t even show!!

Holiday Geranium4

Kristin at skirt as top made a sorta similar, but waaaay more gorgeous dress in Cream Confetti Sparkle for her daughter!  You should check it out, it’s seriously the perfect holiday dress.

And in case you missed it, here’s Yuki’s dress in Navy Confetti Sparkle . . .

Holiday Hanami1

Holiday Hanami4

All the details of the dress can be found here.

Holiday Hanami7

And I am so happy to report that Yuki loves the dress!!

Almost as much as she loves popcorn.

sneaky

Yes, she did almost drop the baby trying to sneak some popcorn!!  Haha.  Caught her just in time . . .

Well I hope your holiday preparations are going well.  I’m honestly starting to feel super stressed about all the things I want to get done before next week.  I have a list of things I wanted to sew up as gifts, but I’m afraid that at some point I’m just going to have to let some things go.  How are you doing with your lists?  Feeling ready?

Alright, one more Confetti Sparkle project coming up this week and then I promise to give it a rest for awhile.  Hope your holiday season is filled with your own sparkle! 😉

Introducing mohr studio

Hey!  Anyone still need to do some Christmas shopping?  I hope I’m not the only one!  I’ve barely gotten started and I’m in denial about how quickly Christmas is creeping up on us!  At the start of the season I have the intention of making handmade gifts for everyone.  But a couple weeks out I realize that’s not going to happen, but still want to give special and meaningful handcrafted gifts.  Well in case you’re in my boat, I wanted to tell you about my friend’s Etsy shop, mohr studio.

Ashley, the creator behind mohr studio, blogs over at everything else we do where she shares the gorgeous sewing and knitting she does for herself and her cute kiddos.  She’s recently opened up shop and I absolutely adore everything she’s made!  She’s got stuff for babies, kids, women and the home.  Everything is made with such great skill and style.

Ashley reached out to me awhile back through email and since she lives not too far away, we’ve gotten to meet up a few times and do some of my favorite things together – fabric shop, talk about natural birth and drink beer.  😛  She’s such a sweet, funny and generous person!  Last time we met up she gave me this perfect little sweater for Kaya.  It’s honestly my favorite thing to put on her now.

photo (3)

Anyways, go check out the shop.  How ridiculously cute is this sweater and dress?  Definitely wish this tunic and this hoodie came in my size.  And this or this would make perfect gifts for me some lucky lady in your life. 😛

OH and I almost forgot, Ashley is offering a holiday deal of 10% off everything in her shop (code: MERRYMOHR)!  What other reason do you need?

Happy shopping!

Confetti Sparkle for the Holidays (Part 1)

Dear Stella recently came out with a new line of fabric called Confetti Sparkle, cotton in bold colors with metallic gold dots.  When I saw it I swooned!  And when Dear Stella contacted me asking if I wanted some of their gorgeous fabric to sew with, I may have jumped for joy!  Um, yes please!  I chose two of their Confetti Sparkle fabrics, Navy and Cream and immediately started dreaming up the holiday outfits I wanted to make.

Holiday Hanami4

First up is this dress I made for Yuki that I’m sharing today on the Dear Stella blog.  I love that this fabric has automatic glam without having to use a tricky to sew fabric or something that I can’t just throw in the wash.  And with the variety of color choices, you’re not just limited to the upcoming holidays – it can be used for any special occasion, any time of the year!

Holiday Hanami6

So head over to the Dear Stella blog for more pictures and details of this dress and then next week I’ll be sharing the dress I made for Kaya and top that I made for ME!  Confetti Sparkle all the things!

*EDIT: Ooooh, I’m totally in love with this gorgeous Confetti Sparkle Geranium Dress that Kristin at skirt as top made!  Check it out!*

Dear Stella Confetti Sparkle can be purchased at Drygoods Designfabric.com or Hawthorne Fabrics.

Are you making any special holiday wear this year?

Simple Sewing and a book giveaway! {CLOSED}

memory game1

memory game6

Hey, look at that!  I’m back with another blog post this week and this time I’m sharing a brand new book, Simple Sewing: 30 Fast and Easy Sewing Projects for Beginners.  This fun book is by Katie Lewis of The Red Kitchen and is a great resource for anyone wanting to learn to sew!

SimpleSewingBook1Just like the title suggests, the book is full of projects that are simple and quick to make, even for a beginner.  But before you get to the projects, the book walks you through some important basics, like supplies you need and sewing tips and techniques.

SimpleSewingBook2

SimpleSewingBook3I love the variety of projects in the book – you can basically make something for everyone!  Katie does an amazing job of walking you through each project and there is actually a photo for every single step!  I can’t tell you how helpful this is, especially if you’re a visual learner like me.

SimpleSewingBook5

The hardest part, honestly, was deciding which project to make.  But I finally decided on the memory game since that’s one I’ve enjoyed playing with my three year old lately.

memory game5

memory game2

These were so fast to sew up!  Instead of using different fabrics, I used this cute animal print fabric that my friend, Sanae, recently sent me.  I knew that Yuki would get a kick out of matching animals.

memory game3

Truth is, Yuki doesn’t totally get the concept of Memory just yet, so we usually place all the “cards” face up and play more of a matching game than a memory game.  When she gets a little older, we’ll flip them over.

So once you’ve gotten a handle on the projects in the book, or for those who aren’t necessarily beginners, there is so much room for embellishing and personalizing, like the applique Jessica added to her lunch sack or the necklaces April made from her bows.

Or you can take the techniques you learned in these projects and apply them to something new, like enlarging the memory game pieces to make coasters!  So many possibilities!

memory game bag

I love that so many of the projects in the book require so little fabric and materials that you might already have at home.  It’s great for using up little scraps of fabric that you’ve been holding onto.  After cutting out my squares for the memory game I had a little bit of fabric left over so I decided to whip up a drawstring bag to hold the game pieces.  This is NOT a project from the book, but there are about a million tutorials online if you’re interested.  It’s actually a great project after you graduate from Simple Sewing (affiliate link).

memory game4

And just like that, I have one of Yuki’s Christmas presents all ready to go!

This book would make a great gift for anyone who wants to learn how to sew (including kids)!  You can buy copies at any of these online stores:

Amazon (affiliate link)

Books & Things

OR, you can try and win one!  Giveaway is open to US residents only.  Click link below.

>> CLICK HERE TO ENTER THE GIVEAWAY <<  {CLOSED}

Good luck and be sure to head over to Sugar Bee Crafts to see what Mandy has sewn up from the book!

*This book was generously given to me for this review, but all opinions are 100% my own.*

Hanami Dresses and a whole lot of thanks

Hey friends!!  How are you doing?  I gotta say, I totally miss being here.  I definitely miss sewing, but I’ve been able to sneak some in here and there.  Blogging is fun because I get to share with you, hear what you’re up to, and get your feedback – I’ve been missing the community!

I celebrated Thanksgiving with my family last week and took some time to reflect on all the things I’m thankful for.  There are so so many things that I’m grateful for, I consider myself a truly lucky person.  This year I’m especially thankful for our newest addition, Kaya, and that both of our girls are so happy and healthy.  But I also wanted to take a minute to acknowledge how blessed I feel to be able to do the things that I love, like sewing and blogging, and that I get to be part of such an amazing community of inspirational and awesome people!  I’ve made such great friends here, and even to those of you who I don’t know – I appreciate you just stopping by!  This blog would be nothing without you readers.  So thank you!

Like I said, I’ve been able to get a little sewing in recently, but first I wanted to share a couple of dresses that I made back in August.  Yes, over 3 months ago.  Don’t ask me why it took so long to blog these, because I really like them!  The pattern is the Hanami Dress/Top by Straight Grain.

Hanami1

Back in July, An of Straight Grain put out a call for pattern testers and after seeing the adorable versions that she had made, I jumped at the opportunity!  The pattern comes with several variations – crossed back or invisible zipper, flutter sleeve, tulip sleeves, peter pan collar and, of course, length – either dress or top.  I love a pattern with endless possibilities!

blue hanami

I signed up to test the pattern in size 3T since Yuki was about to turn three and had recently started wearing 3T store bought shirts.  But after looking at the measurements, I knew it’d be too big, which is really no surprise because Yuki is super petite for her age.  But I went ahead and made the dress in size 3 and had a friend’s daughter try it on for the testing.  I chose the unique crossed back and tulip flutter sleeves and used Wild Carrot Blue, by Violet Craft for Michael Miller.  I picked this up from the remnant section of Britex.

The name of the pattern, Hanami, is a Japanese word meaning “flower viewing.”  In Japan it is a custom for people to gather and picnic under the blooming cherry blossoms and enjoy their short lived beauty.  It was something I got to experience when I lived there.  So with that name in mind, I couldn’t shake the image of flowers so naturally when I went to my stash to pick fabric, they both ended up being florals.

blue hanami2

I made one addition to the dress which is a bias tape “belt” around the waistline.  I just wanted to add a little contrast to the dress and thought this finished it off quite nicely.

So after I made the first dress in size 3, I really wanted one that would fit Yuki, so I made another Hanami in size 2 and it fit her perfectly.  I chose this watercolor floral fabric that I bought at Ikea awhile back and I love the way it came out!  I decided to do the regular flutter sleeves, but stuck with the crossed back that I love so much.  But do you notice anything interesting about these pictures?

Hanami2

Hanami3

She’s wearing the dress backwards!!  When I was making the dress, I was trying to be thoughtful about which parts of the fabric I was cutting for each piece, but when it was all done I realized that I liked the back better than the front.  So when I put it on Yuki I tried it on backwards to see how it’d fit her and I loved it.

Hanami4

I added a strip of thin black bias tape around the waist again for a little contrast (no bow this time) and I really like how it separates the bodice from the skirt.

Hanami5

The pattern is great.  Well written step-by-step directions with color photos for every step.  These two versions of the dress I made are very spring/summer appropriate, but if you are looking to make a holiday dress, this would be a great pattern to use as well.  In fact, if I have time, I’m hoping to make a holiday version for Yuki later this month.  If you’re interested, you can buy the pattern HERE along with An’s other great patterns.  And if you want to check out my absolute favorite Hanami of all time, see Stitched Together’s version.  You won’t regret it 🙂

I hope you are all doing well.  I’ll be back later this week to share a fun new book with a giveaway!

Miss ya!

Happy Bee-lated Halloween

Har har, I know.  I can’t resist a good pun!

Happy Halloween

But I hope you all enjoyed a happy Halloween (for those of you who celebrated)!  I realize it’s a bit late to be sharing our Halloween costumes, but that’s how things are rolling around here, so let’s just go with it, k?

So in the weeks leading up to the holiday, I had been asking Yuki what she wanted to dress up as.  Her answers changed every time I asked.  First, it was a purple dinosaur.  Then a pumpkin dinosaur – though I have no idea what that is!  Then she would just name whatever was nearby or happened to be on her mind, so I would get answers like “juice box” or “Mercury” (the planet).  We started planting the idea of Ladybug Girl into her head because we thought it’d be a fun and easy costume, but one she could get into.  Ladybug Girl is a character from a series of children’s books.  The stories are about a young girl named Lulu who calls herself “Ladybug Girl,” wears a costume, and likes to have adventures.

Yuki was still throwing out ideas like cat and owl, but when I found a pair of ladybug wings and a wand at Joann for 60% off, I decided it was meant to be.  I was worried that Yuki wouldn’t get on board, but took the risk anyways.

I had plans to make the costume identical to the book character, but you know how things change.  I knew Yuki would get excited about a tutu though, so I used one of the thousand tutu-rials out there to make one with red tulle from Joann.  And as expected, she loved it.

LadybugGirl5

Before I keep saying Joann, Joann, Joann – I’ll just say that I pretty much got everything I needed for both costumes at Joann.  This is not a sponsored post.  I just bought all the supplies on one trip, thank goodness for that!

So anyways, the headband is one of the few things that I got elsewhere.  Picked it up at a drugstore and used pipe cleaners and pom poms to make antennae.

LadybugGirl3

The shirt was made using the ever useful Flashback Skinny Tee in size 3T (you know I love this pattern, right?).  At first I just made a solid red tee like Lulu’s, but after seeing the costume the weekend before, Hideko felt like adding spots would make it more ladybug-ish.  Here’s what it looked like before:

ladybug

So I picked up some Tulip Fashion Glitter and tried that out for the first time.  I thought Yuki would like the sparkles and I could use the other colors on future projects.  If you use the Fashion Glitter pack that I did, you’ll need to buy the bond/glue separately.  I made a stencil to get the circular dots and the glitter was easy to apply.  Some of it came off during the drying/wearing stage, which I expected, but it held up really well otherwise.  I’ve washed and dried the shirt once (inside out) and it lost some of it’s glitter, but still looks pretty decent.  I’ll have to try it out on another project and see how it holds up through multiple washes.  I’m glad I added those spots though – I think they add a lot to the costume.

LadybugGirl1

I also made a little pair of shorts to go under her tutu using the Fancy Pants Leggings pattern.  They came together really quickly and I like how they came out, but I’ll never know how the fit was because Yuki refuses to wear them.  So she ended up wearing the plain black leggings I made for this outfit.  Her boots are from Target.

LadybugGirl2

The best part about her costume is that she absolutely loved it and seemed so proud to be wearing it.  She loved going up to other kids and saying, “Hey, I have wings like you!” or “You have a wand like me!”  (She’s really into comparing herself to other people these days – ugh).  But I didn’t have to bribe her to put it on like other costumes and outfits I’ve made for her!  I did, however, have a really hard time photographing her like always . . .

Happy Halloween2

And that brings us to our little bee . . .

Bumblebee4

There she is, zipping through the air!  Haha.  So I know it’s a little ridiculous to dress up a one month old, let alone hand-make the entire costume the day before Halloween, but I couldn’t resist.  When I decided on Ladybug Girl for Yuki’s costume, a bumblebee seemed like an obvious choice for Kaya, so I went ahead and bought the yellow and black fleece.  But a couple of days before Halloween, I still hadn’t had time to make her costume and I had to accept that it just wasn’t going to happen.  It wasn’t worth it if I meant having to loose sleep.  I went to bed pretty disappointed that night (If you don’t know me, let me just say that Halloween/making costumes is kinda my thing.  So it’s a big deal).

Then I woke up the next morning at 5am and decided it was a good time to start that damn costume after all.  It came out pretty decent considering I was determined to make it the fastest and simplest costume ever knowing that it would only get a few hours of wear.

Bumblebee1

The body is just a simple sack with an elastic casing at the neck and bottom with armholes.  I cut the stripes from black fleece and just top stitched onto the yellow fleece before sewing up the sack.  The wings are made from boning since I wanted something softer and more flexible than metal wire.  I just stretched some thin knit fabric and sloppily sewed/tied it on.  Not my best work, but no one could see the other side anyways.

I made the tights using Rae’s Baby Tights tutorial some black knit in my stash.  She offers a  free pattern for the tights in 3-6 mo. size, but since Kaya is a bit younger/smaller than that, I tried to size it down.  Unfortunately, I sized it down too much and I could barely get them over her bum!  Mostly because she wears cloth diapers but I had also shortened them too much as well.  They were super easy to make though, so I think I’ll try again with a better idea of how to make adjustments to the pattern.

Bumblebee2

I made the beanie using Zaaberry’s free baby hat pattern and tutorial.  I made the antennae with the same black knit and stuffed them with some poly-fil.  At first I tried to sew them into the seam to save time, but they just flopped down.  I really wanted them to stand up when worn, so I cut them off and hand stitched them on real quick.  Again, not my finest sewing, but that’s what Halloween costumes are about right!?

We went trick-or-treating with Yuki’s school during the day around some local businesses and Yuki was super excited and proud in her costume and Kaya slept the entire time getting lots of little “oohs” and giggles from other parents and kids.  So was it all worth it?  Absolutely.  And maybe a bit ridiculous?  Absolutely.  But that’s me!

How was your Halloween?  Did you make any costumes?  What was the best costume you saw this year?  And are you ready for Christmas?  Cuz the rest of the world seems to be getting ready already.  I can’t handle that.  It’s November 7th and I’m still on Halloween.