Black and White Infant Mobile

As I prepare for my own newborn, I thought I’d bring back this guest post/tutorial that I did a loooooong time ago.  It’s the perfect project for a newborn’s nursery – a stimulating black and white infant mobile.  Just last week I got the sweetest email from a reader living in Dubai who has made a few of these for friends.  She says that both the mamas and the babies love them and she loves making them too!  It was seriously such a heartwarming email to read and it made me feel so happy to share these kinds of tutorials with you.  Thanks Julie!

I made this mobile forever ago and I’m excited that we’ll finally have a little one to enjoy it.  I mention this in the post, but please note that I used a slightly older than newborn model for my pictures.  But this mobile is recommended for newborns, not toddlers.  Enjoy!

___________________________________________________________________

Projects for newborns have a special place in my heart because the arrival of my daughter (Yuki) is what really catapulted me into the world of sewing.  And now I can’t imagine my life without either!  Today I’m going to show you how to make a stimulating Black and White Mobile for your baby’s changing table.

Out of aaaaall of the things that I made for my daughter when she was an infant, the one that was the most loved and the most used was a mobile similar to this.  She. Loved. It.  She was so mesmerized by the high contrast designs – we actually called it “the babysitter” for awhile because she could just lay there and stare at it forever!

 Not a newborn anymore, but the only model I had on hand – and she was still pretty intrigued!

Studies say that newborns can best register black, white and red in high contrasting patterns.  These designs stimulate their eyes and promote brain development.  This is probably most beneficial during the first 3-4 months of life, though my daughter loved hers well past her first birthday (we had to keep adjusting the height so she couldn’t reach it)!  Because these designs stimulate (not soothe), this mobile would be best
placed over a changing table or play area as opposed to a crib.

So let’s get started!  Here’s what you’ll need:
– An embroidery hoop (10 inches)
– Paint and paint brush
– White and black felt (I like wool or wool blend)
– Embroidery floss

I bought this 10 inch hoop at Joann’s and at full price it was $1.50.  You can use polyester felt, but I prefer wool or wool blend felt because it’s thicker and will make the squares stiffer.

I bought 1/8 of a yard in white and black.  Luckily I had the rest of the supplies at home already, so between the felt and the hoop (and a couple of coupons), I only spent about $3.50.  Not bad . . .

So the first step is to separate the two hoops.  One has some hardware on it and you can toss that in your “stuff I swear I’ll find a purpose for someday” pile (please tell me you have one too).  The other hoop should have nothing on it.  Paint your hoop with acrylic paint or spray paint.  A couple of coats will ensure a nice opaque finish.  I went with black because I thought the dark circle against the white ceiling would add another visual element of interest.  But you can paint it whatever you color you want!

Set the hoop aside to dry and cut your felt into 4×4 inch squares.  You’ll need 6 white ones and 4 black ones.

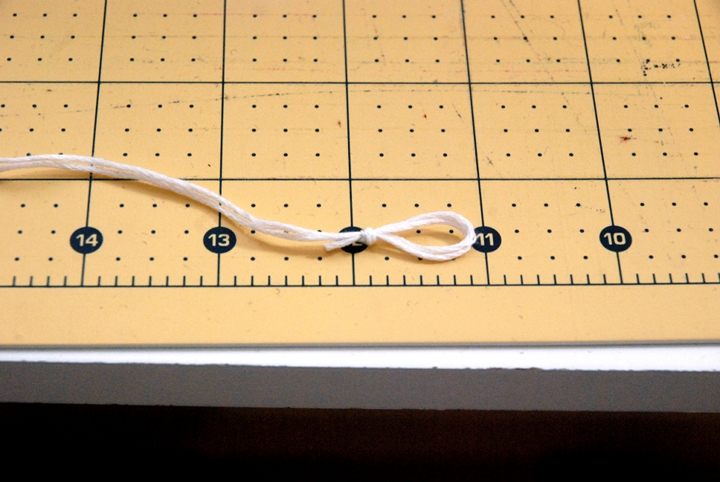
Let’s also cut your embroidery floss.  The lengths I give here are based on what I needed (determined by the height of my ceiling and my changing table), so you may need to make adjustments.  I used one piece that was 90 inches and 4 pieces that were 50 inches.

Sketch out some designs for your mobile pieces.

These were my original sketches, though some of the designs came out different.  I’m going to walk you through the 5 designs I made, but you can be as creative as you want!

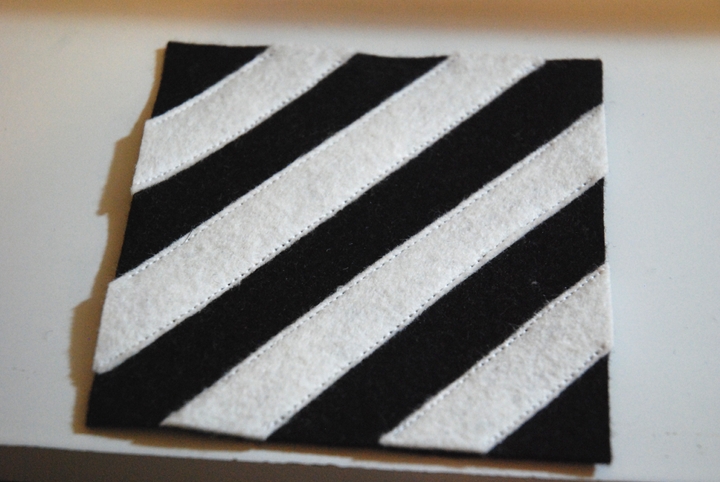
1. Cut out strips of white felt  and lay them down diagonally on a black square.

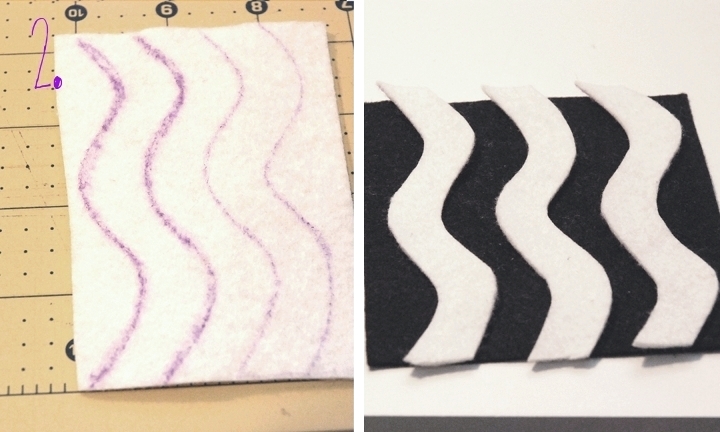
2. Cut a piece of white felt 4 inches long.  Draw 4 wavy lines, cut them out and lay them on a black square.

3. Draw nine circles on some black felt (trace a coin).  Originally I made them all the same size, but before I sewed them on I decided to make 4 of them smaller.  A nickel and a dime might be about right.

4. Draw concentric circles about 1/2 inch apart on black felt and create a target design on a white square.

5. This is probably the most complicated one.  First cut two black 2×2 inch squares.  Keeping in mind that 2 of the sides of the square will be part of the seam allowance (dashed line), draw a small square in the “middle.”  Carefully cut the square out, repeat with the other black square and arrange as shown.  Don’t forget that you’ll lose a 1/4 inch on all four sides!

Now top stitch all the felt designs on and trim anything extra felt hanging off the edge of the square.  Take your time with the circles and curved shapes.

Here’s what they should like at this point:

(Notice the change I made in the 9 circles design)

Put those aside while we prep the other 5 squares, which will be the back pieces.  Felt doesn’t generally have a right and wrong side, but I’ve labeled them just in case you’re using something that does.

Use a ruler to find the center of the square and mark it on the wrong side.  Measure about a 1/2 cm to either side of the center to make a 1 cm line.

You’ll need to decide which of the designs you want in the center of the mobile.  That design will get the longest (90 inch) piece of thread.  For the other 4 designs you’ll use the shorter pieces of embroidery floss.
Thread your needle and enter from the right side on one end of the centimeter long mark and then push the needle back through at the other end of the centimeter long mark (geez, did that make sense?).
Now pull the threads till they are even lengths and the felt square hangs parallel to the ground.  Flip the square over and tie a simple knot close to the square.  You don’t want to tie it so tight that the square puckers.  Make sure that it lays flat and it’s ok if there is a little sliding room.
Wind up the thread and lay it in the center of the square so it’ll be out of the way when you sew the two sides of the square together.  Repeat with the other 4 squares (remember to use the longest piece of thread for your center square).
To sew the square front and back pieces together, lay your patterned squares on top of the back square pieces, right sides together.  Pin and sew them together with a 1/4 inch seam allowance, making sure to leave an opening on one side.
Trim the corners and flip them right side out.  Use a chopstick to poke out the corners and press.  Top stitch all the way around with a 1/4 inch seam allowance making sure to sew the opening shut.  As you top stitch, make sure to move the embroidery floss aside so you don’t sew over it.
Now you should have 5 felt coaster-like squares with thread coming out the back side.
Decide how long you want each square to hang from the hoop and tie a simple knot at that mark.
Separate the two pieces of thread and place the hoop in between them.
With the two pieces of thread back together, tie a knot above the hoop as close to the hoop as possible.
Now repeat this with the other 3 squares that will hang from the hoop.  Place them exactly 90 degrees apart from each other.  Pull all the thread to the center above the hoop in one hand.
For the center square, add the loooong threads to the bunch in your hand and adjust the length of the thread depending on where you want the center square to hang.  Make sure the hoop is parallel to the ground.  If it is tilted, you need to adjust the lengths of the thread.  Tie a knot with all of the strands of thread about 6-7 inches about the hoop (the thread should measure at least 8 inches from the hoop to the knot – this will help for the next step).
Trim the
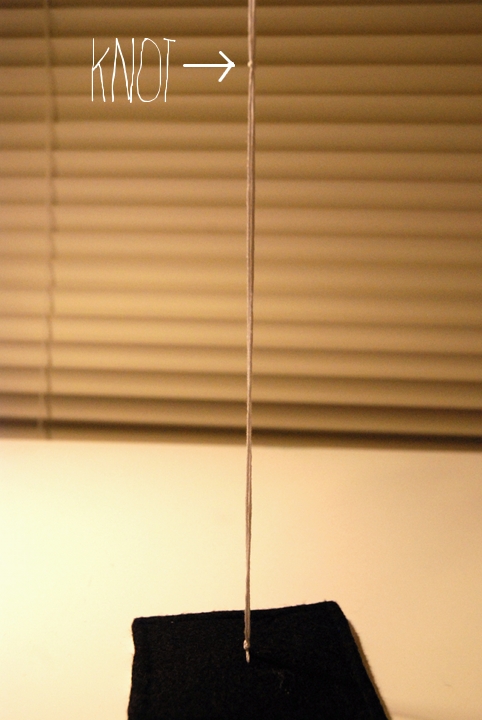
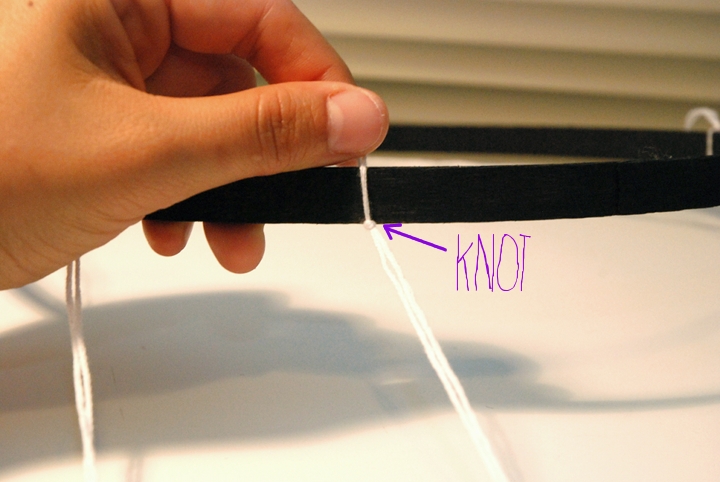
short threads to a 1/2 inch above the knot.  Be sure not to cut the two
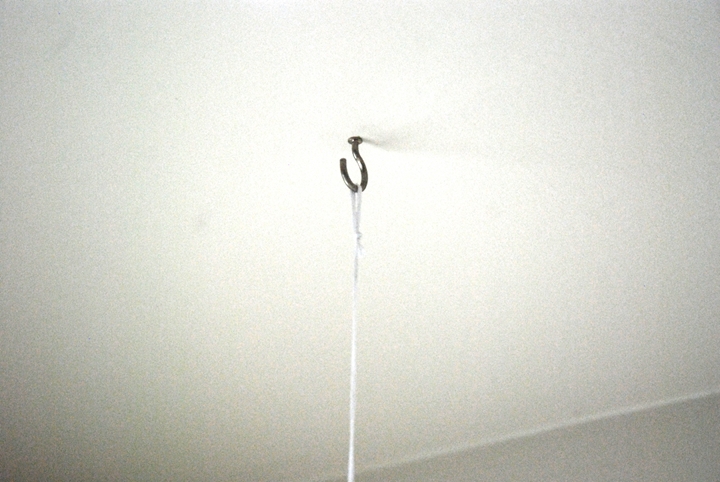
long threads!!!  You’ll need those to hang the mobile.
Cut out 2 circles about 1.75 inches in diameter.
Place them wrong sides together and top stitch around half of the circle.
Slip the circle over the knot and top stitch the rest of the circle making sure to sew over the thread so the circle doesn’t slide up and down.  If you can’t machine sew this because the hoop gets in the way, you can hand stitch it.
And you’re basically done!!  I just tied a loop at the end and used a ceiling hook to hang it.
Done!  Now give it a little spin, sing a song and watch how your baby becomes mesmerized by these handcrafted designs.  Can you see the synapses firing??  Well, maybe not, but I’m pretty sure you’ll see the intrigue in their eyes.
Baby’s eye view
Again, I used my toddler in these pictures because I didn’t have a newborn on hand.  I don’t actually recommend this (or any) mobile over a changing table for toddlers, mostly because it’ll end up looking something like this:
Anyways, thanks for letting me share this tutorial with you.  I hope you give this project a try and that your little one loves this mobile as much as mine did!
Hope you all have a great week!
Advertisement

Black & White Mobile at Nap Time Crafters

Today I’m guest posting a tutorial for this Black & White Infant Mobile over at Nap Time Crafters for Amy’s Bundle of Joy series. There have been some amazing guests throughout this series sharing advice for parents as well as tutorials for baby things.  And today I get to join the bunch so please head over there and check it out!

In other news, my Painted Purple outfit was featured on Freshly Pressed today!  It’s basically the main page for WordPress and it’s such a thrilling honor.  If you’re coming over via Freshly Pressed today, thanks so much for stopping by!!  🙂

I’ll be around later this week for my Vintage May guest post.  Have you been following along with all the amazing vintage and vintage-inspired looks!?  CINO and Skirt as Top have rounded up some truly awesome guests and their posts have not disappointed!  Check in on Thursday for my post 🙂

Happy Monday everyone!


Yuki’s Nursery: Last Day and a (sorta) tutorial

(click the button to see the whole series!)

So we made it to the last day!  I just wanted to share a couple more things and a super easy and cheap home decor idea.

First is this quilt.  My first real hand-quilted quilt ever.  Probably the last 🙂

Don’t you love how the 2010 creeps upwards?  Hah!

It was a fun project and I’m pretty proud of it, but I really don’t know if hand quilting is for me.  I love quilts though!  I think, from now on, it’s either machine quilted or knots. 🙂

This next project was a mobile I made after Yuki was born.  I realized that it would be handy to have one hanging right above her changing table to keep her distracted during diaper and clothing changes.  We had a hand-me-down mobile but it wasn’t right for our room.  So I decided to make some black and white cards and attach them to the mobile frame with fishing wire.

It was great because it still had the music and rotating mechanism, but she LOVED the black and white designs.  This was, by far, the most practical and well used item that I made.  And it was so cheap and dinky!  It was literally white pieces of cardstock that I drew on with a black marker.

She loved it for a loooong time, but eventually was able to sit up and then grab them and since they were just paper, they didn’t last long after that.  I plan on making them again when we have another baby, but I’ll probably make them with felt (or at least laminate the cards) so they are more sturdy.

This next piece is a combo of a fun find and a DIY project.  While in Portland we found this awesome gift shop and I picked up these super cute postcards.  I can’t remember how much they were, but I’m assuming pretty cheap.  They fit perfectly with the feel and theme of the room.  It’s hard to see, but they are copies of oldish dictionary pages with hand drawn and colored ADORABLE illustrations.  Birds, rabbits, a dear, a bear and a squirrel?  Yes please!

So here’s where the sorta tutorial comes in.  I wanted to show you how I painted these cheap-o frames to look vintage-y and distressed, but I didn’t have the time or any extra frames to demonstrate.  So I thought I’d just describe it, since it’s pretty simple.

Just go and pick up a 3-pack of these RAM frames from Ikea for $1.99.  They are unfinished pine and have a plastic sheet instead of glass making it totally safe for a kid’s room.

All you need is acrylic paint in the color you want the frame, and white.  Paint a few coats of your main color to make sure it’s nice and well coated.  In my case, I did about 2-3 coats of brown paint.

Once the frame is completely dry, take a dry brush and dip it very lightly in the white paint.  You can brush some of the excess paint off if you need to, because you really only need a tiny bit.  You want to lightly brush the white paint along the edges of the frame a few times all the way around.  Do it on both the outside edge and inside edge of the frame.  You can very lightly run it over the rest of the frame too.

The nice thing about this, is if you accidentally get too much white on the frame, you can always take another dry brush with a tiny bit of your base color and brush it over.  Keep going until it’s got the amount of distressing you like.

And that’s it!

Thanks so much for coming on this little tour of Yuki’s room.  For me, it was a trip down memory lane!  Though some of this stuff is still up in the room, a lot has changed, and most of it has just become part of the mess.  I don’t really appreciate it anymore.  But looking back, I remember all the love and thought that went into it AND it makes me a little excited to plan another nursery!!  Not that we’re ready for that yet . . .

And in case you want to go back and see the other days, here are the links:
Day 1: Fabric Wall Decals
Day 2: Bird Mobiles
Day 3: Punched Fabric Flowers
Day 4: Fun Finds

Anyways, have yourself a great weekend!!  I’ll see you next week for some fun green activities in honor of St. Patty’s Day 🙂

Yuki’s Woodland Nursery: Bird Mobiles

Check out the whole series:
So this week we’re going through Yuki’s nursery as it was over 18 months ago before she was born (a bit has changed since then)!  I decided to revisit some of my nursery decorating projects after sharing the fabric wall decal tutorial and realizing that none of these were ever shared because they were made before this blog existed!

A little background about the nursery:
Since crafting is a hobby of mine I definitely knew I wanted to take a very DIY/hands-on approach to designing and decorating our baby’s room, while staying on a budget. I think our style and personality are reflected here.  I was inspired by nature, beautiful fabric and a small budget and the style I was going for was simple, playful, creative and bright.  We picked a woodland creatures theme because we were really into woodland animals at the time (we still are).  We love the outdoors and wanted the room to have a nature-y feel and thought the animals would be cheery friends for out little daughter on the way.  I also wanted to use a lot of colorful fabric because I thought it would add a warm and soft feel to the room.  I used the wall decals to cover the room with tons of animal friends like a deer, a squirrel, a rabbit, and about a million birds.  Oh yes, I love birds.

Which brings us to the project that I am sharing today.  My second favorite part of this nursery (after the decals) is the bird mobiles!  I saw this amazing bird mobile on the Spool blog and knew I had to make one!  Spool is a fabric shop in Philadelphia and also has an online store.  I’ve bought some of their fat quarter bundles in the past, they put together some really cute collections. The best part is, you can download the free bird softie pattern here!!  For free!

So I made a batch of birds, some small and some regular.  Then on our babymoon road trip up the west coast to Washington I picked up these sticks so the mobiles would a sentimental meaning.  I used fishing wire and eye hooks to make them into a mobile and can I just say, it took me a loooong time to figure out how to get the balance just right.

Aren’t they just the perfect touch to this fabric filled woodland world??

The birds were really easy to make, so if you want to add a few fun friends to your home, I suggest checking out the pattern (link above) and whipping up a few yourself!

And come back later this week as I continue to share the rest of the room, with more project ideas for your home!