film petit: fantastic mr. fox

for

I’m so thrilled to be a part of film petit this month, a ridiculously awesome series hosted by Kristin from skirt as top and Jessica from A Little Gray.  For the series, Kristin, Jessica and a guest choose a favorite movie to use as inspiration for original children’s wear.

These ladies have fantastic taste in movies and incredible vision and sewing skills, so if you haven’t checked out the first two installments, A Life Aquatic and Amelie, check them out here and here.

When we were discussing movies for this month’s film petit, we were all drawn to several Wes Anderson titles (really, which Anderson film aren’t we inspired by??).  But we couldn’t deny how perfect Fantastic Mr. Fox would be for this season.  Not only is it a witty, well made, hilarious movie, but we loved the warm, rich, golden tones of the film, the amazing world of fantastic creatures, the apples, the farms, the fields – all of it, just screams AUTUMN!

The movie is about Mr. Fox, a reformed squab thief who has left his wild days behind for a life of domesticity when his wife, Felicity, announces that she is pregnant.  After living a responsible life as husband and father for 12 fox years, Mr. Fox finds himself wanting to provide more for his family and buys a gorgeous tree home despite how dangerous the location was for a family of foxes.

Life in their new home may not be as satisfying as Mr. Fox had hoped for and he finds himself restless and craving adventure again.  He cannot resist the temptation of a few nearby farms belonging to Boggis, Bunce and Bean, full of poultry and cider for the taking, and quickly dives back into the world he promised his wife he had left behind.

This movie is FILLED with amazing characters.  Though the title character is certainly fantastic, he shares the spotlight with a huge cast of hilarious creatures.

I feel like I could talk about all these characters and the movie for a long looong time, but this is already getting long and I haven’t even talked about my outfit yet!  Between Kristin, Jessica and me, we had so many ideas inspired by the movie that we could have easily outfitted a small fox army.

But what I was most inspired by was the gorgeous setting of this film.  The opening scenes of the movie show golden rolling hills and fields and the warmest yellow, orange and gold skies and fields.  I wanted to try and capture that feeling in my outfit.

I love the Felicity Fox character, and as one of the only females in the film, she has to represent.  She’s a pretty kick ass lady and definitely the “brains behind the brains” as they call her.  She’s an artist, a landscape painter obsessed with painting dark and stormy thunderstorms, and also a strong wife and mother.

(some of Felicity’s paintings)

The opening scenes of the movie show a younger Felicity Fox, still the calm, patient and rational Mrs. Fox, but with a slightly more free spirited artist look.

I decided to try and capture these looks into a dress.

I used the Charlie Tunic pattern by Rae (thanks for the idea, Kristin!), which has that awesome neck facing and bohemian vibe.

Of course, I had to include the iconic tree that catapulted Mr. Fox back into the crazy life of crime and became the battlefield between the animals and the farmers.  So I appliqued it onto the dress, and it added a nice pop of color.

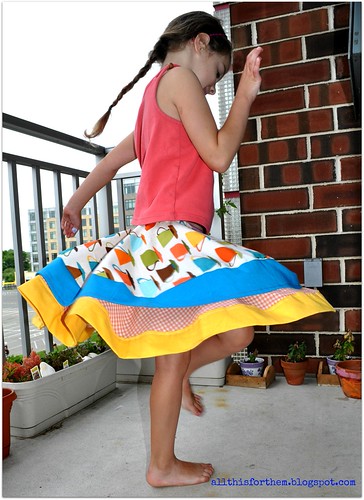
The main fabric for the dress is a linen/cotton fabric in a light brownish gray, which was a nod to Mrs. Fox’s gray stormy paintings, but without making the dress too dark.  I pieced together some golden yellow fabrics to try to recreate the gorgeous hills from the movie (the striped fabric is hand painted).

I lengthened the tunic ever so slightly (though I realize now that it needs another couple of inches) and I added pockets.  My little sneaky fox LOVES filling her pockets with as many rocks as she can find.  This tunic pattern is really great (like all of Rae’s patterns), so definitely check it out if you’re interested.

So that’s my clothing interpretation of this fantastic film, and seriously, I have ideas for a few more outfits still!  You absolutely MUST go and check out the most awesome shirt of the most awesome game EVER on A Little Gray and the ridiculously cute, straight-out-of-the-movie PERFECT Mr. and Mrs. Fox outfits on skirt as top.

But before you go, I just wanted to take a minute to tell you how amazingly awesome Kristin and Jessica are.  Not only are they amazing artists and sewists, with the most brilliant visions and ideas and MAD skills, but they are sooo much fun to work with, hilarious, humble, and extremely helpful, encouraging and sweet.  If you aren’t already following these gals, you absolutely must do it now.  Everything they touch turns to gold – they are definitely ones to keep your eye on.  And since I’ve been lucky enough to be a part of some film petit conversations recently, I happen to know that there will be a lot of AMAZING stuff coming up over the coming months that you will not want to miss!  I truly wish I could be a part of film petit every month!  So a huge thank you to Kristin and Jessica for letting me be a part of this series and being such awesome friends!

No go check out their awesome work and be in awe of their fantastic-ness and happy autumn to you all!

One

As of yesterday, this blog is one year old!  Hurray!  It’s definitely just like a baby – you can’t believe it’s already been a year, and yet it feels like you’ve had it forever.  Know what I mean?

It’s fun to think back about where I was a year ago, in terms of my plans and goals and my sewing level and interests.  A lot of things have changed, all for the better, and the one thing that I never knew when I started this little blog is just how many awesome people I’d get to know through the blogging/sewing/crafting community!

Anyways, thanks to all of you supporters, those who have been around since the beginning and those who are new around here.  You make this sewing adventure SO. MUCH. FUN!

So . . . have I reached the point where I can no longer call myself a “new” blogger?  Because I really liked calling myself that, but somehow I feel like one year is the cut off.  What do you think?

(Love you guys)


Sora and the Cloud (and more painted fabric)

So speaking of old projects, here’s one that is loooooooooong overdue.  Do you remember Katy’s Once Upon a Thread Chapter 3?  Back in May?  Like 4 months ago?  So this project is from then.  And I’m not quite sure why I haven’t blogged about it yet – because I like it a lot.  I made this hat and backpack in May, photographed them in July and now I’m blogging about them in September.  Yikes.  I was tempted to just save them for the next chapter of OUT, but I probably would have completely forgotten about them by then.

Anyways!  If you don’t know what Once Upon a Thread is, it’s this amazing series that is hosted by Katy of No Big Dill, where she and her awesome guests take their favorite children’s books and make literature inspired sewn creations.  Well she has an OUT flickr pool where anyone can sew along and add their creations, so I thought I’d join in.  Of course, the last “chapter” of the series has long come and gone, but I’m going to post my submission anyways.

The book I chose was Sora and the Cloud by Felicia Hoshino.  The book is written in both Japanese and English and it has the most AMAZING illustrations.  It immediately drew me in, with the warm, soft, dreamy pictures that looks like a combination of drawing and watercolor.

The story is about a curious boy named Sora, who loves to climb.  “Sora” means sky in Japanese.

“Little Sora loves to climb.  As he grows, he climbs over everything in his path.”

“He even climbs people!”  (Hmmm . . . sounds like someone I know . . .)

“みてみてー!”
“きをつけてー!”

“Then one day Sora climbs a tree.  Up he climbs, higher and higher, as if there is no end.  Peeking through the branches at the top, what does he find?”

Sora finds a napping cloud and cannot resist climbing aboard and they embark on an amazing adventure together.

They travel above the city discovering new and old things together from a magical perspective.  I won’t give away all of their adventures, but I’ll tell you, it’s like this story is straight from my dreams!

The character Sora, reminds me of my daughter, Yuki, because she LOVES to climb just like him.  As Yuki grows up and her personality starts to really show, I definitely see her as a curious, adventure seeking girl.

When I first saw the book, I wanted to recreate Sora’s entire outfit from the cover – I think it’s adorable.  But at the time that I was working on this, it was spring, and the outfit was too “fall.”  So I opted for just the bucket hat and a little drawstring bag that Yuki could tote around as she set off on her adventures.

I am really into the Setacolor Transparent Fabric Paint that I used for the Painted Purple Cardigan and the idea of painting my own fabric.  I wanted to try to recreate the soft and warm, watercolory look of the book illustrations.  I was particularly drawn to this page and all the colorful dots that were part of the amusement park.

So I decided to paint dots in similar colors on muslin.

It took me quite a bit of experimenting to get the right colors and the right amount of water (you can see a lot of bleeding with some of the dots, but I decided to just go with it).

I used the Oliver + S Bucket Hat pattern to make a reversible bucket hat with the colorful dots on one side and a tan home decor fabric on the other.

I used A Little Gray’s tutorial for making the hat without hand stitching.

For the drawstring backpack fabric, I was inspired by the inside cover of the book.  It is based on a traditional Japanese sashiko embroidery pattern, but with a touch of soft color.

(The author is local and was at a fair selling these books, so my sister bought the book and had the author/illustrator sign it for Yuki!  Cute huh?)

I was considering trying my hand at actual sashiko embroidery, but I thought sticking with stamping and painting fabric was more up my alley.  It was so much fun and turned out looking exactly how I wanted it to!  So here is how I created my faux sashiko.

First I saturated my fabric with water (I used two pieces of muslin – one for the front of the bag and one for the back).  Then I used some watered down blue and green and painted all over so the colors blended together.

When it was dry, I heat set it by ironing it.  I set one piece aside for the back and only did the sashiko print on the front.

I created the “embroidery” print with a handcarved stamp.  You’ll need a carving block and a carving tool.

1. Draw a circle on your carving block (trace something circular if you’ve got it).
2. Carve away everything except for a thin outline of the circle.
3. Create a dotted line look by carving away small, evenly spaced pieces of the circle.  Trim the block as close to the edge of the circle as possible.
4. Using a ruler, stamp a row across the bottom of your fabric using fabric paint with the edges of the circles touching each other.  Place the ruler along the center of the first row of circles and add your second row of circles staggered from the first row.

Your first three rows should look like this.

Repeat until the entire fabric is filled.  (Oooh, the difference between natural and artificial light!!)

The last touch that I added was some color to try and resemble the page in the book.  I watered down the paint quite a bit so that the color would be subtle.

Here, the paint is still wet.

And dry!

Then I used this Drawstring Backpack tutorial from Prudent Baby to make the small backpack.

And there’s my little climber – ready for adventures!!

Phew!  Feels good to finally have that posted!  These pieces were super fun to create and I love that they are completely original because I created my own fabric prints.  I really can’t recommend these watercolor fabric paints enough.  The possibilities are absolutely endless!

Thanks for letting me share this out-of-date project.  I’ve got lots of old and new ones to share over the coming weeks, so please bear with the back-and-forth time jumps, season switching and hair style changes you may be seeing a lot of 🙂

Happy Hump Day!

(Hey!  You know what tomorrow is?)

A Handmade Costume at The Train to Crazy

Oy, the first cold of the season has hit our household already.  Between that, craziness at work, and personal projects up the wazoo, blogging is being held up again.  But today I’m sharing a project that not only isn’t old, but is actually early!  I’m guest posting for The Train To Crazy’s Handmade Costume series in preparation for Halloween!

I LOVE Halloween and I love making costumes.  Unfortunately, Yuki does not like wearing them.  She’s old enough now to fight back and take things off if she doesn’t like it.  So this costume wasn’t a win for us – but maybe it will be for your little one?  At least it was super simple, was made from materials I already had at home, and was really fun to make!  Presenting . . .

So head on over to The Train to Crazy to see the full tutorial.  And if you click on the button below, it’ll take you to the series page where there are links to all of the projects that have been shared so far.  The series goes on for another month, so if you’re looking for Halloween costume inspiration, be sure to check back often!

Thanks for checking in and have a great weekend!

Crayon Booklet Party Favors

So before I go back in time to share some of my summer (and pre-summer – eek!) projects, here’s one that I just finished last week.  My daughter recently turned two and we threw a casual little park get-together for some of her kiddo friends and their parents.  Around the same time that I was planning her party, I stumbled upon small + friendly’s new-sew crayon wrap tutorial.  I thought it was genius!  What a simple project to make and perfect for parents of toddlers to whip out at restaurants or whenever they need to distract their little one.  I decided I wanted to make them as part of the party favor for Yuki’s birthday party!

But could I keep it simple?  Could I keep it no-sew?  Nooooooooo . . . obviously not.  I had to go and make it all difficult for myself.  Hah!  Well actually, though did make a few changes and add a few steps, it was still a super simple project and I was able to whip up 17 of these crayon booklets pretty quickly.  AND I had all the materials I needed already in my stash (except for the crayons), so that was a big plus!

So here’s how I used Carla’s tutorial and made my own lil version.  You’ll need:

Felt (I used a wool felt for the outside and acrylic for the inside because that is what I had on hand)
Velcro
Exacto knife
Crayons & paper
Sewing essentials

First, Carla mentions in her tutorial that if you want to thicken your felt to wash it in hot water, put it in the dryer until almost dry and then iron.  My yellow felt was wool, so I decided to give it a try.  But something went terribly wrong!  After washing it, I noticed that the felt was totally coming off in clumps.  It was pilling and crazy-uneven-fuzzy all over and definitely not any thicker.  I threw it in the dryer anyways, but it looked the same when it came out.  I didn’t really take a picture of what it looked like right out of the dryer and after ironing, but here’s what it looked like after I picked off a lot of the loose felt (that ball of fuzz is all the stuff I picked off by hand).

Wool felt isn’t cheap, so I wasn’t about to abandon it.  I just picked off as much as I could and smoothed the rest down with my hands and in the end, I don’t think you can tell at all on the finished product.  It definitely wasn’t any thicker though and I have no clue what I did wrong.  Any ideas?  Has this happened to you?

Ok anyways, I wanted the booklets to fit into these little metal buckets I had bought from the dollar bin at Target, so I had to size mine down.  The size of my unfolded booklet was 5.25 x 7.5 inches.  I added a little tab to my template for the velcro closure.  The original tutorial/pattern has more info about the size and spacing of the slits.  Mine had four pairs of slits for the crayons on the left side and two 2.75 inch slits for the paper on the right.  So here’s what my template looked like:

Using your blade, cut through the lines on your paper template.  Cut a 5.25 x 7.5 inch rectangle from your inner felt.  Lay the template on top and mark the lines using chalk or a disappearing ink pen.  Cut those with your blade.  Using your template as a guide, cut another rectangle WITH the closure tab from your outer felt.

On your outer felt, feel free to add an applique or any other decorations.  Sew one side of the velcro to the tab and the other to the opposite side of the cover about a 1/4 inch away from the edge.

Pin the two layers of felt together with wrong sides together.  Make sure that when you open up the booklet the crayons slits are on the left and the paper slits are on the upper right.

Sew around the edge in a rectangle.

Your booklet is done!  Now to add the goodies . . .

Cut your paper into fourths along the long edge of the paper.  Each strip should be 2.75 inches wide.  Stack the 4 strips and fold them in half.

Slide your crayons in on the left and your paper through the top slit and back out the bottom slit on the right.  The most fun I had was picking out the color combos for the 4 crayons 🙂

And you’re done!  Pretty simple, right?

Now go make 16 more 😉

Thanks to Carla for the fabulous inspiration and tutorial!  I’ve stashed one of these in our diaper bag and I imagine I’ll be whipping it out quite often.

What kinds of “distractions” do you keep on hand to keep your child entertained?  My sister-in-law was the one who taught me to ALWAYS have paper and writing utensils on hand (for any age kid).  And you know what she carries in her purse and has entertained children for loooong periods of time?  A balloon!  Deflated, of course.  Serious (long lasting) fun can be had with a simple balloon.  Genius.

Happy sewing and have a great weekend!!

YOU & mie

I’m baaaaaack!

I went almost an entire month without sewing – CAN YOU BELIEVE IT!?

Summer vacation is officially over and the craziness of back-to-school is upon us.  I had such an amazing summer break and I’ve loved all the time I spent with my family, but a part of me (a small part) is looking forward to the regular schedule of the school year.  Already in the last week I knocked a good 4 projects off my to do list.  Feels gooooood!

I have so many things to catch up on, so over the next few weeks, you’ll probably see a mix of older projects that I never got a chance to post here and current/new projects.  A little bit of late summer and fall mixed together.  I hope you don’t mind.

But while I get myself organized and back in the game, I thought I’d take a moment to share some of the fun creations that have been popping up in the you & mie flickr pool.  If you’ve ever used a tutorial from this blog, or have been inspired to try out a project you’ve seen here, I’d love to see what you’ve made.  Sign up for a free flickr account and add it to the pool!  Every so often I’ll feature some of your awesome creations here.

So thank you to this first group of ladies for sharing pictures of their work.  It makes me soooo happy to see people actually using my tutorials.  Makes the time and work worth it!!
First, there are a few Summer Breeze Tops:

GolfingJulie made this adorable yellow top for her toddler.

037Carol made FOUR tops for her granddaughters for the 4th of July.  She said the pleated placket reminded her of the US flag – how creative is that??

And Tina made this top for herself, adding bust and back darts for a fitted women’s top!

Next there are a couple of Asymmetrical Circle Tops:

044Eleanor made this adorable citrus-y circle top . . .

Asymetrical Circle DressAnd Megzan182 added this sweet photo to the pool of her Asymmetrical Circle Top.  Love that fabric and that smile!!

And lastly we have a few circle skirts from the Reversible Circle Skirt tutorial and these were all created by Mary Jo of All This For Them!

Reversible Circle Skirt ~ side 1Reversible Circle Skirt ~ side 2

First is a reversible skirt, with the cloud applique on one side and Dora on the other.  My daughter would love this!

Two Layers Circle Skirt

Twirly Teacups SkirtThe next two are double layered circle skirts.  Mary Jo used the Reversible Circle Skirt tutorial to make the waistband, but kept the two layers separate.  I love the contrasting fabrics and the wide color bands at the bottom!

A HUGE thank you to these ladies for letting me share their beautiful work with you!  I really do love to see what you guys come up with, so don’t forget to add photos of your you & mie inspired projects to the pool too!

Hope you all have been doing well.  Can’t wait to catch up with you!