KCW Day 3 & 4 – Knit Baby Vest

Well I woke up sick yesterday and nearly threw in the towel on Kids Clothes Week, but I’m chugging along slowly just to see what I can get done.  I started out with a possible 6ish projects for this week and that list has quickly dwindled to two.  If I can finish two things, I’ll be psyched. 

Neither of my daughters really need any new clothes.  Yuki’s drawers are overflowing and Kaya’s are too, plus she grows out of everything so fast.  So naturally I was drawn to the least practical thing ever.

BabyVest1

But seriously cute, no?

It’s the Knit Vest from a Japanese sewing book, いちばんよくわかる赤ちゃんと小さな子の服 (Easy to Understand Baby and Little Kids Clothes).  You can see more pictures from the book in this post here.

Frankly, I surprised myself when I picked out a project from a Japanese sewing book.  I have so many that sit on my shelf, usually passed up for a more user-friendly PDF pattern in English.  But it was calling to me, so I just went with it.  Since my kids don’t actually NEED anything, I might as well use this as an opportunity to practice new sewing skills.

BabyVest2

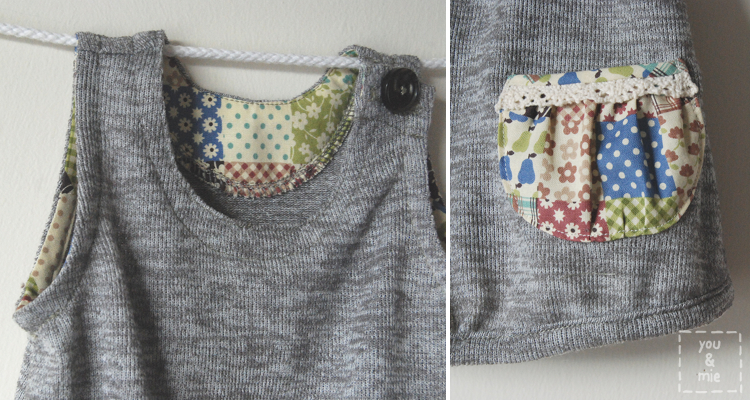
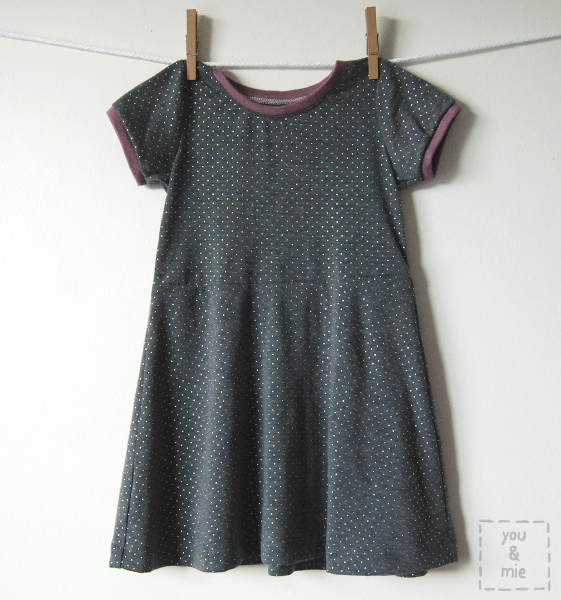
The fabric is a really loose sweater knit that I’ve had in my stash for a long time.  Really soft and comfy, but very tricky to sew with.  Definitely helped to use the walking foot for this one.  And I couldn’t get my buttonhole foot to work on the thick layers of folded knit, so I had to do some zig zag hackery on that buttonhole.  The tricky fabric made this a little difficult to sew up and honestly, it’s not my finest work (don’t look too closely at my stitches!), but really, who is going to notice?  Especially when it’s on this little one!

BabyVest3

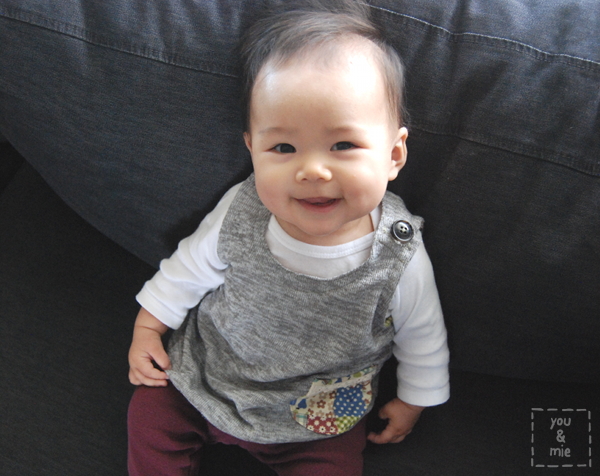
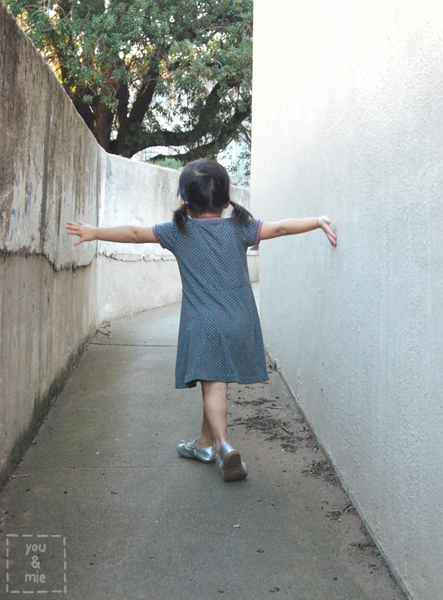
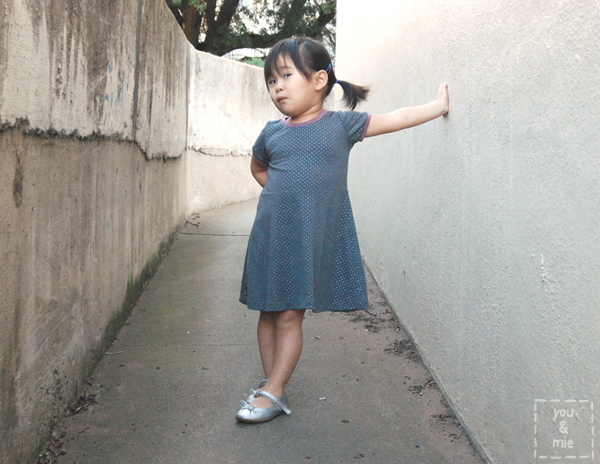
BAM!  Bet you don’t even notice the vest at all now, huh?  She makes me feel all gooey. 

Haha.  Anyways, the pattern itself was fairly straight forward and easy enough to figure out with all the great diagrams and tips I learned during the Japanese Sewing Book Series.

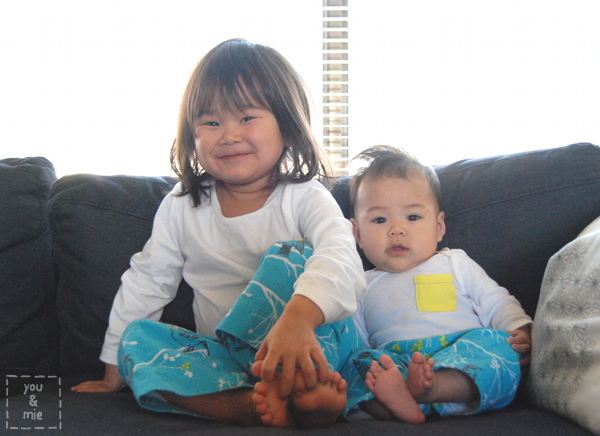
I made size 70 which, according to the book, is for 3-10 months and 65-75 cm in height.  That’s a little bigger than Kaya is, so I assumed it was going to be too big for her.  It fits her, but is still a little big thankfully, so she can wear it for . . . I dunno, two more days maybe!?  (they grow so fast!)

BabyVest4It was fun making something for Kaya.  She’s wearing practically all hand-me-downs, so it feels good giving her something that was made just for her.  But seriously, after I sewed on that tiny detailed lil pocket, I couldn’t help but ask, “what the heck does a 4 month old need with a pocket!?

BabyVest5

Alright, I’m off to the Kids Clothes Week site to figure out how to upload my first project!  Then maybe I’ll make a shirt for my other daughter.  And then sleep.

Ahh yes, sleeeeep.

How’s your week going!?

KNITerview on Made by Rae

Hey!  Have you following along the KNITerview series on Made by Rae?

It’s a really informational series all about KNITS – how to pick them, where to get them, and how to sew them – and today I’m over there as a guest!  I was admittedly a total knit-phobe when I first started sewing and I sometimes still get a little anxiety about it.  But over the last year I’ve really learned a lot about sewing with knits, so I’m happy to be sharing a little bit about my experiences in an interview style post.

kniterview5

Now knits are my fabric of choice when it comes to garment sewing.  Nothing can beat the comfort and ease.  So head on over to check out my KNITerview with Rae.

And I’m off to try and get a little sewing done.  With knits, of course 😛

KCW Winter 2014: Day 1 & 2

So things are off to a pretty slow start over here, in terms of Kids Clothes Week.  No actual sewing going on yet, but I’ve been thinking about it a lot.  That counts for something right?

Processed with VSCOcam with m5 preset

I think I’ve finally picked out a few items I want to work on and last night I did some tracing and cutting and taping of patterns.  I’m even busting out a Japanese sewing book, so I’m using Meg’s awesome trick for adding seam allowance. But seriously, getting my patterns ready has taken me 2 days and I haven’t even finished yet. Oy.

Next step is “shopping” in my bins-o-knit.  Yup, this is pretty much my entire knit stash (though I did just break my fabric shopping diet and buy some knits online yesterday.  *guilty face* I couldn’t resist!!)

Processed with VSCOcam with t1 preset

So tonight I’ll finish preparing the patterns, pick out some fabric and hopefully get it cut.  Maybe even do a little sewing?  Probably not.  Most of the sewing will probably happen on days 3 & 4.  And if all goes well I might even have a garment or two to show you before the week is over.  I still need to figure out how to use the KCW website too.

Where are you with your KCW plans?  Been more productive than me, I hope?

And though this isn’t really KCW related, here is my dining table today.

Processed with VSCOcam with t1 preset

Ahh yes, the life of a blogger 😛

Can’t wait to see what you’re making!

Bess Top in Ikat

So if you’ve been following along the blog recently you know that I’m trying to sew more for myself, but since I’m nursing, anything I make has to be nursing-friendly.  I’ve got a few different styles going on, but honestly, my uniform has been button up shirts with a nursing tank or camisole underneath.  My absolute favorite shirt right now is a Converse One Star top that I got from Target and it has a placket with snaps in the front that extends below the bust for easy opening.  It’s not meant to be a nursing top, but it’s perfect for it.  AND it’s really cute (sorry, I couldn’t find a picture or link).  Then I realized that it closely resembles the Bess Top!

So when Rachael of Imagine Gnats and creator of the Bess Top pattern asked if I would be part of her pattern tour, I was psyched to have the opportunity to recreate my favorite store bought shirt!

IkatBessTop1

So the main alteration I made to the pattern is adding a placket to the front.  I used this great Continuous Placket Tutorial by Melly Sews.  Otherwise, I sewed up the pattern as directed.

IkatBessTop4

My favorite feature of this pattern is the super unique way the sleeves come together.  The back piece of the shirt wraps around to the front to create sleeves instead of attaching them as separate pieces.  SO CREATIVE.  I love how you can use two contrasting fabrics, or just one, depending on what look you want.  If you use two different fabrics like I did, you only need a little bit for the front, so you can use something special you’ve been hoarding, like this woven ikat fabric.

IkatBessTop2

Ok, I have more to share about the pattern, but can we stop to talk about this fabric for a minute!?  I bought this ikat from Michael Levine back in June when I was in LA for the Fabric Shopping Weekend and I’ve been saving it for something special because it’s reeeally gorgeous.  Ikat fabric is made up of threads that have been dyed before it’s handwoven.  Bindings that resist dye are applied to the threads before they are dyed with one or multiple colors (kind of like tie-dying, except tie-dying is done after the fibers are woven into fabric and this method dyes the thread first before being woven).  The bindings are then removed and the threads are woven creating really unique and intricate designs.  The fabric has a looser weave which gives it nice drape, but it also means that raw edges fray very easily.  Michael Levine has a lot of other gorgeous ikat fabrics in their online store, if you’re interested!

*Edited to add – I forgot to mention that the fabric that I used for the back is a black shot cotton I picked up from Stonemountain and Daughter.  It’s got a similar feel and weight compared to the ikat – I really like them paired together.*

IkatBessTop3

Where were we? . . . Oh, right!  The pattern!  It comes in women’s sizes 2-20 and in three lengths, top, tunic or dress.  There are two necklines to choose from and a hi-low hemline.  I appreciate how the top fits loosely over my mid-section – it’s meant to flatter a range of body types.  The neckline, sleeves and hem are finished with knit, which is something I’ve never done before, but really liked!  It’s like finishing with bias, but I feel like it’s a bit lighter in weight and softer too.

The trickiest part of the construction is attaching the yoke and sleeve.  I can’t help but feel like one of the markings is a little off, but I followed the pattern and fiddled with it and it turned out ok.  I might play with it a little more the next time I make this top.  And yes, I do think I’ll make another.

IkatBessTop5

Here are a couple of awkward selfie chest shots for you.  I wanted to show what the placket looks like open, and OH SNAP!  Yes, I used snaps instead of buttons.  I wouldn’t have though of it, but that shirt I love so much has snaps and it’s so genius.  When the baby is hungry, I can pop my shirt open with one hand in one second.  And snapping it back up is a cinch too.  Oh, how I appreciate anything that can be done with one hand instead of two!  I only wish I had used black snaps instead of silver, but this is what I had.

IkatBessTop6

And here it is styled differently.  90s-ikat-denim love anyone!??

The Bess Top pattern can be purchased here.  And be sure to check out all the other stops on the Imagine Gnats pattern tour showcasing all of Rachael’s patterns!

*Edited to ALSO add that Rachael is offering 20% off all of her patterns through the end of January with the code “januarytour” so if you’re thinking about buying the pattern, be sure to buy it now with the discount!*

Inder Loves Folk Art / mon petit lyons / Sew Delicious
la inglesita / Miss Matatabi / Rae Gun Ramblings
Welcome to the Mouse House / Casa Crafty
Make it Handmade / Made with Moxie / Buzzmills
girl like the sea / just me jay / Play Crafts
Sew Well Maide / Sew Charleston / Mingo and Grace
Caila Made / Sewbon / do Guincho / call ajaire
Alison Glass / a.Amelia Handmade / Bored & Crafty
you & mie / Stitched Together / things for boys
fake it while you make it / Sanae Ishida
Behind the Hedgerow / I Seam Stressed / Charming Doodle
The Crafty Kitty / Siestas & Sewing / Figgy’s

Have a great weekend, everyone!

*This pattern was generously given to me for this review, but all opinions are 100% my own.*

Her New Favorite Dress

SilverDotSkater4

I finally got around to sewing up a Skater Dress for Yuki.  The pattern is by Amanda of Kitschy Coo and it is awesome!  I’ve been meaning to sew one since the pattern came out but other things kept cutting in front of it in my sewing line.  Well, last weekend was my mother-in-law’s birthday, and as a present, my sister-in-law had the great idea of getting pictures taken of Grandma and her 4 granddaughters at a photo studio.  We wanted to coordinate their clothes and decided on gray and purple.  Yuki didn’t have anything appropriate, so naturally I had to make something new 🙂

SilverDotSkater1

I made size 18M/2T for my petite 3 and a half year old.  I was a little skeptical about going with a size meant for a kid so much younger, but I went with the measurement chart and it fits really well and will probably fit for quite awhile, especially since it’s made of a stretchy knit fabric.  I already had this gorgeous fabric called “Silver Pin Dot and Charcoal Grey Cotton Lycra Knit” picked out for my first Skater Dress, so I’m glad it fit with the purple/gray colors we picked for the pictures!  I bought it from Drygoods Design but they don’t have it anymore and I can’t seem to find anyone who carries it online anymore.  Bummer for you!  It’s so pretty!

SilverDotSkater2

As you can probably tell by the title of this post, Yuki LOVES this dress.  In fact, she wore it three days in a row and would have worn it a fourth, but it was in the wash.  Then she wore it again the next day!

SilverDotSkater6

I asked her what she loves so much about the dress and she said the silver dots and her silver shoes.  The dots are definitely awesome, but I love the dress because it’s super comfy, casual and fun.  I can imagine this dress would be perfect in pretty much any knit fabric!

SilverDotSkater3

I used a really pretty violet knit, that has a tiny bit of a shimmer to it, to finish the neck and arm holes.  I actually bought this fabric to make something for me and I already have a Plantain tee cut out (I can’t wait)!  I also have quite a bit of this silver dot fabric left over, so I’m hoping to make something for myself as well.  Then Yuki and I can be twinsies!  😛

SilverDotSkater5

I do already have plans for at least one or two more Skater Dresses.  It’s a really fast and simple dress to sew, and such a practical piece for your kid’s wardrobe.  The pattern comes in four sizes, 18m/2T, 3T/4T, 5Y/6Y and 7Y/8Y, so I know I’ll be able to use it for years!  Amanda‘s directions are great and she is really a master at sewing knits, so there are some great tips in the pattern and HERE on her blog.  And I love the design of this dress – a simple fitted t-shirt like top with a semi-circle skirt.  I really recommend this pattern!

SilverDotSkater7

Check out this ‘tude.  I swear, this girl is 3 going on 13.  Sometimes I feel like I have a teenager already.

Ooh, are you participating in Kids Clothes Week?  It starts next Monday on January 27!  I am looking forward to sewing along for the first time in awhile since I missed the last two.  I haven’t figured out exactly what I want to sew yet.  Honestly, there are so many patterns I want to make, but Yuki doesn’t need any clothes – she has tons already!  So I’m a little stuck on what I should do.  Have you made plans yet?  I can’t wait to see what everyone makes – it’s always so inspirational!

Super Yuki to the Rescue!

Superhero4My main Christmas present to Yuki was this superhero dress up costume, and honestly?  Best. Gift. Ever.  For two reasons – 1. it was all suuuper simple and fast to sew up and 2. she absolutely loves it.  Can’t get much better than that!

Superhero8

SUPER YUKI!  Oh man, I get a pretty good kick out of this costume too, I must say!  I first got the idea to make her a cape awhile ago when Yuki started pretending that she was a magician.  But recently, she saw a few episodes of the 1980s show, Spider-man and His Amazing Friends, and got really into the character, Firestar.  She kept asking if she could be her, but she looks like this and I wasn’t going to make that costume for her.  Luckily, details don’t matter much to a three year old and as far as Yuki is concerned, she is totally Firestar.

Superhero2So there are a ton of great cape patterns out there, but this one was made with this free pattern/tutorial because I really liked the shape of it.  Though I used velcro instead of magnets and I also shortened it quite a bit.  The cape is reversible and one side is made of some sort of shiny red fabric with the felt star “logo” top stitched on.

Superhero3

The reverse side is black cotton with silver stars hand stamped on.  This side is supposed to be the magician side.  She hasn’t actually used this side since she’s much more into being a superhero, but I imagine that if I get her a hat and magic wand, she might be inclined to put on some magic shows as well.  I love that this cape is reversible and easy enough for her to put on by herself.

Superhero1

The mask and arm cuffs are made of felt (the red is a glittery felt) and are technically both reversible as well, though these are just yellow on the other side.  I used this template for the mask and this pattern/tutorial for the arm cuffs, though I shortened my cuffs to fit Yuki better.  I started by top stitching the yellow stars on the red layer and then sewed the yellow and red layers together close to the edges.  Sandwich the elastic in between the two layers for the mask and it’s done.  The arm cuffs close with velcro.  I think I finished these in one nap time!

Superhero9

I love how she falls into character so quickly when the costume is on.  All I have to do is give a Green Goblin cackle and she’s after me like the world is depending on it!

Superhero5

Stealth mode.

I just love her imagination right now.  Everything she does is so creative and intensely real and meaningful it is to her.  Sometimes it gets tiring to play the same games over and over again with her, but I also know that I’m going to miss this stage when it’s gone.  She is just always 100% in that moment.  I envy that.

Superhero7

OOF – she’s just too powerful for me!  Super Yuki saves the day once again!

What was the best present that you gave this year?  This would definitely be it for me, hands down.

Pajamas for Four

Pajamas1

Christmas pajamas have never been a family tradition in our house, but when I was trying to figure out what to give my nieces for Christmas, my sister-in-law suggested pajama pants for the middle schooler.  And then, since I’m crazy, I decided to make matching pajamas for my both of my nieces and both of my daughters.  Finished them the night before, but they were a hit.

Pajamas2

The cousins are 9 and 11 and we let the 11 year old pick the fabric.  I went to Joann‘s to pick up some flannel and it was on sale for $2.80 a yard!  Score.

pajama girls

For the three older girls, I used the Parsley Pants pattern, though I had to grade it up for the 11 year old.  I was pretty nervous about the fit because I had no idea what I was doing, but it turned out great!  I basically added about 1.5 inches to the top, and 2 inches to the bottom and then cut the entire pattern along the tuxedo stripe line and added an inch to the width.  Love this pattern for pajama pants!!  I’m thinking of grading it up to make a pair for me!

For the baby, I made Rae’s Basic Newborn Pants (free pattern) with a little added length.  Of course, she’s already almost outgrowing her pajamas.

Pajamas3

The older girls got shirts from Target and Kaya is wearing a store bought onesie.  I just added the yellow pocket to match the yellow on the pants and had to do some altering on Yuki’s shirt since it was way too big for her.

photo2

Yuki claims these are her favorite pajamas now and I’m certain that it’s because her cousins have the same ones.  She absolutely ADORES her cousins and think they are the best.  And they are.

So Christmas pajamas weren’t a tradition before, but maybe they are now?  I admit, it was pretty darn cute seeing them all running around (or just lounging around, in Kaya’s case) in their matching PJs.

Pajamas7

Check out my second shooter!

Do you guys do Christmas pajamas?  Where did this tradition even come from?  Worth continuing?  Apparently some of Hideko’s high school students totally dread it.  Haha!  Were you blessed with (or a victim of) matching pajamas as a kid?

Four Corners Nursing Blouse

One thing I tend to do is buy up new fabric prints and then hang on to them forever and never make anything with them.  Then they aren’t really cool anymore.  Or, the print might still be awesome, but everyone has already seen them and sewn with them and moved onto something else, so I feel like I missed the boat.  I bought some Washi to make a Washi dress with and never did.  I bought some and old lace to make myself shorts with and never did.  I won a charm pack of Briar Rose and had a quilt planned out, but . . . well, you get the picture.

When one of my favorite artists, Leah Duncan, released her Tule fabric line, I carefully chose two fabrics to order with a few possible projects in mind, but nothing definite.  This gorgeous Meadow Vale Dark is exactly the type of fabric that I’d hoard forever, constantly changing my mind about what I wanted to do with it and then never using it in the end.  But what’s the point of having such beautiful fabric if all it’s going to do is sit on the shelf?

I was looking through Anna Maria Horner’s Handmade Beginnings (affiliate link), the same book I used to make this nursing top, and was intrigued by the other nursing top included, the Four Corners Blouse.  I wasn’t convinced that it was my style or that it would be flattering on me, but I wanted to give it a try anyways since I’m trying to find ways to give my nursing wardrobe some variety.  I debated whether or not I should use my precious Meadow Vale fabric or not.  What if I didn’t like the top and ended up wasting the fabric?

Well in the end I decided to just go for it because letting it sit on my shelf would be a waste as well.

Tule Nursing Top1

The construction of the top is really quite interesting – all the pieces (and there are quite a few) are rectangles!  So there are no pattern pieces to trace, only rectangle measurements.  I made some obvious changes to the pattern, 1. I omitted all the buttons and button loops.  They are purely decorative anyways and I like to keep it simple.  2. Instead of using a contrasting fabric for the placket (in between the boobs), I used the main fabric to avoid drawing more attention to the chest area.

Tule Nursing Top3

I also made the straps narrower and lengthened the top and made a few other changes here and there.  This top is made with a panel in the front that acts as a nursing cover that opens up when you untie the ties.  Pretty creative and sneaky!

Tule Nursing Top4

The downside though, is because the front panel isn’t connected to anything at the sides, I noticed that when I was picking up things, say, children for example, it would flip up easily and expose my tummy.  Not good.

Tule Nursing Top2

I can’t say that I love this top, but I am glad that I gave it a try and I will definitely wear it. Mostly layered up like this to give me a bit more coverage.  I think this fabric might have been better as something simple like a Wiksten Tank or an Everyday Skirt, but knowing that I probably would have just let it sit in my stash indefinitely makes me feel like using it was the right decision.  And I do love opening up my closet and seeing this lovely fabric begging me to put it on 🙂

Do you have any favorite nursing top patterns?  I’m trying to sew more for me, but need to keep it breastfeeding friendly so I feel like my choices are pretty limited.  I have a few nursing hacks in mind, but I’d love to hear your suggestions as well!  And if you have some fabric in your stash that you are saving away for a special occasion, I dare you to just use it in your next project!  You might be really glad you did!!

Have a great weekend!

Looking Back and Looking Forward

2013 was a huge year for me.  Around this time last year I found out I was pregnant and that ended up shaping the whole year for me.  Sewing and blogging slowed down as my energy waned and priorities shifted.  I watched my baby sister get married.  I got to go to Spring Quilt Market and LA Fabric Shopping Weekend/Girls Night Out and hang out with some of the most awesome sewists and bloggers around and now I get to call them my friends.  I got married.  Then I gave birth to a beautiful and amazing little girl and I’ve been enjoying her snuggles and smiles for the last 3 months (3 months already!??  How did that happen?).  And I’ve watched my little toddler turn into a little girl – more talkative and spunky than ever, and oh-so-sweet in her new role as a big sister.  I feel so very lucky.

2013events

So, like I said, the blog took a bit of a back seat in 2013 and though I’ve missed it, I’ve obviously had good reasons.  Last year I did a recap of my favorite projects from 2012 with the intention of doing it again this year. Well it wasn’t quite as easy with a limited number of posts, but I did want to look back at some favorites from the past year.  First up are the 6 posts from 2013 with the most views.

2013ReaderFavs

1. Reversible Spring Coat Tutorial
2. Announcing the Japanese Sewing Book Series
3. Maternity Geo Dress {tutorial}
4. Colour Pop Top Knock Off {tutorial}
5. Pretty Pink Pinafore {tutorial}
6. Fanfare Baby Blanket

Seems pretty clear that you guys like tutorials! 🙂

And these are my personal favorites from the past year . . .

2013MyFavs

1. My Wedding Dress
2. Fanfare Baby Blanket
3. Sweetheart Bubble Dress
4. All My Friends Are Dead T-shirt
5. Japanese Sewing Book Series
6. K’s Outfit for Handmade Kids Clothing Swap

As we dive into a new year, I’m hoping to get back into sewing and blogging regularly.  There are just so many things that I want to sew!  It’s hard to know for sure what this year will look like, but I’m setting some goals for myself that will hopefully help me shape it into a productive and fun year.  I stopped at 10, though I probably could have kept going – but here they are, in no particular order . . .

1. Sew more for me.  Last year I started sewing a lot more for me and I’d really like to continue.  It’s a bit tricky with my constantly changing body, but I guess that just means I have a lot of sewing to do to keep up, right? 🙂

2. Another series.  I had such a great time with the Japanese Sewing Book Series last year and I’d love to do another series of some sort.  Either a continuation of the Japanese Sewing Book Series?  Something completely different?  You have any ideas?

3. More tutorials!  Clearly you guys love tutorials and I love making them, even though they are a ton of work.  So I’m hoping to continue rolling those out once in awhile and finally update my super outdated tutorial page while I’m at it.  Eek!  Any tutorials you’d like to see here?  Let me know!

4. More collaborations.  Last year I loved working with other bloggers on the Japanese Sewing Book Series and the Handmade Kids Clothing Swap.  And I LOVED meeting and hanging out with all the amazing people at Quilt Market and Fabric Shopping Weekend/Girls Night Out.  Working together and collaborating with other creative types is why I love blogging so much in the first place so I’d love to find more ways to connect with others and bring new and fresh ideas to blogland.

5. Sew my stash/sew my patterns.  My fabric stash is growing faster than I can sew and so is my pattern collection.  I’m going to make an effort to sew from what I’ve got before buying new stuff.  Though the constant flow of new and amazing fabrics and patterns makes it very VERY difficult to resist!

6. Sew smarter.  I often find myself sewing things that are impractical.  I sew dresses for Yuki even though she lives in t-shirts and yoga pants 99% of the time.  I make myself a dress or skirt that I’ll only wear once.  Sometimes that’s ok, but I need to be smarter and more creative about sewing things that’ll actually get worn.

7. Balance my time better.  This one is quite huge and hard to measure, but I’m pretty bad a time management, so I’d love to find ways to be more efficient.  With blogging, it’s not just sewing and writing, but there’s planning and shopping and sewing and photographing and uploading/editing photos, and writing and reading other blogs and comments and emails and pinterest and on and on.  I love doing it all, but it’s a lot and I’d like to find a way to keep my time organized and balanced.  Tips are welcome.

8. Reorganize my sewing area.  I’m a naturally messy person and my work space has gotten out of control.  Plus my fabric stash and sewing paraphernalia have grown out of my current space, so it needs some fixing up.  It’ll be an ongoing project, but I’ll be sure to share it here along the way or when I’m done.  I love seeing other people’s work spaces, don’t you?!

9. Finish projects on my to do list.  Not a particularly exciting one, but I have a a ton of things that I’ve been meaning to get to forever.  Super late gifts I’ve been meaning to make, pants I’ve been needing to hem, clothes I need to mend, etc.  Not glamorous stuff, but things I need to get done!

10. Revamp the blog.  This one will be tough.  I don’t know how to build a blog or design logos or anything like that, but I feel like this space needs a new and fresh look.  Won’t happen soon or quickly, but hopefully I can make at least some small changes to update this space over the next year.

Think I can do this?  We’ll check in on these again in a year and see!  What about you?  Any sewing, crafting, blogging related goals?  I’d love to hear them!