
My second make for Kids Clothes Week was a Charlie Dress for Yuki in some beautiful new nani IRO double gauze. I love it. I really do.

My second make for Kids Clothes Week was a Charlie Dress for Yuki in some beautiful new nani IRO double gauze. I love it. I really do.
Hey! It’s Kids Clothes Week! It’s been awhile since I’ve fully jumped into Kids Clothes Week, but I was feeling motivated to make some new duds for the 4 year old. I had completely stopped making clothes for her at some point because she was rejecting all the stuff that I was making. But now she’s really into dresses, skirts and tank tops and all those things that I made 1-2 years ago! Lately, she’s been grabbing this skirt a lot (which makes me super happy), so I thought I should add another to the closet.


So I have exactly one project coming out of this Kids Clothes Week, but I’m pretty damn excited about it! The (optional) theme for this season was Kid Art and while this dress was probably the last thing I needed to make, I got really excited by the idea of getting Yuki involved in creating a one-of-a-kind garment for herself. I had all sorts of ideas like fabric painting, stenciling, iron on transfers, etc. But I knew I didn’t have much time so I could only pick one thing. If you know me, you know that I looooove fabric painting (like this cardigan, this hat and bag, and this dress) and I thought Yuki should have a go at it since she loves painting too!

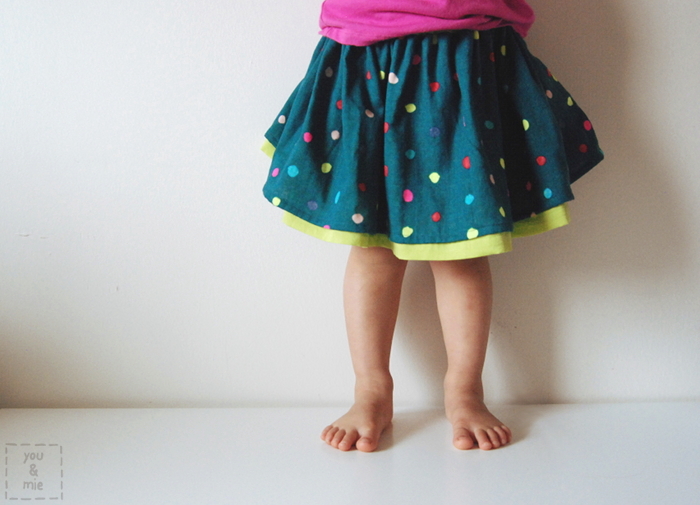
Hey! It’s Kids Clothes Week! No long lists over here this time. Just working on two things. First one was to finish up this skirt I started a week or two ago. I was going to make this springy skirt for a specific project and had the fabric cut out and everything before deciding to scrap it. Well, not scrap the skirt entirely, but just not for that specific project. But I couldn’t let this gorgeous fabric go to waste! So I finished up this double layered skirt and it was a pretty quick project.

The main fabric is Nani Iro Colorful Pocho – neon on dark green, but I’m not sure that you’ll find it available anymore. I remember snatching it up from Miss Matatabi immediately after seeing it and then, well, hoarding it for the last year and a half. It is a soft and lightweight double gauze and as dreamy as Nani Iro double gauze always is.
The bottom layer is a chartreuse cotton voile from Michael Levine. It’s very lightweight and a bit sheer, making it perfect for layering.
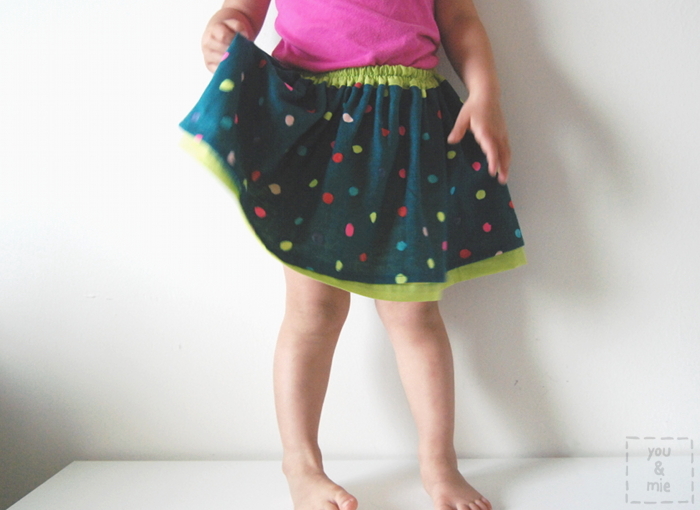
I basically used this Double Layer Simple Skirt tutorial except I added a separate waistband with two casings for elastic. It also has pockets which is really a deal breaker these days for Yuki.

Yuki has always said she loves this fabric – she would pick it out from my shelves and ask me to make her something, but I could never figure out what to make. I thought she would love this skirt, but she is a little unsure. Part of me is sad that I used up this long hoarded fabric on something that she may or may not wear. But I also feel like this neon trend (which I’ve fallen for) is not going to last forever, so I might as well go for it while it’s still hot.
What are you working on this week?
Ok, so technically today is Day 6, but this tee was made mostly on Day 4 and finished and photographed yesterday, so we’re calling it Day 5, ok? OK!
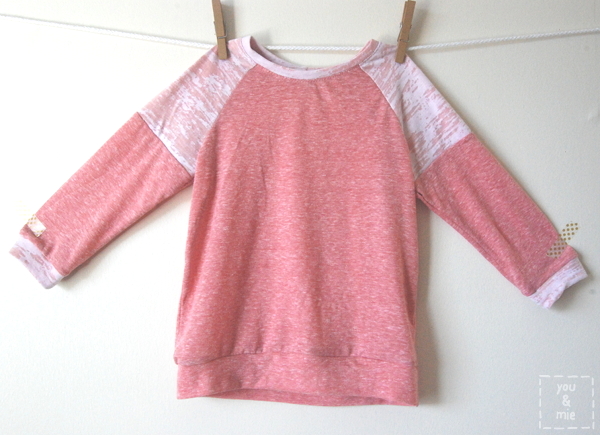
The pattern is the Oliver + S Field Trip Raglan T-shirt which is now available as an individual PDF pattern! I’ve had my eye on this raglan shirt pattern for awhile, but couldn’t fork over the cash for the set, knowing I’d probably never make the cargo pants. But Oliver + S have started offering some of their basic pieces as separates! And a good raglan pattern seems like a staple for any collection. This one doesn’t disappoint and I already have several ideas for more raglans and remixes that I can’t wait to try.
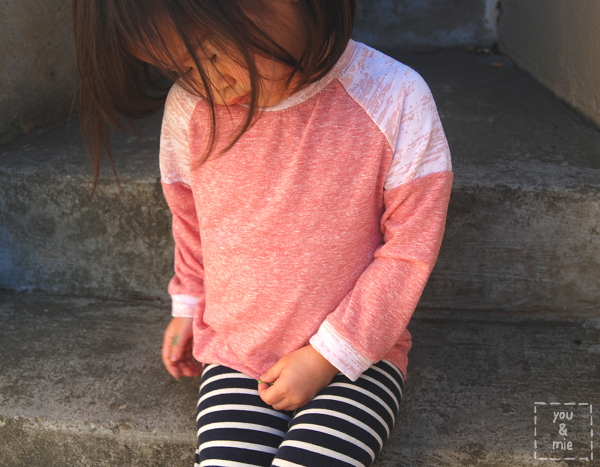
I made the shirt in size 3T and it is a little large for Yuki, which isn’t much of a surprise considering her petite size. I probably could have gone down a size, but this is great because I know it’ll fit her for awhile. It’s definitely a looser fitting shirt than the Flashback Skinny Tee, which, of course, is supposed to be a skinnier/tighter fit. I had to shorten the sleeves a bit.

The biggest adjustment I made to the pattern was adding color blocking to the sleeves. It was super simple to do and I love the finished look. I also decided to finish the sleeves and bottom with bands/cuffs instead of just hemming it and omitted the pocket.
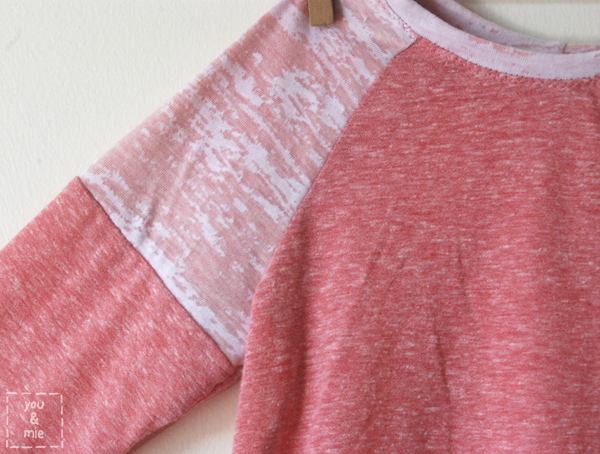
The main fabric is a suuuuper thin and soft heather red knit. It’s so heathered that it looks pink. I bought it from the remnant bin at Discount Fabrics awhile back. I picked it out because it is really soft and comfortable, but I don’t think I realized just how thin it is. I wasn’t sure if it’d be stable enough or opaque enough for a shirt, but it worked out fine, it just isn’t very warm. But definitely soft and comfy. The color blocked shoulder, neckband and arm cuffs are actually two layers. An ever MORE suuuuuuuper thin and see through, burnout tissue knit in white on top of the heather red knit. I don’t even know why I bought this burnout knit since it’s pretty impractical on it’s own (unless you can pull off the see through top look, which unfortunately, I cannot). I actually had thrown it in my “get rid of” pile because I didn’t think I was going to use it, and then fished it out for this. Turns out, it looks great layered!

You can kind of see how see through the top is here, over Yuki’s striped leggings.
I knew that these knits, being as thin as they are, were going to be a bit of a challenge to sew. In fact, they were a challenge to cut! They are so stretchy that if you’re not really careful, your pieces can come out a little misshapen. I tried the stretch stitch with a ballpoint needle and my walking foot, but even with all that, the fabric was getting sucked into the machine and stretched out. I probably could have busted out the tissue paper trick and been fine, but instead I switched over to my serger and it sewed up so easily. So I constructed the entire top using only my serger – this is my first time doing that – and I loved it! The only time I used my sewing machine was to topstitch the neckband down with a stretch stitch. I would have used it to hem the sleeves and bottom, but since I finished those with cuffs instead, I didn’t need it. SO EASY.

Doing a color blocked shoulder panel/sleeve is a very simple pattern adjustment, but if you’re not sure how to do it, I’ll tell ya!
First, I cut out my sleeve pattern in the appropriate size. Then I drew a line horizontally across the sleeve where I wanted to add the contrast fabric. My line is 1/2 an inch below the bottom of the armhole.

Place a piece of tracing paper on top of your sleeve pattern piece and trace the top of the pattern up to the line you created. You’ll want to add a 1/4 inch for seam allowance.

On a separate piece, you’ll need to do the same for the bottom part of the sleeve. Trace around the bottom of the sleeve up to the line you created and then add a 1/4 inch for seam allowance above the line. Now you have your two sleeve pieces!
The first thing I did after cutting out my fabric was sew the two sleeve pieces together with a 1/4 inch seam allowance and press. Then I followed the rest of the pattern instructions as directed! An easy alteration that makes a pretty big statement 🙂

This Oliver + S pattern, like all Oliver + S patterns, is really well written, with clear directions and diagrams and helpful tips. I can never speak highly enough of their patterns. They are just so reliable and . . . GOOD. The shirt comes together really quickly and is a great first-knit-project, if you’re looking for something to get you started. It’s a great basic for boys and girls and now that it’s offered as a separate pattern, there’s no reason NOT to get it.
So that’s a wrap for my Kids Clothes Week. I made two things, this and the Knit Baby Vest. Back in the day I might have tackled 6 projects, but I’m just not that same young sprightly thing I used to be! 😛 I love both of the things I made and that makes me feel happy.
How did your week go? I haven’t actually had a chance to do much browsing of other people’s projects unfortunately, but maybe that’s what I’ll do today and tomorrow. But if you sewed along, leave me a link to your favorite project from your week and I’ll be sure to check it out!
*This pattern was generously given to me for this review, but all opinions are 100% my own.*
Well I woke up sick yesterday and nearly threw in the towel on Kids Clothes Week, but I’m chugging along slowly just to see what I can get done. I started out with a possible 6ish projects for this week and that list has quickly dwindled to two. If I can finish two things, I’ll be psyched.
Neither of my daughters really need any new clothes. Yuki’s drawers are overflowing and Kaya’s are too, plus she grows out of everything so fast. So naturally I was drawn to the least practical thing ever.

But seriously cute, no?
It’s the Knit Vest from a Japanese sewing book, いちばんよくわかる赤ちゃんと小さな子の服 (Easy to Understand Baby and Little Kids Clothes). You can see more pictures from the book in this post here.
Frankly, I surprised myself when I picked out a project from a Japanese sewing book. I have so many that sit on my shelf, usually passed up for a more user-friendly PDF pattern in English. But it was calling to me, so I just went with it. Since my kids don’t actually NEED anything, I might as well use this as an opportunity to practice new sewing skills.
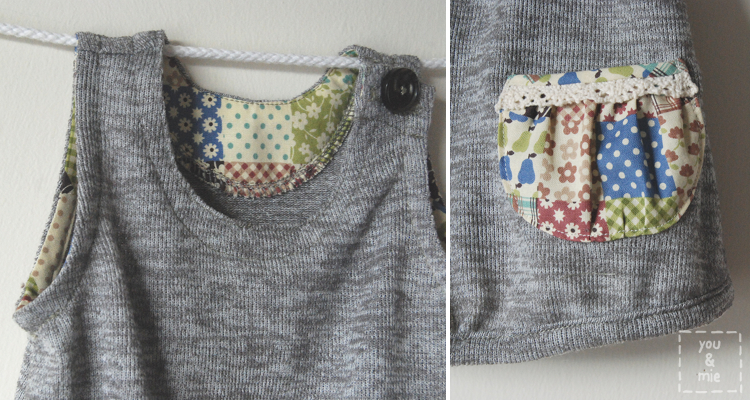
The fabric is a really loose sweater knit that I’ve had in my stash for a long time. Really soft and comfy, but very tricky to sew with. Definitely helped to use the walking foot for this one. And I couldn’t get my buttonhole foot to work on the thick layers of folded knit, so I had to do some zig zag hackery on that buttonhole. The tricky fabric made this a little difficult to sew up and honestly, it’s not my finest work (don’t look too closely at my stitches!), but really, who is going to notice? Especially when it’s on this little one!
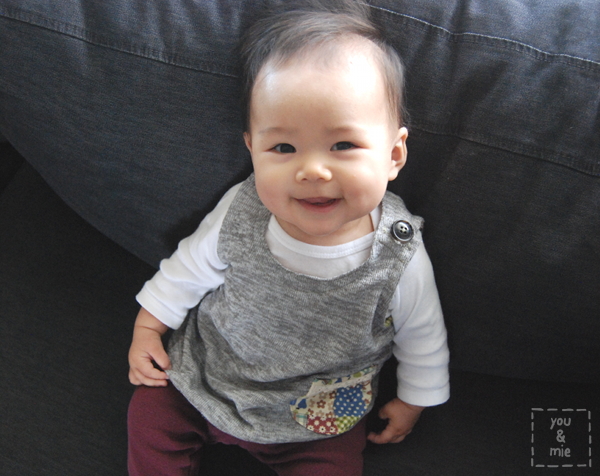
BAM! Bet you don’t even notice the vest at all now, huh? She makes me feel all gooey.
Haha. Anyways, the pattern itself was fairly straight forward and easy enough to figure out with all the great diagrams and tips I learned during the Japanese Sewing Book Series.
I made size 70 which, according to the book, is for 3-10 months and 65-75 cm in height. That’s a little bigger than Kaya is, so I assumed it was going to be too big for her. It fits her, but is still a little big thankfully, so she can wear it for . . . I dunno, two more days maybe!? (they grow so fast!)
 It was fun making something for Kaya. She’s wearing practically all hand-me-downs, so it feels good giving her something that was made just for her. But seriously, after I sewed on that tiny detailed lil pocket, I couldn’t help but ask, “what the heck does a 4 month old need with a pocket!?”

Alright, I’m off to the Kids Clothes Week site to figure out how to upload my first project! Then maybe I’ll make a shirt for my other daughter. And then sleep.
Ahh yes, sleeeeep.
How’s your week going!?
So things are off to a pretty slow start over here, in terms of Kids Clothes Week. No actual sewing going on yet, but I’ve been thinking about it a lot. That counts for something right?

I think I’ve finally picked out a few items I want to work on and last night I did some tracing and cutting and taping of patterns. I’m even busting out a Japanese sewing book, so I’m using Meg’s awesome trick for adding seam allowance. But seriously, getting my patterns ready has taken me 2 days and I haven’t even finished yet. Oy.
Next step is “shopping” in my bins-o-knit. Yup, this is pretty much my entire knit stash (though I did just break my fabric shopping diet and buy some knits online yesterday. *guilty face* I couldn’t resist!!)

So tonight I’ll finish preparing the patterns, pick out some fabric and hopefully get it cut. Maybe even do a little sewing? Probably not. Most of the sewing will probably happen on days 3 & 4. And if all goes well I might even have a garment or two to show you before the week is over. I still need to figure out how to use the KCW website too.
Where are you with your KCW plans? Been more productive than me, I hope?
And though this isn’t really KCW related, here is my dining table today.

Ahh yes, the life of a blogger 😛
Can’t wait to see what you’re making!

Ok, so I feel like I need to tell you a little bit about this shirt. A lot of different little factors went into the creation of this shirt, so bear with me.
So not too long ago, Hideko bought a red T-rex shirt for Yuki at the store. She hadn’t necessarily shown too much interest in dinosaurs, but it was a cool shirt and maybe because we loved it so much or maybe because one of her classmates also had the same shirt, Yuki decided it was her FAAAVORITE shirt. She wanted to wear it every day. She would ask about it even when it was no where to be seen. I’ve never seen her so attached to a piece of clothing before and I decided that I wanted to make something for her that she loved and wanted to wear as much as that dinosaur shirt.
When I was planning for KCW I decided to make her a bunch of t-shirts since that’s what she wears 90% of the time. I asked her what kinds of things she likes or what she’d want me to put on a t-shirt. She said . . .
1. Dinosaurs
2. Robots
3. Stripes
4. Boxes (we’re currently receiving all my sister’s wedding gifts while she’s on her honeymoon, so we’ve got a tower of boxes in our living room that Yuki is obsessed with)
But seriously – proud mama moment!! I love this kid. A dinosaur, robot and striped shirt!? I can do that!!!
So I cut out 4 Flashback Skinny Tees (3 solid colors and one striped) with plans for stenciling on a dinosaur, a robot and maybe stamping some triangles on the last solid one (and the striped one would just be plain ol striped). But when I was talking to Hideko about my plans for a dinosaur shirt, she told me about this book that one of her alumni had written, All My Friends Are Dead.
Let’s take a look at it shall we? No really, go and google image it and you’ll be able to see pretty much all the pages of the book. Is it not the funniest thing you’ve ever seen!? No? Then you should probably just stop reading and go somewhere else, cuz really? This ish had me cracking up!!!
So then I was pretty much obsessed with making it into a t-shirt. Totally inappropriate for a toddler? Perhaps? Totally awesome? I think so!! I love it.

I wasn’t sure how to make it into a shirt at first – stencil it and hand paint the details? Nahh . . . too much work. Luckily I had some iron on transfer paper for dark fabric, so I used an image I found online and added the speech bubble myself (so I wouldn’t have to cut out the individual letters) and ironed the design on. Looks waaay better than any stenciling/painting I would have done. We’ll see how the transfer holds up through wash and wear.
 The pattern is Rae’s Flashback Skinny Tee in size 3T (Rae has a post on how to make the FBST with short sleeves). Normally I’d make 2T for Yuki, but I wanted these shirts to last awhile and not be so “skinny” on her. After talking to Kristin and seeing the awesome Back to the Future/DeLorean shirt she recently made for her son in 3T (our kids are about the same age/size), I figured it was the right choice. And I’m so glad that I did! It fits Yuki perfectly (though I coulda made the neckband a little larger) and it will hopefully fit her for awhile. AND . . . she LOVES it!! Of course, she has no idea what it says, but it’s a dino shirt and it’s bright pink, so she’s happy. None of her classmates or friends can read, so I’m hoping this shirt doesn’t get me into too much trouble. Weird looks from other parents? Maybe . . . but it’s worth it.
 I’ve still got three other shirts to assemble and paint, but those may not get done this week. I’ll definitely share them when they are done but let me tell you, it feels so good to make something that my kid is actually TOTALLY excited about. And maybe after making all these t-shirts I’ll finally feel more comfortable sewing knits??
Well the week is winding down for me, although there is technically two more days to KCW. I MIGHT have one more project in me for tomorrow, but I’m not sure. You still sewing or are you calling it a week?

you & mie is an Amazon affiliate and will earn a small commission for Amazon purchases made through links provided in this post.
