
Yes! I did it! I finally made something for Yuki that she really likes!


I have to admit, I’m pretty psyched about this project. A couple of months ago I saw a little toddler wearing a tunic that was similar and definitely had an “I can make that!” moment. Well the idea has been rolling around in my head since then and I just needed the time to do it. Isn’t that what KCW is all about!?

The theme for this Kid’s Clothes Week is “Mini Me” so I decided to make one for little sister as well. Yuki loved that she and Kaya had matching shirts! Unfortunately, Kaya wasn’t really feeling the photo shoot. But I have a feeling she really loves the shirt too 😛

Yuki says, “Can you see my panda ears?” The 3D ears are definitely the most fun feature of these shirts. And though these are pandas, you can really make this shirt into almost any animal! Want to make one for your favorite animal lover? I made a tutorial!
Here’s what you’ll need:
- a raglan t-shirt pattern (I used the Oliver + S Field Trip Raglan T-shirt Pattern, but you can use any, or draft your own)
- knit fabric (refer to your pattern for amounts) and coordinating thread
- scraps of fabric for the ears (knit or woven)
- freezer paper
- precision knife/scissors
- iron
- fabric paint and brush (be sure to read all the directions on your fabric paint before you begin your project)
To get started, cut out all your shirt pieces as your pattern directs (shirt front, back, two sleeves and a neckband). Lay out the front shirt piece and place your freezer paper on top, shiny side down. Sketch your animal face.

Make a pattern piece for the ears. We will add a small pleat to the ear, so add a little width to the base and also 1/4 around for seam allowance.

Carefully cut out your stencil, making sure to keep any small pieces you need to place on the inside of your stencil, like the eyes.

Place your stencil where you want on the shirt (shiny side down) and iron it on using a high heat setting. Be sure to press well especially around the edges of the design.

Put your fabric on cardboard or paper, in case the paint seeps through. Apply the fabric paint in a thin and even coat. Try not to paint towards the edges of the stencil to avoid sweeping paint under the stencil. Wait till the paint is mostly dry (30 minutes) and apply another thin and even coat.

Allow the paint to dry completely before peeling off the stencil.

What a fun (and slightly nerve wracking) moment 🙂
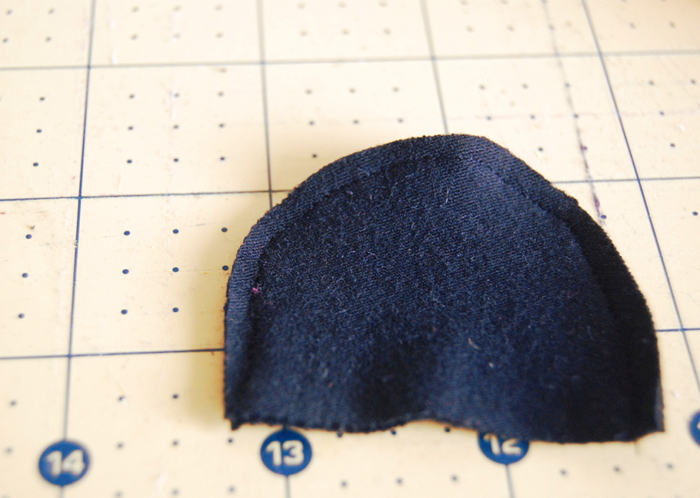
Now for the sewing part. Cut out 4 ear pieces.

Place two ear pieces right sides together and pin. Repeat for other pair.

Sew along the curved edges with a 1/4 inch seam allowance. Leave the bottom open. Trim the curved edge to 1/8 inch.
Turn right side out and press. Add a small pleat to the center of the ear (the two ears should have pleats going the opposite direction). Pin and sew pleat in place.
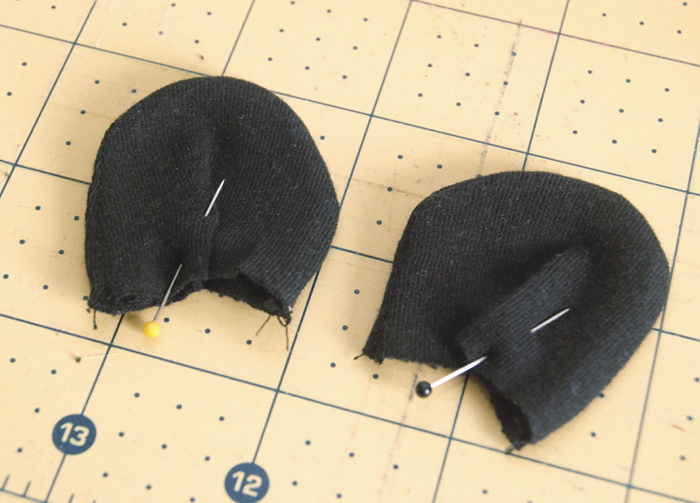
Trim the bottom edge so it is straight again.

Figure out where you want your ear on the shirt front and align the raw edges, right sides together. Pin and baste the ear in place 1/8 inch from the edge).

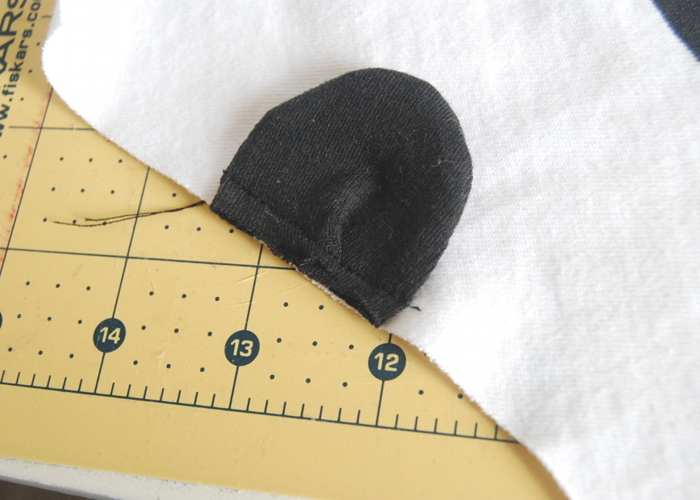
Now we will attach the sleeve to the shirt front. Align the raw edges of the shirt front and the sleeve front, right sides together. The ear should be sandwiched in between. Pin and sew according to the pattern directions.

Finish edge if desired. Press the seam allowance towards the shirt and the ear pointing “up” towards the sleeve. On the right side of the shirt, top stitch the ear to the sleeve close to the seam.

Repeat on the other side with the second ear.

Now finish the shirt as directed in your pattern and voila! An awesome panda shirt for your little one!

Trust me, I reeeeeally think they’ll like it!
Now I’d seriously love to see what other animals you guys can make into shirts!! If you use this tutorial to make a fun animal shirt, please let me know! You can add a picture to the you & mie flickr group or just leave me a comment or email me. I imagine a whole zoo of fun animal shirts 🙂
It was so great to just make something fun, not for a specific project. Thanks for the motivation Kid’s Clothes Week! Hope you’ve been able to make something fun too!

Sono cute!!! Thanks for sharing!
super cute! i might make one for myself! 🙂 great job!
Oh my word! I love these! 😀
I think it’s one of the loveliest things I’ve ever seen. I want to make one too!
Double the cute! I can’t stand it. These are awesome.
j’adore! super joli!!!^^
So cute!
BRAVO! You did it! You sewed 2 Panda shirts . . . being successful in your “I CAN DO THAT” thought when you saw a similar shirt. What a FAB “Mini ME” for Kids Clothes Week. Both Yuki & Kaya are happy. Thanks for sharing your detailed tutorial. You’ll INSPIRE many many moms to sew these shirts for their toddlers, too. Sarah Helene, Minneapolis
So adorable!
I think my daughter would like one for every animal! I might have to start with a cat. Thanks for the tutorial.
the cuteness! WOW! I love these tops!!
Oh my goodness, these are too cute! I can’t even deal. 🙂
oh my gosh! those are seriously the cutest
Mie, these panda shirts are the most adorable thing I’ve seen in a long time! And so simple to make! Love that photo of the girls sitting side by side. My daughter would say they are “twinsies”!
These are just too cute! Irresistibly so! This is inspired, Cherie! Great job!
Seriously cute!! You’re right, I think any kid would love one of these done in their favorite animal. I’ll have to get my act together for next KCW and come back to this 🙂
What a cute idea! My kids would love these too! 🙂
So cute.
how much fun, if I still worked for a certain conservation organisation I would definitely have had to make one of these for myself 🙂
So adorable!! What a great way to fancy up a basic raglan.
I need to make one for my girl!! Love this idea Cherie!
Absolutely adorable!!! What a cute idea!
Holy smokes this is the cutest thing ever. Yuki does look absolutely delighted!
the mini version for Kaya is just so sweet.
Aww so cute!! You even dressed them alike 🙂 They are adorable!
I am weak for pandas. Good job on this! 🙂
Love, love, love. 🙂
IT’S JUST TOO CUTE.
Yay! Thanks everyone! It was definitely an exciting moment for them to come out exactly the way I had pictured in my head (doesn’t always happen, ya know?) AND for Yuki to be so excited about them. Hope you guys make some too!!
This is soooo cute!
Pingback: Tutorial: Panda raglan t-shirt | Sewing | CraftGossip.com
Cutest shirt EVER. I’ve linked to your tutorial on Craft Gossip:
http://sewing.craftgossip.com/tutorial-panda-raglan-t-shirt/2014/04/15/
–Anne
Pingback: Happy Homemade Sew-along // mixing it up | you and mie
Pingback: Bear Butt Baby Shorts DIY - The Sewing Rabbit
Awwwww, this ist so sweet =) If I’ll ever be an auntie or mother or godmother or…. I’ll make this shirt!!!
Rotzi
Pingback: Cosi Swimsuits For Two! | you and mie
Pingback: Back to School Sewing Trends with Kelley | Sew Mama Sew |
So so CUTE! Love it!
Lovely!!! Thank you!!!
Pingback: Sew Geeky: Jiji the Cat | you and mie
Pingback: Princess Unikitty of Cloud Cuckoo Land! | you and mie
Pingback: Favorites from 2014 | you and mie
Pingback: upcycle after: sweaters and shirts | kids clothes week blog
Pingback: WILD THINGS ears | kids clothes week blog