Oliver + S Art Museum Vest

Hey!  I’m still here!  No baby yet, so I’m keeping busy by checking things off my “stuff I gotta do before the baby comes” list.  One of those things was obviously sewing up another new Oliver + S pattern 😛

Haha, ok, so maybe I should be spending my time doing other things, but seriously, who could resist the Art Museum Vest + Trousers pattern?  This is part of the recent Oliver + S fall pattern release and I was so excited to have the opportunity to get my hands on this pattern early.  I love a good unisex/boy pattern and this look is so darn snappy looking!  The pattern is available in both PDF and paper form and in sizes 6M-4 and 5-12.

ArtMuseumVest7

Though the trousers look totally awesome, I opted to just sew the vest this time around because Yuki will not wear any pants that aren’t knit.  And I love this vest!  I was going to pair it with jeggings and a white t-shirt for more of a gender neutral look, but love that it can be taken in so many directions – dressed up, or down, totally feminine, boyish or gender neutral!

ArtMuseumVest8

My favorite thing about sewing with Oliver + S patterns is how professional looking your garments come out because of their precise patterns, reliable sewing techniques and awesome instructions.

ArtMuseumVest1

I made my vest in two linens, both from Joann’s.  The main fabric is soft, striped and, though it’s hard to tell, a subtle purple.  I actually bought it to make something for myself, but thought it’d look pretty awesome as a vest too.  I used a basic off-white linen for the rest.

ArtMuseumVest2

Check out my tiny welt pockets!  This is the most difficult/time consuming part of the pattern.  If you’ve never sewn welt pockets before, they can be a little intimidating, but the pattern does a good job of walking you through the steps and before you know it, you’ll have some sweet looking pockets.  Even with the great directions, there was one part I got a little hung up on, but reading carefully, taking it slow and asking friends for help got me through it 🙂

ArtMuseumVest5

Once you get through the welt pockets, the rest of the vest comes together super quickly!

ArtMuseumVest6

ArtMuseumVest4Yuki is wearing the vest with her Sweetheart Bubble Dress.  It’s surprisingly become one of her favorites!  Which makes me happy because a lot of the stuff I make for her barely gets worn!  She actually got mad at me just for touching “her favorite dress!”  This girl is starting to get an attitude . . .

ArtMuseumVest3

So I can only speak for the vest part of this pattern, but I highly recommend it!  If you want to check out the trousers, be sure to head over to skirt as top to see Kristin’s dapper vest and trouser set and probably actually for Gail’s adorable baby trousers.  The pants pattern looks super professional and again, I can imagine them being made for everything from special occasion to everyday school wear.  If you’re interested, you can buy your pattern from the Oliver + S shop here!

And if you haven’t seen it yet, go check out Gail and Kristin‘s versions of the new Library Dress also!

ArtMuseumVest9

Now go off and enjoy your weekend!  Happy sewing!

*The Art Museum Vest + Trousers pattern was generously given to me for this review, but all opinions are 100% my own.*

Handmade Kids Clothing Swap

buttonA few months back, Robin from Nested in Stitches contacted me about this idea she had about rounding up a group of sewists and bloggers who sew kids clothes and having us all sew for each other’s kids.  Sounds like fun right?  Well the best part about it was the amazing group of people she gathered to participate!  And we didn’t know who was sewing for anyone else, so it was super exciting to see the outfits start coming in.  Read about all the details and who was involved in the Handmade Kids Clothing Swap here.

The wonderful Robin herself was the one who sewed for my daughter!  She took a look at my Kids Clothing Inspiration pinterest board and was inspired to make an ADORABLE outfit for Yuki.  Here’s a sneak peek and then a bit from Robin about the outfit she made . . .

sneakpeek_collage

Here’s Robin:

This swap was so much fun to do! Cherie’s pinterest board is full of fun, graphic kids clothing. I know she loves to dress Yuki in unisex clothes, and I know Yuki can rock that look. I also wanted to sew something that I knew a 2-year old would want to wear- and you can’t go wrong with a knit. After happening across some super soft double knit at Bolt, I decided to recreate this look.

I used the Oliver + S sailboat pattern for the top in a size 2T. Because this pattern uses a facing inside the neckline, it’s a perfect candidate for knit fabric. I ended up sewing the top with the wrong side of the knit facing out because I loved the heathered blue-grey color. (The inside of the top is a solid navy blue). Because of the nature of the double-sided knit, this choice is going to give the top a causal, somewhat wrinkly look. The shorts are sewn from Figgy’s banyan pattern. I used some navy and white gingham shirting I had on hand (and also from Bolt). The sizing on the shorts seems to run a little on the large size, and these are the 18 month size. The pattern is awesome and the shorts are adorable. I took the lazy approach and didn’t sew the zip (or any) fly… I decided that a two-year-old didn’t need a zip fly, and I wanted to keep the look super casual. Finally, to take the whole look to the next level, I knit a little hat for Yuki in a gorgeous grey alpaca yarn I happened to have on hand (the colorway I used is called ash). It’s the perfect cool, every so slightly bluish grey, so was a fantastic match for this outfit. The pattern is Rambled, and I knit it in the smallest size, since I know that alpaca is likely to grown with time.

It was such a blast to sew for Cherie and Yuki! The whole experience is a little nerve-wracking, as you can imagine it would be if you are sewing something for another sewist’s child to wear! But it was so much fun to be able to break out of my own sewing habits and be able to sew something that hopefully embodies someone else’s style. And? It fits! (Phew!)

outfit1AND?  We LOVE it.  The outfit fits her perfectly and suits Yuki so well!

sneakpeek_allRobin really hit the target on this one.  The outfit is totally comfy, practical and so so cute.  Not only that, but Robin’s sewing skills are impeccable!

shirtI can definitely see her wearing this outfit all the time and it’s got enough room to fit her for awhile.  The shirt is suuuuper soft and a beautiful heather blue color.  It’s a simple style with just the right amount of detail to make it unique and stylish.

shortsI love the plaid Banyan shorts too.  Robin added some fun elements like gray pockets and a cute button to match the shirt.

And to top it all off, she knit this ADORABLE lil hat for Yuki.  I won’t lie, when I saw it I really hoped that it was for me.  But alas, it didn’t fit my noggin’.

hat1Probably cuter on her anyways.

hat2I just want to give a HUGE thanks to Robin for the truly amazing outfit for Yuki.  I can tell that a lot of thought and care when into crafting these garments especially for my daughter.  And of course for organizing this fun clothing swap and letting me be a part of it!

outfit2

For the outfit I made, I was assigned to Sanae and I was soooo nervous to sew for her!  But it turned out really fun and rewarding, so head on over to her blog to see the outfit that I made for her daughter, K!

outfit

sneakpeekAND be sure to check out all of the participants’ blogs to see the fantastic handmade outfits we swapped!

robin from nested in stitches
danielle from my sparkle
delia from delia creates
gail from probably actually
heather from well-crafted
kristin from skirt as top
meg from elsie marley
sanae from sanae ishida
vanessa from lbg studio

Calling All Kids!

First of all, I just have to say that I am soooo thrilled with the response I’ve gotten about the upcoming Japanese Sewing Book Series!  I was a little nervous making the announcement – this being my first series and all – I’ve spent a lot of time thinking about it and planning and I just wasn’t sure if people would be into it at all.  But it seems like I am not the only one drawn to, but intimidated by, Japanese patterns and sewing books!  So I’m excited to learn more and conquer our fear of Japanese sewing books together with the help of our 5 talented guest instructors (see the line up here).  The fun starts next week with a great giveaway and a little pre-party to get ourselves ready and then the actual series will run from March 25-29.  I seriously CANNOT wait!

For today, I’m over at Alida Makes with a guest post for her Calling All Kids series.  Calling All Kids is about pushing against gender stereotypes in clothing and finding ways to make awesome and stylish clothes for kids that don’t necessarily conform to those stereotypes.  Who says girls have to wear pink?  Or that boys can’t?  Why can’t boys’ clothing have flowers, or girls’ clothing have superheroes?

CAK3Trying to break stereotypes is just part of who I am and so I thought this series was a pretty awesome idea.  If you know Yuki, you know that she wears boyish/unisex clothes all the time.  It’s a reflection of my partner’s style and my own, but it’s also a conscious decision we make because of how we want to raise her.  It’s a topic that I feel pretty strongly about, so if you’re interested, you can read more about it in my guest post on Alida Makes.

You can also check out more silly pictures of this kid wearing a new button up shirt for the spring and summer and a pair of pants I made from an old thrift store find.

SOOOOO . . . .

CAK7What are you looking at!?  Head over THERE and check it out!

KCWC Day 4 + 5 – Greenpoint Cardigan

So my latest KCWC project is the Greenpoint Cardigan, a pattern by Adrianna of Crafterhours.  She recently started a new pattern shop, hey june, and this is her first pattern for sale (wow, that’s a lot of links).  Adrianna was kind enough to send this pattern to me as a gift, but all opinions are my own.

The fabric that I used was a knit from Joann’s with a gray plus sign pattern all over it.  I rarely see knits with cool prints on it, and I thought this was pretty neat.  For the wristband/waistband/neck binding, I used a tissue thin soft knit (same one I used for the FBST I made earlier this week).  This turned out to be a total mistake because it’s so thin that it doesn’t hold its shape well and sags around the chest (you can see it folded in the picture below).  Looking back at the pattern, I notice that Adrianna TOTALLY warns against using this super thin stretchy stuff, but of course I didn’t realize that earlier – I just thought it was a pretty color.  I still have a lot to learn about knits . . .

I went with the colorful buttons with my sister’s advice.  I think it adds fun and youth to an otherwise more serious print.

The pattern is great.  It is well written and the diagrams are clear.  Overall the cardigan is pretty simple to construct and sews up super quick.  The size is worked out well for Yuki – I made hers in size 2 and I can tell it’ll fit her for awhile.  The only adjustment that I made was to shorten the sleeves.  I love that it is a basic pattern with lots of room for remixing.  And I LOVE a good unisex pattern too 🙂  I highly recommend this pattern for your library.  It’s a great go-to pattern and I will definitely be making up a few more of these.  You can find it here.

I’ve been seeing a bunch of Greenpoint Cardigans popping up this KCWC.  You can check out Adrianna’s here and here, plus these ones on Zaaberry, Running with Scissors, and
Boy, Oh Boy, Oh Boy!

This is how Yuki smiles when I ask her to smile.  Awesome, huh?

So how are you feeling?  The week is winding down, but technically, there are still two days left of KCWC.  Are you still sewing or finishing up?  I have one more project that I want to tackle before the week is done.  We’ll see if I have it in me.

KCWC Day Three – Orange Skinnies

So I’ve gotten a little behind on blogging.  Today is day 4 of KCWC, but I’m blogging what I made yesterday on day 3.  Yesterday’s project was a pair of pumpkin orange knit pants.  They are meant to be skinny in the legs, but they turned out pretty baggy everywhere else.  I guess it’s good that they are loose enough for her to move around in.

It’s a pretty basic pant from a self-drafted pattern.  I was going to go full faux fly with a button closure, but I got lazy and switched to a flat front/elastic back waistband.  The last knit waistband I made got a little slouchy, so this time I used a couple extra layers of knit and reinforced it with a few lines of stitching.

I added some striped knit fabric in the pockets and a couple of subtle stars – just for fun.  Stars have kind of become my lil trademark.  I’ve loved stars for a long time and I think I transferred that borderline obsession to Yuki 🙂

Yuki’s also wearing her Crossed Shoulder Vest (I re-did the shoulders to bring them in a bit) and those shoes were TOTALLY her pick.  Guess she likes color 🙂

For just another pop of color (cuz this outfit didn’t have enough already), I added a bit of blue on the inside hem of the bottom of the pants that show when you fold the pants cuff up.

I realize that this is a very boy-ish outfit, but I like it.  I think it suits Yuki’s personality pretty well and is perfect for school.  It can, of course, be paired with other things if I wanted to “girly” it up a little bit.  But she approved of it – so I’m happy 🙂

I have 2 more things left on my list that I’m hoping to finish.  How’s your list coming along?  Do you sew all the way through Sunday to complete the full week?  Feeling tired or still pumped?

KCWC Day Two – Flashback Tee and Basic Pants

Day Two, people!  Today I have a Flashback Skinny Tee that I made on day one, and a pair of super comfy simple pants (based off of Dana’s Basic Pants) that I finished this morning.

The tee is made with Rae’s pattern and it’s my first time sewing it up as a regular tee.  The only other time I’ve used this pattern is for this cardigan.  It’s a great pattern to have in your collection because it’s such a classic style.  I can imagine making a good solid handful (in long and short sleeve) in every size – it’s a wardrobe staple.

The brown and blue knit that I used is suuuuuper thin and soft, so it was a bit tricky to work with (the machine tried to eat it several times, just like Meg’s!), but it worked out OK in the end.  And the finished shirt is really comfy – Yuki didn’t want to take it off and she wore it to bed!

The pink pocket was added for a fun splash of color.  I decided to just cut a rectangle and sew it to the shirt without folding or finishing any of the edges.  A very raw look.  I like how the top of the pocket rolls out.

The back pants pocket was originally made for the shirt, but I didn’t like it, so I used it on the pants instead.  This pocket is finished on three sides, but has two unfinished edges on the top.  Double roll.

The knit that I used for the pants is a super thick, comfy, cozy, warm, delicious white-with-gray-pinstripes knit that I got for super cheap.  It reminds me of a new sweatshirt.  I bought a lot and I’m hoping that there is enough leftover to make something for me!  So these pants are basically sweatpants, but I wanted them to look like a regular pair of pants and I think the stripes and pockets help make them look more trouser-ish.

They were made based off of Dana’s Basic Pants tutorial and pattern.  I used her pattern for the shape and then resized it to fit my tiny 2 year old.  I also added a separate waistband (on top of the original pattern, which is meant to be folded over), which was great because it added to the rise of the pant.  I feel like most of the pants/shorts I’ve made for Yuki have not fit well because there is not enough room for her enormous diaper booty, but this pant has great coverage!

The one thing that I could have changed is maybe adding another layer of fabric (or interfacing) to the front of the waistband, because it slouches a bit.  But it’s probably comfy this way and the pants stay up just fine, so it’s all good.

Maternity pants!!  She looks a few months along.  JK!  Don’t they look comfy though?  I wish I could get away with wearing elastic waisted sweat pants all day.

So I feel like I got off to a great start, but I’m already exhausted and I think I’m getting sick!!  Time to slow down a bit.  How was your day two?  Are you just getting rolling or are you already burning out like me?

Time for sleep.

KCWC Day One – Crossed Shoulder Vest

Happy Indigenous People’s Day!  And Day 1 of KCWC Fall 2012!  What a fun day it has been!  Did you get to sew?

For this KCWC, I thought for a long time about what I wanted to make.  While you can spend the time making whatever you want or need, I decided to make it a little extra fun for myself and try to pick a theme or tie all the pieces into a collection (I think I’ve been watching too much Project Runway).  I started thinking about what kind of clothing Yuki might need and I remembered her preschool mentioning that as she’s potty training, she’ll need to wear elastic waistband pants that are easy to pull off and on.  And in general, she needs some simple clothes for school that is comfortable and practical, but with some style (of course ;)).

So I developed this idea into a list of fall separates that Yuki can mix and match with each other and other things in her wardrobe.  And they will all be KNIT.  Though it’s been almost a year since my first successful knit project and I’ve definitely tried using it here and there since then, I am still pretty intimidated by it and it is certainly not my first choice in fabrics.  But it seems so practical for children’s clothing that I figured I should just tackle it head on.  Plus it’s the perfect opportunity to force myself to learn how to use the lovely serger that has been sitting around oh so long without being touched because I was too scared!

So to describe my KCWC Fall collection (which only exists in my mind at this point), I’d say – fall separates, knit, unisex, simple/classic, bold colors, solids and stripes.  I’m not going to be making anything breathtaking here, just a couple of pants and tops.  Though hopefully cute ones 🙂

Here’s the pile of fabrics I was considering before I started cutting yesterday.

Today I was able to get TWO pieces done!  I’m feeling super pumped.  I only photographed one though, so the other I’ll show you tomorrow.

So the first is a Crossed Shoulder Vest.  I want to make it very clear that I take no credit for this idea – I totally stole it from a Japanese pattern book called 男の子と女の子の服 (Clothes for Boys and Girls).  I actually have the book but I’m saving it for a giveaway, so instead of using the pattern, I drafted my own.  But the concept and construction were definitely taken from this book.

It was very simple to sew up and I love how it looks with different fabrics on the front and back. The only problem with the pattern that I drafted was the shoulders came out a bit too wide.  I MIGHT go back and adjust it, but that’s pretty low on my priority list – it still fits her fine.

Oooh, check out my serger work.  Actually don’t look too close cuz it’s totally wonky (I’m still getting the hang of it), but how fancy is that!?  I’m psyched.  I have a feeling I’m going to use a serger on everything I sew from now on!

Oh and you may notice no live model in these pictures.  I can’t remember if I’ve mentioned this already, but the last two years of constantly putting my daughter in front of the camera has totally backfired and now she really dislikes having her picture taken.  She yells out “No pictures!” whenever we pull out even just our phones and flails her arms in front of her face and/or charges the camera.  Sooooo – to limit the torture, I’ll wait till I have a few pieces of clothing I can throw on her and photograph at the same time instead of doing one piece every day.

Woohoo – Day One went well for me.  How about you?

Maxwell Top Pattern

One of my goals is to sew more clothes from patterns.  So when the opportunity came up to be a pattern tester for some of Shwin & Shwin‘s new patterns, I jumped on it.  These gals come up with some of the cutest patterns for kids!  And there are so many amazing free tutorials on their site too.  One of the patterns in their current collection is the Maxwell Top for boys and I LOVED it as soon as I first saw it.

I debated whether I should make the top a little more feminine by picking more “girly” fabrics, but decided to go with something simple and (in my opinion) gender neutral.  I knew Yuki could pull it off.  The fabric reminds me of a Japanese shirt, though I don’t actually know if the fabric is Japanese.  I love the finished shirt and all the cute details.

It was my first time sewing a collared shirt so I had a little trouble attaching the collar.  For that reason, I’d say this is a good intermediate or intermediate beginner pattern.  Otherwise, the shirt came together nicely with pretty clear and simple directions.

I think she looks adorable!  I know I will definitely be making more for her as she gets bigger.  The pattern is for sizes 12m-5T!  And it’s always great to find an awesome boy pattern.  I can’t imagine there’s anyone who wouldn’t need this pattern!

Buy the pattern here!

Tutorial: Easy Pants Cuffs

For my last week’s Project Run & Play outfit for Boys Week, I wanted to make some pants with a cuff.  At first I was thinking about making fully lined pants with a fold up cuff, but I decided to simplify and just make a fold up cuff to attach to the bottom of the pants.  It’s a super easy way to add a fun accent or add length to pants that are a bit too short.  I thought I’d show you how I did it.

First, start with a pair of pants, either an already finished pair, or if you’re making pants you can stop before hemming the bottoms.  You want the length of the pant legs to be about a half inch longer than the final desired length of the pants.  If you are trying to lengthen pants, don’t worry.  Start with what you have and you can add the extra fabric to the cuff.

Cut two rectangles out of your cuff fabric.  Your rectangles will need to be twice the width of the pant bottom plus 1/2 an inch for seam allowance.  The leg openings here were about 4 inches, so I doubled that and added 1/2 an inch to get 8.5 inches (the fabric here is more like 9 inches because I usually cut extra, just in case).

The height will be twice the desired cuff height, plus 1/2 an inch.  I wanted my finished cuffs to be about 1.75 inches, so I doubled that and added .5 to get 4 inches.  If you are making cuffs to lengthen pants, you’ll want to add more fabric depending on how much longer you want your pants to be and how big you want the cuff to be.  You might have to play around with the measurements a bit.  I always cut my fabric big and then trim away what I don’t need later. 🙂

Fold your fabric in half, so that the short ends are together, right sides together and sew along the short ends using a 1/4 inch seam allowance.  Now you should have a tube.

Fold the top half of your tube down so that the right side of fabric is showing on both the inside and outside of your tube and press.  If your fabric has a top and bottom like mine, you want to make sure the print is facing the right direction and the folded part of the tube is on top and the raw edge is on the bottom (you may need to flip your tube inside out).

Now, with the folded edge still on top, insert the cuff into the pant leg.  Line up the side seam of the cuff with the inner seam of the pant leg.  The right side of the cuff should be facing the wrong side of the pants.

Line up the bottom of the cuff with the bottom of the pant leg and pin all the way around to hold the cuff in place.

Sew the cuff to the pant leg using a 1/4 seam allowance.  You can also serge or zig zag the edges here for less fraying and a cleaner look.

Pull the cuff out of the pants and fold them up.  Press and you’re done!!

Imagine the possibilities!  Now you can spice up just about any old pair of pants!  Have fun!

Boy-cycle Wear – Boys Week for PR&P

I said I was going to post one more holiday project, but before I do I wanted to share my outfit for this week’s Project Run & Play sew-along.

This week the theme was BOYS!  I find that unique boys clothes are hard to come up with and difficult to make well.  I think that if I have a son someday, I’ll really be pushed to be creative and it was fun challenging myself this week.  I have a daughter, but we dress her up in plenty of boys clothes, this was just my first time MAKING any.  It was also my first time sewing with knits!!  Feels so good to learn new things, especially something that I’d been so scared of for so long!  Anyways, here is the finished outfit.  Hideko thought of the name because of the bicycles on the orange accent fabric and because we thought it might be something a hipster bicyclist might wear. 🙂  Presenting Boy-cycle Wear!

For this outfit, I actually made FIVE pieces.  I was being way too ambitious.  I made pants, a shirt, a hooded vest, a hat and a tie (shown later).  The outfit is a bit more mismatched than I had in mind, but oh well.  Kids are supposed to be mismatched right!? 🙂  Here are some of the details.

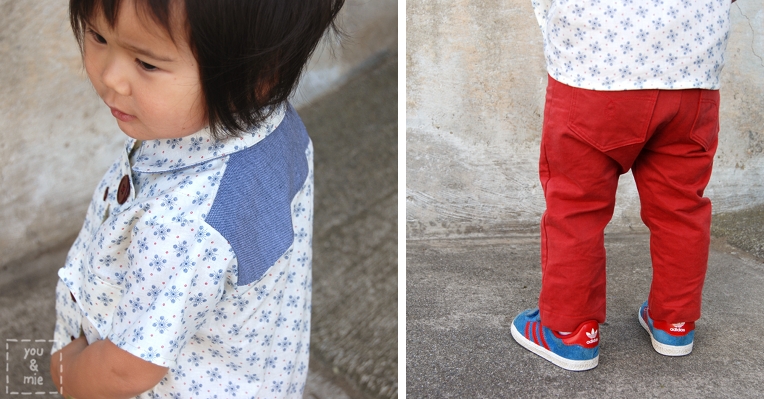
I made the pants first.  I wanted to try more of a straight leg pant (as opposed to my usual boot cut) with some fun cuffs and pocket detailing.  I’ve been using this orange fabric with bicycles on it (this one) for a few projects recently and thought it’d be cute here too.  That’s how the bicycle theme was chosen.  I made 2 pockets in the front, one in the back and cuffs.  This piece was pretty straight forward.

Next I made the hat.  I used this tutorial from Bandy Canyon.  She actually provides a pattern as well, so if you’re interested, I would definitely check it out.  I drafted my own pattern from a similar cap that Yuki already owned adjusting shape and size.  This piece was tricky and I actually had to do it twice.  The first time I wasn’t sure if my pattern was going to work and it didn’t and the hat came out kinda wonky.  The second time was way better except it was WAY too big.  If I tried a third time I’m sure it would have been perfect, but I didn’t have the time or patience to do it again.  Instead I just added a lot of elastic to the back to make it fit.  It’s still a little on the loose side, but that means she can grow into it!  Unfortunately, Yuki HATES wearing hats and refuses to keep them on.  It’s a miracle I even got a few pics of the hat on her head, but I assure you it was only a split second later that the hat was back on the ground.

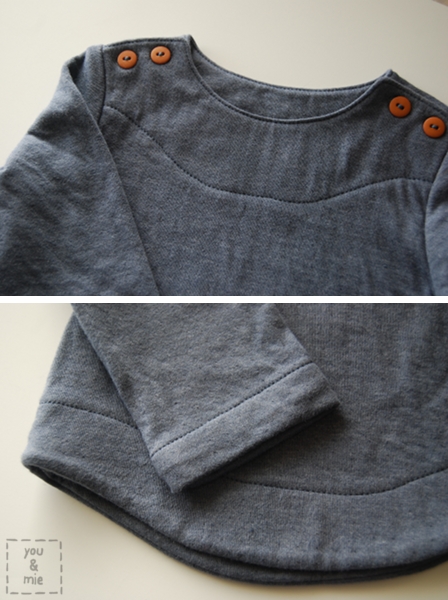
Next I made the shirt.  This shirt is a huge triumph for me because it is my first successful KNIT project.  Yes, I am one of those people who is totally scared of knits.  It started this past summer when I tried to make a dress with a knit bodice.  I thought the stretchy material would be great and I wouldn’t need a zipper or button closure because the neckhole would stretch to fit over Yuki’s head.  What I didn’t know was that if you sew it like regular woven fabric the material doesn’t stretch because of the stitching.  I finished the dress and then had to cut it open when I realized it wouldn’t fit over Yuki’s head.  Tragic.

Since then, I’ve avoided it at all costs.  I started collecting some information and doing a little research (there are some great resources for sewing with knits out there), but I was still confused and nervous.  But when it comes to boys shirts I felt like I didn’t have many options, either attempt a knit shirt or a collared shirt.  Both were daunting, but I’d wanted to learn how to sew with knits for awhile and it seems so practical (there are so many amazing things you can make with knits!).  Plus, learning how to sew a collar was not a task I was about to attempt in such a short amount of time (I had about one night for each piece of the outfit).

ANYWAYS, I tried two techniques: the double pointed needle and the stretch stitch (which looks like an angled zig zag stitch).  Both worked well, but I had to play around with the stitch width and length and also the tension for different fabrics.  I made a simple long sleeved shirt which turned out fine except for the neckline which came out too wide.  After the shirt was done, I used a stamp that I had carved a long time ago for another project (so awesome that I happened to have a bike!) and some fabric paint to stamp the bike image on the bottom corner.

The fourth piece was this necktie that kinda ended up getting scrapped completely.  I used this awesome pattern and tutorial from Very Homemade.  Somehow I thought that it would show at the neck under the vest, but it didn’t.  It’s also too big, so it looks kind of ridiculous on Yuki.  I’ll keep it around for some other time or maybe give it away as a gift.  I love this picture . . . doesn’t she look like a mime or a clown!?

Hahaha!

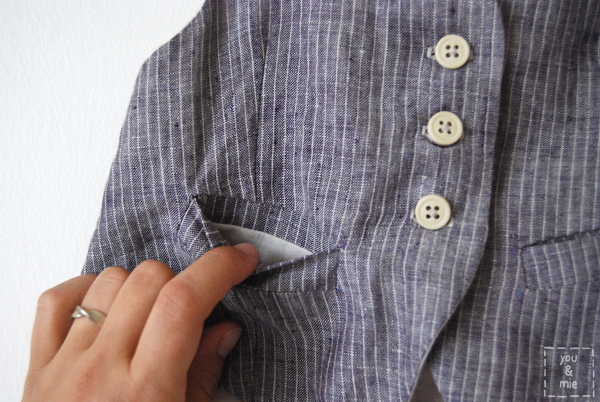
The last piece of the outfit is, without a doubt, my favorite – possibly even my favorite creation to date – the hooded vest.  I had this image in my head and wasn’t quite sure how to make it happen, but it turned out really close to what I wanted!  There are definitely things I’d do differently if I were to make it again, but overall, I really like it.

I’m not quite sure what this type of neckline is called, but it’s kind of popular these days, I’ve seen it on a lot of men’s and women’s sweaters.  In fact, I have a long sleeved sweater with a similar collar.  Except I wanted to turn the collar into a hood and instead of a sweater, I wanted it to be a vest.  The collar/hood construction took a little time to figure out, but it came out just the way I wanted it to (don’t you love when that happens!?).  I lined the hood and the pockets with this new fabric by Lotta Jansdotter called Woven.  I LOVE the print, but it is in fact, a woven, so it has no stretch.  It’s unfortunate because although I love the way it looks, the collar has lost all of it’s stretch and it’s actually a bit of a squeeze to get it over Yuki’s head.  Oh, there has to be at least one problem with everything I make!!  But at least it I’m learning . . .

So those are the 5 pieces that make up Boy-cycle Wear for Boys Week!  Even though we have a daughter, we have no issues putting her boys clothes.  Hideko’s style is more on the masculine side, so Yuki definitely gets the best of both fashion worlds.  I’ve never been into the standard definitions of femininity/masculinity or beauty and we definitely want to raise Yuki as free from gender stereotypes as possible – which of course, is impossible.  So far though, she seems to be a little tomboy, just like us!  She loves to run, climb and play ball and she’s totally obsessed with cars and planes.  Who says those things are for boys??

(maybe I should have made knee pads too!)

Ok Ma, no more pictures!!

Well thanks for checking out my outfit for this week’s PR&P sew-along.  Next week the theme is Sewing Through the Decades – something inspired by fashion from the past.  Sounds fun, but I have NO clue yet as to what I want to make.  If you have any great ideas, I’m all ears!!