Her New Favorite Dress

SilverDotSkater4

I finally got around to sewing up a Skater Dress for Yuki.  The pattern is by Amanda of Kitschy Coo and it is awesome!  I’ve been meaning to sew one since the pattern came out but other things kept cutting in front of it in my sewing line.  Well, last weekend was my mother-in-law’s birthday, and as a present, my sister-in-law had the great idea of getting pictures taken of Grandma and her 4 granddaughters at a photo studio.  We wanted to coordinate their clothes and decided on gray and purple.  Yuki didn’t have anything appropriate, so naturally I had to make something new 🙂

SilverDotSkater1

I made size 18M/2T for my petite 3 and a half year old.  I was a little skeptical about going with a size meant for a kid so much younger, but I went with the measurement chart and it fits really well and will probably fit for quite awhile, especially since it’s made of a stretchy knit fabric.  I already had this gorgeous fabric called “Silver Pin Dot and Charcoal Grey Cotton Lycra Knit” picked out for my first Skater Dress, so I’m glad it fit with the purple/gray colors we picked for the pictures!  I bought it from Drygoods Design but they don’t have it anymore and I can’t seem to find anyone who carries it online anymore.  Bummer for you!  It’s so pretty!

SilverDotSkater2

As you can probably tell by the title of this post, Yuki LOVES this dress.  In fact, she wore it three days in a row and would have worn it a fourth, but it was in the wash.  Then she wore it again the next day!

SilverDotSkater6

I asked her what she loves so much about the dress and she said the silver dots and her silver shoes.  The dots are definitely awesome, but I love the dress because it’s super comfy, casual and fun.  I can imagine this dress would be perfect in pretty much any knit fabric!

SilverDotSkater3

I used a really pretty violet knit, that has a tiny bit of a shimmer to it, to finish the neck and arm holes.  I actually bought this fabric to make something for me and I already have a Plantain tee cut out (I can’t wait)!  I also have quite a bit of this silver dot fabric left over, so I’m hoping to make something for myself as well.  Then Yuki and I can be twinsies!  😛

SilverDotSkater5

I do already have plans for at least one or two more Skater Dresses.  It’s a really fast and simple dress to sew, and such a practical piece for your kid’s wardrobe.  The pattern comes in four sizes, 18m/2T, 3T/4T, 5Y/6Y and 7Y/8Y, so I know I’ll be able to use it for years!  Amanda‘s directions are great and she is really a master at sewing knits, so there are some great tips in the pattern and HERE on her blog.  And I love the design of this dress – a simple fitted t-shirt like top with a semi-circle skirt.  I really recommend this pattern!

SilverDotSkater7

Check out this ‘tude.  I swear, this girl is 3 going on 13.  Sometimes I feel like I have a teenager already.

Ooh, are you participating in Kids Clothes Week?  It starts next Monday on January 27!  I am looking forward to sewing along for the first time in awhile since I missed the last two.  I haven’t figured out exactly what I want to sew yet.  Honestly, there are so many patterns I want to make, but Yuki doesn’t need any clothes – she has tons already!  So I’m a little stuck on what I should do.  Have you made plans yet?  I can’t wait to see what everyone makes – it’s always so inspirational!

Looking Back and Looking Forward

2013 was a huge year for me.  Around this time last year I found out I was pregnant and that ended up shaping the whole year for me.  Sewing and blogging slowed down as my energy waned and priorities shifted.  I watched my baby sister get married.  I got to go to Spring Quilt Market and LA Fabric Shopping Weekend/Girls Night Out and hang out with some of the most awesome sewists and bloggers around and now I get to call them my friends.  I got married.  Then I gave birth to a beautiful and amazing little girl and I’ve been enjoying her snuggles and smiles for the last 3 months (3 months already!??  How did that happen?).  And I’ve watched my little toddler turn into a little girl – more talkative and spunky than ever, and oh-so-sweet in her new role as a big sister.  I feel so very lucky.

2013events

So, like I said, the blog took a bit of a back seat in 2013 and though I’ve missed it, I’ve obviously had good reasons.  Last year I did a recap of my favorite projects from 2012 with the intention of doing it again this year. Well it wasn’t quite as easy with a limited number of posts, but I did want to look back at some favorites from the past year.  First up are the 6 posts from 2013 with the most views.

2013ReaderFavs

1. Reversible Spring Coat Tutorial
2. Announcing the Japanese Sewing Book Series
3. Maternity Geo Dress {tutorial}
4. Colour Pop Top Knock Off {tutorial}
5. Pretty Pink Pinafore {tutorial}
6. Fanfare Baby Blanket

Seems pretty clear that you guys like tutorials! 🙂

And these are my personal favorites from the past year . . .

2013MyFavs

1. My Wedding Dress
2. Fanfare Baby Blanket
3. Sweetheart Bubble Dress
4. All My Friends Are Dead T-shirt
5. Japanese Sewing Book Series
6. K’s Outfit for Handmade Kids Clothing Swap

As we dive into a new year, I’m hoping to get back into sewing and blogging regularly.  There are just so many things that I want to sew!  It’s hard to know for sure what this year will look like, but I’m setting some goals for myself that will hopefully help me shape it into a productive and fun year.  I stopped at 10, though I probably could have kept going – but here they are, in no particular order . . .

1. Sew more for me.  Last year I started sewing a lot more for me and I’d really like to continue.  It’s a bit tricky with my constantly changing body, but I guess that just means I have a lot of sewing to do to keep up, right? 🙂

2. Another series.  I had such a great time with the Japanese Sewing Book Series last year and I’d love to do another series of some sort.  Either a continuation of the Japanese Sewing Book Series?  Something completely different?  You have any ideas?

3. More tutorials!  Clearly you guys love tutorials and I love making them, even though they are a ton of work.  So I’m hoping to continue rolling those out once in awhile and finally update my super outdated tutorial page while I’m at it.  Eek!  Any tutorials you’d like to see here?  Let me know!

4. More collaborations.  Last year I loved working with other bloggers on the Japanese Sewing Book Series and the Handmade Kids Clothing Swap.  And I LOVED meeting and hanging out with all the amazing people at Quilt Market and Fabric Shopping Weekend/Girls Night Out.  Working together and collaborating with other creative types is why I love blogging so much in the first place so I’d love to find more ways to connect with others and bring new and fresh ideas to blogland.

5. Sew my stash/sew my patterns.  My fabric stash is growing faster than I can sew and so is my pattern collection.  I’m going to make an effort to sew from what I’ve got before buying new stuff.  Though the constant flow of new and amazing fabrics and patterns makes it very VERY difficult to resist!

6. Sew smarter.  I often find myself sewing things that are impractical.  I sew dresses for Yuki even though she lives in t-shirts and yoga pants 99% of the time.  I make myself a dress or skirt that I’ll only wear once.  Sometimes that’s ok, but I need to be smarter and more creative about sewing things that’ll actually get worn.

7. Balance my time better.  This one is quite huge and hard to measure, but I’m pretty bad a time management, so I’d love to find ways to be more efficient.  With blogging, it’s not just sewing and writing, but there’s planning and shopping and sewing and photographing and uploading/editing photos, and writing and reading other blogs and comments and emails and pinterest and on and on.  I love doing it all, but it’s a lot and I’d like to find a way to keep my time organized and balanced.  Tips are welcome.

8. Reorganize my sewing area.  I’m a naturally messy person and my work space has gotten out of control.  Plus my fabric stash and sewing paraphernalia have grown out of my current space, so it needs some fixing up.  It’ll be an ongoing project, but I’ll be sure to share it here along the way or when I’m done.  I love seeing other people’s work spaces, don’t you?!

9. Finish projects on my to do list.  Not a particularly exciting one, but I have a a ton of things that I’ve been meaning to get to forever.  Super late gifts I’ve been meaning to make, pants I’ve been needing to hem, clothes I need to mend, etc.  Not glamorous stuff, but things I need to get done!

10. Revamp the blog.  This one will be tough.  I don’t know how to build a blog or design logos or anything like that, but I feel like this space needs a new and fresh look.  Won’t happen soon or quickly, but hopefully I can make at least some small changes to update this space over the next year.

Think I can do this?  We’ll check in on these again in a year and see!  What about you?  Any sewing, crafting, blogging related goals?  I’d love to hear them!

Happy New Year!

Just popping in to wish you a very very happy new year.  2013 was a BIG year for me and my family and because of that, things slowed down a little bit here on the blog.  But I’m really looking forward to jumping back into things in the new year and I’m hoping you’ll join me!  Until then, I just wanted to say thanks for an awesome 2013 and here’s to a beautiful and even more amazing 2014!

Family2013_1


Happy New Year from our family to yours!

Round here (a random update)

It’s Kids Clothes Week!  I’m not even going to explain what that is because I feel like I’ve blabbed about it plenty of times – but if you don’t know what it is (no shame!) you can find all the 411 here (does anyone actually say 411 any more!?)

So last KCW I wasn’t able to participate (for good reason) and this time around I’m not participating either (for an even better reason!), but I just can’t help but want to be involved!  I’ve been watching the build up on the KCW blog, and following people’s preparations on Instagram (#kidsclothesweek) and now that it’s started, awesome sewn creations are littering my blog and IG feed and I’m so jealous!

At one point I started to think maybe I could participate.  I printed out a bunch of patterns and even got a few cut out and taped together.  But before that I was motivated to sort through this ridiculous stack of patterns first.  It felt great to get those organized before I started cutting out new ones.

patterns

When I went to the fabric store to get supplies for Halloween costumes, I stocked up on knits for my stash and started dreaming about what they could become.

knits

But alas, I realize that it’s just not going to happen.  I find that I’m able to squeeze in only about 10 minutes here and 10 minutes there, but no where near an hour of sewing.  And photographing and blogging?  Well, forget about it.  So I don’t have much time to sew, but instead I dream of all the things I want to sew.  I have a rapidly growing list of projects that I know I could never keep up with even if I didn’t have a newborn.  So I end up hoarding more fabric and patterns and ideas and it’s driving me a little crazy that I can’t actually get my hands on any of them.  Sewing is my outlet and I’m starting to feel trapped and stir crazy without it!

workspace

Here is my messy and neglected workspace.  I took this picture a few days ago while holding a fussy Kaya and bouncing on my yoga ball wondering, “When will I ever get to sew again?”

Well as if Kaya heard me, she actually gave me a little time for sewing that night and my first project was this . . .

Fanfare eye mask

A super fast and simple project – an eye mask for Hideko.  Kaya is sleeping in our room right now and several times a night I’m turning on the light to change a diaper or feed Kaya or pump or something, so I made a thick and cozy eye mask out of some leftover Fanfare flannel so Hideko could continue to get some shut eye.

Besides that, I’m actually trying to do some pattern testing and of course, Halloween costumes!  The goal is to have them done by this weekend for some upcoming festivities, but I’m not sure if that’s going to happen.  I’ve decided to go half store bought, half handmade for Yuki’s costume and here’s as far as I’ve gotten so far . . .

costume1costume2

Any guesses?

Only problem is Yuki changes her mind about what she wants to be every 15 minutes.  I went with one of her picks and told her she can’t change her mind anymore, but how do you explain that to a 3 year old?  And now she’s got her heart set on something else and when I told her it was too late she threw a huge fit, so uhh . . . we’ll see how things go.  As far as I’m concerned, she’s wearing the costume I made or she gets no candy, right!?

yuki in a box

I’m also trying to convince her that this is a sufficient Halloween costume 😛

Ok, this is a super random blog post.  Just felt like checking in with you guys and seeing if you are all sewing for KCW.  I love seeing everyone’s creations and I’m hoping I can sew along next time!  Until then, I’ll be trying to soak in as many as these moments . . .

awww

Ok, can I just get a communal “awwwww” please?  Yeah, I thought so 😉

Be well, friends!

Oliver + S Playtime Tunic and Leggings

Long time no see!  I can’t believe how much time I’ve been letting slip by between blog posts, but this end of the pregnancy/back-to-school/preparing for maternity leave thing has been kicking my butt!!  I’m finally on leave from work and I’m officially 2 days away from my due date!  Exciting times!!!

Playtime6

But I’m here today to share an fun new Oliver + S pattern that was just released for the fall.  There are three new patterns and this one is called the Playtime Dress, Tunic and Leggings Pattern and it’s available as both a paper and PDF pattern in sizes 6M-4 and 5-12.

Playtime4_1

This pattern can be made with woven or knit fabric, which makes it versatile.  I chose to make it in knit because that’s pretty much all Yuki will wear these days.  Both pieces are super comfy and Yuki loved playing in these all day, so I’m happy!

Playtime1

It’s not the most exciting or colorful choice of fabrics, but I wanted to make something practical and I already had this striped knit in my stash.  It’s a pretty thin, and super soft and stretchy fabric.  Which makes it really comfy, but a bit of a pain to sew.  Add the fact that I chose stripes and it was a downright nightmare at times.  Sewing with striped knits always seems like such a great idea – until you realize it isn’t.  I had a helluva time lining up those stripes and still did not do a great job.  But then striped knits just look so good as clothing, it’s hard to resist, isn’t it?

Playtime2

The back calls for a button or snap closure.  I chose these gold buttons and was a little nervous about how the thin knit would hold up with the button holes.  But between the two layers of fabric plus the interfacing, it did quite well.  One of the things that I love about knit is its stretchiness (obviously), so if I were to make this top again in a knit, I might adjust the back bodice to one piece to avoid having to make a closure at all.

Playtime3

The leggings pattern is so simple and so awesome.  I wish I had tried sewing my own leggings before.  Now that I know how easy and quick they are to make, it seems silly to buy them.  I bought this fabric at Joann’s and it’s got these cute metallic gold polka dots.  They are actually pretty subtle and only really shine depending on the angle of the light.  But they are fun and fit Yuki well, and did I mention, they are comfy?

Playtime7

If you take a look at the photos on the O+S site, you’ll see that there is stitching along the facing and pockets which you can do in a contrasting thread for accent.  At first I thought I’d just eliminate the top stitching altogether, but then I realized that the facing would flip up and probably bug Yuki (and me), so I sewed it with black thread and it’s very subtle.  I also realized that with the flimsy knit that I used, the pockets hung down below the hem of the tunic, so I stitched the pockets down as well.  Now everything is stitched down and secure!  The contrasting stitching will be a fun variation to play with in the future.

Playtime8

Oliver + S patterns are always well written and easy to follow.  I love knowing that I’m doing things the “right way” when I’m following their directions.  This pattern is no different and I’m excited to have a cozy little outfit for Yuki to wear this fall and winter.  If you’re interested in purchasing this pattern, head over to the O+S online pattern shop!

And if you want to see a totally different version of this same pattern, go check out Jessica of A Little Gray’s dress version!  It’s adorable and hot PINK!

Later this week, Gail, Kristin, Jessica and I will be back with more of the new Oliver + S fall patterns, so stay tuned!!

*The Playtime Dress, Tunic and Leggings Pattern was generously given to me for this review, but all opinions are 100% my own.*

Pretty Pink Pinafore {tutorial}

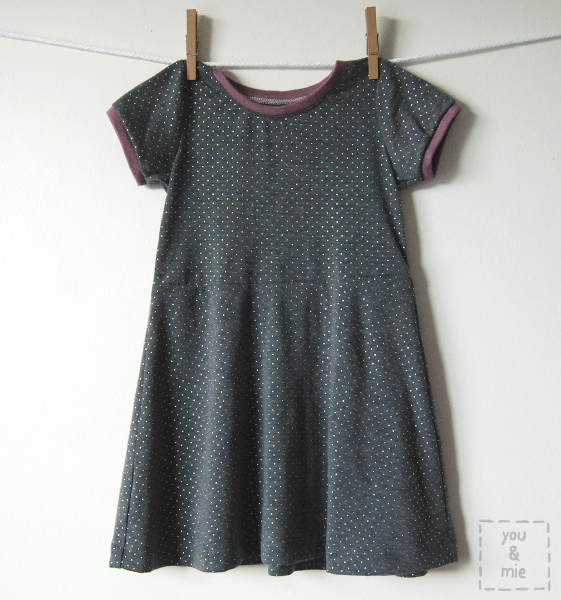
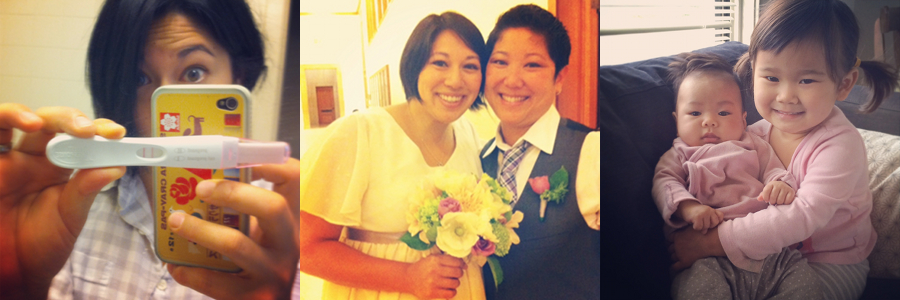
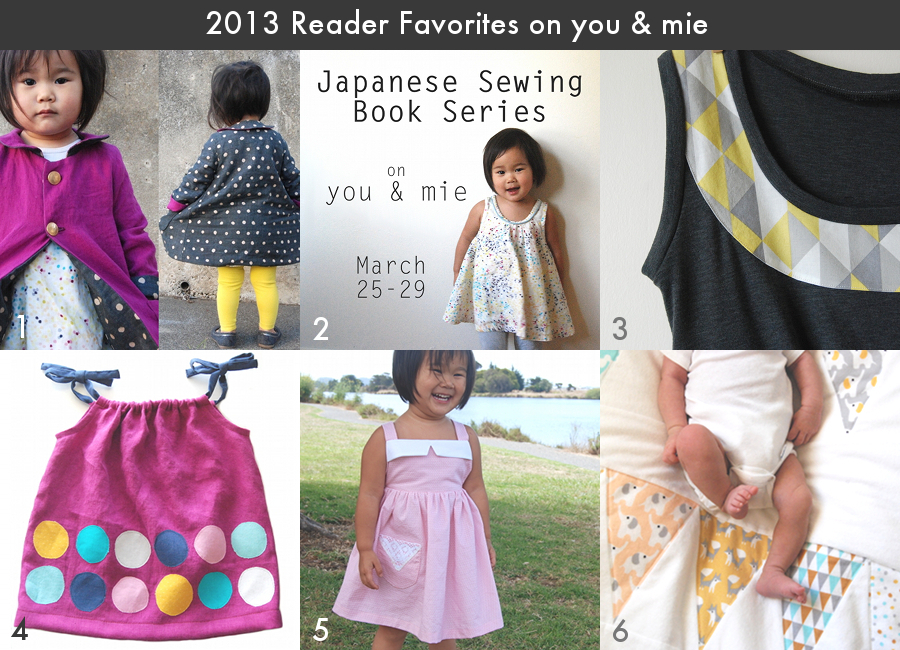
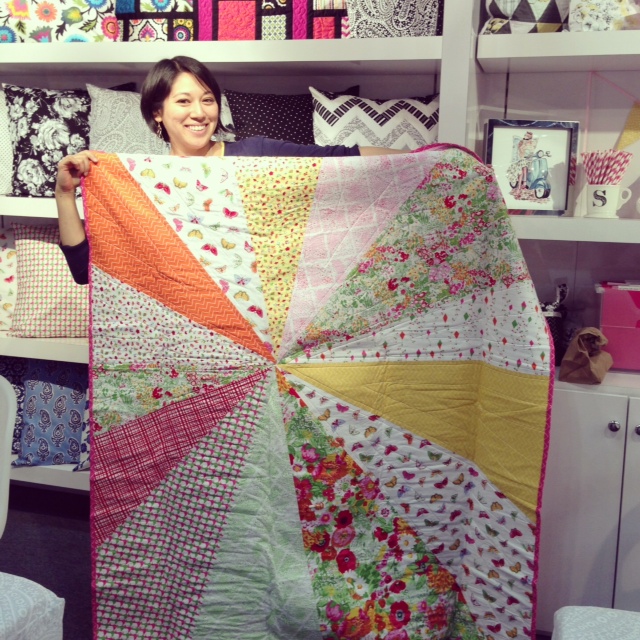
You guuuuuuuys!!  Thanks so much for all of the wonderful well wishes after my last post.  It has been truly heartwarming reading each comment, hearing some of your own stories and feeling the love you’ve sent my family’s way.  I really appreciate it!  You guys rock 🙂

Pinafore21

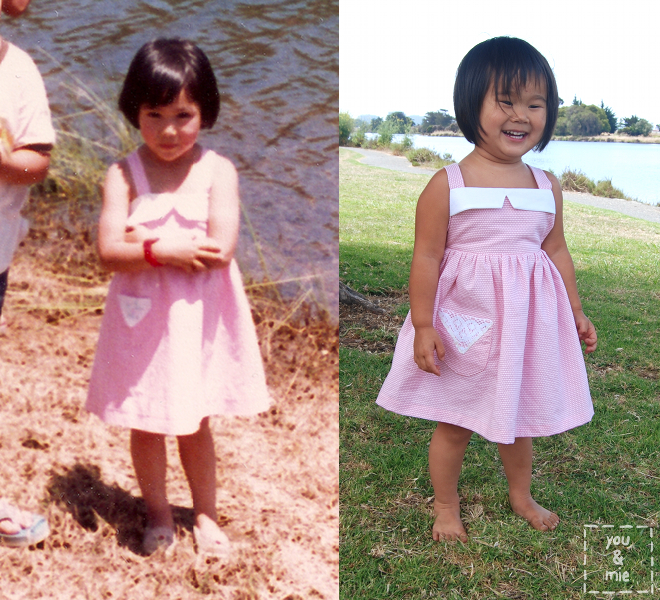
So last week, I did a guest post for sewpony‘s series “When We Were Young” and I shared an outfit that I made for my daughter that was inspired by an outfit that I wore when I was young!  I also mentioned that I’d post a tutorial for the simple pinafore, so here I am, being true to my word.

Here is the original next to the version I made for Yuki:
PinkPinafore7I did a lot of guessing and “winging it” when making this little pinafore, but it came together pretty simply so I wanted to share how I did it in case you wanted to try it too!  But I have to warn you, this tutorial is not about exact measurements or precise directions.  It’s just a basic how-to.  Since I was just making it up as I went along, you may have to be a bit flexible and daring and wing it too.  Hope that’s ok!

PinkPinafore6

PinkPinafore5

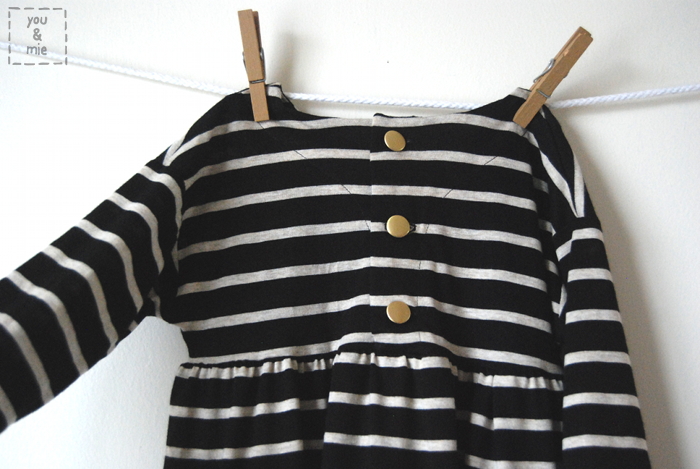
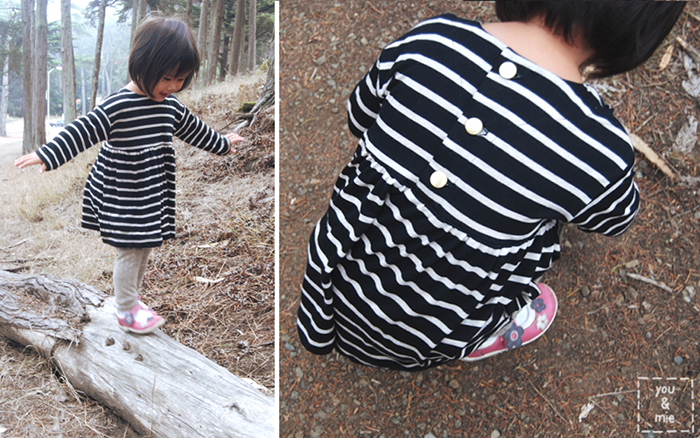
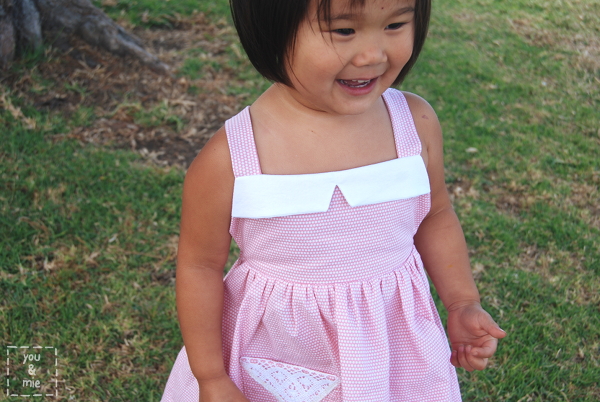
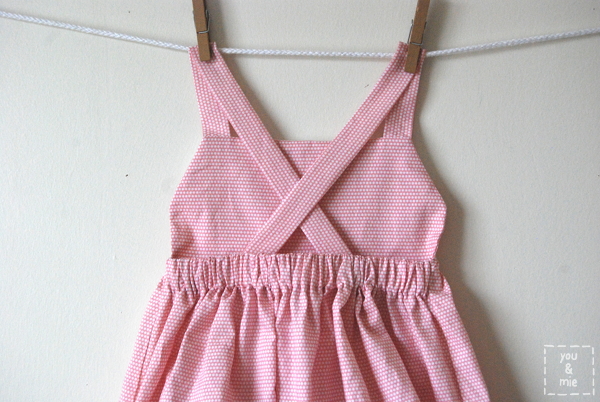
The jumper has a bib bodice in the front and is open in the back with criss cross straps.  The skirt is gathered in the front and has elastic in the band for easy comfort and fit.  Really, it looks a lot like an apron.  There is a cute notched “collar” (clearly, it’s not a real collar, but I wasn’t sure what else to call it), and a crocheted lace detail on the pocket.  It’s perfect for hot summer days, but can easily be layered as we transition into fall.

What you’ll need:

  • Main fabric (1-2 yards depending on what size you’re making)
  • Contrast fabric (1/4 yard)
  • Crocheted doily or lace
  • Lightweight interfacing
  • 1″ wide elastic
  • 2 buttons

To draft your pattern, measure the child’s chest and divide that by 4.  That will be the width of your bodice pattern piece (since it’s drawn on the fold).  You can also measure across the front of a dress or shirt and divide that in two.  When I drafted my piece, I added seam allowance, but my bodice ended up being just a little too wide.  So I’d just stick with the measurement and not add seam allowance and then the bodice will be just smaller than the chest width, which I think will fit better.

Pinafore1

The height of your pattern piece will depend on how long you want the bodice to be.  Measure from the point you want the bodice to start on their chest and down to where you want the skirt to begin.  Add a 1/2 inch seam allowance on both the top and bottom (1 inch total).  I also cut the top corner a bit to allow room for arms.  I eyeballed this, but for my 3T-ish pattern, I made a mark about 1 inch in on the top and 2.5 inches down and drew a diagonal line connecting the two and then cut.  You can place your pattern on your child or on a shirt to see if it’s about the right size/angle (remember to take into account the 1/2 inch seam allowance).  Sorry people, I don’t have an exact formula – like I said, I usually just wing things around here.

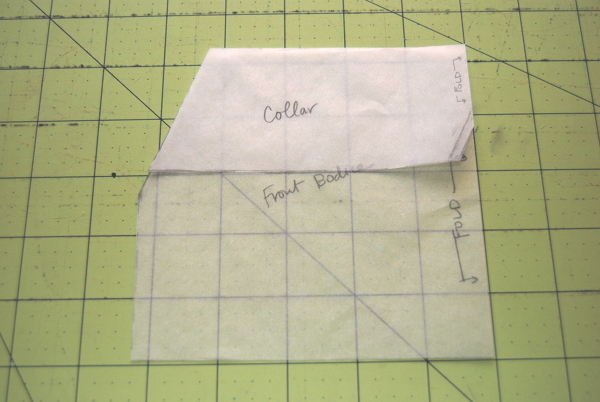
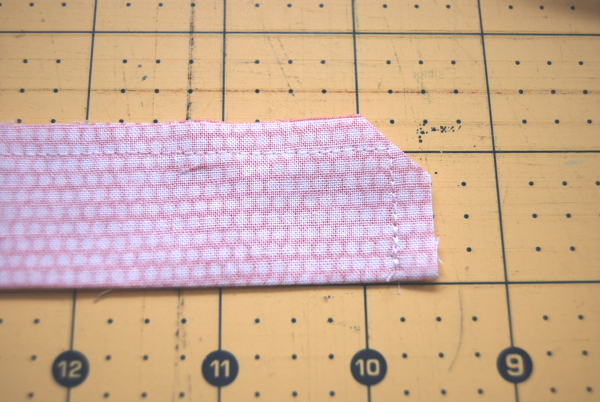
To draft the collar, I placed some tracing paper on top of the bodice piece and traced along the top section of the bodice pattern.  Decide how long you want this collar piece to be and cut straight across, remembering to add seam allowance.  I used a 1/2 inch SA to sew along the outside edge of the bodice, but only a 1/4 inch SA along the bottom of the collar piece.  To add the notch, draw a diagonal line along the fold line of your pattern piece the size and angle you want your notch to be.  Then draw a second line a quarter inch over (towards the fold line) and cut.

Pinafore2

You’ll also need a pocket pattern piece, which you can make whatever size/shape you want.

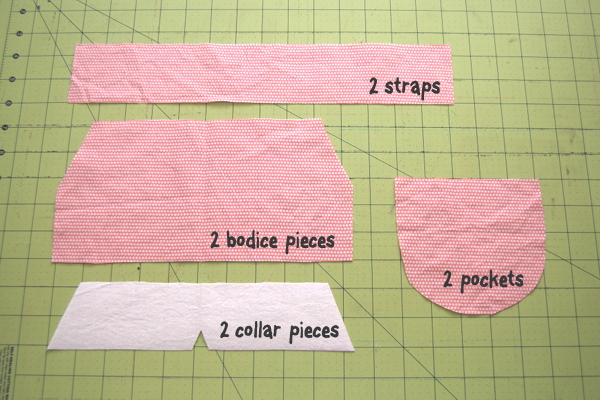
Now you’re ready to cut your fabric.  From your main fabric, you’ll need 2 bodice pieces, 2 pocket pieces and 2 strap pieces.  Your straps should be 2.5 inches wide and whatever length you’ll need to reach from the top of the bodice, over the shoulder and to their waistline on their back.  My 3T straps were 14.5 inches long.

From your contrast fabric, you’ll need 2 collar pieces.  If desired, add lightweight interfacing on the wrong side of one of the collar pieces.

Pinafore3

 You’ll also need to cut 2 rectangles for the skirt front and skirt back from your main fabric.  I used one of Yuki’s dresses to determine how wide to cut the rectangle (by measuring the width of the bottom of the skirt then adding 1 inch for seam allowance) and the length will depend on how long you want the skirt to be, plus added length for seam allowance and hemming.  For the skirt back piece, add one inch to the length to create casing for the elastic.  My skirt pieces were 27×14 inches for the front and 27×15 inches for the back.

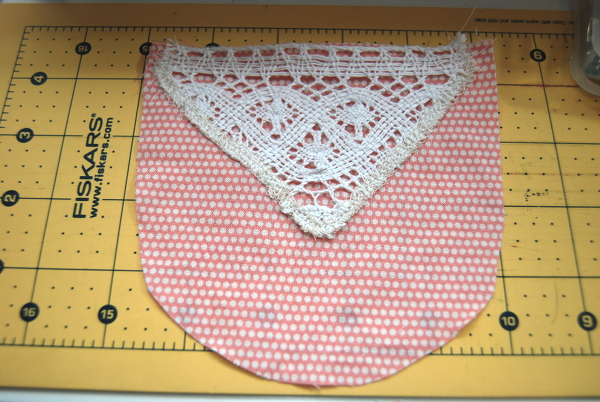
First we’re going to add the decorative lace to the pocket piece.  Depending on what shape lace doily you have, you can probably just leave it as is and sew it on to one of your pocket pieces.  A square or strip can be placed across the top edge of the pocket.  Or a circular piece can be cut in half so that a curved edge lays across the top half of the pocket.  Play around with whatever shape or look you want and sew the lace down onto the right side of one of your pocket pieces.

Pinafore4

Because I was trying to replicate the pocket in the original photo, I needed a triangular piece.  I cut my lace into a triangle and then serged the edges to finish them.  I did kind of a crappy job.

Pinafore5

After you top stitch along the outer edge of the lace to attach it to one of your pocket pieces, lay the other pocket piece on top, right sides together and pin around the edges.

Sew all the way around the pocket leaving about a 1.5 inch opening.

Pinafore6

Clip corners, flip the pocket right side out and press.   Sew this pocket onto the front skirt piece.

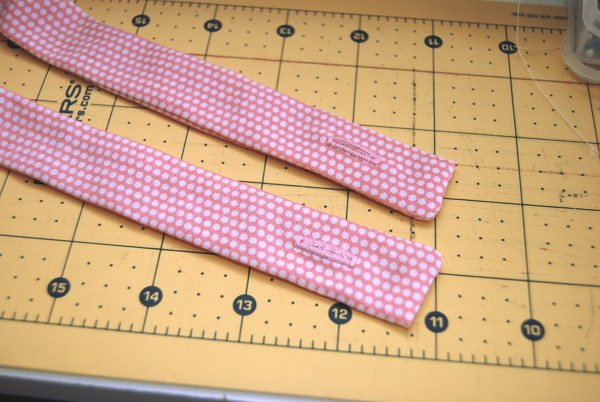
To prepare your straps, fold them in half lengthwise (right sides together) and press.  Then sew along the long edge and one of the short edges with a 1/4 inch seam allowance.  Be sure to leave one short edge open.  Trim the corner.

Pinafore7

Repeat with the other strap and then turn the straps right side out and press.

Pinafore8

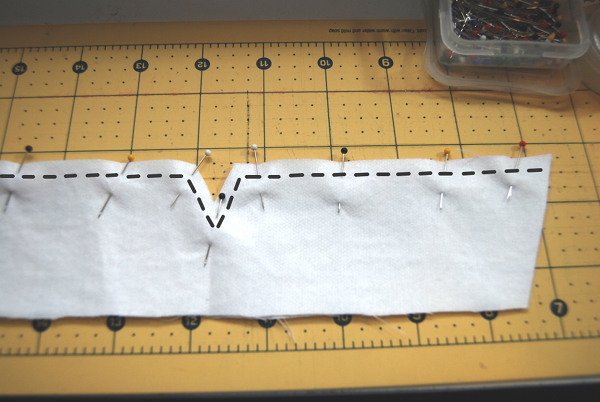
Place your collar pieces wrong sides together and pin along the bottom (notched) edge.  It may help to mark the line you want to sew along, for the notched portion, to assure you get a nice even and centered notch.  Sew just along the bottom edge of the collar.

Pinafore9

Trim corners and carefully clip your notch as close to the stitching as possible – but don’t snip the stitching!

Pinafore10

Flip your collar right side out, use a chopstick or something to push all the corners out and press.

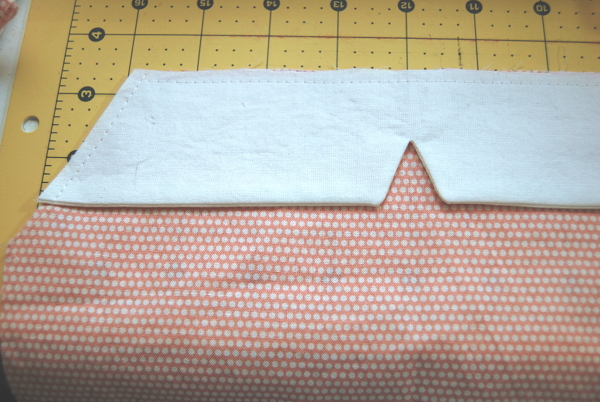
Lay the collar on top of one of your bodice pieces, right sides facing up and baste the collar to the bodice.

Pinafore11

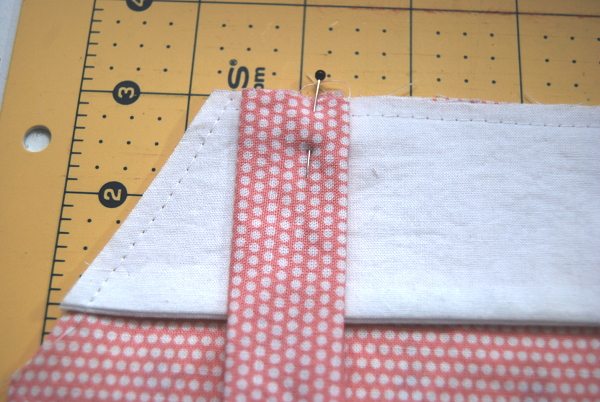
Place the raw edge of one of your straps along the top edge of your bodice – measure a 1/2 inch down and a 1/2 in and pin.  Do the same with the other strap on the other side of the bodice.

Pinafore12

I didn’t photograph the next step, but place the other bodice piece on top, right sides together (with straps and collar sandwiched in between) and pin.  Sew the bodice pieces together along the sides and top of the bodice (leaving the bottom edge open) using a 1/2 inch seam allowance.  Trim seam allowance down to a 1/4 inch and clip corners.  Flip right side out and press.

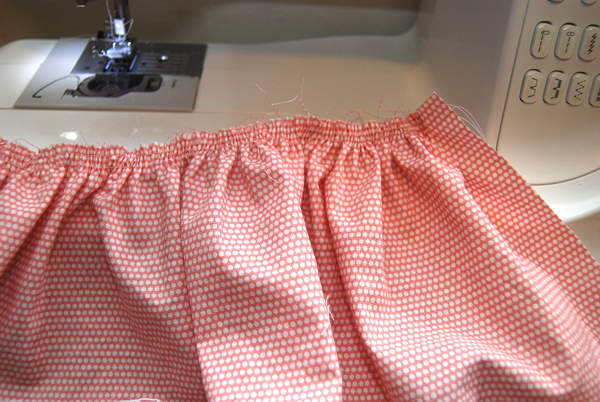
Gather the skirt front piece by sewing two basting lines along the top edge of the skirt.  To baste, set your machine on the longest stitch and do not backstitch at the beginning or end.  Leave the threads long and pull carefully to gather the skirt.  You want the width to be 1/2 an inch longer than the bodice on each side.  Leave that 1/2 inch ungathered.

Pinafore13

Pin the bottom edge of the bodice to the top edge of the front skirt piece with right sides together.  There should be 1/2 an inch of ungathered skirt sticking out on either side of the bodice.

Pinafore14

Sew the skirt and bodice together with a 1/2 inch seam allowance.  Finish this raw edge with your serger or a zig zag stitch.  Press the bodice up and the seam allowance down.

Pinafore15

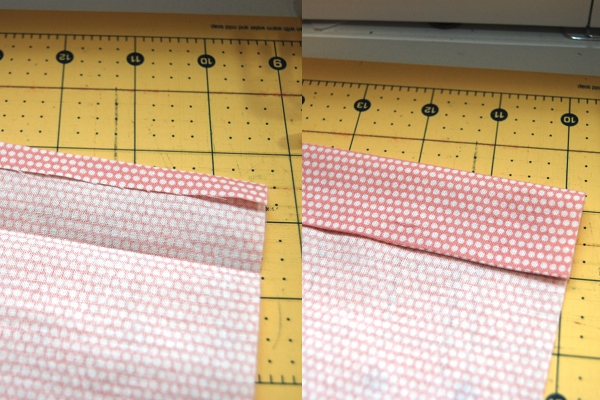
To make the casing for the back skirt piece, fold and press the fabric just less than 1/2 an inch down along one of the long edges.  Fold the fabric down again just over one inch – you’ll want the casing to be slightly wider than the 1″ elastic.  Sew very close to the folded edge.

Pinafore16

Using a safety pin, pull the elastic through the casing.  Sew the elastic in place 1/2 an inch in from one side and then continue pulling elastic through to the other end.  The skirt back piece should match the width of the skirt front piece, or be just a little bit smaller for a snug fit.  Sew the other end of the elastic in place 1/2 an inch in from the end.  Trim excess elastic.

Pinafore17

Place the skirt front and back pieces together (right sides facing in) and pin along the side edges of the skirt.  Sew together using a 1/2 an inch SA, trim and finish edges using a serger or zig zag stitch.

Pinafore18

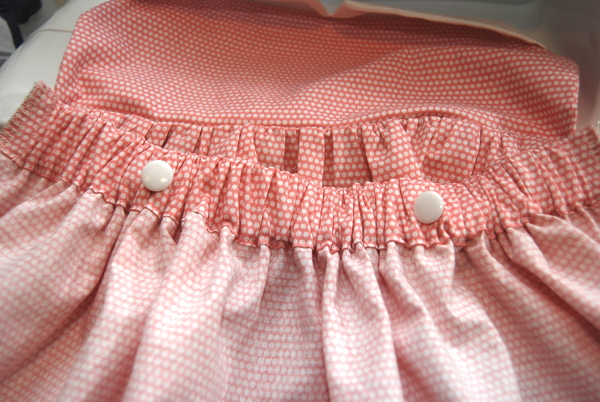
We’re almost done!  Just a few more finishing touches.  On the inside of your back skirt piece, hand sew two buttons to attach the straps to.

Pinafore19

Then sew buttonholes on the ends of your straps.

Pinafore20

Pinafore21

Done!

Pinafore22

Pinafore23

PinkPinafore10

Hooray!  A sweet vintage frock for your sweet little one!

Please remember to add any of your you & mie inspired creations to the flickr pool!  Oh and let me know if you have any questions or corrections.  I wrote this when I was really sleepy 😛

I hope you’re all doing well.  I seriously can’t believe how quickly this summer is going by!  It’s already AUGUST!  And I went from having no real sewing agenda, to a list of about 15+ projects that I want to get done before the baby comes in a couple of months!  I better get to it!  What have you been working on?

Goodbye Google Reader!

So Google Reader, which has been a popular way to follow all your favorite blogs, is shutting down on Monday, July 1st.  This news has been circulating for a long time now, so if you use it, I’m sure you’re already quite aware of what this means.  I haven’t really been paying much attention because I never used Google Reader to manage my blog subscriptions!  But it seems like it’s a big deal to a lot of people, so probably worth mentioning.  From what I understand, if you’ve been using Google Reader, you probably should have saved all your subscriptions and switched over to a new reader by now.  Buuuuut, if you’re a super procrastinator like me, maybe you haven’t!

Well, get on it!

If you’re trying to figure out how to continue following this blog after Google Reader goes bye-bye, OR you’re new to this whole blog thing and want some suggestions on how to keep up with all these posts, here are my recommendations based on what I use and love, and also from what I’ve heard from friends and what is popular in this community.

bloglovin

I’ve been using bloglovin’ as a blog reader for as long as I’ve been following blogs and I really like it.  Since I haven’t used any other services, I can’t really compare, but it’s easy to understand and manage, so I recommend you check it out.

feedly

I haven’t used feedly myself, but I’ve heard really good things about it.  In fact, I feel like it’s the most recommended replacement for Google Reader.  My buddy, Kristin, (who I basically stole this entire post from) mentioned in her post that feedly has a “how to import your feeds from google reader” tool, which seems handy, but I’m pretty sure you need to get on that ASAP if you want to use it.

facebook

Facebook is another easy way to keep up with what’s going on here, especially if you’re already a regular FB user.  “Like” the you & mie page and you’ll get links to recent blog posts, sneak peeks at current projects, links to awesome giveaways, inspiration, sales and other happenings around the sewing world that I think fans might be interested in, and other random questions, news and funny moments as I go about my day 🙂

emailIf you don’t follow a ton of blogs and like the convenience of new blog posts delivered instantly to your email inbox, you can also follow this blog via email subscription.  To be quite honest, I don’t really understand how feedburner works, but I guess you can use it to subscribe to the site.  You can also look over in my sidebar to the right and there is a “subscribe” box where you can enter your email address and subscribe pretty easily as well.

And if you are an Instagram junkie like me, you can follow me @youandmie to see what I’m up to, both sewing and otherwise.  And now IG has video too!  Just got even more addicting.

Anyways, I hope this helps a little bit.  I also just wanted to take a moment to thank all of you who follow this blog – no matter how you do it – it really means a lot to me!  I love being able to share this part of my life with you all, and feel like I’m not just talking to myself all the time 😛

Have a great weekend and I’ll be back with some new sewing projects next week!

Fabric Weekend 2013!

So as if my Quilt Market adventures were not enough, I actually get to participate in ANOTHER fun fabric weekend.  This time it’s a blogger meet-up in Los Angeles and we’re going SHOPPING!

The fantastic Andrea of The Train to Crazy and Go To Patterns has organized this awesome weekend for us with help from Justine of Sew Country Chick and Bev of Flamingo Toes.  Just imagine getting together with a group of talented and fabulous ladies to shop, eat and chat with who all just happen to love fabric and sewing!!  It’s going to be fantastic.

The ladies were able to hook us up with some great sponsors for the weekend as well . . .

Michael Levine is a staple in the Los Angeles Fabric District.  I visited their main store this past winter and was in awe of their selection.  I didn’t even get to check out their upholstery fabric store or the Loft where you can buy fabric by the pound last time, but hopefully I can this time around!  Thankfully they have a great online store as well. Their online brand is lowpricefabric.com so you can shop along even if you’re not in LA!

Oh, Jo-Ann!  What would we do without Jo-Ann?  I don’t know about you, but it’s still one of my main stops for my sewing necessities.  Thank you Jo-Ann Fabric and Craft Stores for sponsoring Fabric Weekend 2013!   Even in a fabric heaven like Los Angeles you still know you can find exactly what you need at Jo-Anns.

We’ll also be stopping at Mood Fabrics, which has a new and improved store in Los Angeles.  I’ve never been there, but I’m sure going to pretend I’m a Project Runway contestant as I wander aimlessly through the aisles and aisles of fabric!

And as if that wasn’t enough fun already, Jessica, the Sewing Rabbit, has teamed up with Jo-Ann once again to host another fabulous Girls Night Out!  I can’t wait!

The girls and I will be posting on Instagram all weekend long like the addicts we all are, using the hashtags #GNOLosAngeles and #FabricWeekend2013, so follow along and join the fun!

In fact, the fun already started yesterday with the first to arrive and pictures are being posted!  Unfortunately, I’m not going to be joining until the second half of the weekend, so I’ll be following along on Instagram as well until I get to be part of the action!

Can’t wait to experience it and share some of it with you.  Maybe I’ll even come back with some extra fabric to share? 😉  Have a great weekend!

Lessons Learned from Quilt Market

2 weekends ago I was lucky enough to be able to attend Quilt Market up in Portland.  I honestly didn’t know what to expect at all, but it turned out to be an extraordinary weekend filled with amazing fabric, quilts, clothes, food, conversation and phenomenal designers, seamstresses, quilters, artists, shop owners, and fabric enthusiasts of all kind.  I feel so so blessed to have had the experiences that I did and I wanted to share a little bit about what I saw and learned.

photo 32Beautiful quilts.  Clockwise from upper left: Pure Elements, Birch Fabrics, The Nest Quilt by Carrie of SUCH Designs, and Waterfall with Lotta Jandsdotter’s Glimma Line

Quilt Market itself is this huge trade show where fabric designers and distributors showcase current and soon-to-be-released fabric lines to fabric retailers.  These retailers can put in wholesale orders for their shops.  Quilt Market is not open to the public, but I got in with Rae under her company, Made By Rae, since she is a fabric and pattern designer and nice enough to get me in!!  Seriously, this girl is a riot.  Super talented and super sweet too.
photo 26
I spent the whole weekend with Kristin from skirt as top and she was the most awesome host!  Over the last year and a half she’s become such a good friend to me, even though we rarely get to see each other.  So spending the whole weekend together was such a treat for me!  Also her family is ridiculously cute and fun.  She not only picked me up from and took me back to the airport, gave me a place to sleep, fed me, and drove me around the whole weekend, but she also took me to some fab fabric stores, amazing restaurants and of course, experienced Quilt Market with me.  I definitely wouldn’t have been so comfortable in the company of all these huge designers, retailers, bloggers, etc. if I didn’t have a friend by my side and it is so nice to have someone to debrief with at the end of each day.
photo 21The fabulous Kristin and I in front of the Cloud9 Fabrics booth.  So many fun and organic fabrics from Cloud 9, including Rae‘s first fabric line, Fanfare! 

photo 34
FOOD!  Oh I had some good food.  Clockwise from the upper left: Pine State Biscuits, Random Order Coffeehouse & Bakery, Pulled Pork Sandwich but I can’t remember where it’s from (help me out Kristin!), Voodoo Doughnut!! 

Kristin was also the one who introduced me to the incredible Liesl of Oliver + S.  We’d “worked” together in the past helping Liesl introduce her new spring O+S patterns, and emailed briefly, but I was finally able to meet her in person and spend some time with her.  And SHE IS AMAAAAAZING.  So sweet, down-to-earth, hilarious and incredibly humble.  I loved getting to hear some of her unique perspectives.
photo 27
Did I mention she’s hilarious?  I hope she doesn’t kill me for posting this pic!  And on the left, Liesl, Gail of Probably Actually, me and Kristin in the wonderfully decorated Oliver + S booth! 

I’m not blogging about this whole experience just to brag about how awesome it was and rub in your face how much you missed, because I know that going to Quilt Market is really not a possibility for most people.  But there are a couple of really valuable things that I learned that I think that anyone can benefit from.  And I thought I’d share some of those things with you . . .
1. Go meet people.  You may not have access to famous fabric or pattern designers, but meeting up with other people who sew, quilt, craft, create and blog is soooo fun and inspiring.  So many of us have these passions and sure, we chat with other people online all the time, but being able to meet up with and really get into it with people in real life is totally different.  It’s so refreshing to be able to connect with people who share your interests and passions.  And really rejuvenating as well – I bet you’ll walk away feeling inspired and excited to create and share.
photo 29
I got to meet Robin of Nested in Stitches and Gail of Probably Actually – both super awesome gals.  I also hit up 3 fabric stores in Portland: Bolt, Modern Domestic and Cool Cottons.  I bought fabric at all three places that you’ll see in upcoming projects.  The pic above is from Cool Cottons – they had every. single. color. of shot cotton!! 

2. Don’t be afraid of people who are “bigger” than you.  Getting to meet people like Heather Ross, Liesl Gibson and Melody Miller is, for sure, intimidating.  But when you talk to them you realize that they are just people too (truly talented and awesome people, but still, just people :)).  And not just that, but they are artists, putting themselves out on the line when they release new fabric lines and patterns, hoping that people will like what they do!  And it turns out that so many of them love seeing what people like us, make with their art!  So now I feel so much more inclined to not only support and give credit to these artists (by identifying the fabric that I use, whenever I can), but also to share with them the stuff I make so they can see how much I, and others, love their stuff.  And really, the people that I’ve met have all been so sweet and seem to welcome feedback and conversation, so don’t be afraid to reach out to them if you have something you want to share with them or a question to ask!  Of course, they are really busy people, but I bet you’ll hear back from most of them!
photo 28
One of my favorite booths was Rashida Coleman-Hale‘s.  I love her fabric and how amazing is that yukata?  The current Tsuru line is awesome, but I can’t WAIT for Koi.  Sooooo beautiful!  I had so much fun talking with Rashida about her time in Japan.  She is seriously sweet! 

3. Be true to yourself and don’t lose sight of why you are creating.  My last night in Portland, Kristin and I were invited to this phenomenal dinner at a new restaurant called Ración with a group of great fabric shop owners.  We ended up sitting with and being part of a truly amazing conversation with Liesl & Todd of Oliver + S, Keli of Drygoods Design (online and in Seattle) and Margaret of Form and Fabric (online and in Austin).  These are some seriously smart and passionate people and I just felt so lucky to have been able to witness and participate in such an honest and exciting conversation!
photo 30
My other favorite booth/artist was Leah Duncan.  This girl is a super talented artist and so adorable too!  I first learned about Leah back when I sewed this Jump Rope dress in some of her fabric and she saw it on Pinterest and emailed me to ask if she could post a picture of it on her blog.  I poked around her website and blog and LOVED her work.  She does amazing work and I love the colors and really organic vibe of her illustrations.  Her upcoming fabric line with Art Gallery is called Tule.  Can’t wait to get my hands on some! 

Anyways, one of my main takeaways from that night was to try remain authentic (this word came up so many times that night).  This can mean so many things, but for me I realized that sometimes we, as bloggers, can get caught up in creating things for series, or making something we think the readers will like, or if we take sponsors – what our sponsors will like, or how to increase our readership or how much to charge for sidebar ads, or whatever – and we lose sight of why we are sewing, creating, blogging in the first place.  I feel like the most awesome creations come from our hearts when we are not thinking about blogging it, but just making whatever we want or whatever we dream up.  It’s good to remember that every day and also connect with, encourage and support others who are doing the same.
photo 31
Briar Rose by Heather Ross for Windham Fabrics (quilt design by Rae Hoekstra!) and Nordika by Jeni Baker for Art Gallery. 

I just wanted to mention also that the restaurant we went to that night, Ración, was incredible.  They are new in Portland (2 months, I believe) and are just getting settled, so I feel like I should help spread the word – if you are ever in Portland and looking for a really nice place to go to – check this place out.  The food was TO DIE FOR.  The people were really fun and friendly.  And they really took care of us and I’d love for them to be successful (and I’m quite certain they will be!), but yeah – a shout out to them!
photo 25
One of the biggest surprises and highlights of Quilt Market for me was visiting the Dear Stella booth and seeing my Sunburst Picnic Blanket there!  They had sewn up the picnic blanket in their Clementine line of fabric, but I had no idea that the blanket would be there at Quilt Market!  It was so exciting to see something that I helped create on display!!  It was such an amazing feeling!
photo 20
Quilt sewn by Becca Jubie from my Sunburst Picnic Blanket tutorial using Clementine by Dear Stella.
Phew!  What a weekend!  Honestly, looking back at it, it feels pretty unreal.  Even throughout the weekend, Kristin and I would just look at each other and be like, “did that just happen!?”  But I’m so glad it all did.  A huge thanks to all of the wonderful people that made my first Quilt Market experience so unforgettable.
And of course, a very special thank you to my best friend and the best life partner in the world, Hideko, who held down the fort and let me fly to Portland to have so much fun. AND she’s doing it again this weekend as I fly out of town for another amazing weekend of fun, friends and fabric.  But more on that tomorrow . . . 😉

Do you Instagram?

Oh yeah.  It’s a verb now.

photo(23)follow me @youandmie

If you like to keep up with the latest social media crazes you’ll know Instagram is pretty huge right now.  It’s basically a photo sharing app for your phone or other mobile device that people use to capture and share beautiful, funny, strange or otherwise noteworthy moments of their day.  I’ve been on Instagram officially for 2 years now, but only started posting regularly one year ago and only REALLY started using it as a way to share and connect with other people in the sewing/crafting/blogging community within the last 6 months.

I’m addicted.

But until now, I’ve kept my photos private which means that you could only see them if you requested access and I accepted.  But as I’ve started connecting more with more bloggers, I’ve discovered how fun it is to get peeks into their daily lives.  I really feel like I’ve made friends with people through Instagram because we share our daily triumphs and trials, our meals and our messes, our projects, our families and even the mundane.  It’s really really fun.

So I’m opening up my account to the public in case you’d like a peek into my life.  My username is youandmie.  And if you’re on IG, feel free to leave your username in a comment, so I can check it out!

If you’re already a follower, you’ve recently seen pictures from my winter break . . .

1000004761And I also like to post pictures of . . .

1000004764fabric and sewing projects (both complete and in progress,) and sometimes I even ask for advice while working on a project if I can’t make up my mind!

1000004765 the beeeeeaautiful place I call home

1000004763the food I eat (looks like I might need to start eating healthier)!

1000004762a looooooooooot of pictures of this kid

1000004767and little moments from my day that make me smile.  Like when my daughter tried to run away from home.  Naked.

If you’re not on Instagram yet, I dare you to check it out and NOT get addicted 🙂  Pretty much all of my favorite bloggers are on there sharing gorgeous and hilarious photos of their lives and it’s such a fun way to get to know people.  Checking my IG feed is one of my favorite things to do because I know someone’s photo is bound to have me laughing out loud.

Anyways, you can find me @youandmie if you’re interested!

Do you Instagram??