Oliver + S Playtime Tunic and Leggings

Long time no see!  I can’t believe how much time I’ve been letting slip by between blog posts, but this end of the pregnancy/back-to-school/preparing for maternity leave thing has been kicking my butt!!  I’m finally on leave from work and I’m officially 2 days away from my due date!  Exciting times!!!

Playtime6

But I’m here today to share an fun new Oliver + S pattern that was just released for the fall.  There are three new patterns and this one is called the Playtime Dress, Tunic and Leggings Pattern and it’s available as both a paper and PDF pattern in sizes 6M-4 and 5-12.

Playtime4_1

This pattern can be made with woven or knit fabric, which makes it versatile.  I chose to make it in knit because that’s pretty much all Yuki will wear these days.  Both pieces are super comfy and Yuki loved playing in these all day, so I’m happy!

Playtime1

It’s not the most exciting or colorful choice of fabrics, but I wanted to make something practical and I already had this striped knit in my stash.  It’s a pretty thin, and super soft and stretchy fabric.  Which makes it really comfy, but a bit of a pain to sew.  Add the fact that I chose stripes and it was a downright nightmare at times.  Sewing with striped knits always seems like such a great idea – until you realize it isn’t.  I had a helluva time lining up those stripes and still did not do a great job.  But then striped knits just look so good as clothing, it’s hard to resist, isn’t it?

Playtime2

The back calls for a button or snap closure.  I chose these gold buttons and was a little nervous about how the thin knit would hold up with the button holes.  But between the two layers of fabric plus the interfacing, it did quite well.  One of the things that I love about knit is its stretchiness (obviously), so if I were to make this top again in a knit, I might adjust the back bodice to one piece to avoid having to make a closure at all.

Playtime3

The leggings pattern is so simple and so awesome.  I wish I had tried sewing my own leggings before.  Now that I know how easy and quick they are to make, it seems silly to buy them.  I bought this fabric at Joann’s and it’s got these cute metallic gold polka dots.  They are actually pretty subtle and only really shine depending on the angle of the light.  But they are fun and fit Yuki well, and did I mention, they are comfy?

Playtime7

If you take a look at the photos on the O+S site, you’ll see that there is stitching along the facing and pockets which you can do in a contrasting thread for accent.  At first I thought I’d just eliminate the top stitching altogether, but then I realized that the facing would flip up and probably bug Yuki (and me), so I sewed it with black thread and it’s very subtle.  I also realized that with the flimsy knit that I used, the pockets hung down below the hem of the tunic, so I stitched the pockets down as well.  Now everything is stitched down and secure!  The contrasting stitching will be a fun variation to play with in the future.

Playtime8

Oliver + S patterns are always well written and easy to follow.  I love knowing that I’m doing things the “right way” when I’m following their directions.  This pattern is no different and I’m excited to have a cozy little outfit for Yuki to wear this fall and winter.  If you’re interested in purchasing this pattern, head over to the O+S online pattern shop!

And if you want to see a totally different version of this same pattern, go check out Jessica of A Little Gray’s dress version!  It’s adorable and hot PINK!

Later this week, Gail, Kristin, Jessica and I will be back with more of the new Oliver + S fall patterns, so stay tuned!!

*The Playtime Dress, Tunic and Leggings Pattern was generously given to me for this review, but all opinions are 100% my own.*

Ruffleless Ruffle Tank

Hellooooooo!  Oh how the time flies, huh?  Back-to-school season is always extremely busy around here for two educators.  Throw in a couple of birthdays, an almost 3 year old and a rapidly approaching due date and you’ve got about 2 months of madness.

But when my good friend, Delia, asked me if I’d review the new Five and Ten Designs Volume One eBook, I couldn’t resist.  Have you heard of Five and Ten Designs?  5 awesome indie pattern designers teamed up to create 10 different looks from one basic pattern piece.  It’s a brilliant concept and is perfect for anyone who is interested in learning how to alter or manipulate pattern pieces to make something totally creative and original.  The book includes bodice pattern pieces for sizes 12m to 10 years and each of the 10 looks is so incredibly different, you’ll want to sew them all!

So really the hardest part for me was deciding which look to sew up first.  Because I’ve made Yuki a few dresses recently and she rarely wears them, I ended up picking up Look No. 2, which is a ruffley top with a super cute tie closure in the back.  I LOOOOVE how cute this top is (designed by Jessica, the Sewing Rabbit).  But I had a really hard time imagining Yuki wearing something so ruffley.  So I decided to give the pattern a try without the ruffle.

Ruffleless Ruffle Tank3

I made this top in size 2T.  It comes together really easily and is even more simple if you omit the ruffles!  I also used store bought bias tape (as opposed to making my own), so that made it an even quicker project!  This top is probably cuter with the ruffles from the original design, but I think it suits my daughter better this way.

Ruffleless Ruffle Tank1

Ruffleless Ruffle Tank2

The pattern instructions and photos are clear and easy to follow.  I did, however, notice as I was creating my pattern pieces that if you follow the directions as they are, your front pattern piece will be slightly longer than the back piece.  I emailed back and forth with Jessica, the awesome designer behind this look and she was super open to my feedback and helpful in working out exactly what the problem was.  It’s such a minor thing really, but if you are making this top, I would follow the directions to draft your front pattern piece and then use that measurement for the back as well (this will make sense if you’re actually making the top, but otherwise, you’ll have no idea what I’m talking about :P).  If you use the front pattern piece to make the back, it’s helpful in making sure that not only the length is the same, but the angle of the side and the curve along the bottom.

Ruffleless Ruffle Tank4

Gahhh – I adore the back of this top . . .

Ruffleless Ruffle Tank5

I also added 2 inches in length to the top because the pattern looked a bit short compared to other 2T tops we own.  Since every kid is different, I’d recommend checking the length of the top before cutting your fabric in case you need to add or take off some length.  And I probably could have taken a bit more off the width of the shoulders as well, since it came out a bit wide for my daughter’s petite frame.

All in all, this was a fun top to sew up and Yuki loved wearing it, so win win!  And I still have 9 more looks that I could sew up with the entire eBook!  I highly suggest you go check it out.  I think you’ll be blown away by the huge range of looks you can make with just one pattern block.

Thanks for stopping by.  I hope you’re all doing well, whether you’re already back to school or enjoying the last few days of summer break!

Ruffleless Ruffle Tank6

*The Five and Ten Designs Volume One eBook was generously given to me for this review, but all opinions are 100% my own.*

Colour Pop Top Knock-off {tutorial}

ColourPopTop2

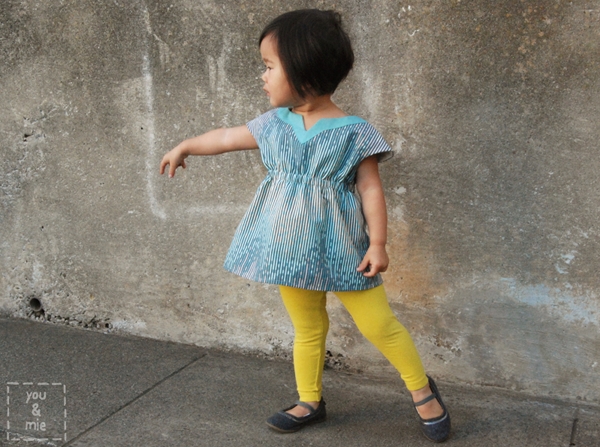
Knock if Off is a series hosted by the fabulous Heidi of Elegance & Elephants and is one of my favorites.  Knock offs are awesome – we all do it – see something at the store and think, “I can make that!”  That’s why so many of us sew in the first place!  The series is already going strong, and you can check out projects from the last 2 weeks here!

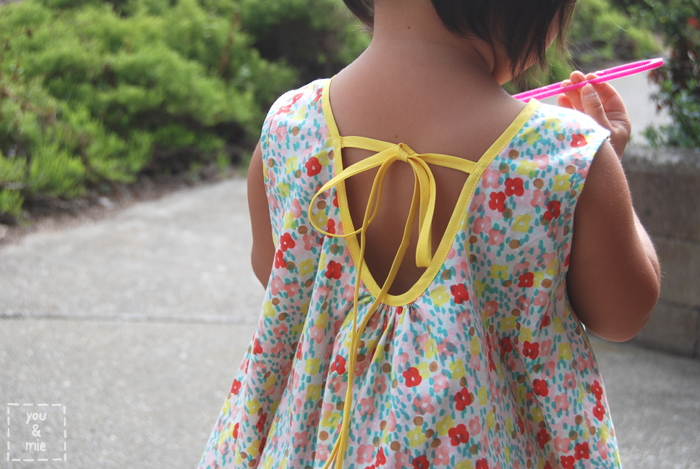
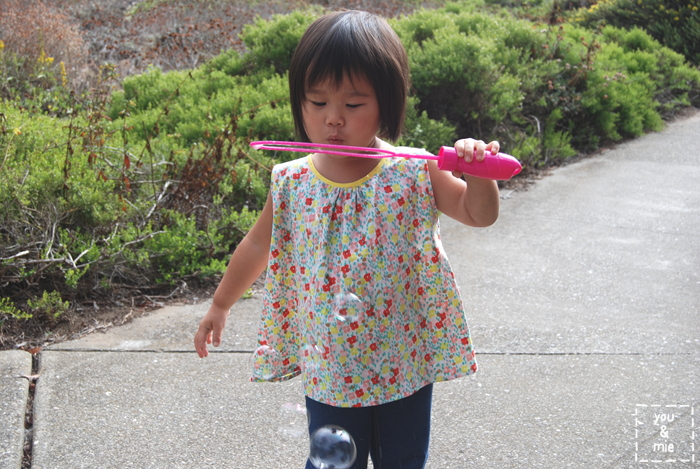
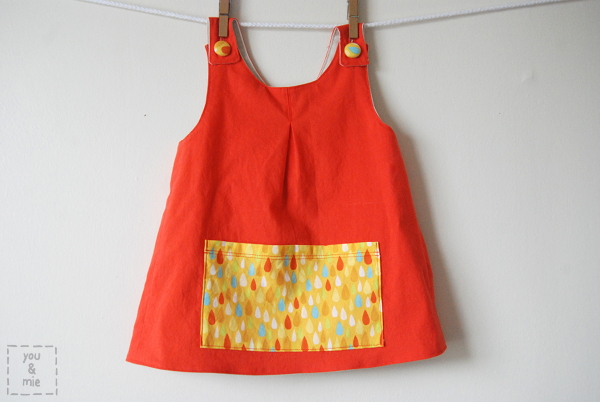
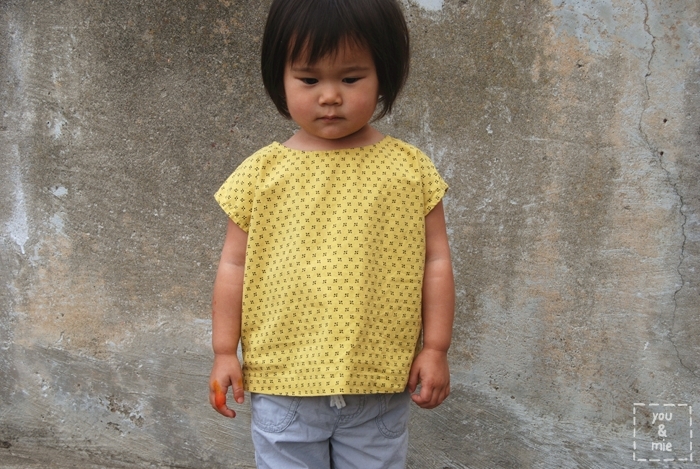
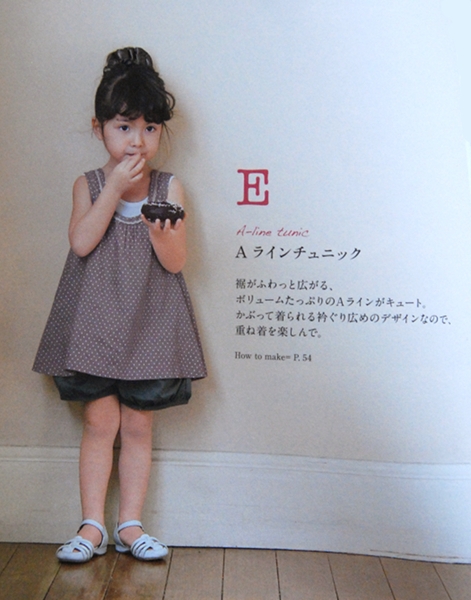
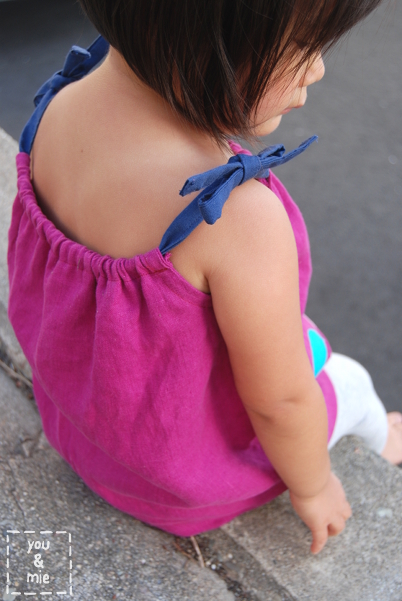
For my project, I recreated this Applique Colour Pop Top from Mini Boden.

ColourPopTop1

It’s a perfect top for summer and really simple to make.  Plus you can customize it with whatever applique you want!  It doesn’t take much fabric and is great for showcasing scraps of cute fabric.  I actually think this is the perfect project to make from an old t-shirt if you have one laying around, and that makes the project even simpler!  Anyways, versatile top, simple to sew, and great for the upcoming summer months – makes a perfect top to knock off!

ColourPopTop19

ColourPopTop22

Fun right?  I’m going to show you how to make your own!

Here’s what you’ll need:

  • Fabric (I think anything light to medium weight is fine – linen, cotton, knits, etc. and amount will depend on what size you’re making, but for most kids, 1/2 yard will be plenty).
  • Scraps of fabric for applique
  • Strips of fabric for shoulder ties, or store bought bias tape if you’re looking to skip some steps 🙂
  • Paper backed (double sided) fusible web (I use Pellon 805 Wonder-Under)

ColourPopTop3
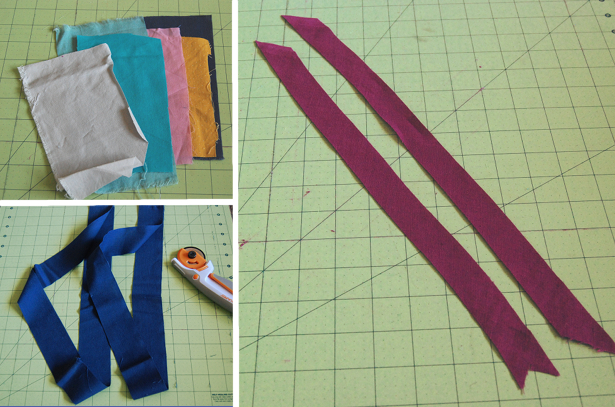
I’m still trying to work through my stash and not buy new fabric, so I dug through stash for all the solid cottons I could find.  Ended up using some leftover linen from this coat and a bunch of scraps from various projects.  The yellow fabric is actually polka dotted because I couldn’t find any solid yellow 🙂

To cut your main fabric, find a top that fits your kid well – a loose fit tunic is probably best.  Measure the width of the bottom.  Add one inch for seam allowance and that will be the width of your fabric.

ColourPopTop4For the length of the fabric, I used the same tunic to measure the general length.  The top of your fabric will be folded over twice to create a casing, so add that to your measurement and know that this will hit at the top of the chest (not shoulders).  Also remember to add about 1.5 inches for hemming the bottom.  You need two of these rectangles – one for the front and one for the back.

ColourPopTop5

Fold one of the pieces in half lengthwise to cut out the armholes.  I just eyeballed this, but draw and cut a curve in the top corner (not on the fold).  The top inch and a half will become the casing, so this should be a straight line down before it curves.

ColourPopTop6When you open up your piece, it should look like this.

ColourPopTop7For simplicity sake, I decided to make the front and back of the shirt the exact same, so using the cut piece, trace the same curve on the 2nd rectangle.

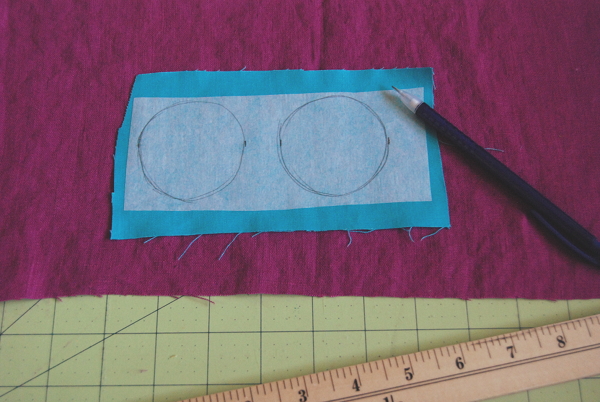
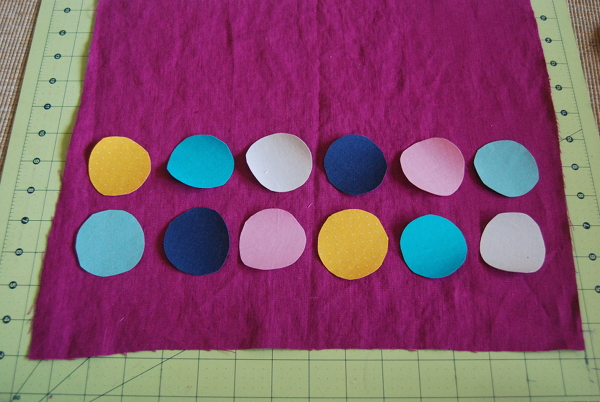
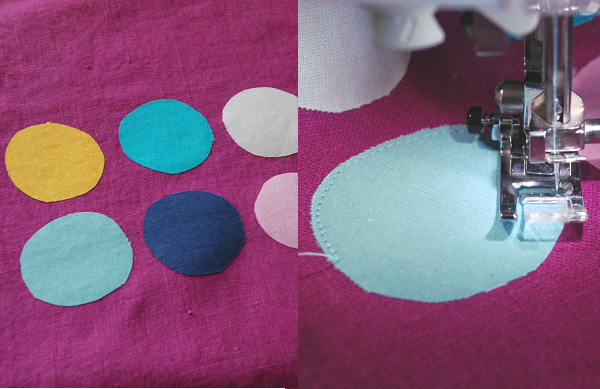
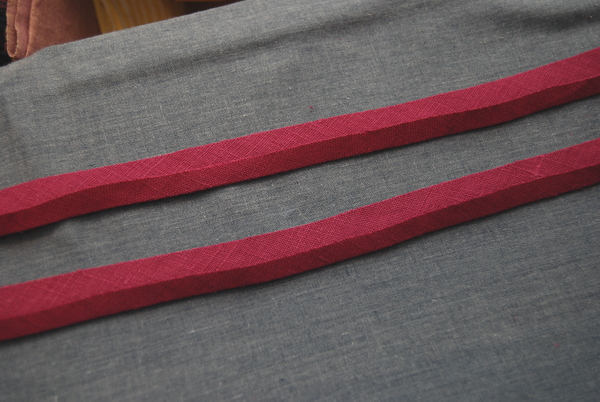
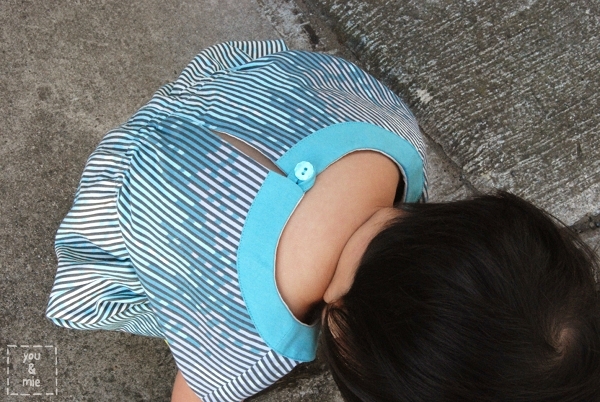
You will also need to cut two strips of fabric on the bias for finishing your armholes.  I cut my strips at 1 inch by about 12 inches or so (and had a lot extra).  You’ll need your scraps of fabric for the applique.  I had 6 colors and 2 circles of each and my circles were about 2-2.5 inches, so I cut little rectangles that would fit two circles on them.  You’ll also need fabric for straps.  If you’re using pre-made bias tape, you can skip this step, otherwise, cut 2 strips of fabric that are 2 inches wide and 30ish inches long (does not need to be on the bias).  Again, mine ended up being longer than necessary, but you can always trim them later.

ColourPopTop8

Now let’s get started with the applique!  Be sure to follow the directions for your particular fusible web.  Cut your fusible web into rectangles slightly smaller than your fabric scraps.  With the Pellon Wonder-Under, there is a papery side and a rough/web side.  The rough side will be ironed down to the wrong side of your fabric.  Repeat with all the fabric scraps.

ColourPopTop9You can easily draw on the papery surface of the fusible web, so sketch your shape out (or just start cutting if you’re feeling daring!)

ColourPopTop10Cut out your circles and play around with placement on your fabric.  Be sure to leave 1/2 an inch on either side for seam allowance, plus room to hem the bottom as well.

ColourPopTop11Once you’ve got it just the way you want it, carefully peel off the paper backing and adhere the circles to your main fabric with your iron.  Be sure to read the directions of your fusible web first!  Wonder-Under requires a damp cloth between the applique and the iron.  Once you’ve got all your circles fused on, top stitch around the edge of the circle with coordinating thread.  Take your time, rounded edges are always tricky – but if they aren’t perfect, no worries!  It just adds character! 🙂

ColourPopTop12
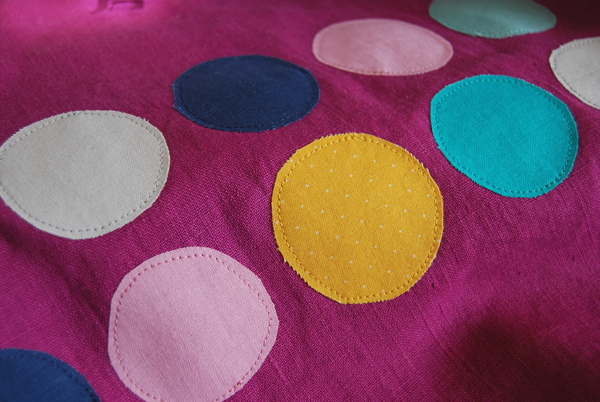
Repeat with all the circles.

ColourPopTop13Fun!  Now we need to construct the top.  Lay the front and back pieces with right sides together and pin the side.  Sew up the side seams with a 1/2 inch seam allowance.  Finish the raw edges with a serger, zig zag stitch or pinking shears, if desired.

ColourPopTop14Press the seam open.  To finish the armholes, take your bias strips and press one edge in about 3/8 inch towards the wrong side.  Repeat with the other strip.

ColourPopTop15

To finish the armholes (click on the picture below for a larger view):
1. Pin the bias tape along the edge of the armhole (right sides together).  Raw edges should be aligned (not the folded edge).
2. Sew along the edge of the armhole with a 1/4 inch seam allowance and then press the bias tape up.
3. Flip to the wrong side and fold the bias tape twice, once along the previously pressed crease and then again to encase the raw edge.  Pin and sew along the edge of the bias tape fold.
4. Trim an excess bias tape, press flat and you should have a beautifully finished armhole! Repeat with the other side.

ColourPopTop16Once you have your armholes finished, we can finish the front and back neckline.  Fold the front edge down about 3/4 inch towards the wrong side and press.  Fold down another 3/4 inch, press and pin.  Sew along the edge to create a casing (leave the two ends open).

ColourPopTop17Repeat with the back.  To create your ties, fold your strips lengthwise, wrong sides together and press.  Fold the two edges in towards the center fold (folding your strip into fourths) and press.  For the ends, unfold the strip and tuck the end in about half an inch.  Fold it back up so you’ve got a nice clean end.  Then top stitch around all open edges.  If you’re using pre-made bias tape, you can just skip right to the top stitching step.

ColourPopTop18I went ahead and eyeballed the tie length, but ended up shortening them after I put them in the top.  So, if you want to top stitch everything but the last few inches, you can finish that part after you’ve measured out the exact length that you want.

Using a safety pin, thread one tie through the casing on the front of the top, and the other tie through the back casing.  Tie them (and trim and finish edges if necessary).

ColourPopTop 25

Then hem the bottom to the desired length by folding and pressing the bottom edge twice towards the wrong side and stitching close to the folded edge.

Done!

ColourPopTop19

ColourPopTop20

Now you know how to make a simple and fun summer top!  And think of all the endless applique possibilities!

If you make a top using this tutorial, please add it to the you & mie flickr group!  I LOVE seeing your creations!

OR if you’ve made your own knock off project, be sure to add it to the Knock It Off Flickr Group.  And don’t miss out on the rest of the series over on Elegance and Elephants!

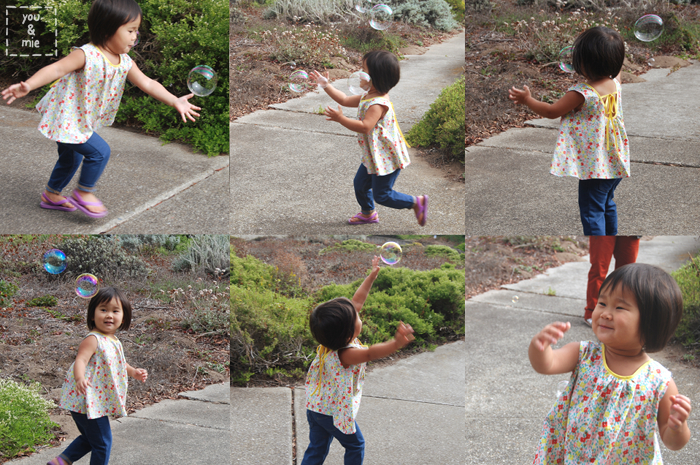
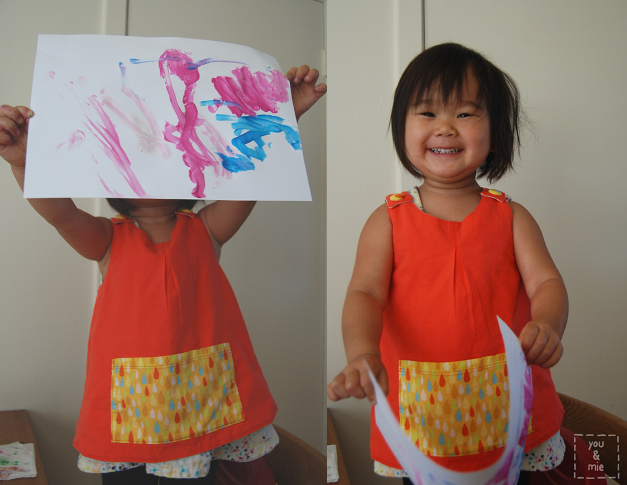
So before I go, I couldn’t not share how goofy my kid is, but for some strange reason during this photo shoot, Yuki decided to sing “Doe A Deer” from the Sound of Music at the top of her lungs on repeat.  Oh how I wish these photos captured sound . . .

ColourPopTop23I love her . . .

ColourPopTop 24Have a wonderful weekend everyone!

Roly-Poly-Along

Have you seen the Roly Poly Pinafore pattern by Imagine Gnats?  It’s a super cute, simple and versatile piece that is perfect for layering, adding fun details and showcasing awesome fabrics.  Rachael of Imagine Gnats and the creator of this pattern has rounded up some of her friends to help show off all their versions of this fun pinafore!  I decided to make one for Yuki to use as an apron/art smock!

RolyPolyPinafore1(Rachael was so kind as to gift this pattern to me, but all opinions are 100% my own)

The pattern range is size 6 mo-10!  That means it’ll basically last me forever!  I made it in size 2 which was the perfect fit her Yuki now, though if I had thought about it more, I probably shoulda made a 3 since this is meant to be an smock worn over clothes.  Oh well, guess that means I’ll have to make another one soon 😉

The pinafore is fully reversible, and one of the best parts is begin able to mix and match and pair fabrics together.  I chose a bright reddish-orange to go with this cute raindrop fabric.  Somehow when I saw the fabric, it reminded me of painting.  The large pouch pocket is not part of the pattern, but something I added myself for Yuki to hold paintbrushes, chalk, pens or other art supplies in.

RolyPolyPinafore2The pattern comes with in seam pockets, which I omitted for this version, but is definitely a great option if you’re making this as a tunic.

For the other side, I used a cream linen for the main fabric and some cute Japanese print that I got at Daiso (the Japanese equivalent to a dollar store) for the pocket and fabric covered buttons.  I love the little pleat in the middle and the sweet criss crossed back.

RolyPolyPinafore3

The pattern is labeled “beginner” and I definitely think that if you are just starting out, this is a great project for you.  It was very fast and simple to sew and the results are just so cute.  Even though I had always intended for this to be used as an apron/smock, I had a hard time letting Yuki get too messy in it!  😛

Unfortunately, I only got a few pictures of Yuki in the smock so far, but the fit is great and she loves having a special apron like mama!

RolyPolyPinafore5

And it kept her shirt clean while being stylish!  Score!

RolyPolyPinafore6

*Edit:  HEY!  More pics!  We did a little morning painting and got more shots of the Roly Poly Art Smock in action :)*

RolyPolyPinafore7

RolyPolyPinafore8

RolyPolyPinafore9

(Someone needs a hair cut!)

I know she’ll get a lot of use out of this and I look forward to whipping up a few more!  If you’re interested, you can buy the PDF pattern here.  And be sure to check out all the other stops on the Roly-Poly-Along blog tour.  It started yesterday and will continue for three weeks!  My current favorite is this adorable raindrop pinafore by Stephanie of The Crafty Kitty.  TOO CUTE!  And looking at the other bloggers joining the tour, I know there is bound to be a lot of other awesome and creative pinafores.  OH and many of them are giving away copies of the pattern too (like the link above), so be sure to check out details on the blogs for your chance to win!

Thanks Rachael for the awesome pattern!!

Happy sewing 🙂

Geranium in Feathers!

FeatherGeranium2Kids Clothing Week Spring 2013 is starting in a few days and Meg invited me to share my favorite pattern over on the KCW blog as part of the weeklong wind up.  I chose the Geranium Dress/Tunic pattern by Made by Rae.  There aren’t a lot of patterns that I make more than once, but this one is so classic that I find myself coming back to it again and again.  You can see my full review and my past Geraniums over on the KCW blog.

And in honor of the post, I made a fun new tunic for Yuki!

FeatherGeranium3There are a ton of different variations of this top you can make, but I decided to go with something simple – sleeveless tunic, scoop neck, and a gathered skirt – since I had chosen such a busy print.

FeatherGeranium1I bought this feather print by Martha Negley awhile back from Stonemountain and Daughter because I loved it, though I wasn’t sure what I was going to use it for.  One of the great things about the Geranium pattern is how much you can change it up – pick a detailed print and keep the style simple, or choose a simple fabric and really play up the details.

FeatherGeranium5The tunic bodice is lined with some aqua fabric that I had in my stash and I made some piping to match.  The back closes with three blue buttons, which I realize now are totally crooked!  Oops!  😛

FeatherGeranium4I love this pattern!!  And now that the weather is warming up, it’s the perfect time to fill someone’s lil wardrobe with Geraniums!

Have you started planning or prepping for next week?  I’ve barely had a chance to think about it, but my goals are to not buy any new fabric and to sew with patterns I already own.  We’ll see what I come up with!

So what are you going to be sewing next week for KCW??

A Simple Blouse from a sunny spot

SimpleBlouse1The second garment I made from a Japanese sewing book is this simple blouse from a sunny spot 女の子のまいにちの服 (Every day clothes for girls), same book I used for this top.

SimpleBlouse2

asunnyspot7asunnyspot6It’s called “Simple Blouse” and it really is exactly that.  I picked it, once again, because of it’s super simple construction.  I was still looking for something with directions so straightforward that I could figure it out by diagram only.

asunnyspot8This top certainly fits the bill.  It’s just a front and two back pieces with sleeves built in (so separate sleeves to sew in).  The neckline is finished with bias and there is a simple folded button placket and that’s it!

SimpleBlouse3I didn’t realize this earlier, but looking at these pictures, the top looks, dare I say, almost hospital gownish!?

SimpleBlouse4But in a cute way, right!?  😛  If you were to make this top, I might recommend a cute print, like the small floral pictured in the book, and steer clear of solids.  Especially anything white or minty, to avoid the whole hospital gown thing . . .

Since I made these first two tops from Japanese patterns months ago, I’ve tried a more slightly more complicated pattern (with success!) which I hope to share with you soon.  And after my wonderful guests share their knowledge with us next week during the Japanese Sewing Book Series, I know I’ll be pumping out garments from Japanese sewing books like crazy!  I can’t wait!

SimpleBlouse5She’s starting to get a hang of this peace sign thing!

Again, if you’re interested in purchasing this book, you can find it on Amazon, Etsy, or Kinokuniya.

If you haven’t entered the Miss Matatabi Giveaway, make sure to do so by Sunday at noon PST!

And the series starts on MONDAY!  Be sure to come back each day next week for Japanese sewing book tips, translations, and inspiration from my amazing and talented guests Kristin, Sanae, Meg, Frances, and Robin.

JSBS_button500

you & mie is an Amazon affiliate.  I will earn a small commissions for Amazon purchases made through links provided in this post.

A-Line Tunic from A Sunny Spot

ALineTunic1I made my very first sewing project from a Japanese sewing book back in August from the book a sunny spot 女の子のまいにちの服 (Every day clothes for girls).

asunnyspot1When I was in Japan over the summer, I picked up a couple of pattern books including this one.  It has a lot of simple but cute, very feminine outfits for little girls.  If you’d like to see more pictures from the book, Japanese Sewing Books has a thorough book review here.

asunnyspot2When I decided to sew up my first project, I picked the cute “A-line tunic” because it is adorable but also a super simple sew.  Even though I couldn’t understand the Japanese directions, I could easily tell how it was constructed by looking at the diagrams.

asunnyspot3asunnyspot4It is just two pieces (front and back) plus bias for the neck and arm holes.  Add some gathers and lace or piping along the neckline and you’ve got a sweet and twirly little tunic.  I highly recommend this as a starting project for newbies to Japanese patterns!

asunnyspot5Of course, I didn’t realize at the time that the book’s smallest pattern size was still too big for Yuki.  Oops.

ALineTunic2I used this double gauze Nani Iro Melody Sketch that I picked up in Japan and it is probably one of my favorite fabrics ever!!  I think it’s so puuuurty.  It’s from an older line, so it’s harder to find, but it looks like there is still some available here.  Double gauze is really lightweight, so it hangs really nicely and it’s a perfect top for warm weather.

ALineTunic4Well it’s finally starting to fit her and I think it’s one of our favorite tops now.

ALineTunic5ALineTunic3Again, it was definitely a manageable project for a first timer.  The hardest part for me was finding the pattern pieces I needed on the pattern sheet.  If you’re interested in purchasing this book, you can find it on Amazon, Etsy, or Kinokuniya.

I have one more top that I’ve made from this book to share with you later this week.  But until then, I wanted to make sure you all knew about this great resource for sewing from Japanese sewing books.  It’s called Japanese Sewing Books!  You really should check out her site for a dictionary of sewing terms, help with understanding patterns, plus translations, book reviews, free patterns and sew alongs.  It really is a fantastic starting point if you’re a beginner to Japanese patterns and between that site and the Japanese Sewing Book Series here next week, you’ll hopefully be ready to tackle those patterns with confidence!

I’ve loved seeing all the projects that you guys have sewn up from Japanese sewing books.  Please keep sharing your links with me – they are very inspirational!  Until next time!

you & mie is an Amazon affiliate.  I will earn a small commission for Amazon purchases made through links provided in this post.

Oliver + S Spring Pattern Preview: Roller Skate Dress

*UPDATE – The Roller Skate Dress + Tunic pattern is now available on the Oliver + S site!  It is available as a paper pattern or PDF pattern.  Head over there to get your copy!*

So I haven’t been blogging much recently, but I’ve been busy with some really exciting projects that I’ll be announcing within the next few weeks (including my first blog series)!

The first of those projects was the opportunity to share with you a new Oliver + S spring pattern that has yet to be released!  If you sew kid’s clothes, you’ve surely heard of Oliver + S patterns.  And if you’ve heard of them, I’m sure you’re a big fan AND know that they are releasing two new patterns within the next week!  So when Liesl (the creative mastermind behind Oliver + S) asked Kristin to sew up the new patterns to share with readers and customers and Kristin asked me and Jessica if WE wanted to sew them with her – I’m pretty sure I shrieked.  You would too, wouldn’t you??

roller skate dress + tunic rolling tourAnd so I present to you, the last stop on the Oliver + S Roller Skate Dress + Tunic Rolling Tour!  The Roller Skate Dress + Tunic is one of 2 new patterns being released for the spring line.  It is a simple and adorable addition to any spring wardrobe and is a pattern I can imagine sewing up over and over again in different variations.  The pattern comes with 4 views or styles.  View A is a dress and you can see Kristin’s sweet floral version here.  View B is a dress with a visible yoke and I think this version that Liesl made is particularly cute.  Jessica made a reversible version of View C, which is a tunic (totally loving the gorgeous tribal print she used).

And I made View D, a tunic with the visible yoke in contrasting fabric!

RollerSkate2

This pattern is really a simple and fast sew, but produces a stylish and professional looking top or dress, which is my favorite kind of pattern!  It’s fully lined, has faux cap sleeves and an elastic waistband for shape and comfort.

RollerSkate4It closes in the back with a simple button and button loop (no zippers or button holes!), so that makes this pattern appropriate for beginners.

I love the optional visible yoke – it adds a nice finishing touch.  My V notch on the neckline got a little deep because the first time I sewed it, it was crooked, so I had to make it bigger to even it out.  My advice if you do the notched neckline is to really take your time with it.  If it’s off even by a little, it’ll be very noticeable!

RollerSkate1I made it in 2T and it fits my daughter perfectly.  I was a little confused by the chest measurement listed for the finished garment because it seemed way too big, but I realized that that’s the measurement before you add the elastic.  So just go with the body measurements table (or whatever size you normally sew with O+S patterns) and you’ll be good!  This style is very forgiving in fit.

This pattern delivers all the wonderful things you’ve come to expect from an Oliver + S pattern.  It’s professional and beautiful, with great diagrams and directions.  There is so much useful sewing information in each pattern that you always come away feeling like you’ve taken a class or learned at least one new sewing technique.

RollerSkate3I used this really cool fabric by Tula Pink called Sea Stripes from the Sea Water line.  I picked it up from one of my favorite Bay Area fabric stores, Stonemountain and Daughter.  I was drawn to the creative print and bought a bunch, not knowing what I was going to do with it.  I really love it with this simple pattern though!

And seriously, this pattern has so many possibilities.  When trying to decide what fabric to use, I picked out a huge stack from my own stash that I thought would look great as a Roller Skate tunic.  The hard part was choosing which one to go with.  But the good news is you really will sew this pattern over and over again – it’s just a great staple to have in your collection.

In other news, Yuki has started to explore new modeling poses.  In this one, I’m pretty sure she’s channeling Em’s dancing spirit.

RollerSkate5(I did not prompt her to do this – she just started doing it on her own!)

And I don’t even know what this pose is about, but hey – I’ll take it!

RollerSkate6So there it is, the Roller Skate Tunic (View D).  The pattern will be available through the Oliver + S website starting tomorrow.  I bet you already have something perfect for this little dress or top already in your stash, so you’ll be able to get started right away!

If you haven’t already, stop by skirt as top and a little gray to see their awesome versions of this pattern!

Thank you, Liesl and Kristin, for letting me sew this incredible new pattern to share with everyone!

Next up, is the Pinwheel Tunic + Slip Dress!

Guest Posting at Project Run & Play!

Doing a bit of blog hopping this week.  Today I’m over at Project Run & Play sharing my Summer Breezes Top.

The pleated placket was a fun and easy way to jazz up an otherwise very simple top.  Check out the full tutorial HERE.

It is really exciting to be sharing over on PR&P today because their sew-along was really what started it all for me, in a way.  They are having tutorials from sew-alongers all month and then skirt tutorials all next month, so go check it out!

Later this week I’ll be popping over on another great blog with another summery tutorial.  I hope you don’t mind traveling a bit with me 🙂