Star Pods Maternity Tank

Woohoo, more sewing for me!  I don’t know about you guys, but I’ve decided to not use the term “selfish sewing” when I sew for myself.  Although that is essentially what it is, the word “selfish” has such a negative connotation and I just feel like we shouldn’t feel bad about sewing things for ourselves.  I think sewing for ourselves is good for building skills, it’s practical, money saving and it’s not always easy!  The fact that it’s fun and often rewarding is just an added bonus!

StarPodsTank8
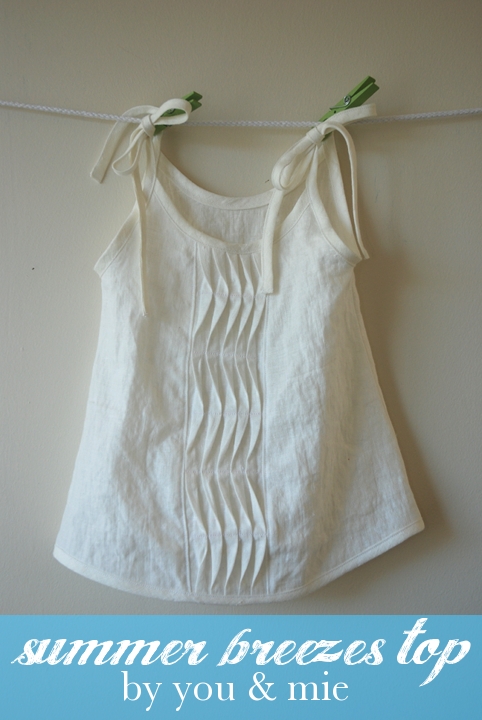
I got the idea to make this tank after seeing this one from Old Navy.  I copied it almost exactly in style except I made an inverted pleat instead of a box pleat at the neckline.  I don’t know if it’s the most flattering top because it doesn’t have a tight fitting bodice.  But it’s comfy and I know it’ll fit for awhile, possibly through my pregnancy.

StarPodsTank10

The fabric I used is Star Pods in Green from designer Patty Sloniger for Michael Miller.  I got it from Modern Domestic when I was up in Portland for Quilt Market.  It’s a lovely chartreuse color and is really lightweight, so I thought the drape would be perfect for a top.  I used the Wiksten Tank pattern as a starting point and I’m going to show you how I adjusted it to make this top.  The Wiksten Tank is a great, simple tank top pattern that anyone can sew (you can see my previous versions here, here, and here).  I recommend you add this to your pattern collection if you don’t have it.  But if not, you can probably draft a pattern for this top using another pattern or a tank top you own with a similar cut.  The only extra material you’ll need is some 1/4 inch wide elastic for the bottom of the tank.

StarPodsTank1

Alright, so using the directions, figure out your size and cut out your pattern.  There were several adjustments that I made to my pattern.  First I added 1.5 inches to the front piece along the “folded” edge.  This will make the pattern 3 inches wider and give you room for that growing belly.  I also raised the neckline an inch because I felt like the original was a bit revealing.

StarPodsTank2

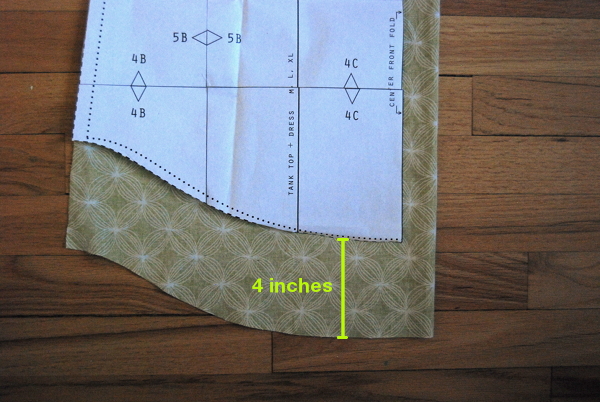
I added about 4 inches to the length of the front piece, but kept the curved hemline the same.

StarPodsTank3

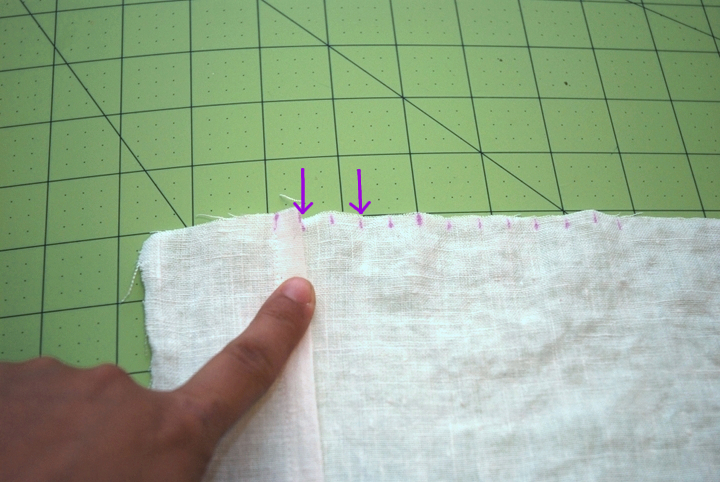
For the back piece, the only adjustment I made was lengthening it enough to match up with the side seam of the front piece (the 2 pink lines).  Then I made an ever-so-slightly curved line for the bottom of the back piece.

StarPodsTank4

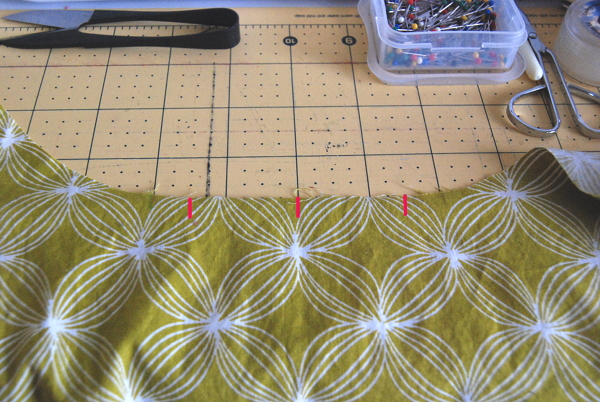
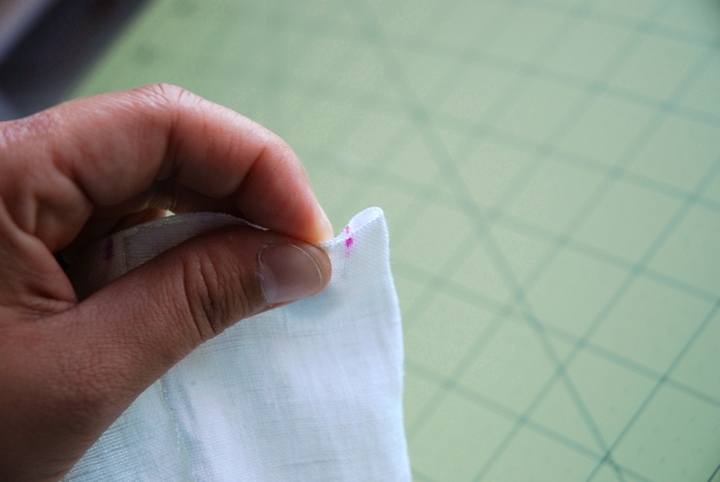
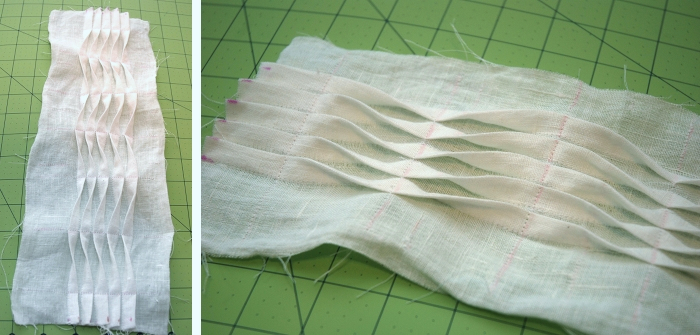
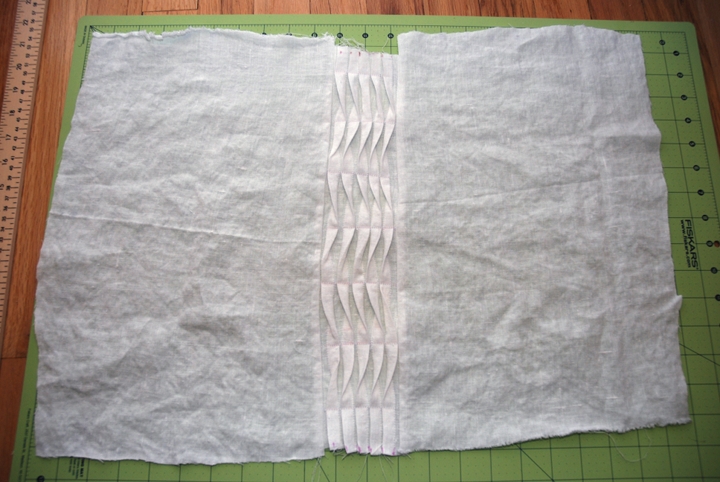
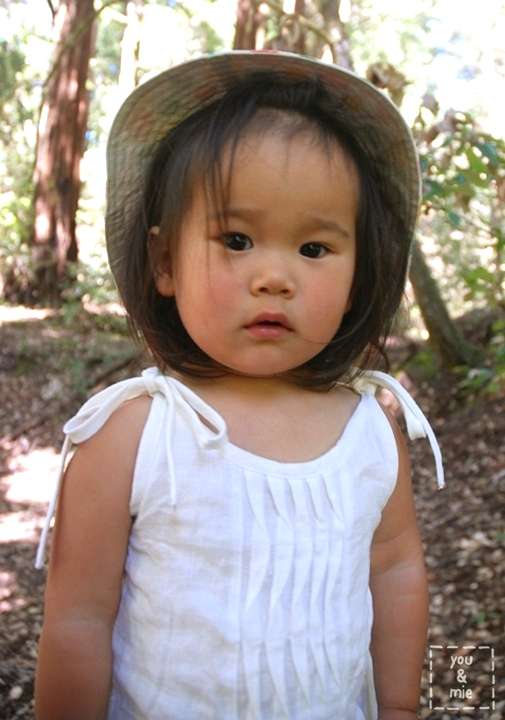
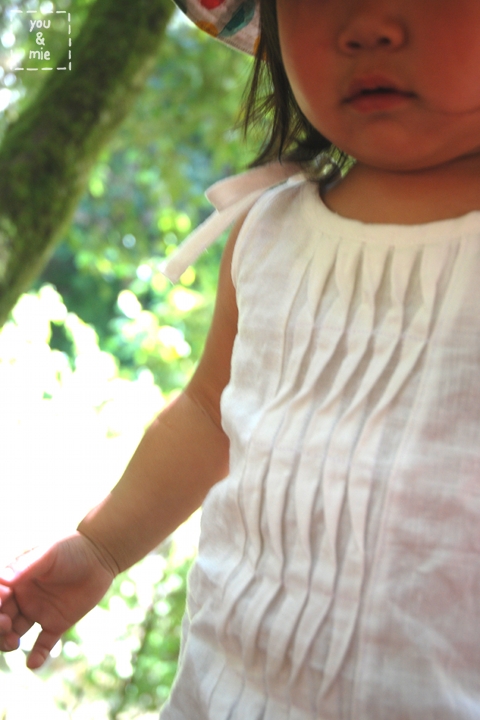
After you cut out your pieces, mark the center of the neckline on the front piece and then 1.5 inches on either side.  These are your pleat markings.

StarPodsTank5

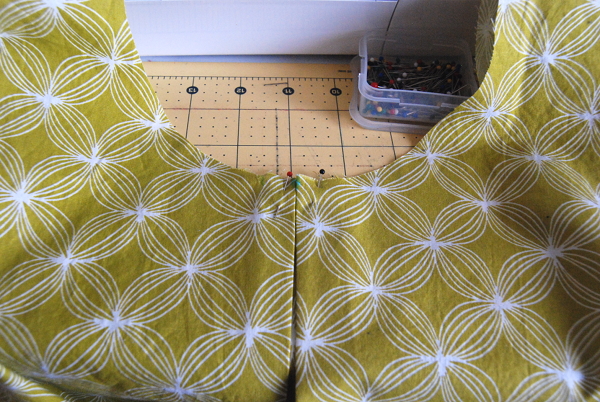
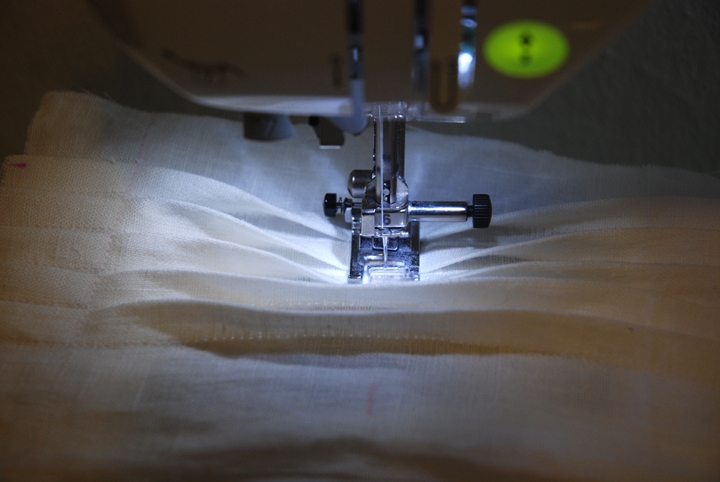
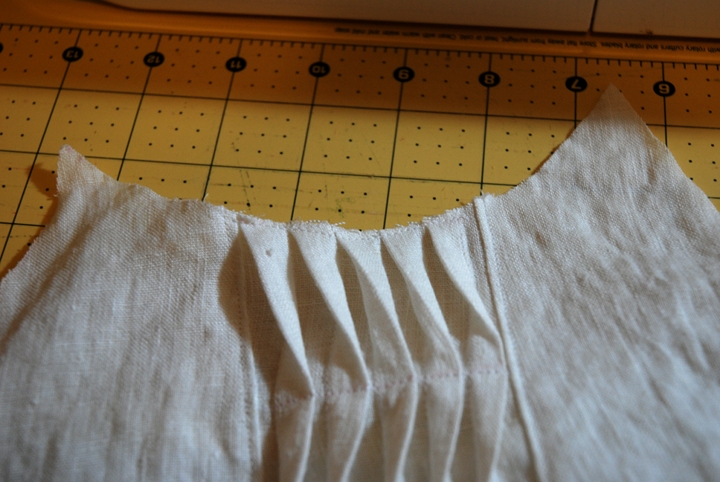
Bring the two outer markings in towards the center, pin and press.  Sew a basting stitch across the pleat to hold it in place.

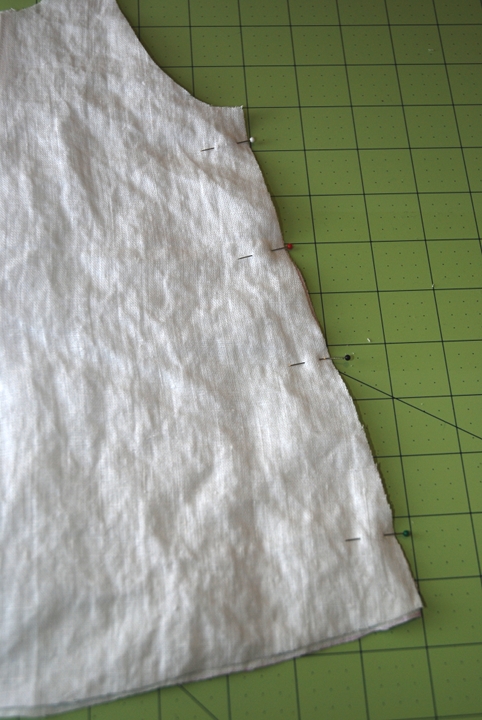
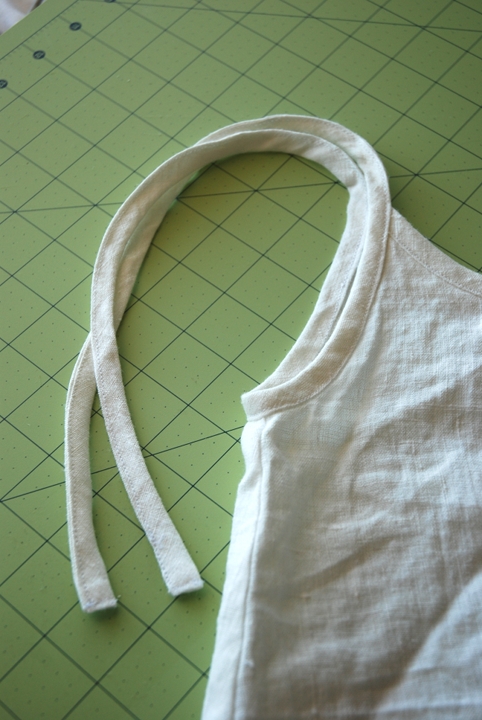
Once you’ve made your pleat, follow the pattern directions for constructing the tank.  Sew the shoulder and side seams and finish the armholes and neckline with bias strips.

StarPodsTank6

For the bottom, to make a casing, fold the hem up about a 1/4 inch, press and then fold again about 1/2 an inch.  Sew along the folded edge all around the hem, but leave about an inch open to thread the elastic through.  Measure your elastic and trim – it should fit comfortably but snuggly around your hips.  Using a safety pin, guide the elastic through. Sew the ends of the elastic together and sew the rest of the casing closed.

StarPodsTank7

And you’re done!

StarPodsTank12Here’s what the bottom of the tank looks like when it’s on.  You can see the slightly longer length in the front for extra belly coverage.

StarPodsTank11

Ooh, by the way, thanks for all the sweet comments about the two “maternity” dresses I made and all the great suggestions for other maternity patterns and styles to try.  I seriously feel like I want to make myself a whole new wardrobe now, I’ve never been so motivated to sew for myself!

I feel so weird with so many pictures of myself up on the blog, but I suppose it’s only fair since I’ve put my daughter through it for the last couple of years.  And I’ve still got more “me” sewing on the horizon, so I hope you’re not too sick of it yet.  I’ll try to spare you and sprinkle some non-“me” sewing once in awhile too 😛

Thanks for visiting!!

Advertisement

Striped High Low Wiksten

So I mentioned awhile back that I had a bunch of old projects to share and I keep meaning to get them blogged, but I get distracted by new projects every day and keep falling further and further behind.  I start to wonder if some things were never meant to be blogged.

Buuuut then Rae made a personal challenge to post pictures of past creations that she never blogged about to “clean out the virtual closet” before she dives into KCWC.  It’s inspired me to just get this stuff off my “to blog” list too, instead of letting .  So my goal is to get a few things on the blog and off that list this week.  I can’t promise I’ll get it all up, but if I can cross at least a couple off this week, I’ll be pretty happy.

So the first is a project that I made for me and not too long ago.  I had this idea to use the Wiksten Tank pattern but adjust the hemline so it was higher in the front and lower in the back.  This style is pretty popular, I think, especially on skirts and dresses.  I didn’t want it to be too high in the front or low in the back, so I went pretty subtle.  Maybe it’s more of a medium-low than a high-low?

The fabric is a lacey striped knit from Joann’s that is a bit see through.  I actually thought it was going to be a lot more see through, but when I wear it, it’s pretty much not see through at all.

I had to do a few adjustments to the pattern to make this work with a knit.  I wanted the top to be fitted in the shoulder/chest area, so I went down a size for the top (to a medium).  But I still wanted the bottom to be nice and loose to skim over my tummy, so I cut the size large pattern for the bottom and just used a ruler to connect the lines from the medium armpit to the large hemline.  When I sewed the top together and tried it on, it was still waaaay too big in the chest, so I took it in about 4 more inches!  It’s amazing how much stretch you get with knit.

For the hemline, I kept the shape of the back, just lengthened it by about 2 inches and then cut the front in a subtle arc.

The other difference in construction is that instead of finishing the neck and arm holes with bias, I just folded the fabric over and sewed it down with a double needle.  It was fast and easy.

So there it is!  One project off my “to do” list, and now off my “to blog” list (and yes, I actually keep lists in my journal under each of those headings).  Hmmm . . . let’s see what else I can clear out of my “virtual closet” this week (sorry Rae, I’m seriously stealing your line).

Tutorial: Summer Breezes Top

I thought I’d bring some guest posts back to the blog, in case you didn’t catch them earlier.  This one was for Project Run & Play’s Flickr Friends series and it’s a great addition to any summer wardrobe.  I recently was sent a photo via my FB page by Tina who made one for herself!

________________________________________________________________

Summer weather is upon us and my daughter needs lots of warm weather tops for outdoor play this season.  I’m going to share a tutorial for my latest top, the Summer Breezes Top.

I saw a tank top in a store about a year ago that used this type of “wavy pleats” (as I like to call them).  I knew I wanted to copy the style, but wasn’t sure how I wanted to do it.  Recently, this technique started popping up around blogland and I decided it was time to share my take on it as well.  The waves created by the changing directions of the pleats reminded me of a summer’s breeze, hence the name of the top.

The top is made of white linen, which at the time seemed like the perfect simple breezy summer top.  But now I’m kicking myself wondering what I was thinking!  A white top for a messy, dirt-loving toddler made of linen, the most wrinkly fabric ever?  Awesome job, Cherie.  Nice.  So I’ll let you choose whatever is appropriate for your kiddo.

This top is finished off with bias tape, so feel free to make your own or use store-bought in either a matching or contrasting color/pattern.  Feel free to brighten it up with some colors!

Ok, let’s make one together!  Here’s what you’ll need:
– 3/4-1 yard of lightweight fabric
– A few yards of bias tape (store bought or homemade)
– Sewing essentials

First you have to make your pattern.  I have to admit, I don’t have an exact science for this, so I hope you can experiment with drafting your own.  To keep it simple, I made one pattern to use for both the front and back of the top.

I started with a straight vertical line which is the center fold of the pattern piece.  Then I used a top that fit my daughter and traced the neckline.  Mark the bottom of the arm hole and draw a curved line up to meet the neckline.  From the bottom of the armhole, draw a line (I flared mine out slightly for an A-line shape) that is the desired length of the top.  From there, draw a slight curve back to the vertical center line.  You will not need to add seam allowance to the neckline, armhole or bottom since we’ll be finishing these off with bias tape.  You will want to add seam allowance along the side seam.  And there’s your pattern!

Now we’ll make the pleated placket (I’m not really sure what else to call it).  Cut a rectangle out of your main fabric that is at least 8 inches wide and a couple inches longer than the length of your pattern.

Find the center of your rectangle by folding it in half lengthwise and marking it.  I wanted my pleats to be 1 cm each, so I made 7 marks on either side of the center, each 1 cm apart.  Do the same on the bottom of the rectangle.

Starting from the left, make your pleats.  Folding your fabric with wrong sides together, the first and third marking should match up and the 2nd mark is where the fold is.

Press your fold and sew along the length of the fabric 1 cm from the folded edge.

Press your pleat and fold it down toward the right.  Make your next pleat using the next three markings and continue until you have five pleats.

When they are all pressed down toward the right, they should look like this.

Sew a line across the top of the pleats about 1 inch down from the top.   Change the direction of your pleats by folding them towards the left.  Mark a line 2 inches down from your first line with chalk and sew.

Continue changing the direction and sewing down the pleats every 2 inches until you get to the bottom.

Cut out two pieces of fabric that are each larger than your pattern piece.  We’re going to attach the pleated placket before cutting out the pattern piece (less math).

Trim the edges of your placket piece to about 1/2 an inch on either side.  With right sides together, sew the placket to the edge of one piece of fabric, and then repeat with the other side.

On the wrong side, trim the seam allowance to 1/4 inch and finish by serging or zig zag stitching.  Press away from the placket, then on the right side, top stitch along the edge of the placket.

Fold your fabric in half, making sure to fold right down the center of your pleated placket and trace your pattern piece.  Cut it out.  Cut out the back piece from a piece of fabric as well.

Pin the sides of the top, right sides together, sew, press and finish edge.  Repeat on other side.

Baste the pleats along the neckline of the top to keep them folded in the correct direction.

Open up your bias tape and pin it along the edge of the neckline, right sides together.  Sew along the fold closest to the edge.

Fold the bias tape over the edge of the neckline, press and pin.  Make sure the edge of the bias tape is covering the stitching on the wrong side.

Top stitch just above the edge of the bias tape making sure to catch the edge on the wrong side.  Trim off the extra bias tape and repeat for the back.

For the armholes and straps, we’ll do the same thing.  Leave about 12 inches of bias tape for the strap then start pinning the open tape to the edge of the armhole.  Measure another 12 inches of bias tape when you get to the other end of the armhole and cut.  Sew the bias tape along the armhole, fold the bias tape back up and when you get to end of the straps, fold it in about a 1/4 inch before folding it up.

Sew the ends of the straps closed, then top stitch along the edge of the bias tape closing up the straps and finishing the armhole.

For the bottom of the shirt, normally I’d just hem it by folding it up twice, but with all the extra pleated fabric, I thought it’d get too thick, so I finished it with bias tape as well.

Done!

I hope you enjoy some nice summer weather!

Guest Posting at Project Run & Play!

Doing a bit of blog hopping this week.  Today I’m over at Project Run & Play sharing my Summer Breezes Top.

The pleated placket was a fun and easy way to jazz up an otherwise very simple top.  Check out the full tutorial HERE.

It is really exciting to be sharing over on PR&P today because their sew-along was really what started it all for me, in a way.  They are having tutorials from sew-alongers all month and then skirt tutorials all next month, so go check it out!

Later this week I’ll be popping over on another great blog with another summery tutorial.  I hope you don’t mind traveling a bit with me 🙂

Vintage Inspired Plaid Summer Tank

I barely had any time to work on a signature look for Project Run & Play this week, but I wanted to submit something.  So I made this top that was inspired by the Vintage May series that Skirt as Top and Craftiness is not Optional is hosting.  I’m not sure what decade this is from, but it reminds me of something my mom wore, so my guess is 60s or 70s?  Maybe even 50s?  What do you think? (I don’t know my fashion eras at all!)

It is a refashion from this pretty hideous blazer thing I picked up at the thrift store.  I’m not sure what was going on with the blazer (it had three huge pockets on the front and shoulder pads too!), but I loved the purple plaid fabric.

Do you recognize the pattern?  It’s a remix of the Oliver + S Jump Rope Dress pattern! When I was making Yuki’s Jump Rope Dress, I noticed after the first few steps that without sleeves or a skirt, it made a pretty cute top!  So that’s pretty much what I did.

First I had to pick the pockets off the jacket and then cut out the front pieces, back piece and sleeves.  I didn’t have two pieces large enough for the front and back of the shirt, so the back of the tank top is actually pieced together (you can see the seam running down the middle in the next picture).

I cut the 2T size pattern, lengthening the shirt and followed the directions exactly for the placket and collar.  I shortened the shoulder length (though I could have gone even shorter) and cut the arm hole a little larger.  I used homemade bias tape to finish the arm holes and hemmed the shirt so it’s curved up on the sides.  I added a little pocket on the chest made from one of the original pockets that I had picked off.

I love it!

So for my “signature look,” I paired this shirt with the chambray shorts I made during KCWC.

I thought the outfit was a little simple and so I wanted to make an accessory to “dress it up” a little.  It looked good in my head . . .

I whipped up a little felt flower belt, which I really like.  Just not with this outfit.

But I’m sure you’ll be seeing it around again.  Juuuust not with this outfit.

So that’s it!  Simple.  Summery.  Vintagey.  All the things I’m feeling right now.

Is it just me or did that season of PR&P just fly by!?

KCWC S12: Day 2 – Double Ruffle Top

I got more done than I expected yesterday!  I whipped up this little ruffley top before work (I work in the afternoons, by the way).

Now, if you’ve been following me for a bit, you may have noticed that ruffles are not really my style.  Not that I have anything against ruffles!   Because I think they can be pretty darn awesome and, in some cases, they can truly make an outfit (here is where I’d include a lil round up of ruffley things I like, but alas, no time).

Anyways, for whatever reason, I usually just stick to simpler lines and don’t think to embellish with ruffles.  But I had this idea to use a striped fabric and mix up the directions of the stripes to create an interesting look (I think I saw a kid run by me wearing something similar – that’s where I get a lot of my inspiration). Plus with RUFFLES 2012 going on over at See Kate Sew, I guess I was hit with a bit of ruffle-mania.

The top came out pretty fun, though I don’t know if the different angled stripes POP as much as I thought they would.  It’s pretty girly and flouncy huh?

I used the Every Little Thing pattern for the bodice because I’d used it before and I knew it’d fit.

Either way, Yuki’s got a fun new (slightly dressy?) top for the spring/summer.  The felt bow is a removable pin and was a last minute add.  I thought the shirt needed something to lighten it up and add some interest (the fabric/color is a bit serious for a toddler, no?).  I seriously just cut 2 pieces of felt, grabbed a glue gun and a pin back and threw that bow together in 2 minutes.  And without any burns!  I always seem to burn myself when I get out my glue gun . . .

RUFFLES!!

Looking at the back, I bet I could put this top on her backwards with the buttons in front and it’ll still fit/look cute.  Fun!

In the evening I worked on step 2 of my Jump Rope dress: the collar.  It took FOREVER.  Mosty because I’m slow and there was hand stitching involved.  But it’s so exciting to see this coming together!  The placket and the collar were definitely the two most unfamiliar pieces to me so it feels good to have those done.  And how handy are those skills?  I want to put a placket and collar on everything now!  (well, not really – they were both pretty hard :P)

Hand stitching damn near killed me!!

Collar looks uneven, but don’t worry, it’s not 🙂

Oh, and someone asked me what fabric I’m using for the dress!  I’m always so bad about paying attention to the fabric designer and line and that seems unfair!  Their art makes ours what it is!  So this awesome fabric is PR426 from the line Maya by Leah Duncan for Anthology Fabrics and I got it on my trip to Britex with Kristen.  In fact she picked it up first and I stole it from her!  Hah!

Part of me feels like I’m moving quickly through my projects and I might even be able to add one more to the list.  But I’m also pretty tired and today’s project is a bit trickier, so we’ll see.

How are you doing?

Spring Top #2 and Prepping for KCWC

So after I finished my Wiksten Tank Top I was motivated to try more sewing for me and I even had a vision for my second Spring Top Sewalong entry.  I finally got around to sewing it, and just barely made the deadline.  And you know what?  I don’t like it.

(trust me, it looks worse in person)

I’m not going to get into the details, but I’m pretty sad that I wasted so much time on it.  I threw it in the pool just for the hell of it, but I doubt I’ll ever wear it.  Does anyone recognize it?  Yup, it’s the adult version of the top I made Yuki for my signature look for the PR&P Sewalong last season.  I think I’m better off sticking with kids clothes.

And speaking of kids clothes, KCWC is here!!

This is my first time participating but I’m super excited.  I LOVE that so many people in the online sewing community are participating.  I see almost all my favorite bloggers talking about it and I haven’t seen that kind of across-the-board participation in other events.

So I’ve got my list of projects – 1 big one and several small ones – we’ll see what I actually finish.  And despite a hectic weekend, I was able to get some prep done.  No thanks to this little “helper.” 😛

I haven’t quite figured out my schedule or plan of attack.  Do I spend a little time each day working on the big project plus one small project?  Or should I try and tackle the big project first and then get done what I can after that?

I’m thinking I’ll go with the former, because I’d like to have at least one or two things done by the end of the week and who knows if I can even complete this big project in one week.  The big project, in case you’re wondering, is the Jumprope Dress by Oliver + S.  My first O+S pattern!  Can’t wait.

And I’m going to try to take pictures and blog about it as I go, but man, it’s feeling pretty ambitious.

Here’s a sneak peek of my fabrics.  Pretty drab for spring kids clothes huh?  What’s up with that!?

Sooooooo . . . what are you going to be sewing??  What’s your plan of attack?

Top of the Tops Week 2!

I’m totally shocked, but my Color Blocked Wiksten Tank was selected as one of this week’s Top of the Tops for Rae’s Spring Top Sewalong!!

Click HERE to check out all the top tops and vote for your favorite!  My top is labeled B, the Color Blocked Wiksten Tank, but there are a lot of awesome tops to choose from.

I kind of just threw this top into the pool on a whim (because Kristin told me to :)), and I don’t expect to win, but it was a fun surprise and a little affirmation for my FIRST ever sewing project for myself.  I’m totally motivated to sew more for me and I already have an idea for another top.  I just have to see if I can get it done before the sewalong ends on April 22nd!

Voting ends on Friday at noon (EST).  Thanks for checking it out!!

Color Blocked Wiksten Tank

So I did it!  Selfish sewing!  I finally sewed something for myself and what do ya know?  I like it!

There are a lot of reasons I don’t sew for myself, or adults in general.  One reason is because fit is soooo important and it feels like details REALLY matter on adult clothing.  Kids can wear elastic waistbands 24/7.  They can have slightly crooked hems or wonky seams and no one will care or notice.  Heck, it makes them look even cuter!  They look adorable in anything you put them in and most of the time they are just going to run around and roll in the dirt, so perfection isn’t necessary.

Adult clothing is different.  There are curves you can’t ignore.  You can’t just put elastic waistbands on everything (or can you? :P).  You want to wear your clothes in public, to work, where people may look at you funny if something is totally ill-fitting.  Or with unfinished seams, or crooked.  Unfortunately, it will not make you look cuter.

Adult clothing also requires a lot more fabric.  That means more money, and just more fabric to deal with, and combined with the reason above, it means more time!  I love how little material you need and how quickly you can whip up something for your wee one.

But the MAIN reason I don’t sew for me is because I don’t like my body!  Because I have body issues, it’s hard to imagine liking any clothing on myself and I don’t want to invest time and money into sewing for me if I’m not even going to like how it looks.  I feel much more compelled to sew for my sister because I know it’ll look cuter on her, like the Winter Party Skirt or the Wiksten Tank in Ikat.

But I decided that shouldn’t stop me and after giving up my Ikat print fabric to use for my sister’s top, I thought about what else I’m into now and I thought I’d try color blocking!  This is a pretty big trend right now and I thought with some bright colors it’d be a fun, youthful spring top.  So without further ado, here’s my color blocked Wiksten Tank!

I used 3 different colors of cotton fabric and sewed them together before cutting out the pattern pieces making sure they were lined up perfectly so the color blocks would match up at the side seams.

When it started coming together I wasn’t sure if I had made the right decision to color block, or if I had picked the right colors.  It looks so BRIGHT.  Maybe too youthful and bold?  I felt like something from the 80s or early 90s, or maybe something super hipster from American Apparel?  I really didn’t know if I could pull it off.  But after finishing it and trying it on (and toning it down with a cardigan), I realized that I liked it!

Let me just stop and say that I chose only the most flattering pictures to share with you.  Trust me, most of them were not so pretty.

And getting a good picture of yourself is hard!  I apologize for the awkward poses and poor lighting/quality.

So the pattern is the Wiksten Tank and I HIGHLY recommend it.  It’s a very simple and straight forward top (no buttons, zippers or special materials needed).  It comes together quickly and the fit is pretty flattering for most people I imagine.  The loose bottom covers little tummies quite nicely!  Because it calls for french seams there are no unfinished exposed edges and this makes the top look neat and professional.  It’s definitely a good top to start with if you’re just delving into adult clothing sewing.

It’s funny though, I kept thinking that the tops were waaay too big.  I made a size small for my sister and I thought for sure that it was going to hang off her petite frame.  But it fit her perfectly!  When I made mine, it looked like a circus tent!  And I was a bit disappointed to find that it fit me perfectly too.  Hah!  I think that it just comes from only sewing tiny little toddler clothes, I didn’t realize how much fabric you need to cover an adult body.

Anyways, I’m kinda inspired to sew more for me!  Between the Sewing for Me series that Kojo Designs and Sewing in No Man’s Land hosted and Made by Rae’s Spring Top Sewalong, I feel like not only is it doable, but it’s important to take the time to create for yourself.  I’d love to make a top to enter in the Spring Top Sewalong, so I’ve got some work to do!  You guys have any great patterns for women’s tops that you’d recommend??  Do you like to sew for you?

Signature Look for PR&P

It’s done!  Finally!  I finished my outfit for the Project Run & Play Sew Along.  The theme was Signature Look.  Like every other week, I thought and brainstormed and mulled for a loooong time and then finally made a decision and ended up cramming in late night sewing sessions just to BARELY get it done in time.  I’m a procrastinator, through and through.  I think THAT’S my signature style!

But really, I think this outfit captures a lot of my signature styles.  Most of my children’s clothes is inspired by adult clothing.  I tend to like clothes that doesn’t look like it’s for kids, but is still totally wearable and appropriate for little tykes.  I like to make clothes for Yuki that I would wear myself.  I think my style leans towards classic, simple, and modern, but can also be soft and feminine.

I decided on three pieces: pants, a top and a light pullover.  Although it’s still on the chilly side here in San Francisco, in my head, I’m in spring mode.  I’m ready for warm weather and wanted to make something for a day at the beach.

We totally lucked out with AMAZING weather today for our photo shoot.  It was perfect for a day at the beach and I had so much fun taking a ton of pictures.  Get ready for a photo overload!!

I’ll start with the top.  Besides some issues with the fit, I really like how it came out.  I was inspired by the fabric.  I had this GORGEOUS double gauze fabric by Nani Iro that I bought awhile back and when I noticed it in my stash I thought it’d be perfect for a spring/summer top.  Double gauze is amazing fabric.  It’s super soft and light and breathable.  It’s meant to help you keep cool in hot weather.  If you ever see some at the store, please buy it and make something beautiful with it.  It’s pricey, but so worth it!!  I can’t find a link to any of this particular fabric online, but just do a search for “double gauze nani iro” and you’ll see some of the stuff I’m talking about.

Anyways, back to the top . . . I just threw in some fun elements like the pintucks and the keyhole in the back to add a little interest to an otherwise simple piece.  I wanted it to look soft and clean so I made sure to have no visible stitches.  It was a fun challenge and I like the finished look.

The second piece is the pullover.  I actually LOVE the way this came out.  I don’t think I’d change anything about it.  I used a cotton/linen blend and wanted to make something to wear in the spring/summer as a cover up when it gets chilly or to put on over a bathing suit.

I decided to line the hood with linen stamped with stars.  Yuki is OBSESSED with stars right now, it’s her favorite word and every time she sees the shape or anything that vaguely resembles it she says, “staaa!  STAA!”  I think it’s awesome because I LOVE stars and had a slight obsession with them myself when I was in high school/college.

So I carved up 2 star stamps and mixed some fabric paint to match the pants fabric and stamped it randomly on some white linen.  I cut out one of the extra stars and appliqued it to the pocket.

I don’t really know what to say about the rest.  I like the loose fit and the star and stitching details.  I can imagine Yuki wearing this a lot.

As for the pants, they came out ok and I love the color, but the fit is not perfect.  They are a little too skinny and might be better in a knit fabric so they don’t feel so tight or restrict movement.  I did have a lot of fun with the details on these though, like the pocket stitching and the faux fly.

Super HIGH rise for that diaper booty 🙂

High rise pants provide full diaper coverage!

And that’s it!  The three pieces that make up my “signature look.”  I’ve had a ton of fun sewing along with Project Run & Play for the last 7 weeks and will probably talk more about that later, but it feels good to be done with my final outfit.  I hope you like it!

Here are my bloopers from today’s shoot.

Ewwww!

And I can’t even tell you what’s going on in this photo sequence, but this is her new favorite move.

Our little yogi/dancer 🙂

I just have to say a huge THANK YOU to Hideko and Yuki for being such big helpers and super troopers through, not only this photo shoot, but the whole Project Run and Play season.

And thanks to you for stopping by and checking out my sewn creations week after week!