Japanese Sewing Book Series with Sanae Ishida

JSBS_button_Sanae

Oooh, I hope you are ready for today’s post because it is a BIG one.  We are starting to get into the nitty gritty details of Japanese patterns – the parts that make a lot of us cringe.  But today we have Sanae of Sanae Ishida as our trusty guide and Japanese pattern sewing expert and we are SO lucky to have her!

I was recently introduced to Sanae’s blog and have been hooked since day one.  Her blog, her words, her photos, and all of her creations live in this perfectly simple space that just exude beauty and a sense of calm. I also remember reading about her and finding that we have a surprising amount of things in common.  We’re both Japanese American, we both studied Communications (among other things) as undergrads at UCLA, we both lived in Japan and taught English there for two years before going back to UCLA for graduate degrees in the education field.  She even lived in San Francisco for a bit.  Our lives look pretty different now though, the biggest factor being that she’s about ten thousand times cooler than me.

Not only is she a skilled seamstress (I think this post pretty much sums up her gorgeous style and straight up awesomeness), but she’s a true true artist.  She writes, she paints, she sketches, has her own art shows, she knits, she bakes, and takes the most beautiful photographs.  She’s the kind of person who I want to stand close to with the hopes of absorbing some of the talent and beauty that seems to ooze out of her.

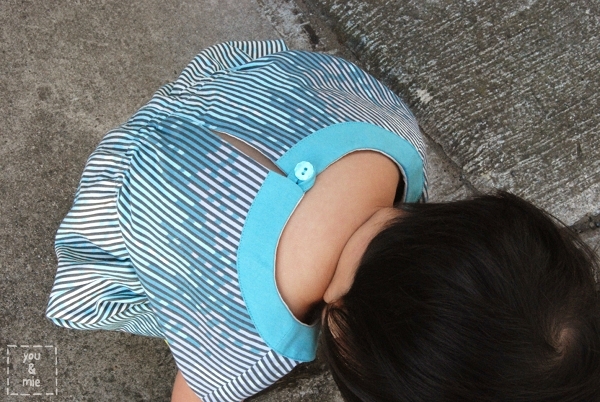
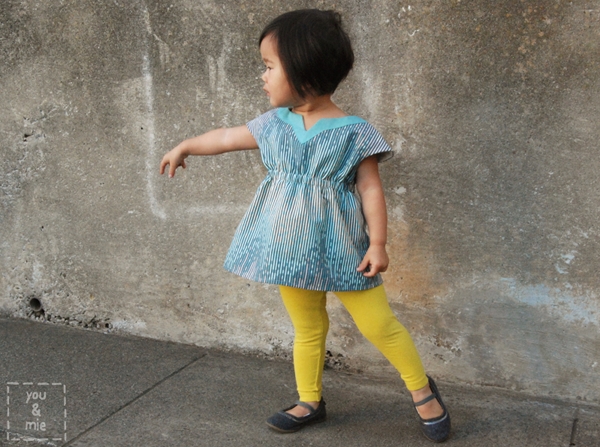
And you have to check out the incredible “100 Dresses” art show that she put together with exquisite toddler dresses made by her mom (I guess we know where Sanae gets it from!).  It really is one of the most unique and amazing things I’ve seen!  Ok!  Without further ado, I’ll let Sanae take it away . . .

***

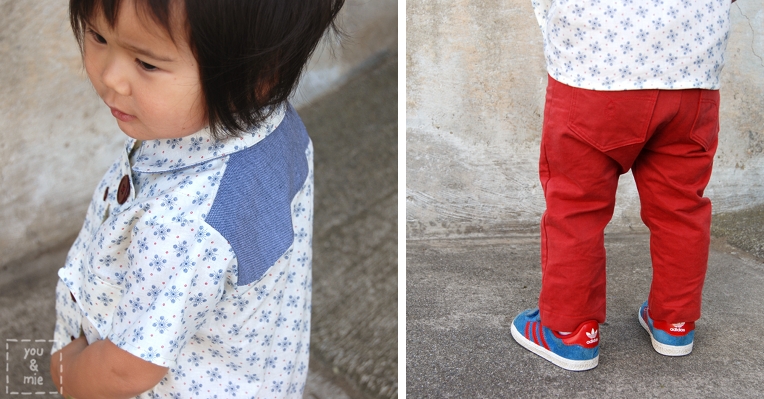
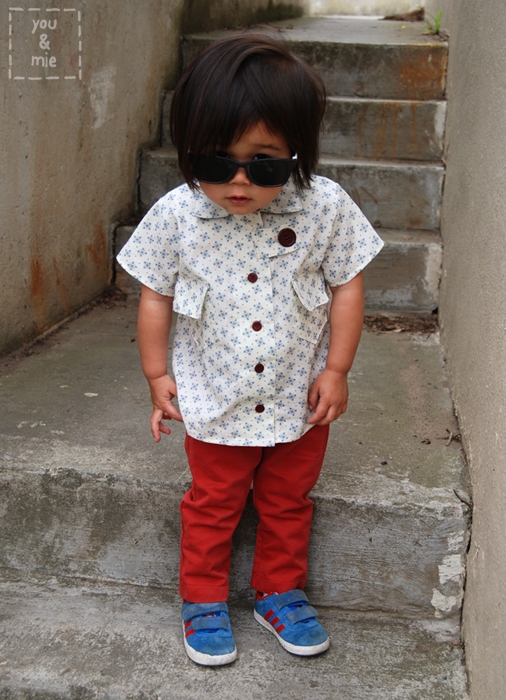
Hello, lovely You and Mie readers! I’m Sanae of the oh-so-originally named sanaeishida.com. On my blog, I prattle on about sewing and creating in general, and I’m so pleased to be part of the Japanese Sewing Book Series! I’m a huge fan of Japanese sewing books and have amassed a lot of ’em over the years and frequently use them to sew outfits for my six-year-old. This is my very first guest post so I’m doubly excited to be here! I’ve also created two outfits to accompany this post on my own blog, and I hope you’ll get a chance to check them out.

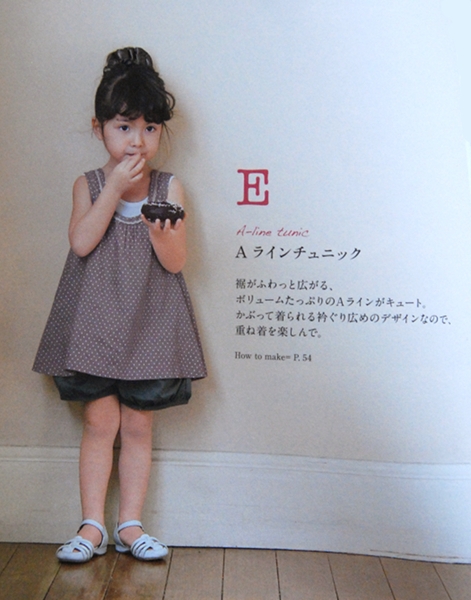
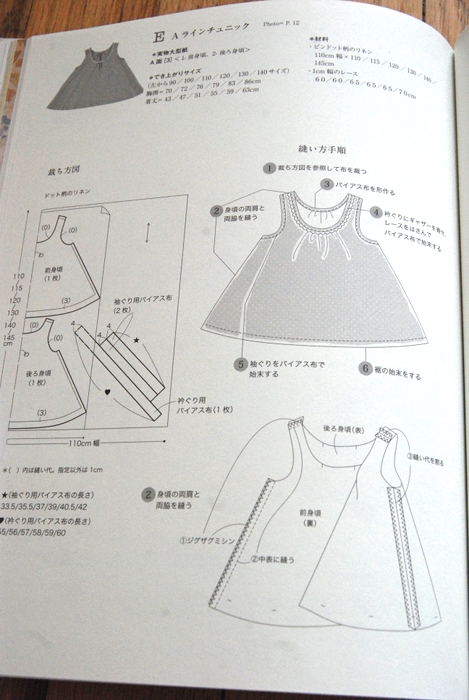
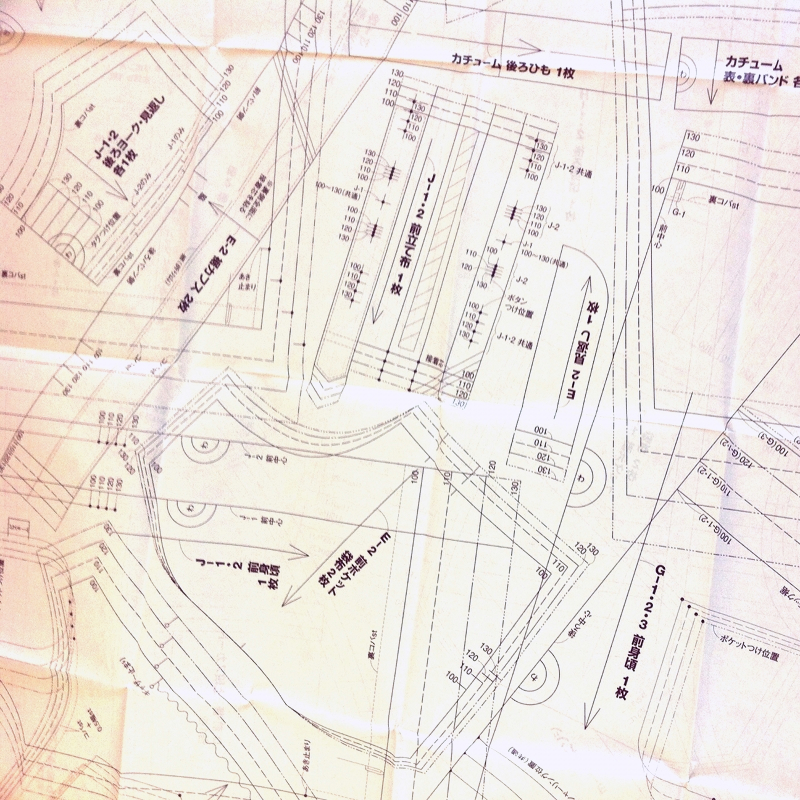
Today, I’ll be covering the basics of the text that you see in the beginning (or top section) of the pattern instructions. The pattern instructions themselves are typically located at the back of the book. See Exhibit A below. If you don’t read Japanese, it all probably looks like gobbledygook, and I hope that I’ll be able to make that portion a bit more accessible.

Exhibit A:

exhibit-a

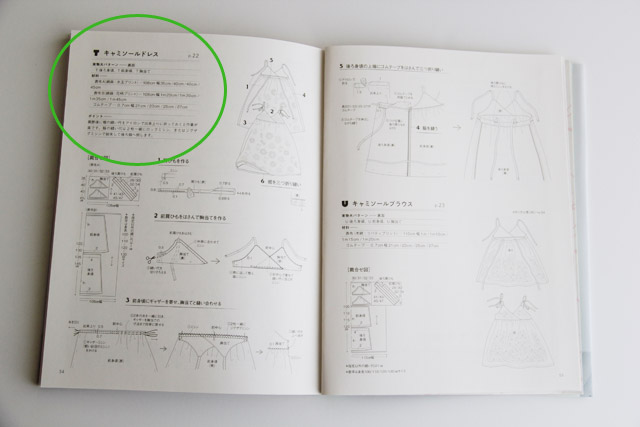
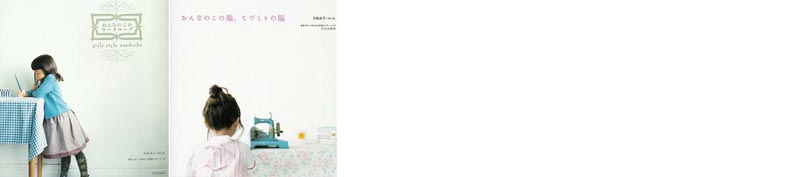
Pattern T from Happy Homemade v. 5 ISBN: 978-4579112951

One thing you should know about me is that I can only read at about second grade level in Japanese so I’m actually not completely literate in the language. Which means that I’m familiar with that head-scratchy feeling of, “What in the world??” and have had to figure out a lot over the years.

I will be covering the following today:

1. Anatomy of Instructions
2. References to Translated Dictionary of Sewing Terms
3. Instructions Layouts (with translations)

Lots of information coming atcha, so you might want to grab a cuppa…Without further ado, let’s jump in!

1. ANATOMY OF INSTRUCTIONS

anatomy-of-instructions
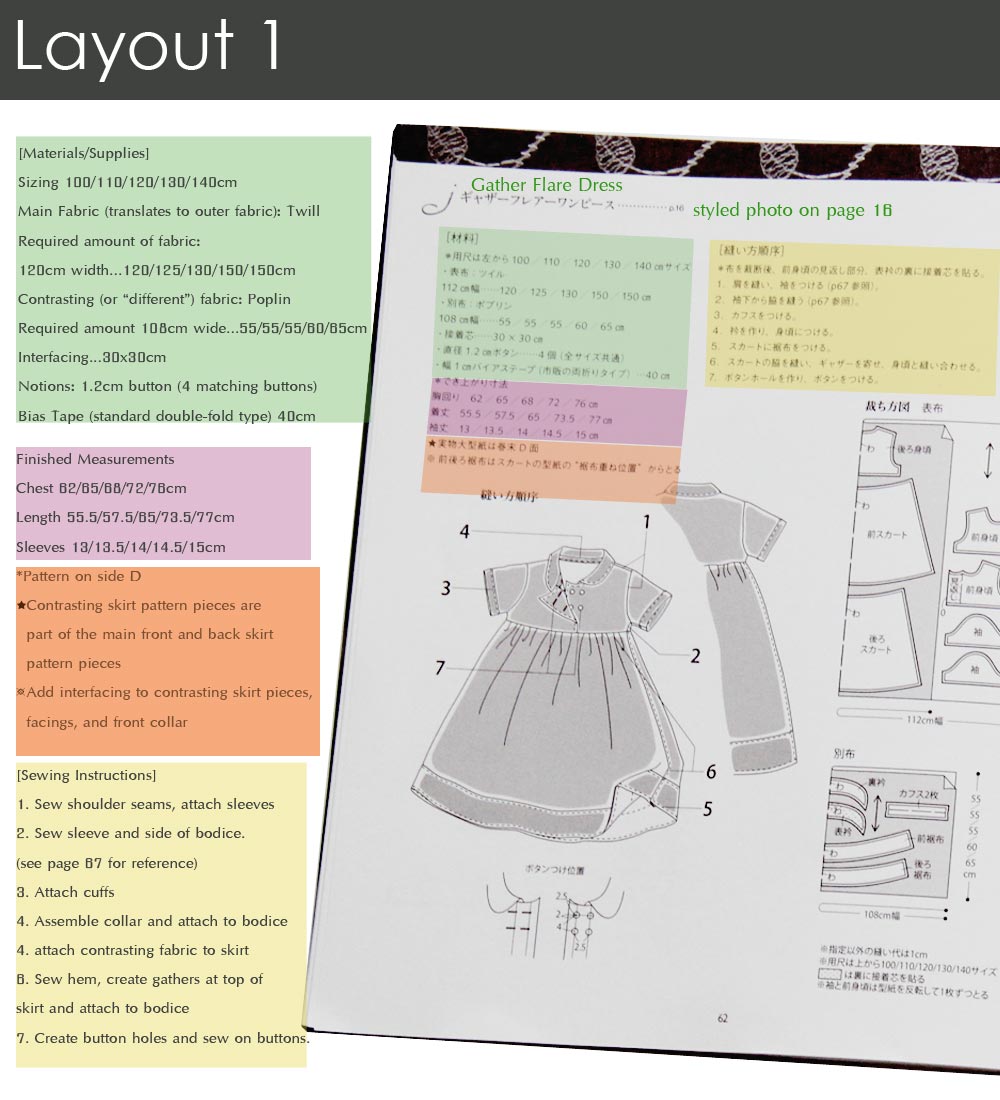
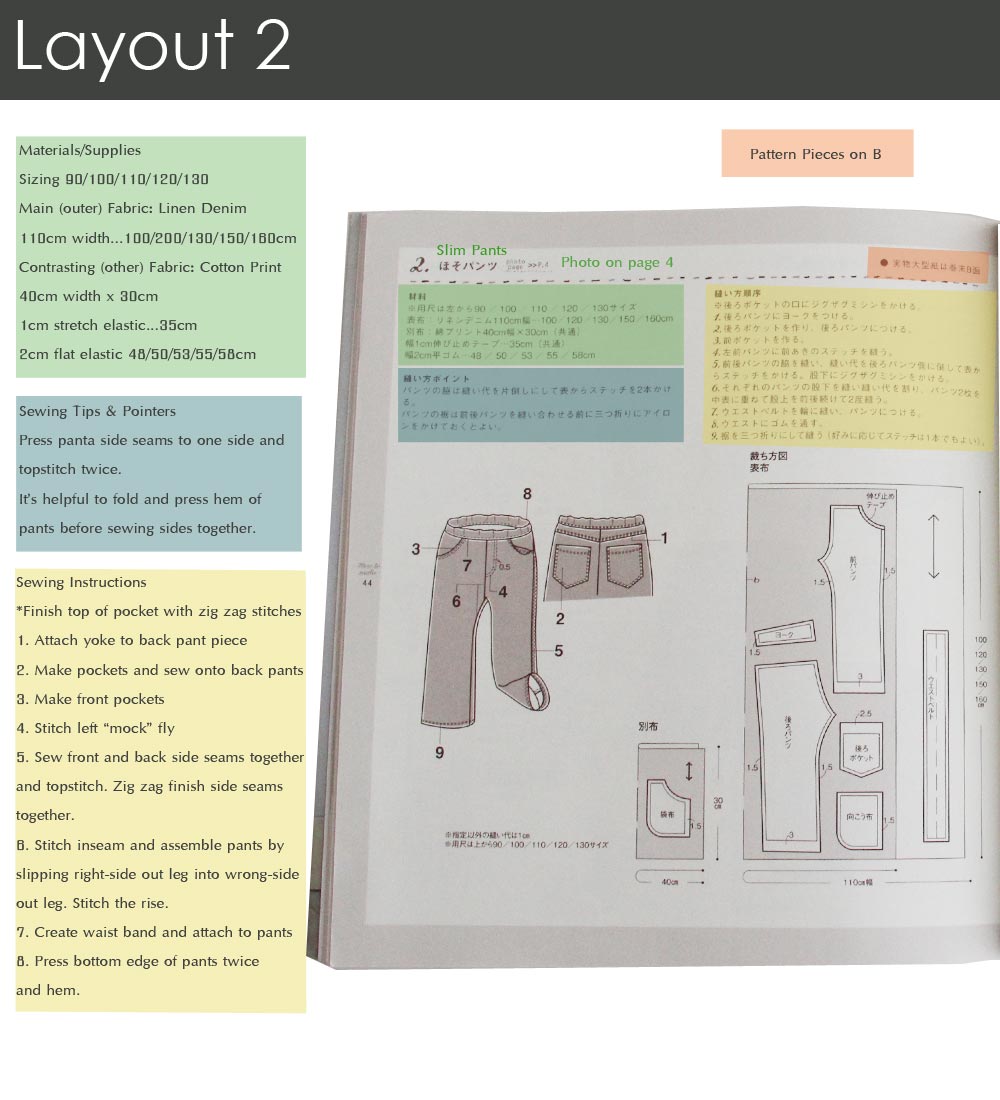
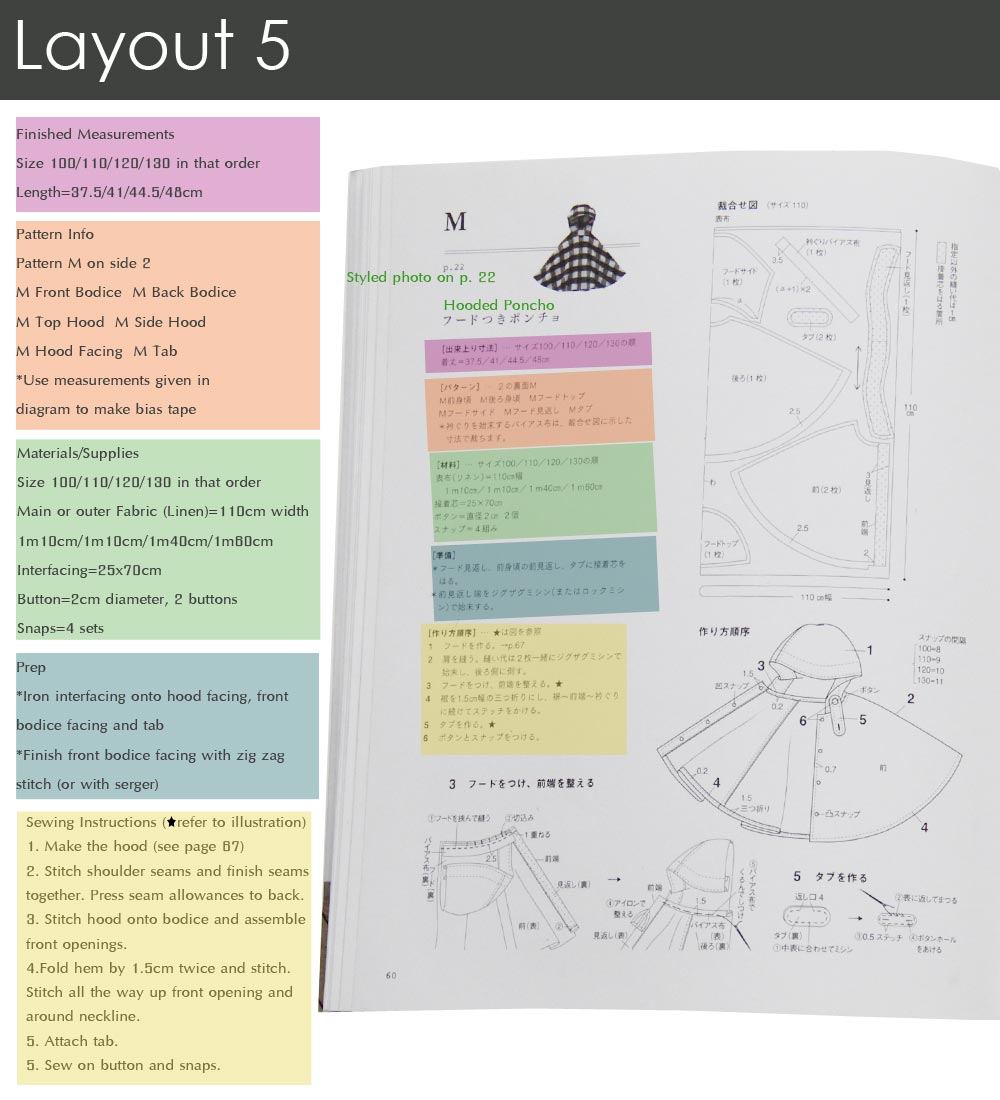
I own fourteen Japanese sewing books, and the books all have some variations of the information listed above in the instructions section at the back of the book. I’ve color-coded sections you’ll most often see. Here are a few more details about each section:

Pattern Identifier – This is usually a letter or number and you will use this identifier to locate the correct pattern pieces on the crazy pattern sheets provided with the sewing books.

Page of Styled Photo – Every garment is beautifully styled and photographed in the front section of each sewing book and this page number references that image that makes you want to make the garment in the first place 🙂

Garment Name – These names tend to be very straightforward descriptions like “peter pan collar shirt”, “skirt with pockets”, “camisole dress”. You usually won’t find any cute or pun-ny names.

Finished Measurements – Basic finished measurements are provided and usually includes length of garment, chest circumference, sleeve length, etc.

This section may also have the available sizing which is usually 90cm to 130cm. Kristin covered this information yesterday. The sizing info is also often included in the Materials/Supplies section.

Pattern Info – This section will indicate the pattern sheet on which you will find the necessary pieces (e.g. in the image above, the pattern pieces for the skirt is on sheet 2). The books usually come with multiple pattern sheets. Some books also list the pattern pieces specifically such as “2 collar pieces, front bodice, back bodice, sleeve, facing”.

Materials/Supplies – This is where fabric and notions information will be listed. The quirky thing about Japanese sewing books is that they don’t really offer recommendations for fabric options. They list the exact fabric that was used for the garment featured. So instead of a list of fabric recommendations as you would see with American or European patterns, this section will list “Liberty Tana Lawn” or “Striped yarn-died cotton”. It’s interesting to see what they used, but I usually completely ignore the fabric section. Rather than spending time trying to painstakingly translate every part of the fabric listed, I would merely try to see if one of the common fabric types was used (I talk about links to a dictionary of sewing terms in the next section).

One other thing about the fabric section is that the amount of fabric required is also listed in Japanese standard widths (110cm usually). The numbers separated by slashes tell you how much length you need for the size you are making. So if the sizing available is 90/100/110/120/130cm and the fabric requirement section shows 45/50/55/60/60, and you’re making a size 90cm shirt for your wee tot, you’ll need 110x45cm in fabric.

Prep & Tips – Not every book has this section. The prep & tips section advises on things like adding interfacing, finishing certain seams beforehand, etc.

Instructions (text) – These are the step-by-step instructions to construct the garment. These steps correspond with the illustrated overview with the numbers that indicate construction order (see below). I should point out that not every step has a detailed illustration, except for A Sunny Spot and Happy Homemade books which omit this texts instructions section and literally has step-by-step written and illustrated instructions.

Note: Keep an eye out for any page numbers in the instructions as they are references to illustrated instructions to help you. For example, if you’re sewing a shirt with a placket and you don’t see any illustrated guide to how to create the placket but you see “p.57”, go to page 57 and you’ll find the illustration there.

These three sections will be covered on other days this week:

Pattern Layout Suggestion – Similar to American and European commercial patterns, this section provides recommendations on how to arrange your pattern pieces in the right direction/grainline and to minimize fabric waste. This section also shows you how much seam allowance to add and any square or rectangular pattern pieces or bias tape you may need to measure out (pattern pieces are usually not provided for bias tapes or for square/rectangular pattern pieces)

Visual Step-by-Step Overview – As mentioned in the text instructions section above, this is where you can see at a glance the construction order of the garment, and the numbers correspond to the steps in the text instructions section.

Illustrated Instructions – The illustrations are excellent, and I find that this is the section I really use above any others. More on this later this week!

*************************************************************************

2. TRANSLATED DICTIONARY OF SEWING TERMS

I was going to create a glossary of terms, but realized that Japanese Sewing Books has already done an excellent job, and you can find her translated dictionary of terms here. It’s a great compendium of terms with pretty much everything: fabrics, garment terms, measurements, general sewing terms, etc. etc.

There are a couple of small errors in the dictionary, though. 衿 is listed as “neck” but should actually be “collar” and 襟 is listed as “collar” but should be “lapel”.

An *updated* note on linen and linen blends (from Frances of Miss Matatabi, our resident fabric expert):

Many Japanese fabrics are 麻綿 blend and I find that 麻 is very commonly mistranslated as hemp, and a dictionary search shows that asa is hemp, linen, ramie, and so on. 麻 is just a term used to cover many textiles made from plant fibers, but the Japanese fabrics most people have access to (for example the blends from Kokka) are cotton – linen, not cotton – hemp.

*************************************************************************

3. LAYOUTS

layout1

jsbs-heartwarminglifeseries[1] [2] [3] [4] [5]

So I went through all 14 of my sewing books and identified six main instructions layouts, and you can see the first one above. I also included the books that have the same layout; click on the numbers for details on the books. The other 5 layout images are below. I quickly translated these six, and chances are good that you have one of the fourteen books that I own. Or, if you don’t own any yet, these are the ones that are typically available, so this should give you a pretty good sense of how to find information on the instruction pages. They’re even color-coded!

Green=Materials/Supplies
Purple=Finished Measurements
Blue=Prep & Tips
Orange=Pattern Info
Yellow=Sewing Instructions

layout2jsbs-polkadrops-mainichi[1] [2]

layout3jsbs-asunnyspot[1]

layout4jsbs-tsukiori[1] [2]

layout5jsbs-mano[1] [2]

layout6jsbs-happyhomemade[1] [2]

There you have it, whew! Did you make it through? Was this helpful? Please feel free to contact me with any questions you may have. Sewing with Japanese patterns, though seemingly labor intensive, is incredibly rewarding. The designs are simple yet stylish and fit very, very well. I sew almost exclusively from Japanese Sewing Books and love them more and more and I hope you will too!

Thanks so much for having me Cherie!

***

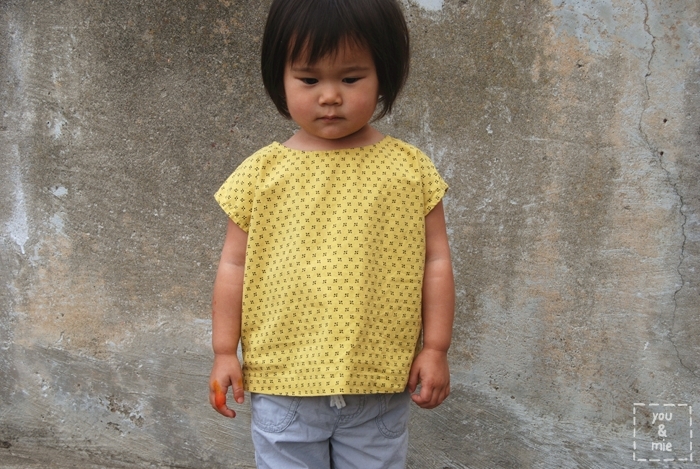
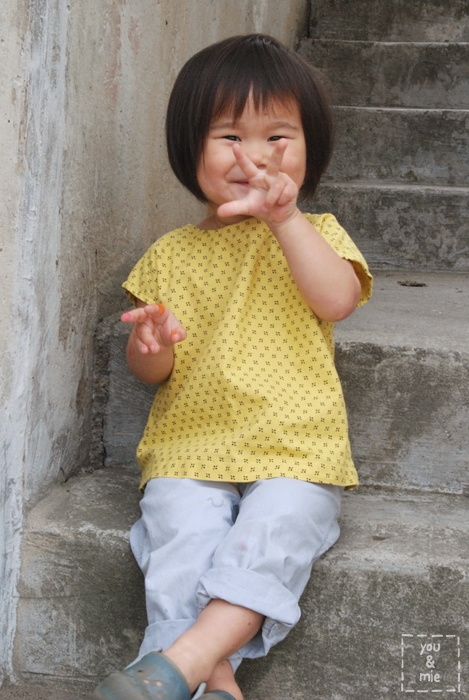
Isn’t Sanae incredible!?  And she’s sewn up TWO new outfits to share with you guys over on her blog, so head over there to check them out!

sanae-teaser-imageAnd I’m betting you’ll stay awhile to browse through all of the other gorgeous things you’ll find over there.

Sanae_collage

Tomorrow, we’ll be tackling how to find the pattern pieces you need on the pattern sheets and adding seam allowance.  You won’t want to miss it!

JSBS_button500

you & mie is an Amazon affiliate.  I will earn a small commission for Amazon purchases made through links provided in this post.

Japanese Sewing Book Series with skirt as top

JSBS_button_KristinIt’s finally here!  It’s Day ONE of the Japanese Sewing Book Series!  I hope you’re as pumped as I am.  Today we are going to be covering some of the basics that you need to know before you even buy a book!  And my first guest is none other than the amazing Kristin of skirt as top.  Honestly, I could probably go on and on for days gushing about this girl – she really is an amazing person!

It’s hard to believe it was only a little over a year ago that she sent me that first email to congratulate me on my first guest post (how sweet is that!?) – and now, a year and literally hundreds of emails and texts later, I’m so honored to call her one of my very good friends.  She’s clearly got amazing sewing skills and impeccable taste – just check out this springtime ayashe, her washi dress (still my favorite), and her doily foldover clutch.  She is also a truly creative and original artist.  You know you’re not going to see something that’s already been done on Kristin’s blog.  For me, her sweet tartan junebug remix and sunshine dress really stood out to me as incredibly unique.

She’s always coming up with awesome new ideas and has great perspective – she’s my favorite person to brainstorm with.  Honestly, there is rarely a project that I haven’t consulted her on.  She is the co-creator and co-host of the ridiculously amazing, hilarious, and creative, not to mention, my favorite series, film petit.  I mean, if you haven’t been following film petit, I really have no clue where you’ve been – you NEED to check it out.  AND on top of all this, Kristin is really just a sweet, generous, humble and fun person.  And today she’s going to walk us through some of the super basic steps that will get us started with Japanese sewing books.  I’m honored to have her here as a guest!

***

Hi, You & Mie readers!  I am really looking forward to learning more about Japanese pattern books this week, and knowing about this series has motivated me to pull my books out again and be inspired!  I don’t speak Japanese at all (just a few phrases my husband taught me – he took it in high school and college), but I just love the aesthetic and sewing methods in Japanese pattern books SO much.  They’re simple but beautiful and I think the generally loose-fitting styles look really great on kids (this is one of my personal favorites).

I’m going to cover three topics today:

  • Where to buy Japanese pattern books
  • Sizing of the pattens / how to determine your child’s size
  • Basic structure of the books

japanese pattern books - the basicsWhere to Buy:

This was a big mystery to me when I first saw people blogging about Japanese pattern books a couple years ago – they weren’t sold in fabric stores or regular bookstores, so at a certain point I went on a hunt to find them.   Fortunately, Portland has an Asian grocery store called Uwajimaya that just so happens to have a bookstore in the back – it carries a HUGE selection of pattern books and it’s where I’ve gotten most of mine.  The actual bookstore is called Kinokuniya, and they have seven locations in the US .  They also take orders online (though their site is a bit difficult to navigate).  If you’re lucky enough to live near one, go check it out!  Really cool to see so many books all lined up and thumb through each pattern.
japanese pattern books - the basics

Amazon is also a great resource for the more common books – just search “japanese pattern books” and check out the titles.

You can also browse etsy – a seller named pomadour24 has a wide selection with good photos of the insides of each book, which is very helpful – you want to know you’ll sew at least a couple of the patterns before investing in the whole book, I think, since they tend to be a little on the pricey side, no matter where you get them.

For this post, I chose to make a project from Carefree Clothes for Girls by Junko Okawa, since it’s probably the most easy to find and accessible of the Japanese pattern books.  The style, format, and construction techniques are similar to what you’ll see in most Japanese pattern books, but it’s been translated into English (and inches), so it’s a really good one to start with.  If, even after this series, you’re dying to sew a Japanese pattern but are still intimidated by the language barrier, give Carefree Clothes for Girls a try!

japanese pattern books - the basicsThere are actually free PDF pattern pieces (no instructions) from Carefree Clothes for Girls here and a couple free full projects from book here if you want to see what you’ll be working with.

Sizing:

Before you buy your chosen pattern book, there’s something else you should note – and I think this probably applies more to purchasing them in person versus online, since you can see a pretty good description online – Japanese pattern books (like many other patterns) come in a limited range of sizes per book!  The size range is typically indicated on the front cover, and kid sizes are listed in centimeters (more on that later).

japanese pattern books - the basicsI bought most of my Japanese pattern books when my daughter was 2, and once I got them home I realized the sizes started at 4 (100 cm).  I tried to resize a few back then, but it’s so much easier to sew for her now that she is growing into the proper size!

japanese pattern books - the basicsSo be careful of that.

Sizing is typically in centimeters, since, you know, most of the world uses the metric system.  The primary size driver is height, and 100/110/120/130 seems to be a common range.  Some books are better than others about including chest, waist, and hip measurements as well, and Happy Homemade Vol. 2 even has a cute little chart for you (English labels are mine):

japanese pattern books - the basics

I put together a chart with some conversions and included the Japanese characters to help you guide your pattern size selection based on your child’s measurements –  as with all sewing patterns, it’s best to use your child’s measurements rather than age to determine sizing, and though I noticed the chest/waist/hip measurements correlated to the same height size in all three of the books I looked at, there could be some variation.  But hopefully this gives you a general idea what to look for – you can see how the Japanese characters in the chart below match the drawing above.

japanese pattern books - the basics

(Japanese characters from the dictionary of Japanese sewing terms at this indispensable site)

If you’re curious, here are some baby sizes:

  • 50 : newborn
  • 60 : 3-6 months
  • 70 : 6-12 months
  • 80 : 12-18 months

Japanese sizing seems to run a little smaller than American sizing in general. For instance, I usually sew a size 3 for my petite almost-five-year-old daughter in most American patterns, but I sewed a 4 for this project and it fits her perfectly. She wears a 5 in store-bought clothes.

Basic Book Structure:

Every Japanese sewing book I’ve seen starts with pages of beautifully photographed outfits, with letters/numbers/names associated with each photo.  Once you’ve browsed through the eye candy at the beginning, you get to a section usually titled “how to make” which is where the size chart and instructions begin.

japanese pattern books - the basicsFor the Apron in Carefree clothes for girls, the photo is on page 10 but the instructions are on page 45.  The instructions guide you to pattern B on page 1 of the pattern insert, which looks like this:

japanese pattern books - the basics

And how to make heads or tails of that spiderweb will be covered in the next few days by future guests!

Please add any stores, resources, and sizing tips you may have to the comments, and if you’d like to see the project I made from Carefree Clothes for Girls, visit skirt as top today!

japanese pattern books - the basics

Thanks, Cherie!

***

Thank YOU, Kristin!  While you’re over at skirt as top, be sure to check out all of her amazing and inspirational projects!

Kristin_collageAnd stop by tomorrow for a really great post about decoding all that essential information found at the top of each instruction page.  It’s the part that usually makes me sigh and close the book before I even get started.  But not after tomorrow!

*The Miss Matatabi Giveaway winners have been announced HERE.  Are you one of the two lucky winners!?  Thank you to all who entered.*

JSBS_button500

you & mie is an Amazon affiliate.  I will earn a small commission for Amazon purchases made through links provided in this post.

A Simple Blouse from a sunny spot

SimpleBlouse1The second garment I made from a Japanese sewing book is this simple blouse from a sunny spot 女の子のまいにちの服 (Every day clothes for girls), same book I used for this top.

SimpleBlouse2

asunnyspot7asunnyspot6It’s called “Simple Blouse” and it really is exactly that.  I picked it, once again, because of it’s super simple construction.  I was still looking for something with directions so straightforward that I could figure it out by diagram only.

asunnyspot8This top certainly fits the bill.  It’s just a front and two back pieces with sleeves built in (so separate sleeves to sew in).  The neckline is finished with bias and there is a simple folded button placket and that’s it!

SimpleBlouse3I didn’t realize this earlier, but looking at these pictures, the top looks, dare I say, almost hospital gownish!?

SimpleBlouse4But in a cute way, right!?  😛  If you were to make this top, I might recommend a cute print, like the small floral pictured in the book, and steer clear of solids.  Especially anything white or minty, to avoid the whole hospital gown thing . . .

Since I made these first two tops from Japanese patterns months ago, I’ve tried a more slightly more complicated pattern (with success!) which I hope to share with you soon.  And after my wonderful guests share their knowledge with us next week during the Japanese Sewing Book Series, I know I’ll be pumping out garments from Japanese sewing books like crazy!  I can’t wait!

SimpleBlouse5She’s starting to get a hang of this peace sign thing!

Again, if you’re interested in purchasing this book, you can find it on Amazon, Etsy, or Kinokuniya.

If you haven’t entered the Miss Matatabi Giveaway, make sure to do so by Sunday at noon PST!

And the series starts on MONDAY!  Be sure to come back each day next week for Japanese sewing book tips, translations, and inspiration from my amazing and talented guests Kristin, Sanae, Meg, Frances, and Robin.

JSBS_button500

you & mie is an Amazon affiliate.  I will earn a small commissions for Amazon purchases made through links provided in this post.

A-Line Tunic from A Sunny Spot

ALineTunic1I made my very first sewing project from a Japanese sewing book back in August from the book a sunny spot 女の子のまいにちの服 (Every day clothes for girls).

asunnyspot1When I was in Japan over the summer, I picked up a couple of pattern books including this one.  It has a lot of simple but cute, very feminine outfits for little girls.  If you’d like to see more pictures from the book, Japanese Sewing Books has a thorough book review here.

asunnyspot2When I decided to sew up my first project, I picked the cute “A-line tunic” because it is adorable but also a super simple sew.  Even though I couldn’t understand the Japanese directions, I could easily tell how it was constructed by looking at the diagrams.

asunnyspot3asunnyspot4It is just two pieces (front and back) plus bias for the neck and arm holes.  Add some gathers and lace or piping along the neckline and you’ve got a sweet and twirly little tunic.  I highly recommend this as a starting project for newbies to Japanese patterns!

asunnyspot5Of course, I didn’t realize at the time that the book’s smallest pattern size was still too big for Yuki.  Oops.

ALineTunic2I used this double gauze Nani Iro Melody Sketch that I picked up in Japan and it is probably one of my favorite fabrics ever!!  I think it’s so puuuurty.  It’s from an older line, so it’s harder to find, but it looks like there is still some available here.  Double gauze is really lightweight, so it hangs really nicely and it’s a perfect top for warm weather.

ALineTunic4Well it’s finally starting to fit her and I think it’s one of our favorite tops now.

ALineTunic5ALineTunic3Again, it was definitely a manageable project for a first timer.  The hardest part for me was finding the pattern pieces I needed on the pattern sheet.  If you’re interested in purchasing this book, you can find it on Amazon, Etsy, or Kinokuniya.

I have one more top that I’ve made from this book to share with you later this week.  But until then, I wanted to make sure you all knew about this great resource for sewing from Japanese sewing books.  It’s called Japanese Sewing Books!  You really should check out her site for a dictionary of sewing terms, help with understanding patterns, plus translations, book reviews, free patterns and sew alongs.  It really is a fantastic starting point if you’re a beginner to Japanese patterns and between that site and the Japanese Sewing Book Series here next week, you’ll hopefully be ready to tackle those patterns with confidence!

I’ve loved seeing all the projects that you guys have sewn up from Japanese sewing books.  Please keep sharing your links with me – they are very inspirational!  Until next time!

you & mie is an Amazon affiliate.  I will earn a small commission for Amazon purchases made through links provided in this post.

Miss Matatabi GIVEAWAY! {CLOSED}

**The winners are . . .
Delia, who will receive 1 yard of the Nani Iro Painting Check and
Carolina, who will receive 1 yard of Candy Party Paint Splatter!

Congrats to the winners (you should have received an email from me)
and thank you to all who entered!**

The Japanese Sewing Book Series starts next week, but let’s get the fun started a little early with a giveaway, shall we??

And what better to sew up some Japanese patterns with than some gorgeous Japanese fabric!? Today’s fantastic giveaway is from the Miss Matatabi fabric shop.

Miss Matatabi is an online fabric shop that sells Japanese fabric. When my local fabric store stopped carrying nani iro fabrics, I needed a new supplier (yeah, it’s kinda like a drug). Rae had mentioned Miss Matatabi in one of her posts and since I trust Rae, I checked it out and never went anywhere else for Japanese fabrics. The shop is run by Frances, an Australian who now lives in Japan and has a deep love and a keen eye for beautiful fabrics. She is such a fun and sweet person, and I’m lucky to now call her my friend! She’s also one of my guests for the series next week 🙂

Her shop carries the new 2013 nani IRO line. I seriously can’t even pick my favorites – I love them all. So here’s just a peek into her shop . . .

nani IRO 2013
naniirofavsRuby Star Sparkle by Melody MillerStamped by Ellen Luckett Baker
Not to mention Heather Ross, nani IRO prints from older lines, a sale section and other fantastic Japanese fabrics . . .
fabfavsYou really should just head over there and check out all the wonderful goodness that Frances has stocked her shop with.

She also has her own blog where she shares shop updates and some of the beautiful things she sews with the fabric from her shop (perfect for ideas and inspiration) and has a pinterest board called miss matatabi & me, where you can share projects that YOU have made with fabric from her shop!

And today, Frances has generously offered an amazing prize to TWO winners!

One winner will win 1 yard of this summery Nani Iro Painting Check in black and grey:

And another winner will win 1 yard of this super fun Candy Party Paint Splatter KNIT fabric!

Wanna win??

Giveaway details:
– giveaway will be open until Sunday, March 24th 12pm PST
– winners will be chosen at random and will be announced on Monday, March 25th
– open to international readers
– S&H is included

TO ENTER: {CLOSED}
There are four ways you can enter. You can choose any method of entering and if you do all of them, you’ll be entered four times! Make sure to leave a separate comment for each entry!
– follow Miss Matatabi on Pinterest and leave a comment telling me you do so
– follow Miss Matatabi on Instagram and leave a comment telling me you do so
– follow Miss Matatabi on Facebook and leave a comment telling me you do so
– follow you & mie on Facebook and leave a comment telling me you do so

Good luck and be sure to join us for the series next week!!

JSBS_button500

Calling All Kids!

First of all, I just have to say that I am soooo thrilled with the response I’ve gotten about the upcoming Japanese Sewing Book Series!  I was a little nervous making the announcement – this being my first series and all – I’ve spent a lot of time thinking about it and planning and I just wasn’t sure if people would be into it at all.  But it seems like I am not the only one drawn to, but intimidated by, Japanese patterns and sewing books!  So I’m excited to learn more and conquer our fear of Japanese sewing books together with the help of our 5 talented guest instructors (see the line up here).  The fun starts next week with a great giveaway and a little pre-party to get ourselves ready and then the actual series will run from March 25-29.  I seriously CANNOT wait!

For today, I’m over at Alida Makes with a guest post for her Calling All Kids series.  Calling All Kids is about pushing against gender stereotypes in clothing and finding ways to make awesome and stylish clothes for kids that don’t necessarily conform to those stereotypes.  Who says girls have to wear pink?  Or that boys can’t?  Why can’t boys’ clothing have flowers, or girls’ clothing have superheroes?

CAK3Trying to break stereotypes is just part of who I am and so I thought this series was a pretty awesome idea.  If you know Yuki, you know that she wears boyish/unisex clothes all the time.  It’s a reflection of my partner’s style and my own, but it’s also a conscious decision we make because of how we want to raise her.  It’s a topic that I feel pretty strongly about, so if you’re interested, you can read more about it in my guest post on Alida Makes.

You can also check out more silly pictures of this kid wearing a new button up shirt for the spring and summer and a pair of pants I made from an old thrift store find.

SOOOOO . . . .

CAK7What are you looking at!?  Head over THERE and check it out!

Announcing the Japanese Sewing Book Series!

JSBS_button500That’s right!  I’m hosting my very first series here on you & mie and we’re going to be talking all about Japanese sewing books!

(pictures from Sanae Ishida)

Shortly after I started following sewing blogs, I started to notice that some of my favorite seamstresses were sewing gorgeous clothes from Japanese pattern books.  I was drawn to the classic, simple and beautiful style and aesthetic, but I didn’t understand how people could construct such elaborate pieces without being able to read Japanese.  Since most of them seemed like they were able to figure it out using the diagrams, I thought I should give it a shot too.  So I picked up a couple of books (and trust me, this is one of the harder tasks when you start looking at all the adorable choices that are out there!) and as soon as I cracked them open, I felt completely overwhelmed and lost.

photo 3I picked a simple garment, one that I could do even without directions, but left and right, I was faced with questions – what size should I make?  How much fabric do I need and will I need other notions?  Where do I find the pattern pieces I need on this crazy puzzle of a pattern sheet?  (OK, they fit pattern pieces for like 20 garments on one piece of paper, it’s intense!)  I have to add my own seam allowance!?  And so on . . .

photo(27)I clumsily worked my way through the directions and ended up with the tank top in the top picture.  It was way too big.  But it was an accomplishment and (now that it actually fits her) is one of her most worn tops.  I just wished I had someone to walk me through the steps and answer all my questions as I tried to decode each piece of the pattern and directions.

So that’s where this series comes in!  Like I said, there are TONS of amazing Japanese sewing books out there and I feel like they are a largely untapped resource – intimidating and not accessible to many of us.  So I’ve invited 5 friends to help answer some of the most basic questions about sewing with Japanese patterns and basically walk you through the entire process!  Isn’t that sweet of them!?  I think you’ll be pleased with my line up . . . I know I am!  The lovely and talented ladies who will be joining us from March 25-29 are:

Kristin from skirt as top
Sanae from Sanae Ishida
Meg from elsie marley
Frances from miss matatabi
Robin from nested in stitches

Between the six of us, we represent a pretty wide range of experience with Japanese patterns, from total beginner (me) to super advanced pros (umm . . . some of these other ladies).  So no matter where you fall, I think this series will have something for you!  Not only will they be sharing their knowledge with us, but also some of their own handmade goodies from Japanese sewing books to provide us with PLENTY of inspiration.

And to get us started with some inspiration, I’ve started a Japanese Sewing Book Inspiration Board on Pinterest that the ladies have helped fill up with beauties for your viewing pleasure.

Screen Shot 2013-03-11 at 4.12.29 PMYou should also check out Sanae’s blog post about her amazing Japanese Pattern book collection.  After you finish drooling over her books maybe you can even order a book or two now so you can sew along with the series?  And this flickr pool has tons of kids clothing sewn from Japanese patterns!

Next week, I’ll start off with a little “pre-party” and share some of the things I’ve made from Japanese sewing books.  So until the series starts in 2 weeks, please go check out all the gorgeousness on my guests’ blogs and the pinterest board to whet your appetite.  And stay tuned, because I have a couple of giveaways coming up too!  You really aren’t going to want to miss any of it 🙂

So tell me,
– Do you sew with Japanese patterns?
– What big questions do you have about sewing from Japanese patterns?
– Do you have something you’ve sewn from a Japanese pattern that you want us to add to the pinterest board?  If so, leave a link in the comment section!

Please feel free to spread the word about the series.  I really hope that this can become a great resource for seamstresses everywhere.  I can’t wait!

photo 6

Oliver + S Spring Pattern Preview: Pinwheel Dress + Tunic

Pinwheel1Last week I got to share my version of the new Oliver + S Roller Skate Dress + Tunic.  This week, Kristin, Jessica and I are sharing the Pinwheel Dress + Tunic (both patterns are available for sale on the Oliver + S site now)!

This is the 2nd of two new patterns being released by Oliver + S this spring.  This pattern comes with two pieces, a tunic and a slip dress, meant to be layered or worn separately.   Jessica blogged her awesome combo of the two pieces yesterday.  And Kristin made a cute summery sleeveless tunic for her little one.  I went with the simple slip dress with no modifications.

Pinwheel2The slip dress is a pretty fast and easy sew.  The way it is constructed with straps sewn in between the dress and the facing is pretty brilliant – I love learning new things like that!  The hardest part for me was attaching the flounce to the dress, but just follow the directions, take your time, and snip the curve a TON (this will all make sense when you’re sewing it 🙂 ).

Pinwheel3To take my Pinwheel in a different direction from the other girls’ versions, I made a sweet and simple linen version in ivory.

Pinwheel4For the bias tape, I used this gorgeous Nani Iro double gauze Little Letter bias that I bought from my favorite Nani Iro supplier, Miss Matatabi.  I had been saving it for the perfect project and I just couldn’t pass up this opportunity to compliment the clean linen with this sweet floral trim.

Pinwheel7I made the dress in size 2T and it’s a tad bit roomy on her.  It would probably look better if I had gone a size down, but I’m positive this will fit her for a looong time!

When I first saw the pattern, I could definitely see the appeal, but it wasn’t necessarily my style.  I’m so glad that I had this opportunity to sew it up though because I ended up really enjoying both picking out the perfect fabrics to make the garment “me” and the whole sewing process.

Pinwheel5

When this picture was taken I had just asked Yuki what she thought of the dress and she looked down and said, “It’s beeautiful!”  Hee hee.

Pinwheel6This pattern is now available in paper format and PDF so head over to the Oliver + S site to get your copy now.

Oliver + S Spring Pattern Preview: Roller Skate Dress

*UPDATE – The Roller Skate Dress + Tunic pattern is now available on the Oliver + S site!  It is available as a paper pattern or PDF pattern.  Head over there to get your copy!*

So I haven’t been blogging much recently, but I’ve been busy with some really exciting projects that I’ll be announcing within the next few weeks (including my first blog series)!

The first of those projects was the opportunity to share with you a new Oliver + S spring pattern that has yet to be released!  If you sew kid’s clothes, you’ve surely heard of Oliver + S patterns.  And if you’ve heard of them, I’m sure you’re a big fan AND know that they are releasing two new patterns within the next week!  So when Liesl (the creative mastermind behind Oliver + S) asked Kristin to sew up the new patterns to share with readers and customers and Kristin asked me and Jessica if WE wanted to sew them with her – I’m pretty sure I shrieked.  You would too, wouldn’t you??

roller skate dress + tunic rolling tourAnd so I present to you, the last stop on the Oliver + S Roller Skate Dress + Tunic Rolling Tour!  The Roller Skate Dress + Tunic is one of 2 new patterns being released for the spring line.  It is a simple and adorable addition to any spring wardrobe and is a pattern I can imagine sewing up over and over again in different variations.  The pattern comes with 4 views or styles.  View A is a dress and you can see Kristin’s sweet floral version here.  View B is a dress with a visible yoke and I think this version that Liesl made is particularly cute.  Jessica made a reversible version of View C, which is a tunic (totally loving the gorgeous tribal print she used).

And I made View D, a tunic with the visible yoke in contrasting fabric!

RollerSkate2

This pattern is really a simple and fast sew, but produces a stylish and professional looking top or dress, which is my favorite kind of pattern!  It’s fully lined, has faux cap sleeves and an elastic waistband for shape and comfort.

RollerSkate4It closes in the back with a simple button and button loop (no zippers or button holes!), so that makes this pattern appropriate for beginners.

I love the optional visible yoke – it adds a nice finishing touch.  My V notch on the neckline got a little deep because the first time I sewed it, it was crooked, so I had to make it bigger to even it out.  My advice if you do the notched neckline is to really take your time with it.  If it’s off even by a little, it’ll be very noticeable!

RollerSkate1I made it in 2T and it fits my daughter perfectly.  I was a little confused by the chest measurement listed for the finished garment because it seemed way too big, but I realized that that’s the measurement before you add the elastic.  So just go with the body measurements table (or whatever size you normally sew with O+S patterns) and you’ll be good!  This style is very forgiving in fit.

This pattern delivers all the wonderful things you’ve come to expect from an Oliver + S pattern.  It’s professional and beautiful, with great diagrams and directions.  There is so much useful sewing information in each pattern that you always come away feeling like you’ve taken a class or learned at least one new sewing technique.

RollerSkate3I used this really cool fabric by Tula Pink called Sea Stripes from the Sea Water line.  I picked it up from one of my favorite Bay Area fabric stores, Stonemountain and Daughter.  I was drawn to the creative print and bought a bunch, not knowing what I was going to do with it.  I really love it with this simple pattern though!

And seriously, this pattern has so many possibilities.  When trying to decide what fabric to use, I picked out a huge stack from my own stash that I thought would look great as a Roller Skate tunic.  The hard part was choosing which one to go with.  But the good news is you really will sew this pattern over and over again – it’s just a great staple to have in your collection.

In other news, Yuki has started to explore new modeling poses.  In this one, I’m pretty sure she’s channeling Em’s dancing spirit.

RollerSkate5(I did not prompt her to do this – she just started doing it on her own!)

And I don’t even know what this pose is about, but hey – I’ll take it!

RollerSkate6So there it is, the Roller Skate Tunic (View D).  The pattern will be available through the Oliver + S website starting tomorrow.  I bet you already have something perfect for this little dress or top already in your stash, so you’ll be able to get started right away!

If you haven’t already, stop by skirt as top and a little gray to see their awesome versions of this pattern!

Thank you, Liesl and Kristin, for letting me sew this incredible new pattern to share with everyone!

Next up, is the Pinwheel Tunic + Slip Dress!

Reversible Spring Coat Tutorial

I’m re-posting this Reversible Spring Coat tutorial that was originally up on iCandy Handmade for their Basic Bodice Series.  The premise of the series was that if you have a great bodice pattern and some ideas for mixing it up, you can pretty much make anything!

ReversibleCoatSo I decided to take a basic dress bodice and turn into a reversible coat!

It’s going to take a bit of pattern altering, of course, but I’ll walk you through it and it’ll be pretty simple!

ReversibleCoat2

And the finished product will be a sweet and practical coat for your little one!  I used 2 lightweight fabrics (nani iro double gauze and linen) to make a spring coat since I know the weather will be warming up soon.

You’ll need:

  • 2 fabrics (yardage will depend on what size coat you’re making)
  • 4 buttons (or as many as you desire, just be sure they are the same size and you have enough for both sides of the coat)
  • interfacing (optional)
  • bodice pattern
  • sleeve pattern (or draft your own)
  • tracing paper
  • ruler

I started out with Made by Rae’s Geranium Dress pattern for my bodice because it’s the pattern I’ve been using for dresses recently, but you can use pretty much any basic bodice pattern.  I went up one size because this is outerwear and I want it to fit over clothes, so instead of 2T which my daughter usually wears, I cut out the 3T size bodice pattern.

Basic Bodice Coat1The original pattern has the front bodice piece cut on the fold and a button placket in the back, but we want our button placket in the front and will cut our back piece on the fold.  So, the first step is to cut the extra off the back bodice.  Place the front bodice pattern on top of the back bodice pattern lining up the bottom of the armhole and bodice.  Mark the fold line onto the back pattern and cut on the line.

Basic Bodice Coat2Depending on your bodice pattern, you may want to lower the bottom of the armhole.  I trimmed off a bit starting from half an inch down.

Basic Bodice Coat3On your tracing paper, line up the straight edge of your back pattern piece with the edge of your paper and trace the shoulder seam and armhole.  I raised the neckline so it hit about an inch higher at the fold line.

Basic Bodice Coat4From the bottom of the armhole, use a ruler to make an A-line shape for your coat.  You can make it whatever length you want.  The bottom hemline is slightly curved.

Basic Bodice Coat5For the front pattern piece, you’ll want to take another piece of tracing paper and tape it so it hangs over the straight edge of the back coat pattern by 1.5 inches (1/2 an inch for seam allowance and another 1 inch for the button placket).  Place the front bodice pattern to top so that the bottom of the armhole and the straight edge lines up with the back piece.  Trace the shoulder seam and armhole of the bodice pattern.  I brought the neckline up by about 1/2 an inch.

Basic Bodice Coat6Remove the bodice pattern and trace the side seam and bottom hemline from the back pattern piece.  Make sense?

Basic Bodice Coat7_1Here’s what my pattern pieces looked like.

Basic Bodice Coat8

You’ll also need to draft a sleeve, collar and pocket pattern.  For the sleeve, I actually used one that I already had.  To make sure it’d fit, I cut a muslin of the sleeve piece and after I sewed the front and back pieces together of the coat, I checked to see if it would fit in the armhole, then adjusted the pattern as necessary.  If you don’t have a pattern piece for a sleeve, you can find many tutorials for drafting your own with a simple web search.

For the collar, I used this tutorial by Vanessa of LBG Studio.  And for the pocket, I took a piece of paper, folded it in half and drew the basic shape that I wanted.  Be sure to add seam allowance!

Basic Bodice Coat9Basic Bodice Coat10

From Fabric A, you’ll need:
– 2 front pieces
– 1 back piece (cut on the fold)
– 1 collar piece
– 2 sleeves
– 4 pockets

And from Fabric B, you’ll need the exact same thing.

Now we get to the sewing part!

Basic Bodice Coat11

*If you are using super thin or flimsy fabric, you may want to fuse interfacing to one or both of the collar pieces to add more structure.  I did not.*

Place your collar pieces down (1 from Fabric A and 1 from Fabric B) with right sides together.  Pin and sew the outer edge.  Clip rounded edges to reduce bulk when you flip the collar right side out.

Basic Bodice Coat12Flip right side out and press flat.  Top stitch around the outer edge, if desired.

Basic Bodice Coat13Place two pocket pieces together (right sides together) and pin.  Sew around the edge, leaving a 1 inch opening.  I like to sew along the opening as well because it helps flip the seam allowance in when you turn the pocket right side out.

Basic Bodice Coat14

Flip the pocket right side out, press flat and sew onto one of the front coat pieces.  Stitch close to the curved edge of the pocket, back stitching several times at the tops of the pocket to reinforce the corners (don’t sew the pocket closed!)  Repeat with the other 2 pocket pieces for Fabric A.

*Again, if your fabrics are really thin, you can add a strip of interfacing to the front coat pieces where your buttonholes and buttons will be.  Cut two strips of fusible interfacing 1 inch wide.  The length will depend on how many buttons and where you will place them.  Fuse them to the wrong side of your front bodice pieces 1/2 an inch from the edge.  I skipped this step too.*

Basic Bodice Coat15Pin and sew shoulder seams.  Press them open.

Basic Bodice Coat16Open up the coat at the shoulder seam, right side up.  Find the center of the sleeve and pin that to the shoulder seam, right sides together.  Continue pinning the sleeve to the armhole carefully.  Sew and press seam.  Repeat with other sleeve.

Basic Bodice Coat17Line up the side seams and the bottom of the sleeve, pin and sew (right sides together).  Repeat with the other sleeve and side seam.  Turn coat right side out and press.

Basic Bodice Coat18Take your prepared collar and line up the center with the center of the back of the coat.  You want the right sides of Fabric A to be facing up for both the collar and the coat when you lay them on top of each other like this.  Pin the inner edge of the collar to the neckline of the coat.  Baste the collar to the coat.

Basic Bodice Coat19Repeat all of the steps with Fabric B (except for basting the collar).

Basic Bodice Coat20To attach the two coats, lay Fabric A coat down, right side up.

Basic Bodice Coat21_1Lay the Fabric B coat on top, right sides together.  Sleeves should be on the inside.  Pin the entire outer edge and sew together leaving about a 6-8″ opening along the bottom.

Basic Bodice Coat22Pull the sleeves out.

Basic Bodice Coat23Take one of the sleeves and fold it out (towards the wrong side) by about 1.5 inches.  Slide it inside the other sleeve, line up the bottom seams of the sleeves and pin the ends of the sleeves together.

Basic Bodice Coat24

Sew the sleeves together along the pinned edge.  Go slowly and untwist the coat to your left as you go along.  Repeat with other sleeves.

Flip the coat right side out through the opening in the bottom.  You’re almost done!!  Press all the edges of the coat out.  Hand sew the opening shut using a slip stitch.  If you want, you can top stitch along the entire outer edge of the coat.

Basic Bodice Coat25

Sew your buttonholes where desired and attach your buttons.  You’ll want to either use the same buttons on both sides or at least use the same size buttons.  I sewed buttons to both sides of the coat at the same time using one thread.

You’re done!

ReversibleCoat1Now your kiddo has two stylish coats in one!

ReversibleCoat3ReversibleCoat4

I hope you guys have fun with your bodice patterns and are realizing all the endless possibilities a great pattern has.  If you sew up a reversible coat using this tutorial (or any from this site), I’d love it if you shared it with us in the you & mie flickr pool!

Thanks for stopping by 🙂