Boardwalk Delight Skirt and Shorts

BW4

I don’t blog anymore.  You all know that.  But when DANA from Made Everyday asks you if you want to sew with fabric that she designed and be part of her blog tour, you blog.  It’s what you do.  Well, at least, it’s what I do, so here I am!

BWD 8

Dana’s debut fabric collection for Art Gallery is called Boardwalk Delight and was inspired by all the things that she loves about summer.  And it really does encompass the fun, carefree, beachy spirit that I love so much about summer too!

BWD 5

I knew the bright, festive colors would be something that my daughter would love too, so I took the opportunity to do some back-to-school sewing for my kindergartner.  The fabric I used is called Candy Dots and the colorful dots reminded me of all our favorite fruit sherbets.  It also screams, “Party!” Dontcha think?

BW1

The fabric is a crisp and smooth quilting cotton that washes and sews really well.  It’s lovely to wear too!  Though I should have anticipated this, the print is on white fabric so it’s quite light and I wasn’t sure what kind of garment I could make that wouldn’t be too see through.  The original plan was a simple skirt, so I figured if I gathered enough fabric, it would be fine.  And I think it worked!

BW3

BW2

This is the most simple skirt, much like this tutorial I made a ridiculously long time ago.  I cut two rectangles the whole width of the fabric (about 44″) and sewed those together.  So I ended up with about 88″ of fabric around a 21″ waist!  It gives it a very full look and a bit of spinability.  That’s a word, right?

BW5

When I tried the skirt on my daughter, it felt a bit too long, so I added a pintuck pleat to shorten it.  And I like that I can always unpick it and let it down as she grows taller!  And it gives the skirt a little bit of interest as well.  A happy accident.

After I finished the skirt, I had some extra fabric leftover and I wanted to make something else.  So I cut some strips on the bias to make a pair of Purl Soho City Gym Shorts.  This is the first time I’ve made these shorts and I love them so much!

BW6

They are fast and easy to sew, they require such little fabric and the pattern is free!  And they are super cute!  Yuki has pretty much refused to wear shorts for the last couple of years.  I think she fell once while wearing shorts and scraped her knees up, so she thought it’d be safer if she wore leggings all the time instead.  The funny thing is, she wears skirts and dresses all the time!

Anyways, she’s coming around to wearing shorts and she loves these so I’m thinking of making a few more.

BW7

This pattern doesn’t necessarily highlight the cute Candy Dots fabric, but it compliments it quite nicely and adds a nice little pop 🙂

BW8

BW9

boardwalk-delight-fabrics-by-dana-willard-1Photo credit: Dana Willard

I feel like this collection is basically Dana in the form of fabric.  It’s cheerful and bright, stylish and spunky.  She’s done a brilliant job translating her summer fun vision to reality that we now all get to enjoy.  Dana is such a pioneer and has always given so much to the sewing/blogging community, so I’m excited to see that she keeps taking on new endeavors like designing fabric.  The Boardwalk Delight collection includes 10 prints on cotton, 3 knits and 1 canvas, making it extremely versatile – you can use it for almost any project you can think of!  All of the details and a fun video are up on Dana’s site.

BWD 1

And check back in weekly on Made Everyday for recaps of all the blog party posts, like Anna’s Poolside ToteRae’s Ice Cream Dress, and Amy’s Summer Star Quilt.  There are a lot of great bloggers and projects coming up throughout August, so stay tuned!

Happy summer, folks!  Until next time 🙂


Advertisement

Let’s Have A Party Skirt

Hey!  It’s Kids Clothes Week!  It’s been awhile since I’ve fully jumped into Kids Clothes Week, but I was feeling motivated to make some new duds for the 4 year old.  I had completely stopped making clothes for her at some point because she was rejecting all the stuff that I was making.  But now she’s really into dresses, skirts and tank tops and all those things that I made 1-2 years ago!  Lately, she’s been grabbing this skirt a lot (which makes me super happy), so I thought I should add another to the closet.

Let's Have a Party Skirt by you & mie

Continue reading

Birds Eye Skirt

July is a pretty busy month for me and I’ll be spending a lot of time with family and away from the computer.  So I thought it was a good time to bring some posts home, especially all the stuff I’ve been sharing on Miss Matatabi the last few months.  This one is back from February!

***

I love to sew for my daughters, but recently I’ve been trying to sew more women’s clothing, so today I’ve got a skirt that I made for myself and I’m so excited to be here sharing it with you!

everydayskirt1

If you know me, you know that I’ve been a HUGE Nani Iro fan for a few years now, but unfortunately my local fabric store stopped carrying the fabric.  I had to search elsewhere to feed my Nani Iro addiction and that’s how I found Miss Matatabi.  Frances has been my official supplier ever since!  I started out only buying little bits of fabric and using it only for my daughter because it’s pricier than most other fabrics and I didn’t want to buy a large amount of yardage.  But after realizing that a toddler does not need or appreciate the perfection that is Nani Iro, I was determined to start using the fabric for me.  And I’m so glad that I did!

Continue reading

Neon Dot Skirt

Neon Dot Skirt by you & mie

Hey!  It’s Kids Clothes Week!  No long lists over here this time.  Just working on two things.  First one was to finish up this skirt I started a week or two ago.  I was going to make this springy skirt for a specific project and had the fabric cut out and everything before deciding to scrap it.  Well, not scrap the skirt entirely, but just not for that specific project.  But I couldn’t let this gorgeous fabric go to waste!  So I finished up this double layered skirt and it was a pretty quick project.

Neon Dot Skirt by you & mie

The main fabric is Nani Iro Colorful Pocho – neon on dark green, but I’m not sure that you’ll find it available anymore.  I remember snatching it up from Miss Matatabi immediately after seeing it and then, well, hoarding it for the last year and a half.  It is a soft and lightweight double gauze and as dreamy as Nani Iro double gauze always is.

The bottom layer is a chartreuse cotton voile from Michael Levine.  It’s very lightweight and a bit sheer, making it perfect for layering.

Neon Dot Skirt by you & mie

I basically used this Double Layer Simple Skirt tutorial except I added a separate waistband with two casings for elastic.  It also has pockets which is really a deal breaker these days for Yuki.

Neon Dot Skirt by you & mie

Yuki has always said she loves this fabric – she would pick it out from my shelves and ask me to make her something, but I could never figure out what to make.  I thought she would love this skirt, but she is a little unsure.  Part of me is sad that I used up this long hoarded fabric on something that she may or may not wear.  But I also feel like this neon trend (which I’ve fallen for) is not going to last forever, so I might as well go for it while it’s still hot.

What are you working on this week?


Straight Lines and Angles Skirt

Straight Lines and Angles Skirt by you & mie

Today I am part of the Straight Lines and Angles series hosted by Jess of If Only They Would Nap.  The series is inspired by the geometric shapes trend, which I have totally fallen for.

I had originally planned on a triangle print skirt, but ended up setting that idea aside and taking a different approach to the project.  Instead of making something with geometric shapes on it, I decided to make something out of geometric shapes.

Straight Lines and Angles Skirt by you & mie

I was inspired by this awesome hoodie, and decided to use straight lines and angles to piece together a skirt with pockets.  I figured it was the perfect opportunity to do some color blocking as well, because that’s always appropriate, right!?

Straight Lines and Angles Skirt by you & mie

So this is kind of like a basic rectangular skirt (tutorial here), but I cut the pattern into polygons to create the angled center piece and pockets.  Here are my pattern pieces . . .

Straight Lines and Angles Skirt by you & mie

Doesn’t get more “straight lines and angles” than that, huh?

Straight Lines and Angles Skirt by you & mie

As a finishing touch, I freezer paper stenciled a set of stars (my favorite of all polygons) in one corner.  I love stars so much.

Straight Lines and Angles Skirt by you & mie

I’ve also been having fun coming up with different and unexpected combinations of colors.  Since I’m trying to use fabric from my stash, I dug all of these up from my scrap pile.  Recognize any of them?  The center panel is a gorgeous purpley shot cotton from the Maggie Mae Tunic.  The chartreuse is from my Project Run and Play Sew-along Signature Look skinny pants.  The side panels of the skirt are a cream linen/linen blend that I used for the Art Museum Vest.  The waist band is an oatmeal colored linen, but I have no idea where it came from or what I used it for before.

Straight Lines and Angles Skirt by you & mie

When I first showed Yuki the skirt, she said she didn’t like it, or the tank top I wanted her to wear with it.  Then she suddenly changed her mind and put them on happily and wore them the rest of the day!  That was a nice surprise – I feel like I haven’t made her anything she’s actually liked in a long time.  And hey!  I like it, too!  Isn’t it nice when things work out like that?

Follow along the rest of the series here and be sure to enter the Straight Lines and Angles giveaway here!

Have a great week!

Birds Eye Everyday Skirt

Hey!  Enjoying your weekend!?  Hop on over to Miss Matatabi to check out my new skirt made from some goooorgeous Nani Iro Birds Eye fabric.  Can you tell I’m getting ready for spring??

Everyday Skirt in Nani Iro Birds Eye by you & mie

Miss Matatabi is my favorite online source for Nani Iro and other fantastic fabrics from Japan.  Seriously, check it out.  I just spent way too much time drooling over all of the new stuff she’s been adding to her shop.  IT’S SO GOOD.  If you don’t know, now you know.

You’re welcome.

Anyways, if you follow me on Instagram or Facebook, you may have seen a tiny preview of this skirt and the injury I sustained while making it.  It was totally worth it though!  Head on over to my guest post to catch all of the details of this skirt.

And enjoy whatever is left of your weekend!

Suspender Skirt Tutorial

I just spent the most amazing weekend up in Portland at Quilt Market hanging out with talented, fun and inspirational seamstresses, fabric designers and shop owners from all over the country!  I really want to tell you more about my experiences soon, but since I’m still recovering from my busy weekend, I thought I’d repost this tutorial I did a year ago for the fabulous series, Vintage May, which is running again right now!  The hosts, Jessica of Craftiness is Not Optional and Kristin of skirt as top, have rounded up some fabulous guests to showcase some vintage and vintage inspired looks, so be sure to check it out!  I was part of the fun last year and I never reposted the tutorial here, so in honor of Vintage May II, here ya go!

***

Hello vintage lovers!  It’s amazing what Kristin and Jess have put together here and I’m so honored to be a part of it!  I must have run through 50 ideas for what vintage-inspired creation I wanted to share with you before deciding on something – the possibilities are endless!  I decided to go through some old family photos to see if I could find some inspiration there and I saw a particular style pop up a few times in my mom’s childhood photos.

(Left photo: My mom, standing in front, with her two brothers and mother
Right photo: My mom, center, my grandmother, upper left and their neighbors)

(My mom, lower right, with her brothers and uncle)

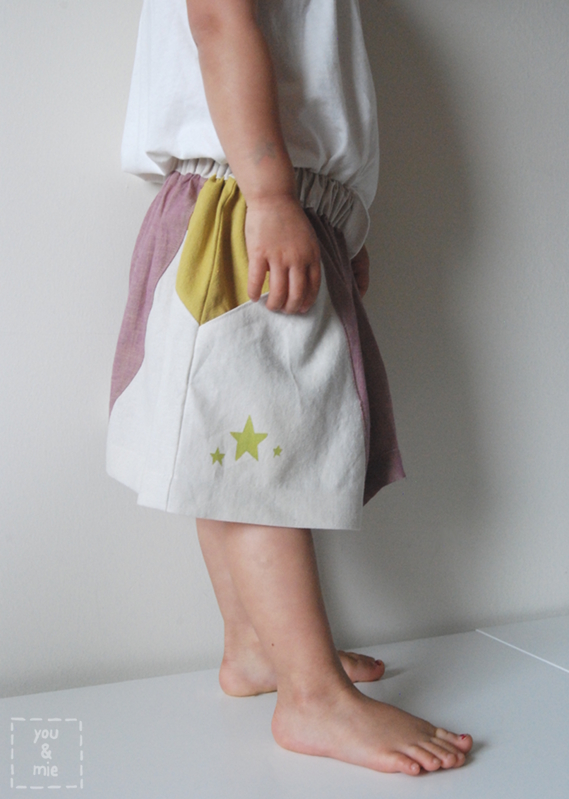
I loved the simple and classic style of the jumpers my mom and her neighbor are wearing in these pictures.  So I created a suspender skirt for my daughter and I’ve got a tutorial so you can make one too!

(Did I mention this was from a year ago?  Check out these old pics of Yuki!!)

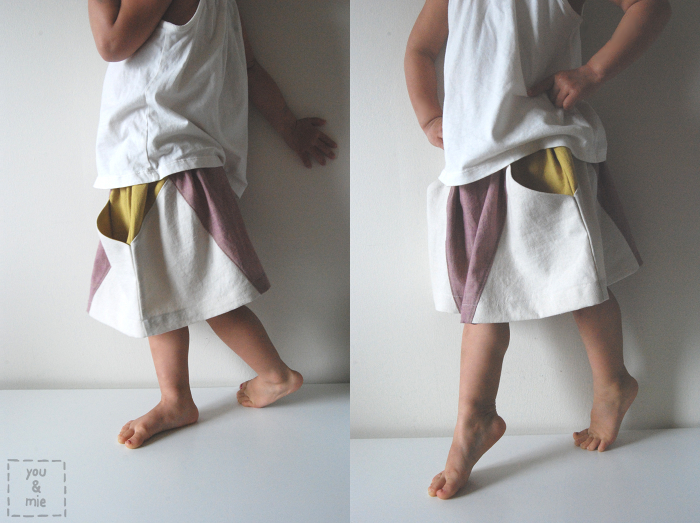
It’s got a bit of a school uniform vibe, but it’s still cute enough to be worn anywhere.  It’s a simple high waisted pleated skirt with a flat front and elastic in the back.  The buttons in the front are just for fun and completely optional.  The suspender straps are sewn in the front and adjustable in the back for longer wear.  You could easily use this technique to attach straps to any style skirt, pair of shorts or pants.  If you want to make the straps completely removable, you can follow the directions for the back of the skirt in the front, and then the skirt can be worn alone or with the suspenders.  So many options!

Ok, let’s get started.  You’ll need:

Fabric (about a yard, depending on the size)
Contrasting fabric for pockets (optional)
Buttons 2-4
1″ wide elastic and safety pin
Sewing essentials

*I used a 1/2 seam allowance, unless stated otherwise.

Measure your kid’s “waist.”  I say “waist” because it depends on where you want the skirt to sit.  My skirt is so high up it’s practically her chest measurement!  Your skirt pieces will be the “waist” measurement by the desired length of the skirt and you’ll need two.  So I cut 2 rectangles that were 18 x 12 inches.

You’ll also need 4 pocket pieces.  I just drew a pattern freehand in what I thought was a “pocket-like” shape.  Make sure to cut two and then flip the pattern over for the other two.

For the waistband, cut a long rectangle that is the “waist” measurement times 1.5, then add a few inches for good measure.  So I multiplied 18 x 1.5 = 27, plus a few inches – I probably cut mine at 32 inches (I always cut waaay more than I need then trim later).  The height is 4 inches.

For the suspenders, you’ll need to measure your child from the “waist,” up over the shoulder across the back (remember the straps will criss-cross in the back) and then add about 6 inches to this measurement.  The height is 3 inches and you’ll need 2.  So I had two strips that were 3 x 20.

I hope I haven’t lost you already!  Here are my cut pieces, note that the waistband and straps are folded up in this picture.

Working on the right side of one of your skirt pieces, we’ll make some pleats.  We basically want to get this piece of fabric to be half of the waist measurement, plus one inch.  So I need my 18 inch wide fabric down to 10 inches.  The size and amount of pleats will depend on the size of your skirt and how you want it to look.  Mark the center of the fabric and then two equidistant marks on either side of the center.

Fold the fabric on the marks toward the center and pin.

Add more pleats on either side, playing around with the size until your skirt piece the right size.  Press your pleats, pin, sew them down using a 1/4 inch seam allowance and press again.

Place your pocket pieces right sides together on your skirt front and back.  Sew down the straight edge of the pocket.

Press the pocket pieces open.  Lay the skirt pieces down right sides together lining up one side and pocket piece.  The back skirt piece will be much larger than the front still, so just do one side at a time.  Sew them together using a 1/2 inch seam allowance, then trim and finish the edges by serging or zig zag stitching.

Flip the skirt right side out and press.

Put the skirt aside while we prepare the suspenders.  Fold the strips in half lengthwise with right sides together and press.  Sew down the length of the strip and down one end.  This will give you one closed end, but leave the other open.  Trim the corner.

Turn the strip right side out using a pointy object to poke the corners out.  Press the strap flat and top stitch around 3 sides, leave one end open still.  Repeat with the other strap.

Now for the waistband.  You’ll want it to be the same measurement around as your skirt.  Lay your skirt down (the front and back will not line up, but that’s ok), and lay your waistband down folded in half (right sides together) with one side lined up and mark the other edge of the skirt.  Add 1/2 an inch to that and mark again.

Cut the extra fabric off, pin and sew along the line to create a loop.

Press the seam open and fold the bottom of the band to meet the top.  One edge of the loop should be raw and the other folded.  Press the fold.

Open up the waistband and pin one raw edge to the top of the skirt, lining up the seam with the one of the side seams of the skirt.  Sew the skirt and waistband together all the way around with a 1/2 inch seam allowance.  Make sure the pleats are laying nice and flat.

Flip the waistband up and press.  Fold the top of the waistband down towards the wrong side 1/2 inch.  When the waistband is folded down it should just barely cover the stitching at the bottom of the waistband.

Fold the waistband down and pin in place.  We’re going to make the casing for the back of the skirt first, so starting at one side seam top stitch along the back of the skirt just above the seam.  Make sure the inside of the waistband is being caught in your stitching.  Stop at the other side seam.

Cut a piece of elastic that is half of the “waist” measurement.  My waist measurement was 18, so I cut a piece of elastic 9 inches long.  I don’t add more for seam allowance because I like my elastic to have a bit of pull.

Using a safety pin, thread your elastic through the casing.  Before the end of the elastic is about to be pulled completely into the casing, sew up the waistband along the same line as the skirt’s side seam catching about a 1/2 inch of the elastic.  Continue pulling the elastic through until it’s about 1/2 an inch past the other side seam.  Top stitch the waist band vertically along the skirt side seam.

Flip your skirt inside out and slide your suspenders into the waistband by about 1/2 an inch.  Pin in place.

Carefully turn the skirt right-side out.  Top stitch just above the seam where the skirt meets the waistband.  Flip the suspenders up and top stitch along the front of the waistband just below the top.

Almost done!  Hand sew buttons into the back of the skirt catching only the inside of the waist band (not the elastic or the outside of the skirt).

Mark on the straps where you want the button holes to be.  I made a few on each strap so I could adjust the length of the suspenders.

Hem the bottom, sew buttons on the front if you want and you’re done!

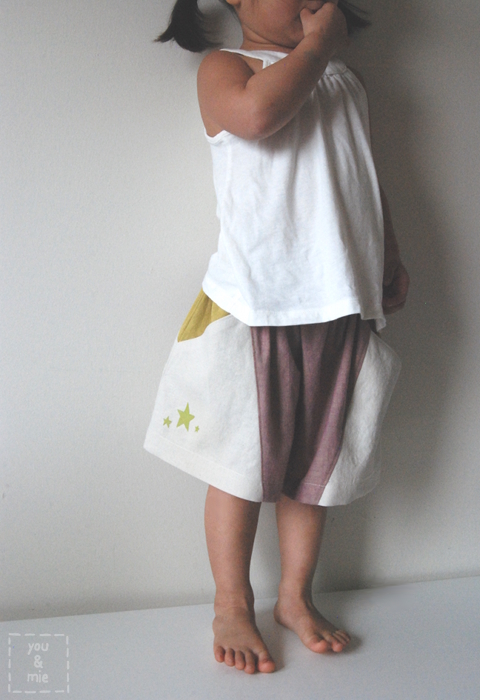
I played around with two different lengths in these pictures.  High waisted and HIGHER waisted.

Maybe too high?

Thank you so much for letting me share this tutorial with you today!  If you have any questions or think a part needs some clarification, please let me know – I’d be happy to help!  If you’re interested in the pink top my daughter is wearing, stop by my blog for a little how-to on this remix of Oliver + S’s Jump Rope Dress.

If you make a suspender skirt using this tutorial, please add it to the you & mie flickr group!  I LOVE seeing your creations!

***

I’ll be back with some fun photos from Quilt Market later this week.  Seriously, it was SO. MUCH. FUN.  Can’t wait to share it with you 🙂
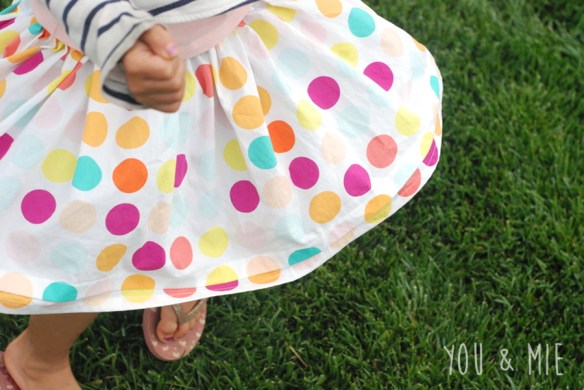
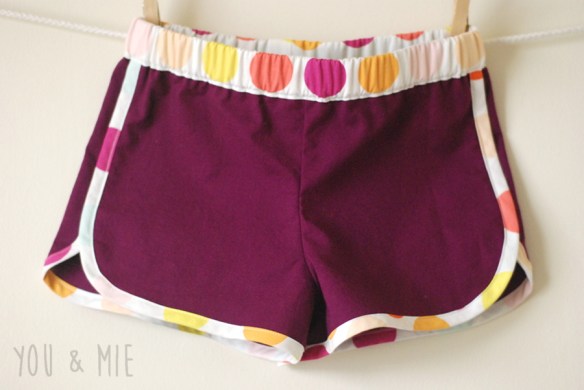
Tutorial: Reversible Circle Skirt

Since I’m busy with a bunch of different projects this week, I thought I’d repost a tutorial I did for Amy‘s Spring Fling series last month.  Most of you have probably seen this, in case you haven’t, it’s a super easy and versatile skirt that I’m sure you and your little one will love!  Hope you are all having a good start to your week!

_____________________________________________________

Spring is something that I am very excited about.  I live in San Francisco, so I’m pretty spoiled by mild weather, but the gray and the rain get me down just as much as anyone else.  I’m ready for some warm sunny days spent playing outside and going on picnics!  So that is what has inspired the project I’m sharing with you today.

I call this The April Showers Skirt (because, you know, April showers bring May flowers!) and it is a reversible circle skirt.  Of course, you can use whatever material you want for yours, but I chose to make one side gray and cloudy and used a bright floral print for the other to represent the changing of the seasons and the sometimes erratic weather patterns of spring.  The best thing about this project is, not only is it SUPER simple but, you get 2 skirts in one!

So let’s begin!  Here’s what you’ll need:
About 3/4-1 yard of lightweight cotton fabric in 2 coordinating fabrics
Elastic
Bias tape
Safety pin
Sewing essentials

For optional applique:
Scrap(s) of fabric
Fusible web

A couple of notes about choosing fabric:
1. Since you are layering two pieces of fabric and adding bias tape for the hem, you want to keep the fabrics lightweight so you don’t weigh it down and it’ll still have that bouncy, twirly effect that circle skirts are famous for.

2. Also, you’ll want a print that looks good from all angles since that’s how the fabric is going to lay.  If you pick something that has a clear up and down, your print will appear upside down on one side of the skirt (and sideways in other parts of the skirt).

3. Lastly, when choosing fabrics, hold them up against each other to see if one will show through.  Since I picked a light gray and a bold print, you can see a little bit of the print from the gray side, but I was ok with it.

To begin, you’re going to need to know how to make a circle skirt.  I used this awesome circle skirt tutorial from made to help me figure out how to make my circle skirt pattern.  You’re going to need the waist measurement and the desired length of skirt and a little bit of math to make this pattern, but Dana did a fabulous job of breaking it down, so go over there and make your pattern and then come back here!

(Note: In Dana’s tutorial she attaches the elastic to the outside of the fabric and leaves extra fabric in the length for hemming.  Here, we’re not going to hem the bottom, but we’re going to make an elastic casing from the material, so I figured it kind of balances out.  I cut my fabric exactly the way Dana described, and it worked fine.  If you plan on using a wide elastic or just want to be cautious, add an extra inch to the skirt length and you can always trim it at the end.)

Ok, so now that you have your custom circle skirt pattern, fold both of your fabrics into fourths and cut out your circle.

This is what it should look like when they are still folded.  If you unfold them, they should look like donuts.

If you’re going to add applique, which is optional, now is the time to do it.  Cut your scrap of fabric to the approximate size you’ll need and then cut your fusible web slightly smaller than that.  Follow the directions that are specific to the fusible web you have.

The one I use most often is Pellon Wonder Under and I love it.  It has a rough side and a paper backed side.  Place the rough side down on the wrong side of the fabric and iron it on.

Now draw your design on the paper side and remember to flip your image since you are drawing on the wrong side of your fabric.

Cut it out, place it on the skirt where you want it to go (at this point, there is no front or back to the circle skirt, so you can put it wherever you want).  Cover it with a damp cloth and iron it on.

It should be nice and adhered, but I always zig zag stitch around my entire applique to make sure it stays put!

Repeat with any other appliques you want to add to either side of the skirt (I decided to add the second cloud later, but I should have done it all at once).

Now to sew the two sides together, place them on top of each other right sides together.  Pin the inner circle together and sew all the way around.

Take one layer of the skirt and push it through the center of the circle turning it right side out.  Press.

Now we’re going to make the elastic casing by top stitching another circle around the waist leaving an opening to insert the elastic through.  Make sure your casing is slightly larger than the width of the elastic you’ll be using.

To insert the elastic, separate the two layers and find the opening that you left.  Attach a safety pin to one end of your elastic, and push it all the way around the circle back to the opening.  Sorry, I didn’t photograph this part, but take both ends of the elastic and sew them together, trim the extra off and sew the opening shut.  We’re almost done!

(At this point, you can measure the length and trim off extra fabric if necessary).  Pin your bias tape around the outside of the circle.

Leave a few inches of bias tape at the beginning unsewn, then top stitch all the way around.  When you get back to the beginning, you should be able to measure out where the bias tape needs to be sewn together.  Sew the two ends of the bias tape with the right sides together.  Press open and then finish top stitching the bias tape on.

And you’re done!!

Now your little one has two skirts to skip around in during the upcoming spring months!

I love both sides, but I think it’s extra fun to catch a peek of the colorful flowers on the underside of the gray.  So fun!

I feel like the possibilities are endless with this reversible skirt.  I might just have to make one for every season! 🙂

_____________________________________________________

Oh and don’t forget, if you make a skirt using this tutorial (or any tutorial or project on this site), I’d love to see it!  Just add it to the you & mie flickr pool!!

KCWC S12: Day 1 – Shirt to Skirt Refashion

Made it through Day 1 of Kid Clothes Week Challenge Spring 2012!  Did you know that there are 550 640 people participating!?!  You should check out the flickr pool to see all the amazing clothes being churned out this week.

I’m really excited to be getting around to some projects I’ve had floating around my head for awhile.  I’m MOST excited about the Jump Rope Dress!  I decided to get this pattern because it was available as a downloadable PDF pattern from the Oliver + S site and I have a minor obsession with PDF patterns.  Plus I’ve heard so many amazing things about O+S patterns that I thought I should try one.  Then I saw Gail’s Jump Rope Dress and it is perfection!!  The thing I love most about it, is that I would never have picked that fabric for this dress, but Gail did, and I LOVE the way that it came out.

So I made myself a little schedule for KCWC, especially for the Jump Rope Dress.  Gail pointed out that they did a sewalong for the dress on Sew, Mama, Sew, awhile back so I looked at their schedule and they broke it up into 7 days.  The first day was tracing your pattern and cutting your fabric, which I’ve already done, so I figured I could just do the other 6 parts over the next 6 days and have a pretty little dress at the end of the week!  Well that’s the PLAN anyways.

I still have about 3-4 little projects that I’ll work on each day on top of the Jump Rope Dress and we’ll just see how much I can get done.

I’ll just say upfront though, that I plan on spending more than an hour each day sewing.  Even today’s project which was supposed to be a super simple refashion took me about 2 hours.

I bought this shirt at the thrift store because I really liked the fabric.  From far away, it probably just looks grayish, but it’s actually got super colorful and super tiny stripes.

At first I was just going to cut out a rectangle over the pocket section of the shirt, hem it and make an elastic waistband and call it a day.  But of course, I like to complicate things.  I couldn’t use the section with the pocket because the sleeves started right there.  So I removed the pocket and sewed it back on right above the bottom of the shirt (yay, no hemming!).  Then came the idea for the pleats in the front, which I thought would look better with a flat front waistband and I didn’t want to fold over the pleated fabric, so I made a separate waistband.  A few mistakes and some ripped out and resewn seams (isn’t that the WORST?) and 2 hours later and I have this little skirt.  AND it somehow turned out too big!  I had to pin it for these photos, but I’m sure it’ll look great on her when she’s a bit bigger (like when she’s 4) 😛

I really do love it though.

Today’s task for the Jump Rope Dress was to make the placket.  Pretty intense, but following the sewalong post was really helpful.  I’m proud to say that I did not totally screw it up!  Plus, I have the hard part done and hopefully the rest will come together pretty smoothly.

I’ll try post an “in progress” pic of the dress every day that I work on it so you can see it come together.

Day one.  DONE.  Hope we can keep this up . . .

(it’s a joint effort, you know)

Tutorial: Lucky Chevron Skirt

I made this skirt for St. Patrick’s Day and though I realize it’s a bit late for you to make one, it’s really a great skirt for any time of the year.  This has been a pretty popular idea recently and my original inspiration was a skirt I saw a little girl wearing.  Hers had bunch of different colors (maybe 10?) in skinny stripes, pieced together to make a chevron pattern.  I wanted to recreate that skirt exactly (and maybe I still will), but for this holiday, I had these three lovely shades of green and greenish-yellow so I made some adjustments.  I decided to make my stripes different widths to make it more interesting, but you can make yours as skinny or wide, and all the same or all different, as you want.  And use as many colors as you want too!

Before I begin, I must add that I was just making this up as I went along and it may not be the best or the “proper” way to do things.  In hindsight, I definitely would have started out with more fabric, because I ended up with BARELY enough.  You need a lot more fabric than you’d normally need for a skirt because you cut away a lot (bummer)!  Anyways, here we go:

What you’ll need:
About 1.5-2 yards total in different colors
1 inch wide elastic
Safety pin
Sewing essentials

First cut your fabric into strips.  Like I said, you can make them as wide or narrow as you want.  I didn’t know how much fabric I’d need when I started, but as an estimate, I’d make sure you have enough strips to form 2 rectangles that are 1.5 times your desired length, by 2 times the waist measurement.  For example.  Yuki’s waist is 19 inches and I wanted the skirt to be about 9 inches long.  So I’d need two rectangles that are 38 inches (19×2) by 13.5 inches (9×1.5).  Again, this is just an ESTIMATE, so please go bigger if you can and don’t blame me if it’s not enough! 🙂

Here are the strips I cut.  The first one was about 1.75 inches wide, the second was 2.75 and the third was 2.25 inches.

The bottom strip in the picture is the waistband.  You’ll need a rectangle that is 3 inches wide and twice the waist measurement in length.

Start sewing your strips together by pinning them together along the long side of the strips, right sides together.

Continue adding strips to form one rectangle.  Then start again in the same pattern to make your second rectangle.  Because you want all your rows to line up perfectly when you piece them together later, try to sew your strips together keeping your seam allowance straight and consistent for all your strips.

I zig zag stitched each seam as I went along to prevent fraying.

When you’re done sewing all your strips together, your rectangles should look something like this.

Press all the seams in the same direction.  To keep those seams laying nice and flat, I top stitched along each strip in coordinating thread.  This step is optional.

Now we’re going to make an angled cut on each end of your rectangles.  The larger the angle, the sharper the chevron V is going to be.  I could already sense I wasn’t going to have enough fabric, so I made my cut at an angle smaller than 45 degrees.  This made my chevron V wide.

Whatever you decide, make sure you cut it exact on each end of your rectangles to form two isosceles trapezoids that look something like this.

Place them on top of each other, right sides together, make sure that the seams match up as closely as possible.  Pin and sew.

The line you just sewed is now the front center and back center of your skirt.  Press the seam open and it should look like this.

Chop off the top and bottom (along the white lines) to make them straight.

Next, you’d want to cut off the sides to make a rectangle.  My skirt was getting tiny at this point and since I didn’t want it to be a mini skirt, I cut mine at a slight angle to leave more room at the bottom.  Ideally though, if you have enough fabric, cutting it straight will give you a nice angle for your chevron pattern on the sides of the skirt.

Place your two rectangles right sides together and sew up the side seams.

Now to create your waistband, fold your strip in half, and sew the ends together to make a loop that is the same as the width of the skirt.

Move seam to the center and press open.

With right sides together, slip the waistband over the top of the skirt, lining up the seam with the center of the skirt in the back.  Pin all the way around and sew.

When you flip the waist band up, it should look like this.

Fold the top of the waistband in about 1/4 inch and press.

Now fold it down again to create a casing wide enough to fit your elastic.  The folded edge should come down just past the bottom of the waistband, covering the seam ever so slightly.

Pin the waistband in place.  Starting in the back, about 1 inch right of the center, start top stitching around the waistband, making sure the casing is wide enough for the elastic.  Sew all the way around and stop about 1 inch from the center, leaving a 2 inch opening.

Attach a safety pin to one end of your elastic and push it through the casing.

Sew the ends of the elastic together and finish top stitching the waistband to close the casing.

You’re practically done!  Just hem up the bottom of the skirt by folding and pressing it 1/4 inch and then another 1/4 inch to hide the unfinished edge and sew all the way around.

Done!

Unfortunately, I didn’t get very many good pictures of Yuki wearing the skirt since we were running out the door to go somewhere.  But she was definitely all decked out in green for St. Patrick’s Day!  And now she has a new bright skirt to wear through spring and summer.

There are so many variations of this skirt that would be fun to make.  What combo of colors and strip widths will you use?

Now I gotta come up with a project where I can use all the poor pieces I had to cut away from this skirt so they don’t go to waste . . .