Bunch-o-shirts

BunchOfShirtsSo this was actually part of my Kids Clothes Week project list, but I didn’t quite finish it that week.  I did finish the “All My Friends Are Dead” shirt and Yuki liked it so much that I was excited to get these done as well.  If you recall, she requested a dinosaur shirt, a robot shirt and a shirt with stripes.  So there you have it!  Three more t-shirts for my tomboy.

I didn’t actually intend for them to be so boyish.  I did make a bright pink one first but the rest of the knit that I had laying around happened to be dark.  The pattern is the Flashback Skinny Tee by Made by Rae in size 3T.  My daughter is more like a 2T, but since I wanted it to fit a little looser and fit for a long time, I went a size up.  I would recommend doing the same if you want a less “skinny” fit.

StripedShirt

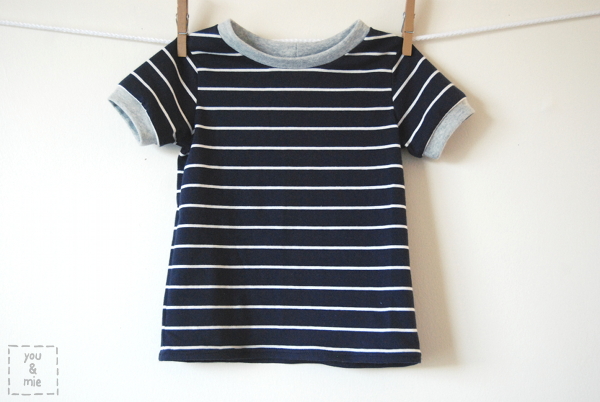
The first one is a simple tee with contrasting arm cuffs and neckband.  This was the easiest one to make not only because I didn’t paint anything on it, but also because adding cuffs is way easier than hemming sleeves (in my opinion).  Rae has a tutorial for making a short sleeved FBST here.

RobotShirt1

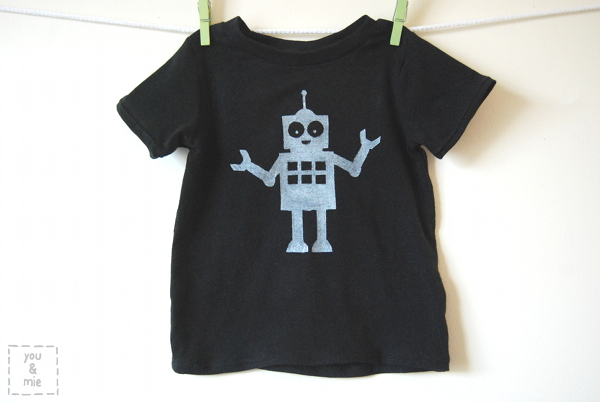
The second tee is the robot tee!  Simple solid black knit with hemmed sleeves.  I just used the same fabric for finishing the neck.  For both this tee and the Stegosaurus tee, I just searched for simple images/silhouettes on google image to use as a stencil.

RobotShirt2

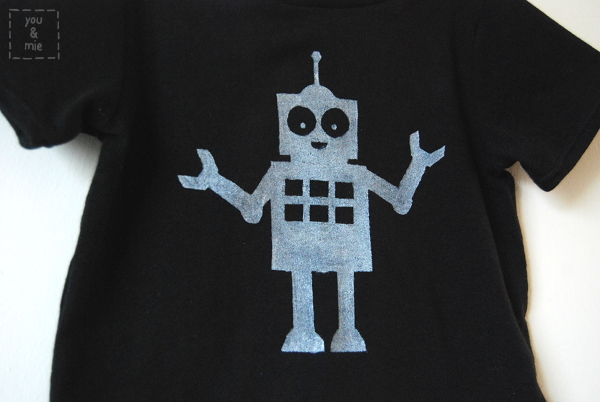
I printed them out at the size I wanted, cut it out to use as a stencil, traced it out on contact paper and cut the shapes out.  I know everyone talks so much about freezer paper stencils, but honestly, I have no idea what freezer paper is!  I really need to find out though, because contact paper does not work all that well.  It doesn’t stick to the fabric as well as I’d like, so it leads to wobbly lines and such, if you’re not careful.

DinoShirt1

Yuki’s favorite of the three is by far the “dinosaur shirt.”  Between this, the pink “dinosaur shirt” and the original (store bought) red “dinosaur shirt,” now she has three dino shirts!!  And I honestly think that I have to make 4 more because she wants to wear them EVERY DAY.  When we get dressed in the morning and give her some options for clothes she can wear, she keeps asking for “dinosaur shirt!”

DinoShirt2
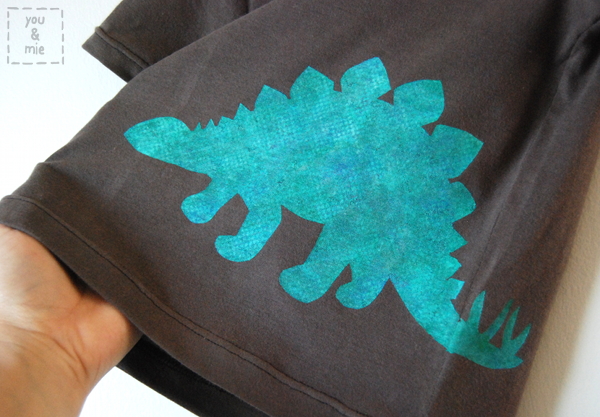
This is honestly my favorite too.  It’s made from a super thin, soft and comfy knit.  The stegosaurus wraps around the side slightly and I just used a bunch of different fabric paints in blue, green, silver and white to give it the multicolored look that it has.  At the last minute, I decided to take a quilted paper towel and lay it over the painted area.  I pressed it down on the paint to pick up any excess and when I lifted it, it gave it this really cool textured look.  Like a real dinosaur!

So, no pics of Yuki in the shirts, but I can tell you the dinosaur shirt is getting really good wear.  The others are comfy too, but they aren’t getting as much love.  😦

BUT I LOVE THIS PATTERN.  So basic.  So quick.  So many ways you can mix it up.  As of now, I’ve used this pattern at least 6 times and that’s more than any other pattern I own.  It comes in two size ranges: 12-18 months-5T and for bigger kids, sizes 5/6-13/14!  If you don’t own this pattern yet, I think you should go get it now.

I didn’t actually finish all the projects that I had lined up for Yuki during KCW, but the rest are on hold for now.  I have two fun projects coming up for next week – one is for the Roly Poly Pinafore Pattern Tour (a pattern by Imagine Gnats) and the second is my post for Elegance and Elephants‘ fun series, Knock it Off (the series is already underway, so go check it out!)

AND ALSO . . . I’m trying to sew more for ME!  So if any of it comes out decent and I work up the courage to model them, you may get to see some of it 🙂  We’ll see!

(Oh hey!  Did you enter the Zakka Sewing Book and Fabric Giveaway yet?  There’s still time!  The giveaway is open until Friday, May 10th at 5pm PST.)
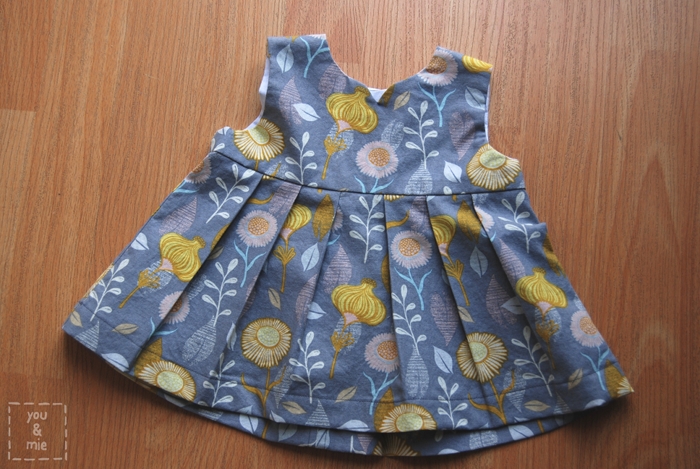
 

Geranium in Feathers!

FeatherGeranium2Kids Clothing Week Spring 2013 is starting in a few days and Meg invited me to share my favorite pattern over on the KCW blog as part of the weeklong wind up.  I chose the Geranium Dress/Tunic pattern by Made by Rae.  There aren’t a lot of patterns that I make more than once, but this one is so classic that I find myself coming back to it again and again.  You can see my full review and my past Geraniums over on the KCW blog.

And in honor of the post, I made a fun new tunic for Yuki!

FeatherGeranium3There are a ton of different variations of this top you can make, but I decided to go with something simple – sleeveless tunic, scoop neck, and a gathered skirt – since I had chosen such a busy print.

FeatherGeranium1I bought this feather print by Martha Negley awhile back from Stonemountain and Daughter because I loved it, though I wasn’t sure what I was going to use it for.  One of the great things about the Geranium pattern is how much you can change it up – pick a detailed print and keep the style simple, or choose a simple fabric and really play up the details.

FeatherGeranium5The tunic bodice is lined with some aqua fabric that I had in my stash and I made some piping to match.  The back closes with three blue buttons, which I realize now are totally crooked!  Oops!  😛

FeatherGeranium4I love this pattern!!  And now that the weather is warming up, it’s the perfect time to fill someone’s lil wardrobe with Geraniums!

Have you started planning or prepping for next week?  I’ve barely had a chance to think about it, but my goals are to not buy any new fabric and to sew with patterns I already own.  We’ll see what I come up with!

So what are you going to be sewing next week for KCW??

My Little Flower Girl

FlowerGirlThis past weekend my sister got married and if you follow me on Instagram (@youandmie), you’ve probably seen some sneak peeks of the fun and beautiful weekend.  The entire week before the wedding was pretty much devoted to wedding prep – I had wedding projects piled up all over the place.  Menus, table numbers, escort cards, signs, and of course, the flower girl dress.  But it all got done and everything went so smoothly – I really don’t think it could have been any more perfect.  The lovely bride and groom put together a really amazing wedding weekend and was surrounded by all of the people who love and support them – it was a really awesome thing to see.

Unfortunately, I didn’t take any pictures, so I can’t show you all of the little projects that I worked on, but as I collect pictures from friends and family members, and of course, the professional photographer, I may be sharing some of those with you.  My only big sewing project for the wedding was Yuki’s flower girl dress.  Since I didn’t get any pictures of her during the wedding, I made her put the dress back on yesterday and quickly snapped some new ones.  Amazingly enough – she really likes the dress!  She wore it for 9 hours straight on Saturday and never once complained or asked to take it off!  And the truth is, I like it too!

FlowerGirl1The pattern is the Oliver + S Fairy Tale Dress.  The dress is simple in it’s design (which is great for special occasions or for adding embellishments), though it is not necessarily a simple dress to construct, BUT the result is pretty stunning!  The pattern comes with two views: sleeveless and sleeved, with two different kinds of collars, an optional sash or waist tie.  For my version, I made it sleeveless, but omitted the collar and added a ribbon sash instead of the one included in the pattern.  I did, however add a lace overlay and my fabric choices, though they ended up looking exactly how I envisioned, made construction a bit tricky.

FlowerGirl2I made the dress in size 2T and it fits Yuki perfectly.  The bodice (for sizes 2T and up) have darts in both the front and back, which make for that perfect fit and professional look.  It has an invisible zipper in the back and is fully lined.  It also has an optional layer of tulle for skirt volume.  As you can imagine, there are a lot of steps to constructing this dress and I did quite a bit of hand sewing to give it a truly professional finish.  It takes time, but really, I think it was worth it!

FlowerGirl6All the materials besides the lace, I bought at Britex Fabrics.  I decided splurge on something high quality for this special occasion dress.  The main fabric is a synthetic satin in eggshell and is pretty thick.  I think this also made construction a bit trickier in places (the pattern calls for light to mid-weight fabrics) but I really love how well the fabric holds it shape because of the heavier weight.  I used a polyester lining that was a pain in the butt to work with – it was soooo thin and slippery and shifty.  Probably the right choice for this project, but still no fun to work with.  The ribbon is a double sided satin ribbon that was chosen to match the color scheme/bridesmaids dresses.  The lace was a last minute decision and I picked that up at my local Joann’s.

FlowerGirl3The flowers in these pics are not her actual bouquet from the wedding, but rather those from a table at the wedding.  The flowers for the wedding were done by my sister’s friend, Jaclyn K. Nesbitt Designs, and they were all soooo gorgeous!  I wrapped these up in some ribbon so Yuki could have another bouquet.  I think the flowers were the most exciting part of the flower girl job for Yuki!

FlowerGirl5And she was such a trooper the entire wedding.  She didn’t have any meltdowns, she kept her dress on (and UNSTAINED) the entire time and escorted me down the aisle during the ceremony.  She had to leave the ceremony towards the end because she was starting to get bored and when she watched the wedding party walk back down the aisle at the end she started getting really upset saying she “didn’t get married” because she was “too loud.”  Omigosh, it was too cute.  She thinks that all of us who walked back down the aisle got married and she didn’t get to because she was making too much noise.  Poor sweet thing.

FlowerGirl4Anyways, this dress was definitely a labor of love and I don’t even know if she’ll ever wear it again, but I think it was worth it.  She was the cutest flower girl I’VE ever seen and I think she felt pretty darn special.  I think I will use this pattern again, though in more casual and lighter weight fabrics.  I’d definitely recommend this pattern for a special occasion dress!  Like all Oliver + S patterns, it is a high quality pattern with clear instructions and great diagrams.  You know the techniques are legit and you always end up with a professional looking garment.  I feel like I give this same shpeal every time I talk about O+S patterns, but it’s always true – you really can’t go wrong with them!

So it’s been pretty busy around here and just when you think things might settle down, KIDS CLOTHING WEEK rolls around!  🙂  Can you believe it’s already next week?  I honestly haven’t given much thought about what I’ll be making and I probably won’t be quite as involved as I have been the last 2 rounds, but I am looking forward to getting some good ol’ kids clothes sewn.  If you don’t know what KCW is, check out all the important info here and know that it is a TON of fun.  And it’s not too late to get in on the action!  Coming up later this week, I’ll be posting on the KCW blog about one of my favorite patterns, so be sure to check that out 🙂

Handmade Kids Clothing Swap

buttonA few months back, Robin from Nested in Stitches contacted me about this idea she had about rounding up a group of sewists and bloggers who sew kids clothes and having us all sew for each other’s kids.  Sounds like fun right?  Well the best part about it was the amazing group of people she gathered to participate!  And we didn’t know who was sewing for anyone else, so it was super exciting to see the outfits start coming in.  Read about all the details and who was involved in the Handmade Kids Clothing Swap here.

The wonderful Robin herself was the one who sewed for my daughter!  She took a look at my Kids Clothing Inspiration pinterest board and was inspired to make an ADORABLE outfit for Yuki.  Here’s a sneak peek and then a bit from Robin about the outfit she made . . .

sneakpeek_collage

Here’s Robin:

This swap was so much fun to do! Cherie’s pinterest board is full of fun, graphic kids clothing. I know she loves to dress Yuki in unisex clothes, and I know Yuki can rock that look. I also wanted to sew something that I knew a 2-year old would want to wear- and you can’t go wrong with a knit. After happening across some super soft double knit at Bolt, I decided to recreate this look.

I used the Oliver + S sailboat pattern for the top in a size 2T. Because this pattern uses a facing inside the neckline, it’s a perfect candidate for knit fabric. I ended up sewing the top with the wrong side of the knit facing out because I loved the heathered blue-grey color. (The inside of the top is a solid navy blue). Because of the nature of the double-sided knit, this choice is going to give the top a causal, somewhat wrinkly look. The shorts are sewn from Figgy’s banyan pattern. I used some navy and white gingham shirting I had on hand (and also from Bolt). The sizing on the shorts seems to run a little on the large size, and these are the 18 month size. The pattern is awesome and the shorts are adorable. I took the lazy approach and didn’t sew the zip (or any) fly… I decided that a two-year-old didn’t need a zip fly, and I wanted to keep the look super casual. Finally, to take the whole look to the next level, I knit a little hat for Yuki in a gorgeous grey alpaca yarn I happened to have on hand (the colorway I used is called ash). It’s the perfect cool, every so slightly bluish grey, so was a fantastic match for this outfit. The pattern is Rambled, and I knit it in the smallest size, since I know that alpaca is likely to grown with time.

It was such a blast to sew for Cherie and Yuki! The whole experience is a little nerve-wracking, as you can imagine it would be if you are sewing something for another sewist’s child to wear! But it was so much fun to be able to break out of my own sewing habits and be able to sew something that hopefully embodies someone else’s style. And? It fits! (Phew!)

outfit1AND?  We LOVE it.  The outfit fits her perfectly and suits Yuki so well!

sneakpeek_allRobin really hit the target on this one.  The outfit is totally comfy, practical and so so cute.  Not only that, but Robin’s sewing skills are impeccable!

shirtI can definitely see her wearing this outfit all the time and it’s got enough room to fit her for awhile.  The shirt is suuuuper soft and a beautiful heather blue color.  It’s a simple style with just the right amount of detail to make it unique and stylish.

shortsI love the plaid Banyan shorts too.  Robin added some fun elements like gray pockets and a cute button to match the shirt.

And to top it all off, she knit this ADORABLE lil hat for Yuki.  I won’t lie, when I saw it I really hoped that it was for me.  But alas, it didn’t fit my noggin’.

hat1Probably cuter on her anyways.

hat2I just want to give a HUGE thanks to Robin for the truly amazing outfit for Yuki.  I can tell that a lot of thought and care when into crafting these garments especially for my daughter.  And of course for organizing this fun clothing swap and letting me be a part of it!

outfit2

For the outfit I made, I was assigned to Sanae and I was soooo nervous to sew for her!  But it turned out really fun and rewarding, so head on over to her blog to see the outfit that I made for her daughter, K!

outfit

sneakpeekAND be sure to check out all of the participants’ blogs to see the fantastic handmade outfits we swapped!

robin from nested in stitches
danielle from my sparkle
delia from delia creates
gail from probably actually
heather from well-crafted
kristin from skirt as top
meg from elsie marley
sanae from sanae ishida
vanessa from lbg studio

A Simple Blouse from a sunny spot

SimpleBlouse1The second garment I made from a Japanese sewing book is this simple blouse from a sunny spot 女の子のまいにちの服 (Every day clothes for girls), same book I used for this top.

SimpleBlouse2

asunnyspot7asunnyspot6It’s called “Simple Blouse” and it really is exactly that.  I picked it, once again, because of it’s super simple construction.  I was still looking for something with directions so straightforward that I could figure it out by diagram only.

asunnyspot8This top certainly fits the bill.  It’s just a front and two back pieces with sleeves built in (so separate sleeves to sew in).  The neckline is finished with bias and there is a simple folded button placket and that’s it!

SimpleBlouse3I didn’t realize this earlier, but looking at these pictures, the top looks, dare I say, almost hospital gownish!?

SimpleBlouse4But in a cute way, right!?  😛  If you were to make this top, I might recommend a cute print, like the small floral pictured in the book, and steer clear of solids.  Especially anything white or minty, to avoid the whole hospital gown thing . . .

Since I made these first two tops from Japanese patterns months ago, I’ve tried a more slightly more complicated pattern (with success!) which I hope to share with you soon.  And after my wonderful guests share their knowledge with us next week during the Japanese Sewing Book Series, I know I’ll be pumping out garments from Japanese sewing books like crazy!  I can’t wait!

SimpleBlouse5She’s starting to get a hang of this peace sign thing!

Again, if you’re interested in purchasing this book, you can find it on Amazon, Etsy, or Kinokuniya.

If you haven’t entered the Miss Matatabi Giveaway, make sure to do so by Sunday at noon PST!

And the series starts on MONDAY!  Be sure to come back each day next week for Japanese sewing book tips, translations, and inspiration from my amazing and talented guests Kristin, Sanae, Meg, Frances, and Robin.

JSBS_button500

you & mie is an Amazon affiliate.  I will earn a small commissions for Amazon purchases made through links provided in this post.

A-Line Tunic from A Sunny Spot

ALineTunic1I made my very first sewing project from a Japanese sewing book back in August from the book a sunny spot 女の子のまいにちの服 (Every day clothes for girls).

asunnyspot1When I was in Japan over the summer, I picked up a couple of pattern books including this one.  It has a lot of simple but cute, very feminine outfits for little girls.  If you’d like to see more pictures from the book, Japanese Sewing Books has a thorough book review here.

asunnyspot2When I decided to sew up my first project, I picked the cute “A-line tunic” because it is adorable but also a super simple sew.  Even though I couldn’t understand the Japanese directions, I could easily tell how it was constructed by looking at the diagrams.

asunnyspot3asunnyspot4It is just two pieces (front and back) plus bias for the neck and arm holes.  Add some gathers and lace or piping along the neckline and you’ve got a sweet and twirly little tunic.  I highly recommend this as a starting project for newbies to Japanese patterns!

asunnyspot5Of course, I didn’t realize at the time that the book’s smallest pattern size was still too big for Yuki.  Oops.

ALineTunic2I used this double gauze Nani Iro Melody Sketch that I picked up in Japan and it is probably one of my favorite fabrics ever!!  I think it’s so puuuurty.  It’s from an older line, so it’s harder to find, but it looks like there is still some available here.  Double gauze is really lightweight, so it hangs really nicely and it’s a perfect top for warm weather.

ALineTunic4Well it’s finally starting to fit her and I think it’s one of our favorite tops now.

ALineTunic5ALineTunic3Again, it was definitely a manageable project for a first timer.  The hardest part for me was finding the pattern pieces I needed on the pattern sheet.  If you’re interested in purchasing this book, you can find it on Amazon, Etsy, or Kinokuniya.

I have one more top that I’ve made from this book to share with you later this week.  But until then, I wanted to make sure you all knew about this great resource for sewing from Japanese sewing books.  It’s called Japanese Sewing Books!  You really should check out her site for a dictionary of sewing terms, help with understanding patterns, plus translations, book reviews, free patterns and sew alongs.  It really is a fantastic starting point if you’re a beginner to Japanese patterns and between that site and the Japanese Sewing Book Series here next week, you’ll hopefully be ready to tackle those patterns with confidence!

I’ve loved seeing all the projects that you guys have sewn up from Japanese sewing books.  Please keep sharing your links with me – they are very inspirational!  Until next time!

you & mie is an Amazon affiliate.  I will earn a small commission for Amazon purchases made through links provided in this post.

Baby Geranium

I only made a few gifts this holiday season, but when I found out I was going to be visiting my favorite lil baby, Logan, I knew I had to make her something.  Logan is 7 months old and the daughter of one of my best friends from high school.  She lives in LA and she is precious!  And since I had Geranium on the brain, I just had to sew up another one!

Logans Geranium1The pattern is Made by Rae’s Geranium Dress pattern and if you’ve checked out the pattern, you’ll know there are a ton of options you can choose for the dress.  I was tempted to stick with my favorite combo (see my eyelet version), but decided I should try something at least a little different!  With the advice of Melissa and Kristin, I settled on something simpler for lil 7 month Logan.  Tunic length (more practical for the soon-to-be crawler), no sleeves, pleats (Logan is a modern and sophisticated gal) and of course, the notch.  I can’t forgo the notch!

Logans Geranium2Most patterns I own, I’ve only sewn once.  This pattern is one I know I’ll sew from over and over again.  I already have ideas for lots of cute different Geraniums, but alas, Yuki only has one body.  Good thing this pattern goes up to size 5T!  Plus it’s a really simple yet beautiful project, so it makes the perfect gift!

Logans Geranium3Here’s a close up of the notched neckline.  Definitely my best yet (out of two), but still not perfect.  It’s got a tiny dimple near the bottom that I couldn’t press flat.  I’ll get it right one of these times!

The fabric is from the line Timber & Leaf by Sarah Watts (you should check out the rest of the line – it’s gorgeous!).  I bought it at one of my new favorite fabric stores in the Bay Area, Stonemountain and Daughter in Berkeley.  I’ve gotten a lot of amazing things there recently and if it weren’t across the bay, I swear, I’d be there all the time!

Logans Geranium4The back closes with 3 beautiful blue buttons just like Logan’s eyes.  I was going to sew them on with gray thread, but the needle I happened to grab already had some almost-neon yellow thread in it that I ended up using.  Thought it went well.

I made the dress in size 6-12 months and I think it’ll still be a little while before she can wear it.  But by then the weather will have warmed up and it’ll be perfect for a crawling and cruising and maybe even walking lil Logan!  Oh, they grow up so fast!!  *sniff sniff*

I’m slowly getting back into the swing of things around here, but I’ve been a bit under the weather so it’s been tough.  To be honest, I haven’t touched my sewing machine since I left for my winter vacation 2 and 1/2 weeks ago even though I’ve already been home for over a week!  I’m hoping to get my sewing mojo back again soon.  But don’t worry, I’ve got lots of new projects planned for around here, including my post for the Basic Bodice Design series over on iCandy handmade coming up next week!

How are you doing?  Did you take a little break after the busy holiday season?  Or did you dive right back in?

Maggie Mae Tunic and a GIVEAWAY!

I’m really excited to be the next stop on the Very Go To Christmas pattern tour!  Go To Patterns really is the place to go if you’re looking for fun and classic patterns.  They carry patterns for everything from clothing and gift bags to quilts and stuffed animals from a variety of great designers.  Andrea is the mastermind behind the pattern shop and the blog, The Train to Crazy, and she’s created a really amazing collection of must-have patterns.  It’s definitely worth checking out.

maggiemae1I chose the Maggie Mae Tunic by Shwin & Shwin to review because it’s been on my to do list for a very long time.  I actually purchased this pattern before KCWC in the fall, but never got around to making it until now.  I wish I hadn’t waited though because I. Love. This. Tunic. maggiemae5
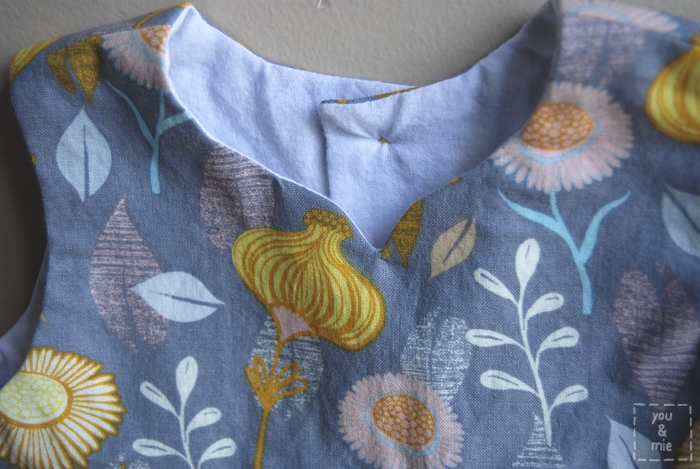
I just think it’s adorable and I’ve thought so since I first saw the pattern come out.  I love the colorblocking, the curved pieced bodice, the little cap sleeves, the pleats – I love how stylish it is, but still so appropriate for kids (Shwin & Shwin has a knack for designing kids patterns that balance style and practicality). And it really can be made for any occasion – from casual playwear to special occasion – depending on the fabric you choose.  I used this gorgeous Kaffe Fasset woven ikat and shot cotton that I picked up at Stonemountain & Daughter in Berkeley. sneakpeek maggiemae3 
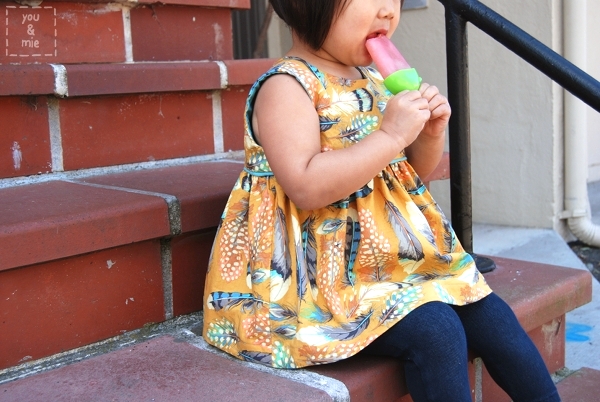
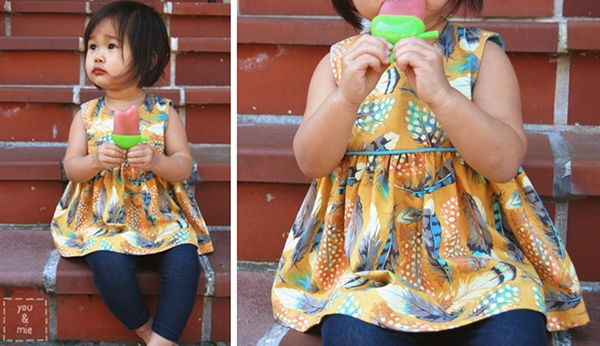
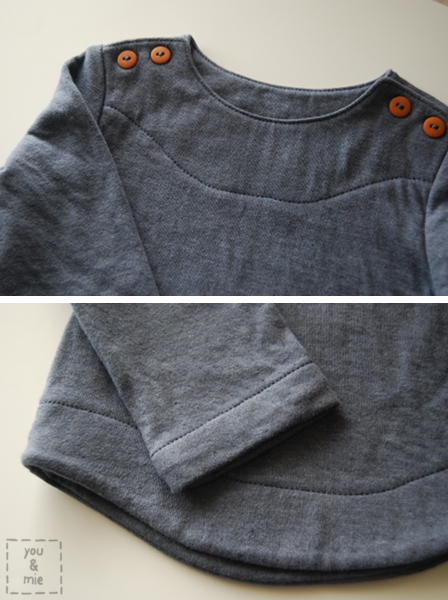
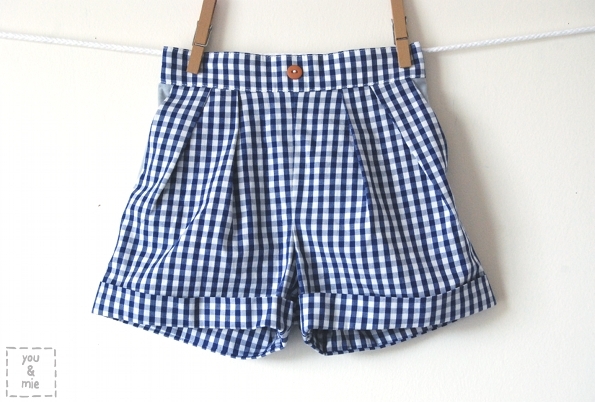
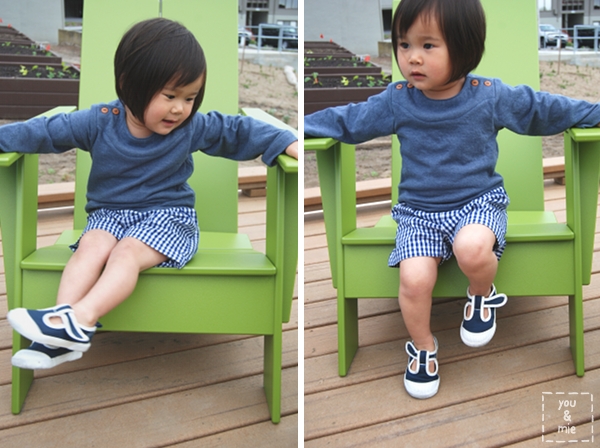
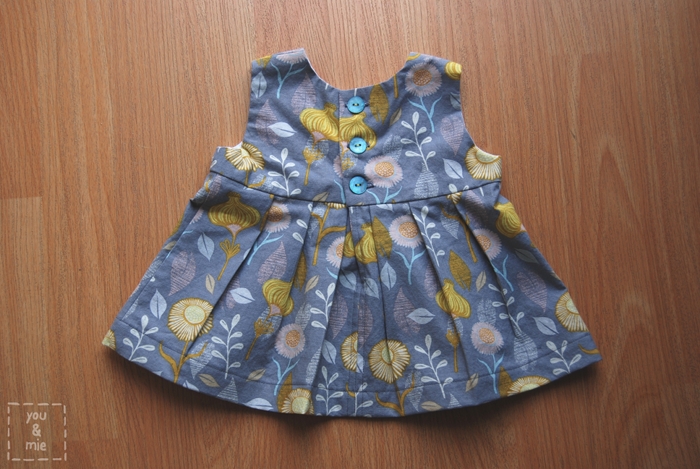
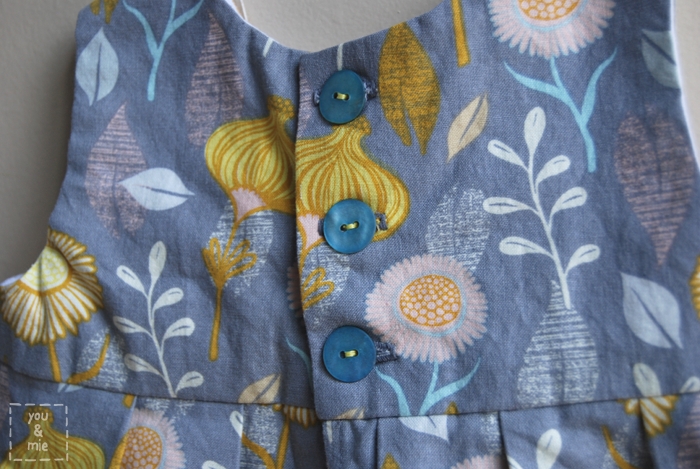
The Maggie Mae can be made as a tunic or a dress (the version I made is the tunic) and comes with inseam pockets and buttons in the back. maggiemae4 This project is a good intermediate beginner pattern.  The construction is fairly simple even with the curved bodice piecing.  You’ll have to do some pleating and of course buttonholes, but if are comfortable with those things, you can sew one of these up in a snap. Despite that, this project was a little bit of a nightmare for me to sew up (at no fault of the pattern – purely my own stupidity).  I just wanted to share the story with you so you know that I have really bad sewing days too.  Because this pattern is pretty simple, I was excited to get it done quickly.  Well I was finishing an edge with my serger, which I’m still learning how to use, when a corner of the bodice was gobbled up into the serger with the slicing blade on, so SNIP!  Off goes a small corner of the bodice. 😦 Then, it literally took me forever to get my pleats looking good – centered, evenly sized and spaced.  Unfortunately, there are no pleat markings on the pattern, so you have to figure it out yourself and I don’t know why it took me so long – but I must have pleated, pinned, basted and torn them out 5 times before I got it just right. When I was just about done, I accidentally hemmed the tunic up in a thread that stood out a lot more than I expected and I didn’t like it.  As I was tearing the hem out with a seam ripper to do over, I tore a small hole in the front of the dress at the hem line.  WTF – is this project trying to kill me!?  Have you ever had a project like that?  Where everything goes wrong?  And to top it all off, I had meant to make this a dress and didn’t realize until I put it on my daughter and her booty was hanging out the bottom that I had used the tunic measurements instead!!!  Haha, seriously, I was having issues that day.  BUT, despite all that, I still looooooove the way it came out.  So all of that to say, even if you’re a complete knuckle head like me, you can still make this adorable top/dress (just make sure you’re reading the appropriate measurements off the chart depending on whether you want to make a skirt or a tunic). maggiemae6 I made the size 2T for my 2 year old and it fits her pretty well.  The only thing that I would change if I make it again (and I’m sure I will), is to lengthen the top bodice piece just a little bit to make the armhole a little roomier.  It fits her just perfectly, if not a little snug there.  Otherwise, the sizing seemed just right. maggiemae2 I love that there are sooooooo many possibilities with this dress depending on what coordinating fabrics you choose.  I’m already dreaming up combinations for the next one.  What colors/prints would you choose? Well lucky for you, you have a chance to win an amazing giveaway prize and trust me, you’re gonna want to win this. {CLOSED}

Enter to win a shopping spree at GoToPatterns.com and Sew Fine Fabric!

Go To Patterns PDF sewing patterns 

THREE WINNERS!

Go To Patterns sewing pattern giveaway

Click here to enter the giveaway via Rafflecopter!

Go check out the rest of the Very Go To Christmas posts here:

Handmade Therapy Nov. 29th a pretty cool life. Nov 29th Sew Much Ado Nov. 30th Simple Simon and Co Dec. 1st One Little Minute Dec. 1st The Cottage Home Dec. 2nd Sew country chick Dec. 2nd Nap Time Crafters Dec. 3rd A Little Gray Dec. 3rd skirt as top Dec. 4th you & mie Dec. 5th Boy, Oh Boy, Oh Boy! Dec. 5th Me Sew crazy Dec. 6th see kate sew Dec. 6th Delia Creates Dec. 7th

And what Yuki photoshoot could be complete without one of these pics!?

maggiemae_peek2

Haha – I love this kid.  I hope you’re all enjoying getting ready for the holidays.  Please go check out Go To Patterns – I’m pretty sure you’ll find so many things you love.  And be sure to enter the Washi Giveaway here (ends Friday, December 7th at 5pm PST).

Thanks, as always, for stopping by and I hope you’re all having a great week 🙂

Happy Halloween from my sneaky lil fox!

Happy Halloween!  Today is a big day for us over here.  Not only is it Halloween and Yuki’s first in preschool (meaning her first Halloween parade and party), but it’s the SF Giants Parade.  We won the World Series!  Again!  And this city goes craaaazy when it’s time to party!  It’s estimated that over a million people will gather to celebrate the win in our little city.  But I’m gonna miss the party to hang out with this little fox and her classmates.

When I made the Rain Cloud costume, I never thought it would be Yuki’s actual Halloween costume.  I was proved right when Yuki hated the costume and figured out within seconds how to rip it off (if you’re wondering, there was a lot of pleading and a bit of bribery during our photo shoot :)).  So I started a search for a new costume idea.  Since Yuki does not like hats, hoods, ears, tails, or anything bulky hanging off her, I felt pretty restricted in my choices.  I was trying to think of a costume that would require no more than regular clothes, but none of the ideas felt right or had any real meaning to her.

The fox idea was one of the firsts, but I quickly dismissed it because I knew Yuki would hate it.  She’s into the show “Dora the Explorer” and she loooooooves Swiper the Fox.  Swiper is the show’s villian.  He’s a sneaky little fox that shows up and swipes things from the other characters.  When she first started watching the show, she was totally scared of Swiper and she’d even cry a little when he came around.  But soon she couldn’t stop talking about him.  She’d take things and hide it behind her back and say, “Swiper took it!”  I think it was part of her alter ego.  She would sometimes refer to herself as Swiper and also giggle and say, “sneaky fox!!”  Pretty funny kid, that Yuki.

Anyways, after considering dozens of other options, my partner, Hideko, persuaded me to go for the fox outfit because it suits her so well.  I decided not to make a Swiper costume, but just a regular ol fox.  I have to say, I’m pretty pleased with how it came out!

The costume is pretty similar to the Totoro costume I made last year in terms of construction.  In fact, I used that costume to make the pattern for this one since it was the perfect size.  I used sweatshirt knit which is soft inside and warm, but not quite as much as fleece.  Unfortunately, it barely has any stretch which I thought was weird, but it still works.  The white fabric is also sweatshirt knit, but I sewed it on with the wrong side out so it’d be soft and fuzzy.

I moved the zipper to the front so I could attach the hood to the back and narrowed the wrists and ankles.  I added visible pockets to the front.  I wanted deep pockets for all the things Yuki would swipe (usually just rocks) and decided to make them contrasting for a fun visual look.

I added a little fox paw print to her booty, just for fun too.  All the details are just top stitched on.  Gotta love that knit doesn’t unravel!

So does she love it?  No.  I still have to struggle with her a bit to put it on and she definitely does not like the hood on (again, this photo shoot involved pleading and lots of treats!).  But I think she likes being a fox and she also gets excited when she sees other kids in costume.

Today will be the real test.  First her school Halloween Parade and then her first time really going trick-or-treating tonight!  Let’s see how much loot this fox comes away with!  Most of it is going to be mine anyways 🙂

Big festivities for you tonight?  Finish your costumes in time?  If you’ve made costumes for any of your kiddos, be sure to link it up at the Project Run & Play costume link up party and check out tons of other cute costumes!

Happy Halloween to you and your family!  And GOOOOOOO GIANTS!!!

KCWC Day 6 + 7 – Striped Swing Coat and a Recap

KCWC is officially over!  I have one final project to share that I worked on over the weekend – it’s a the Stylish Double Breasted Coat pattern from Dear My Kids.

I totally stole the idea to make this coat from Jessica, when she mentioned it in her KCWC planning post.  And then she didn’t even make hers.  Hehe, I basically stole her project.  Thanks Jessica!  😛

The pattern was pretty simple and very easy to follow.  I made the coat in the 2T size and didn’t bother making any adjustments.  The coat came out super long on Yuki – It’s about the length of a dress and I have to fold the sleeves up.  I probably should have looked at the measurements and shortened everything, but I wasn’t thinking.  Now the coat will fit her for several years! 🙂

I made the coat in a striped knit (continuing the knit theme of my KCWC collection) and lined it with a really soft cream colored knit.  I added a layer of fleece in between and so the coat is SUPER soft, thick and warm.

Of course, with the jacket getting so thick, I did have trouble sewing some parts and in fact, I since there was no way of getting the buttonhole foot to work, I decided to hand sew the button holes.  The first tutorial I looked up was a basic blanket stitch around the buttonhole.  I kinda like it/kinda hate it.  While it’s got a cute hand stitched touch, it also looks a bit messy and frankensteiny.

I think this could be really cute on a different type of garment, if done well, in a contrasting thread for a decorative look.  I’ll try remember that for later.

Anyways, I’m done!!  I checked off the 6 main things I had on my KCWC list.  I feel a pretty huge sense of accomplishment for not only finishing 6 garments but because I tackled knits – which I’ve always been a bit scared of.  I’m by no means a knit expert now, but I feel a bit more confident about sewing with knits and won’t be scared off by them so easily.  I finally learned how to use my serger and I’m feeling more confident about using that too.  And I LOVE it!  I’ll be using it on all my garments from now on.  I don’t know why I was so afraid of it!

So here are the things I made last week.  Oh, and I should clarify – KCWC is a challenge to sew for an hour each day for a week, but since I sew that much on a weekly basis, I like to challenge myself a little differently.  Last week, I decided to make Yuki a fall wardrobe that is appropriate for her active toddler lifestyle 🙂  (click on the photo to check out the post)

Phew!  What a fun week!  If you haven’t already, you should definitely go check out the elsie marley flickr pool where everyone has been uploading their KCWC creations.  There is so much amazing inspiration there and browsing through all the pictures is my favorite part of KCWC.  If you didn’t participate this time, don’t worry, there will be another one in the spring!  Thanks so much for hosting, Meg!

Alright, back to work.  You’d think that after so much sewing in one week, I’d be burnt out, but I’m actually really pumped to tackle more projects.  This week I’ve got some custom order stuff I’m working on, pattern testing, a tote bag I want to make and maaaaybe something for me?  Plus I’m itching to make a dress after all this unisex knit stuff I’ve been working on 🙂

Happy Monday!