Four Seasons Pillow Cover GIVEAWAY! {CLOSED}

CONGRATS CATELYN!  You are the winner of this giveaway and you should have received an email from me!  Thanks to everyone for entering!

It’s Giveaway Day!

If you’re not familiar, Sew Mama Sew hosts a huge collection of giveaways, for either handmade items or supplies (like fabric and patterns), twice a year.  Today is the day when all the giveaways are listed, and you have until Friday to enter as many as you want!

Irome Pillow by you & mie

I’m going to be giving away this Four Seasons Pillow Cover that I made from Kokka’s new Irome fabric collection.  The pillow cover measures about 15×15 inches and is perfect for a 16×16 inch throw pillow.  It has a simple envelope style closure in the back – no buttons or zippers.  The pillow form is NOT included.

Irome Pillow by you & mie

Giveaway details: CLOSED!
– Giveaway will remain open until Friday, May 16th at 5pm PST
– Winners will be chosen at random and will be contacted by email
– Open to all (I will ship internationally)
– Void where prohibited

Here’s how to enter:
– Leave a comment on this post telling me what your favorite season is and one reason why!

Additional entries:
PLEASE LEAVE A SEPARATE COMMENT FOR EACH
– Follow you & mie on Facebook and leave a comment telling me you do so.
– Follow me on Pinterest and leave a comment telling me you do so.
– Follow me on Instagram and leave a comment telling me you do so.

(maximum number of entries is 4)

I might try and post another giveaway later today with some fabric and other goodies, so check back in for that.  In the meantime, be sure to take a look at all the other giveaways happening this week on Sew Mama Sew: Handmade Items and Supplies.

Best of luck!!

*This promotion is in no way sponsored, endorsed or administered by, or associated with, Facebook, Pinterest or Instagram. We hereby release Facebook, Pinterest, and Instagram of any liability. No purchase necessary.  you & mie takes no responsibility for packages lost by the postal service. Giveaway starts Monday, May 12th and ends Friday, May 16th at 5pm PST. Once the giveaway ends, winners will be chosen at random and contacted within 24 hours by e-mail. This post will be updated with winners’ names. Winners will need to respond within 48 hours to claim their prize or another winner will be chosen. Giveaway is void where prohibited.*


Four Seasons Irome Pillows

When I got a chance to play with Irome, the new fabric collection from Kokka, I was inspired to try some quilty things.  And I’m sharing the two pillow covers I made over on the Kokka blog today!

Irome Pillow by you & mie

I was inspired by the four seasons, represented by four different colorways, but I totally screwed up and got my seasons in the wrong order!  Oops!  😛  You can read all about it and more details about the fabric and pillows here.

Irome Pillow by you & mie

Special shout out to Jessica, super quilt master mentor, who helped me figure out how to quilt the pillow cover above.  I don’t quilt often, but I had a ton of fun with these and I’m excited to try more!  Maybe improv next?

Oh!  And next week is Sew Mama Sew’s Giveaway Day and I’m going to be giving away one of these pillow covers to a reader, so be sure to check back in for that!

And if you haven’t entered the Happy Homemade: Sew Chic Kids giveaway yet to win a Japanese sewing book translated to English, you have till Friday evening!  Don’t wait!

Ok – Kokka blog.  Go now.

Follow my blog with Bloglovin

Happy Homemade: Sew Chic Kids Review and GIVEAWAY! {CLOSED}

*CONGRATS to Natasha Tung, the winner of Happy Homemade: Sew Chic Kids*

You guys know that I love and adore Japanese sewing books right?  I mean, I did an entire series on them.  How to buy, decipher and sew with them even if you don’t understand a bit of Japanese.  Well, if you didn’t know that I love Japanese sewing books, now you know.  And I truly believe that anyone can sew from these sewing books without knowing any Japanese.

BUT I also truly believe that there is no reason to make things harder for yourself than necessary.  So now that the ever popular Happy Homemade Vol. 2 has been translated into English, I am psyched because, not only is this a AWESOME book of patterns, but it’s also a great way to familiarize yourself with Japanese sewing patterns without dealing with the foreign language!  Here it is, Happy Homemade: Sew Chic Kids!

Sew Chic Kids Review & Giveaway // you & mie

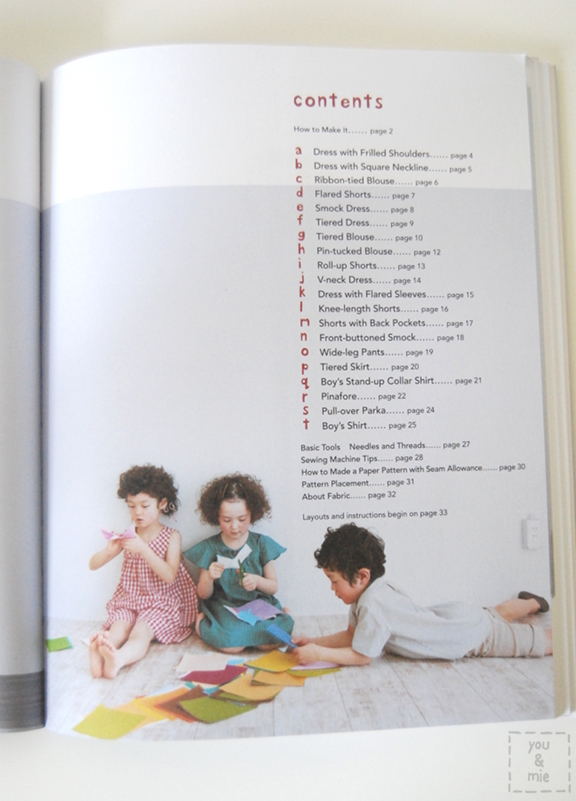
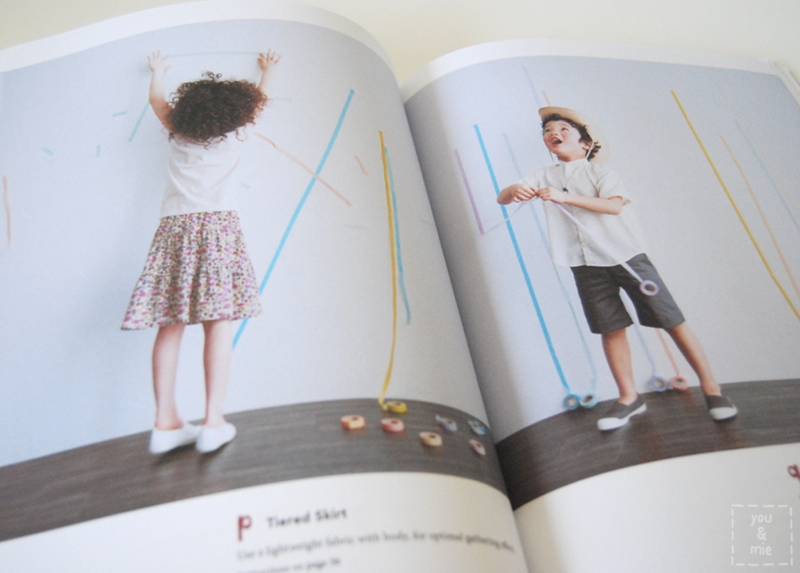
In this book, you get 20 patterns.  Dresses, shorts, shirts, skirts, blouses, pants, and a pullover.  There are a lot of great basic patterns that you can basically build a wardrobe from and I love that there are patterns that are for girls, boys, and plenty of gender neutral stuff.  And all REALLY CUTE!

Sew Chic Kids Review and Giveaway // you & mie

Sew Chic Kids Review and Giveaway // you & mie

Sew Chic Kids Review and Giveaway // you & mie

Sew Chic Kids Review & Giveaway // you & mie

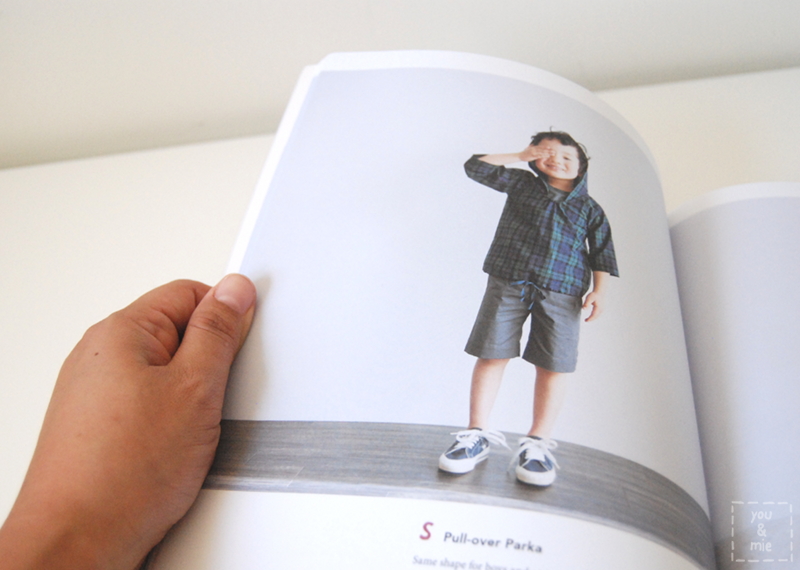
This Pull-over Parka is high on my sewing to do list!!

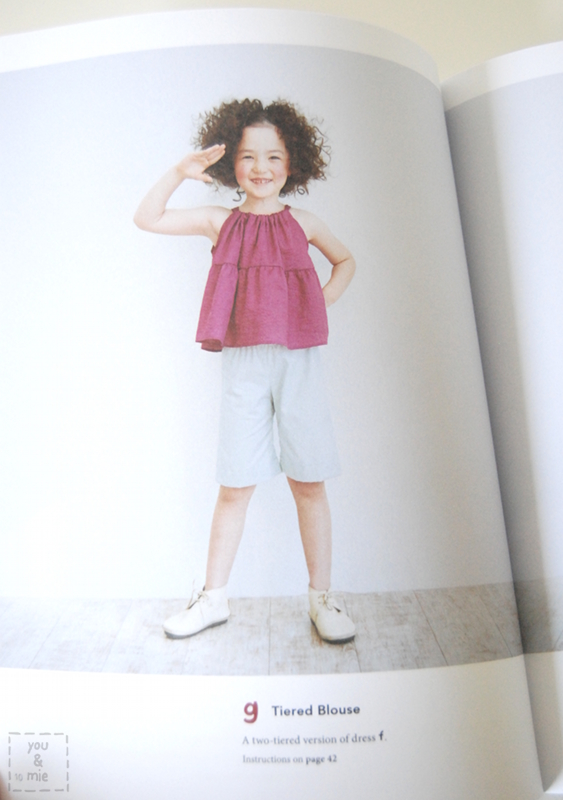
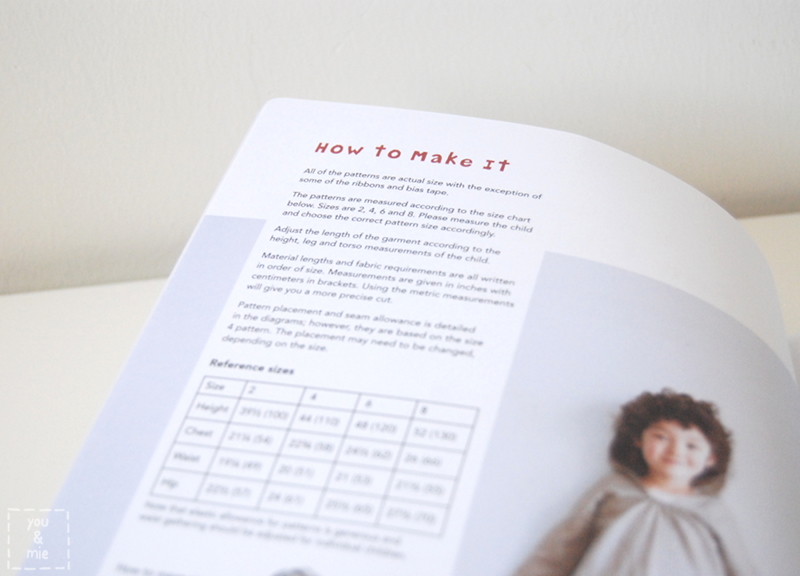
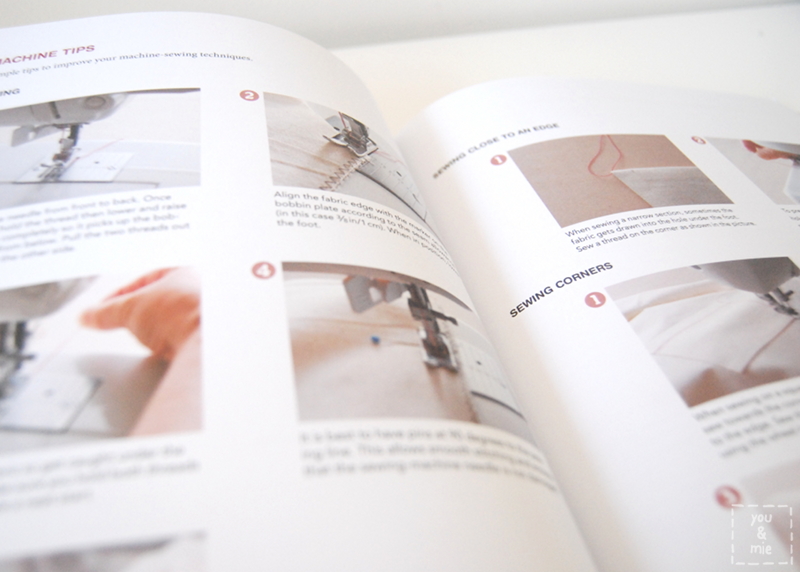
The English version is very similar to the original Japanese book.  The format is the same, with gorgeous photos of the finished products in the front and all the directions for each project in the back.  The instruction pages are also laid out the same way as the Japanese book.  This part is often tricky to decipher in Japanese, so having it in English makes it a breeze.  The best part in my opinion, is that you can learn so much from seeing a Japanese book in English that you can then use to help you with sewing books that are actually in Japanese.  This book makes a great teaching tool in so many ways.

Sew Chic Kids Review & Giveaway // you & mie

Here’s a little look at a diagram from the English version of the book and the same one from the Japanese version so you can compare.  Same great drawings, but labels, instructions and hints in English!  Yes!

Another plus . . . all the measurements are listed in inches and centimeters!

Sew Chic Kids Review & Giveaway // you & mie

The patterns in the book come in four sizes that are labeled 2, 4, 6, 8, but be careful because those aren’t the same as typical American sizes.  They are the equivalent to 100, 110, 120, and 130, respectively, in Japanese sizes.  This is approximately size 3/4, 5, 6, and 7/8 by American standards, but be sure to use the measurement chart at the front of the book to choose the right size for your child.

Sew Chic Kids Review & Giveaway // you & mie

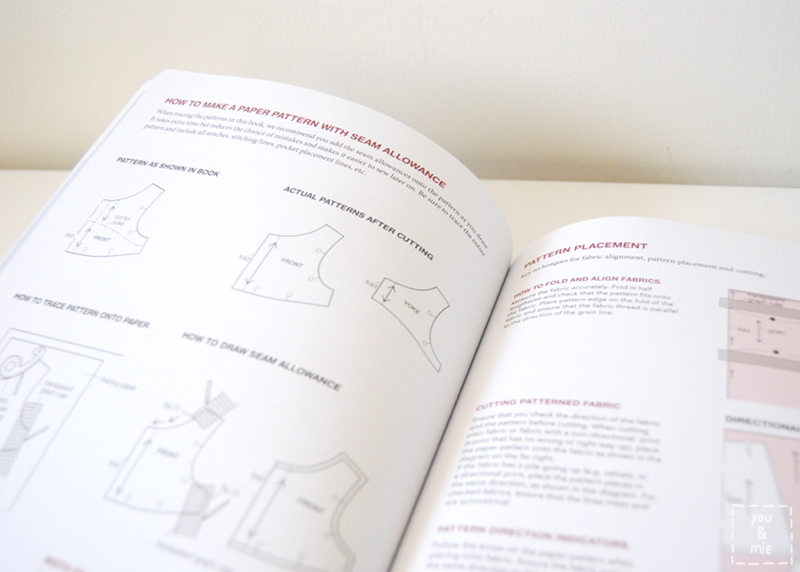
The book includes plenty of handy tips about sewing basics, materials and skills, for example, adding seam allowances to your pattern pieces!

Sew Chic Kids Review & Giveaway // you & mie

The pattern pieces are laid out on both sides of two large sheets.  The pattern pieces overlap, so they do require tracing (and adding seam allowance), but they much easier to navigate than the Japanese version.

Sew Chic Kids Review & Giveaway // you & mie

If you’re drawn to Japanese sewing books but are still hesitant to take the plunge, this is a really great first step.  You really get all of the great things about Japanese patterns, but without the challenge of a foreign language.  You can’t really ask for more . . .

Sew Chic Kids Review & Giveaway // you & mie

And guess what!?  The kind people from Tuttle Publishing who have brought us Happy Homemade: Sew Chic Kids are giving away a copy to one lucky reader!

Giveaway details: {CLOSED}
– Giveaway will remain open until Friday, May 9th at 5pm PST
– Winners will be chosen at random and will be contacted by email
– Open to US and Canadian residents only
– Void where prohibited

Here’s how to enter:
– Leave a comment on this post.  Any comment will do!

Additional entries:
PLEASE LEAVE A SEPARATE COMMENT FOR EACH
– Follow you & mie on Facebook and leave a comment telling me you do so.
– Follow me on Pinterest and leave a comment telling me you do so.

(maximum number of entries is 3)

Thanks to Tuttle Publishing for providing me with this great book to review.  Be sure to check out other titles from Tuttle Publishing (they’ve got several other Japanese sewing books in English, including 2 for women’s clothes!!) and keep up with their latest here:

website // facebook // pinterest // twitter

Good luck and have a great weekend!

*This promotion is in no way sponsored, endorsed or administered by, or associated with, Facebook or Pinterest. We hereby release Facebook and Pinterest of any liability. No purchase necessary.  you & mie takes no responsibility for packages lost by the postal service. Giveaway starts Friday, May 2nd and ends Friday, May 9th at 5pm PST. Once the giveaway ends, winners will be chosen at random and contacted within 24 hours by e-mail. This post will be updated with winners’ names. Winners will need to respond within 48 hours to claim their prize or another winner will be chosen. Giveaway is void where prohibited.*

Frozen’s Elsa-Inspired Dress

LET IT GOOOOOOOO
LET IT GOOOOOOOO
CAN’T HOLD IT BACK ANYMOOOORE!

Elsa Inspired Dress by you & mie

Every.  single.  day.  Yup, we’re still living in a Frozen obsessed world over here.  You know, we actually held out (and still do) when it comes to letting her watch “princess” movies.  Frozen is the first and really only that she’s seen, but she has dove head first into obsession and we’re just kinda going with it.  What’s the point of being a 3 year old if you can’t be an awesome ice power yielding queen.

Elsa Inspired Dress by you & mie

After my last blog post, I decided that I wanted Yuki to earn the dress since she’s so used to getting things all the time and she’s starting to think that things come so easily.  So I created a little sticker chart and told her that she needed to help out around the house to earn stickers and when she got 10 stickers she could have her dress.  She did things like putting away everyone’s laundry, hanging diapers for drying, setting the table and wiping it clean after dinner, etc.  She didn’t complain too much about doing the work and was super psyched to earn each sticker.

Earning her Elsa dress with chores // you & mie

And she was reeeeeally excited to finally get her dress!

Elsa Inspired Dress by you & mie

Ok, on to the dress . . . this is inspired by the dress Queen Elsa wears when she “lets it go” and embraces her ice powers.  It’s definitely not a replica of what she wears in the movie, but heavily inspired by it.  I had a few criteria when designing the dress in my mind.  I wanted it to be knit – comfy and easy to put on and take off.  I wanted it to be easy to clean.  And I wanted the materials to be inexpensive.

At preschool, there is a group of kids that is REALLY into “dress up” and almost every time I go to pick Yuki up, she’s got a raggedy piece of tulle tied around her neck or head or wherever and she’s walking around like she’s the queen of the world.  It made me realize that these kids don’t need some fancy expensive costume to make believe – they can pick up any simple prop and turn it into whatever they see in their fantastic imagination.  So my goal was to make it special, but keep it simple.

I went to my favorite cheap fabric store, Fabrix.  It carries “off-price surplus and closeout fabrics and trims” so it’s hit or miss what you’ll find in there, but sometimes you come across something perfect for a really low price.  I get a lot of my solid knits there when I find good colors.  Anyways, I walked in hoping to score some blue knit when I laid my eyes on this:

Frozen fractal fabric from Fabrix

And the words that immediately popped into my head were FROZEN.  FRACTALS.

Now, I have no clue what frozen fractals even look like, but if you’re familiar with the song, “Let it Go,” Elsa belts those words as she is constructing her beautiful ice castle at the climax of the song.  Here are the images from the movie that I think of when I see this fabric and what became the inspiration behind the dress.

Let it Go - ice castle scenes

I actually went back to the store to see if I could buy more yardage to give away to one of you, but it was already gone!!  😦

And that’s the actual Queen Elsa dress.  So with those images in my head, I went to design a simple and kid friendly dress.  Along with two yards of that frozen fractal knit, I got two yards of whatever sparkly tulle they had and a little bit of trim, all of it costing about $2.39 per yard.  Score!  For the sleeves and top of the bodice I used leftover burnout knit that I think probably also came from Fabrix, but I used in this shirt here.

Elsa Inspired Dress by you & mie

I started with the ever awesome Flashback Skinny Tee pattern by Made by Rae for the bodice.  I widened the neckline to more of a boatneck shape, but I think I went a little too wide and deep.  I brought the sides in a little, rather than slightly flaring out at the bottom, shortened the bodice and changed the shape of the bottom to a slightly curved V.  I cut the pattern along the colorblocked lines that you see and added seam allowance to attach the pieces.  The sleeves are unmodified.

Elsa Inspired Dress by you & mie

I was just going to make the dress purely knit and leave off any tulle so that I could throw the dress in the washer and dryer without working about it.  But I worried that it looked too plain and not special enough, so I gathered some of the tulle and attached it with the skirt.  I like the way it looks, but it does make cleaning the dress a bit harder.

Elsa Inspired Dress by you & mie

Watch out!  Ice power! 

With the rest of the tulle, I gathered it a bit and zig zag stitched it to a piece of sparkly elastic from Jo-Ann, to make the cape.  Elsa doesn’t even wear a crown for the second half of the movie, but Yuki wanted one, so I sewed some trim onto a piece of craft felt, and folded and sewed the bottom 1/2 inch to make a casing to slide a headband through.  Took me just a couple of minutes – yay!

She loves it.  She wants to wear it every minute of the day.  She’s started telling people her name is Elsa.  I’m happy that she is happy, but I really hope this phase doesn’t last forever because I can really only handle listening to “Let it Go” so many times.

Queen Elsa does her chores // you & mie

And the Queen does her chores.  She wore her well-earned dress to a Sing-Along Frozen showing at the Castro Theater over the weekend.  Her classmate wore a beautiful mom-made dress as well.  They got to walk across the stage in front of the entire theater with all the other kids in costumes.  She belted out the words to her favorite songs and stuffed her face with popcorn.  She said it was the best day ever 🙂

Queen Elsa and her baby sister // you & mie

What’s on my sewing table

Or maybe I should say floor . . . My fabric is kind of all over the place when I work . . .

Anyways, I don’t have a finished project today, but just felt like checking in with some projects that I’m currently working on and fabric that I’m working with.

First up, is this amazing TRIPLE gauze.  Yes, that’s right – not double, but triple.

Triple Gauze Reversible Dots from Miss Matatabi

It came out of the wash like a dreamy fluffy cloud!  It’s basically already quilted.  I love the cozy, yet super lightweight feel.  Oh, and it’s reversible.

Triple Gauze Reversible Dots from Miss Matatabi

This fabric is for my next Miss Matatabi Makers post.  Here’s a little peek of the project in progress.  Can you guess what it is?  I’m using a JUST released pattern.  Look out for the finished project on Miss Matatabi in a week and a half or so.

Well, I bet you’ll have an easier time guessing that THIS is going to be!!  Here’s a hint – it’s for Yuki, and she’s absolutely frozen with anticipation.

Soon to be Elsa dress

Oh, she’s officially OBSESSED with the movie!  And she’s suddenly reeeally into dress up/costumes at her school.  *sigh*  I suppose it was inevitable and there’s no point fighting it now.

Elsa in the making

I made the mistake of showing her the bodice that I was working on and every day since then she’s asked me, “Is my dress done yet!?”  Truth is, I could finish it pretty quickly, but I’m trying to think of something Yuki can do to earn the dress.  Recently, we’ve been feeling like she’s getting pretty spoiled.  We give her lots of things without her having to work for it.  So I’m worried that she doesn’t understand the value of anything.  We started assigning her some chores and we’re trying a sticker chart, so I think I’m going to tell her that she can have her dress when she earns 10 stickers or something like that.

So yeah – an Elsa inspired dress (definitely not going for an exact copy) is on my sewing table right now.

And this lovely stack of fabrics arrived just yesterday . . .

Kokka Irome

It’s the new line, Irome, from Kokka.  I’m still in the brainstorming phase for these fabrics, though I have a couple of ideas.  What would you make with a stack of colorful fat quarters?

And what’s on your sewing table?

A Floral Baby Dress and a tutorial

Today I’m sharing a tutorial on the Oliver + S blog on how to alter a shirt pattern with sleeves to a sleeveless shirt!  I modified the Lullaby Layette Shirt pattern for the tutorial, but you can use this method for pretty much any pattern.

Floral Lullaby Layette Dress by you & mie

Floral Lullaby Layette Dress by you & mie

Head over to Oliver + S to check out the full tutorial!

Floral Lullaby Layette Dress by you & mie

I made the Lullaby Layette Shirt pattern (View B in the 3-6 month size), but I made a few modifications.  Besides making it sleeveless, I decided to add a little gathered skirt.  It was actually supposed to be more of a peplum top, but I made the skirt so long that it became a dress!  But that’s ok, I think this will actually fit her for awhile!

Floral Lullaby Layette Dress by you & mie

Before adding the skirt, I shortened the bodice by a couple of inches and also took the sides in a bit, so it was less A-line.  I was too nervous to add snaps to this amazing fabric (the chances of me messing up and tearing a hole in the fabric was too high), plus there’s something so sweet and more vintage-y about buttons, so I went with these light blue ones.  I think I made the right call.

Floral Lullaby Layette Dress by you & mie

This fabric!  It was a gift from my good friend, Frances, AKA Miss Matatabi.  It’s a nani IRO double gauze and it says “Fuwari Fuwari” on the selvage, but I didn’t recognize it, so I knew it must be older than a couple years.  Well after I cut into it I asked Frances about it and it turns out it’s a super rare print from 2006!  VINTAGE NANI IRO (yes, 2006 is vintage when it comes to a fabric line).  I suddenly felt mortified that I had just cut into it!

Floral Lullaby Layette Dress by you & mie

But Frances said that it was probably a good thing that I was able to use the fabric without the pressure of having to create something “worthy,” and I think she’s right.  This fabric probably would have sat in my stash forever and ever, and at least this way it was used to make something special for my daughter and maybe someday it’ll get passed on or something.  Random question – do you save your handmades?  When they are outgrown, do you give them away?  Store them?  Toss them?

Floral Lullaby Layette Dress by you & mie

In other news, Kaya is getting harder and harder to photograph.  That window of time when she could sit up, but not move has been too brief.  She’s already getting ready to crawl and I can barely get her to sit still for a few seconds.  Oh boy!

Anyways, I’d love it if you headed over to the Oliver + S blog to check out my tutorial.  It’s my first time posting over there!  🙂

Happy Monday!


Panda Raglan Tee {tutorial}

Yes!  I did it!  I finally made something for Yuki that she really likes!

Panda Raglan Tee Tutorial by you & mie

Panda Raglan Tee Tutorial by you & mie

I have to admit, I’m pretty psyched about this project.  A couple of months ago I saw a little toddler wearing a tunic that was similar and definitely had an “I can make that!” moment.  Well the idea has been rolling around in my head since then and I just needed the time to do it.  Isn’t that what KCW is all about!?

Panda Raglan Tee Tutorial by you & mie

The theme for this Kid’s Clothes Week is “Mini Me” so I decided to make one for little sister as well.  Yuki loved that she and Kaya had matching shirts!  Unfortunately, Kaya wasn’t really feeling the photo shoot.  But I have a feeling she really loves the shirt too 😛

Panda Raglan Tee Tutorial by you & mie

Yuki says, “Can you see my panda ears?”  The 3D ears are definitely the most fun feature of these shirts.  And though these are pandas, you can really make this shirt into almost any animal!  Want to make one for your favorite animal lover?  I made a tutorial!

Here’s what you’ll need:

  •  a raglan t-shirt pattern (I used the Oliver + S Field Trip Raglan T-shirt Pattern, but you can use any, or draft your own)
  • knit fabric (refer to your pattern for amounts) and coordinating thread
  • scraps of fabric for the ears (knit or woven)
  • freezer paper
  • precision knife/scissors
  • iron
  • fabric paint and brush (be sure to read all the directions on your fabric paint before you begin your project)

To get started, cut out all your shirt pieces as your pattern directs (shirt front, back, two sleeves and a neckband).  Lay out the front shirt piece and place your freezer paper on top, shiny side down.  Sketch your animal face.

Panda Raglan Tee Tutorial by you & mie

Make a pattern piece for the ears.  We will add a small pleat to the ear, so add a little width to the base and also 1/4 around for seam allowance.

Panda Raglan Tee Tutorial by you & mie

Carefully cut out your stencil, making sure to keep any small pieces you need to place on the inside of your stencil, like the eyes.

Panda Raglan Tee Tutorial by you & mie

Place your stencil where you want on the shirt (shiny side down) and iron it on using a high heat setting.  Be sure to press well especially around the edges of the design.

Panda Raglan Tee Tutorial by you & mie

Put your fabric on cardboard or paper, in case the paint seeps through.  Apply the fabric paint in a thin and even coat.  Try not to paint towards the edges of the stencil to avoid sweeping paint under the stencil.  Wait till the paint is mostly dry (30 minutes) and apply another thin and even coat.

Panda Raglan Tee Tutorial by you & mie

Allow the paint to dry completely before peeling off the stencil.

Panda Raglan Tee Tutorial by you & mie

What a fun (and slightly nerve wracking) moment 🙂

Now for the sewing part.  Cut out 4 ear pieces.

Panda Raglan Tee Tutorial by you & mie

Place two ear pieces right sides together and pin.  Repeat for other pair.

Panda Raglan Tee Tutorial by you & mie

Sew along the curved edges with a 1/4 inch seam allowance.  Leave the bottom open.  Trim the curved edge to 1/8 inch.

Panda Raglan Tee Tutorial by you & mie

Turn right side out and press.  Add a small pleat to the center of the ear (the two ears should have pleats going the opposite direction).  Pin and sew pleat in place.

Panda Raglan Tee Tutorial by you & mie

Trim the bottom edge so it is straight again.

Panda Raglan Tee Tutorial by you & mie

Figure out where you want your ear on the shirt front and align the raw edges, right sides together.  Pin and baste the ear in place 1/8 inch from the edge).

Panda Raglan Tee Tutorial by you & mie

Panda Raglan Tee Tutorial by you & mie

Now we will attach the sleeve to the shirt front.  Align the raw edges of the shirt front and the sleeve front, right sides together.  The ear should be sandwiched in between.  Pin and sew according to the pattern directions.

Panda Raglan Tee Tutorial by you & mie

Finish edge if desired.  Press the seam allowance towards the shirt and the ear pointing “up” towards the sleeve.  On the right side of the shirt, top stitch the ear to the sleeve close to the seam.

Panda Raglan Tee Tutorial by you & mie

Repeat on the other side with the second ear.

Panda Raglan Tee Tutorial by you & mie

Now finish the shirt as directed in your pattern and voila!  An awesome panda shirt for your little one!

Panda Raglan Tee Tutorial by you & mie

Trust me, I reeeeeally think they’ll like it!

Now I’d seriously love to see what other animals you guys can make into shirts!!  If you use this tutorial to make a fun animal shirt, please let me know!  You can add a picture to the you & mie flickr group or just leave me a comment or email me.  I imagine a whole zoo of fun animal shirts 🙂

It was so great to just make something fun, not for a specific project.  Thanks for the motivation Kid’s Clothes Week!  Hope you’ve been able to make something fun too!

Neon Dot Skirt

Neon Dot Skirt by you & mie

Hey!  It’s Kids Clothes Week!  No long lists over here this time.  Just working on two things.  First one was to finish up this skirt I started a week or two ago.  I was going to make this springy skirt for a specific project and had the fabric cut out and everything before deciding to scrap it.  Well, not scrap the skirt entirely, but just not for that specific project.  But I couldn’t let this gorgeous fabric go to waste!  So I finished up this double layered skirt and it was a pretty quick project.

Neon Dot Skirt by you & mie

The main fabric is Nani Iro Colorful Pocho – neon on dark green, but I’m not sure that you’ll find it available anymore.  I remember snatching it up from Miss Matatabi immediately after seeing it and then, well, hoarding it for the last year and a half.  It is a soft and lightweight double gauze and as dreamy as Nani Iro double gauze always is.

The bottom layer is a chartreuse cotton voile from Michael Levine.  It’s very lightweight and a bit sheer, making it perfect for layering.

Neon Dot Skirt by you & mie

I basically used this Double Layer Simple Skirt tutorial except I added a separate waistband with two casings for elastic.  It also has pockets which is really a deal breaker these days for Yuki.

Neon Dot Skirt by you & mie

Yuki has always said she loves this fabric – she would pick it out from my shelves and ask me to make her something, but I could never figure out what to make.  I thought she would love this skirt, but she is a little unsure.  Part of me is sad that I used up this long hoarded fabric on something that she may or may not wear.  But I also feel like this neon trend (which I’ve fallen for) is not going to last forever, so I might as well go for it while it’s still hot.

What are you working on this week?


Miss Matatabi Makers and a Big Bow Washi Dress

It’s no secret that Miss Matatabi is one of my favorite online sources for fabric, especially Japanese fabrics like Nani Iro.  Frances always has an amazing selection of high quality fabrics and she’s a total sweetheart on top of all that.  So I am really excited to announce that I get to be one of the regular contributors on her site, sewing up a new project every month with some fabulous fabric from her shop, along with 3 suuuper awesome ladies!

We’re the Miss Matatabi Makers and you can read all about us here.

MissMatatabiMakers

Starry Night Washi Dress by you & mie

My first project as an official MM Maker is up on the blog now!

I made a big bow Washi Dress in some gorgeous voile AND it has a secret modification to make it nursing-friendly!  Head over to Miss Matatabi for the full post with all the details and how I nearly ruined the whole dress with an accidental serger slice!

And while you’re over there, be sure to check out the other recent posts from Leslie, Angela, and An.  So much fun inspiration and gorgeous fabric!

Happy Monday 🙂