Straight Lines and Angles Skirt

Straight Lines and Angles Skirt by you & mie

Today I am part of the Straight Lines and Angles series hosted by Jess of If Only They Would Nap.  The series is inspired by the geometric shapes trend, which I have totally fallen for.

I had originally planned on a triangle print skirt, but ended up setting that idea aside and taking a different approach to the project.  Instead of making something with geometric shapes on it, I decided to make something out of geometric shapes.

Straight Lines and Angles Skirt by you & mie

I was inspired by this awesome hoodie, and decided to use straight lines and angles to piece together a skirt with pockets.  I figured it was the perfect opportunity to do some color blocking as well, because that’s always appropriate, right!?

Straight Lines and Angles Skirt by you & mie

So this is kind of like a basic rectangular skirt (tutorial here), but I cut the pattern into polygons to create the angled center piece and pockets.  Here are my pattern pieces . . .

Straight Lines and Angles Skirt by you & mie

Doesn’t get more “straight lines and angles” than that, huh?

Straight Lines and Angles Skirt by you & mie

As a finishing touch, I freezer paper stenciled a set of stars (my favorite of all polygons) in one corner.  I love stars so much.

Straight Lines and Angles Skirt by you & mie

I’ve also been having fun coming up with different and unexpected combinations of colors.  Since I’m trying to use fabric from my stash, I dug all of these up from my scrap pile.  Recognize any of them?  The center panel is a gorgeous purpley shot cotton from the Maggie Mae Tunic.  The chartreuse is from my Project Run and Play Sew-along Signature Look skinny pants.  The side panels of the skirt are a cream linen/linen blend that I used for the Art Museum Vest.  The waist band is an oatmeal colored linen, but I have no idea where it came from or what I used it for before.

Straight Lines and Angles Skirt by you & mie

When I first showed Yuki the skirt, she said she didn’t like it, or the tank top I wanted her to wear with it.  Then she suddenly changed her mind and put them on happily and wore them the rest of the day!  That was a nice surprise – I feel like I haven’t made her anything she’s actually liked in a long time.  And hey!  I like it, too!  Isn’t it nice when things work out like that?

Follow along the rest of the series here and be sure to enter the Straight Lines and Angles giveaway here!

Have a great week!

Adding Ruffle Sleeves {tutorial}

Ruffle Sleeve Tutorial by you & mie

Last week I shared my daughter’s new baby bodysuit from the Oliver + S Lullaby Layette pattern set and one of the biggest modifications I made to the pattern was adding ruffle sleeves.  Ruffle sleeves are a fun and feminine touch for any spring or summer top or dress.  Super sweet especially on little ones.

When I was trying to figure out how to attach the sleeves, I looked for a tutorial online, but couldn’t find what I was looking for.  I’ve attached ruffle sleeves or flutter sleeves when there was a bodice lining (like in the Geranium pattern), but there was no lining for the body suit.  I wanted the ruffle to only cover the top of the arm hole, so I knew I’d need a way to finish the rest of the arm hole with bias tape.  Took me awhile to figure out, but it’s so simple, I wonder why I never knew how to do this in the first place!

Ruffle Sleeve Tutorial by you & mie

So some of you might think, “duh, Cherie!”  But hey, if I wanted a tutorial like this to be out there in blogland, there must be others needing the same thing, right?!  So anyways, here’s the tutorial on how to add ruffle sleeves to any unlined bodice pattern.

If you are starting with a pattern that is meant to have sleeves, the first step is to reduce the width of the shoulder.  You can either do this to the pattern before you cut your fabric, or you can do it after.  I didn’t remember to do it until after I had cut the fabric and sewed the shoulder seams together.  Not a problem.

Ruffle Sleeve Tutorial by you & mie

Trim off from the outer edge of the shoulder seam.  The amount is up to you, I trimmed about 1/2 an inch from the shoulder and then gradually curved my line to meet back with the original arm hole.  Your finished arm hole will be folded under 1cm (3/8 in), so take that into consideration when deciding how much to trim off.

If you haven’t already, go ahead and cut your front and back bodice pieces and assemble them as you wish/as directed by your pattern up to the point when they are sewn together at the shoulder seams.  Side seams should not be sewn yet.

Ruffle Sleeve Tutorial by you & mie

Next, cut your ruffle sleeves.  Size will depend on the size of your garment and your preference.  I cut my sleeve to be about 3 times longer than the desired size of my finished ruffle.  For the height, you can make it however long you want the sleeve to be at the shoulder (longest point) plus about an 3/4 of an inch for seam allowance and hemming.  By the way, none of this is very exact, but ruffle sleeves are pretty forgiving like that. 😛

Ruffle Sleeve Tutorial by you & mie

To cut these pieces, cut 2 rectangles in your measurements.  Mine were about 2.25 x 13 inches.  Fold the rectangle in half widthwise and starting from the center fold, draw an arc to the corner.  Cut that out and use it to cut your second ruffle sleeve in the same shape.

You will also need to cut two 1″ strips of fabric on the bias.  Measure your armhole and add a couple of inches to that number to determine the length.  My armholes were about 9 inches, so I cut 12 inch long strips that were 1″ wide.

Ruffle Sleeve Tutorial by you & mie

Mark the center of the sleeve along the curved edge.  This will help later with placement.

Finish the straight edge of the sleeve piece.  You can do this in a number of ways.  You can hem it by folding it towards the wrong side a 1/4 inch and pressing, then another 1/4 inch encasing the raw edge and sewing it down.  You can do a zig zag stitch or serge the edge for a rougher, but cute finish like the Geranium flutter sleeve.  I went with something in between by serging the edge and then pressing it under and stitching it down.  It looks finished from the right side and you can see the serged edge from the wrong side.  This will make it easy to distinguish the right and wrong side in the rest of the pictures.

Ruffle Sleeve Tutorial by you & mie

Now to ruffle that sleeve!  Set your machine to widest stitch possible and sew a basting stitch along the curved edge a 1/4 in from the edge.  Do not backstitch at either end and leave a couple inches of thread when clipping.  Carefully pull on one of the threads (either the top or the bottom) to gather the fabric.  Gather the fabric to the length and ruffleness you desire.  Make sure the gathers are distributed evenly.

Ruffle Sleeve Tutorial by you & mie

Pin your gathered sleeve to your bodice, right sides together and raw edges aligned, lining up the center mark on your sleeve with the shoulder seam.  Baste the sleeve on with a 1/4 inch seam allowance.  Repeat with the other sleeve.

Ruffle Sleeve Tutorial by you & mie

Take your bias strip and fold it into thirds and press.  If you want to be really exact, you should fold it in 1/4 in. on one side and 3/8 in. on the other side (the center section will be 3/8 in).  Really though, when we start talking an 1/8 of an inch of a difference, I’m not sure if it matters that much.

Ruffle Sleeve Tutorial by you & mie

Pin your bias tape right side down (facing the wrong side of the ruffle sleeve) along the edge of the armhole.  This should sandwich the sleeve between the bias tape and the bodice pieces.  If you are going with the exact measurements, you want the 3/8 inch fold to be along the edge (right side in this picture).  Stitch along the crease closest to the edge.

Ruffle Sleeve Tutorial by you & mie

Fold the bias away from the garment and press.

Ruffle Sleeve Tutorial by you & mie

Flip the garment wrong side up and fold the bias tape in once, then again towards the wrong side.  The ruffle sleeve should flip out and the raw edge should be encased.  Press carefully and pin.

Ruffle Sleeve Tutorial by you & mie

Sew along the folded edge of the bias tape and trim off excess.  Almost done!

Ruffle Sleeve Tutorial by you & mie

Sew side seams of the bodice, right sides together and finish edges as desired.  Press seam towards the back.  Tack the top of the seam down with a few stitches, if desired.  You can see the tacking in the picture below, though it’s hardly noticeable when being worn.

Ruffle Sleeve Tutorial by you & mie

Finish the rest of the garment as directed in your pattern and you’re done!

Oliver + S Lullaby Layette Summer Bodysuit // by you & mie

Enjoy those little arms in those little ruffles!

*As with all my tutorials, this was written extremely late at night when already sleep deprived, so if something doesn’t quite make sense and you need clarification on any part, please don’t hesitate to ask.  It’s probably my fault, not yours.*

Happy Sewing!  😛

Lullaby Layette Summery Bodysuit

Oliver + S Lullaby Layette Summer Bodysuit // by you & mie

I’m back with another project from the new Oliver + S Lullaby Layette Pattern Set!  This time I made the bodysuit (View A) and went in a totally different direction from the cozy jacket in modern colors.  I really wanted to make something sweet, vintage-inspired and summery for the upcoming months.  Before you ask, no, the ruffle sleeves are not part of the pattern, BUT I have a tutorial for those coming up next week!  They are really quite simple and can be added to pretty much any bodice pattern.

Oliver + S Lullaby Layette Summer Bodysuit // by you & mie

But back to this sweet number . . . the bodysuit features a snap placket at the neckline and also at the bottom for easy diaper changes.  It has a cute pleat in the front and back and elasticized leg openings.

Oliver + S Lullaby Layette Summer Bodysuit // by you & mie

The bodysuit is really cute alone because it is quite roomy at the bottom.  But you can easily pull pants over it as well and let the extra fabric hang over the pants like a top.  Or, if you prefer it, this same pattern can be made as a top.  And it has short and long sleeve options.  Before I made this bodysuit, I actually made the shirt version (View B), but because of a poor fabric choice on my part, it didn’t come out that great.  More on that later . . .

I don’t think I really need to say much about the quality of the pattern, do I?  You all already know how awesome Oliver + S patterns are, right?  Ok, good.  I’ll just leave it at that.

Oliver + S Lullaby Layette Summer Bodysuit // by you & mie

Besides the ruffle sleeves that I added, there were a few other changes I made.  Remember how I mentioned I had some difficulty attaching the snaps to the jacket?  Well, this pattern called for snaps at the neck and bottom and while it would have been totally doable, I wanted to test out some other options for those who prefer to avoid snaps.

Oliver + S Lullaby Layette Summer Bodysuit // by you & mie

For the front closure, I decided to add buttons instead of snaps.  My machine makes pretty neat buttonholes, so this was an easy option for me.  Another option, which I tried for the first shirt I made, was to simply sew the bottom portion of the placket closed.  I wanted to leave enough room for baby’s head to fit through, but not leave the shirt hanging wide open.  So I measured how far up the placket I should sew shut (by testing it on my baby) and left just a few inches open at the top.  Easy to do and easy to put on – nothing to open or close!

Oliver + S Lullaby Layette Summer Bodysuit // by you & mie


For the bottom of the bodysuit, snaps are really a must.  So I sewed on a strip of this twill tape that already has snaps attached to it.  You can find it at most fabric stores – I bought mine at Jo-Ann.  If I remember correctly, it’s a bit expensive, but definitely comes in handy when you don’t want to attach your own snaps.  I also think it was a good choice for this particular fabric, which even with interfacing, is very thin and delicate.

Oliver + S Lullaby Layette Summer Bodysuit // by you & mie


The fabric is a very lightweight swiss dot cotton that I bought at Discount Fabrics.  I originally bought it to make myself a Staple Dress, which I almost finished, but abandoned because I didn’t think it was very flattering on me.  I found the unfinished dress recently and I think with a few modifications, it might work, so maybe I’ll try and work on that for the spring.  But I had enough left in my stash for this little number.  And I think it’s perfect!

The fabric is so thin that it is a little sheer.  Perfect for hot weather and appropriate for babies, since they don’t really have to worry much about modesty.  Because it’s so thin, it’s very comfortable.  The problem with the first shirt that I made was that I had used a quilting cotton that was a bit too stiff for a baby’s shirt.  I would recommend sticking with lightweight fabrics and knits, especially for the wee littlest ones.  I also chose a crazy print that ended up looking kind of like a miniature bad Hawaiian shirt.  😛

Oliver + S Lullaby Layette Summer Bodysuit // by you & mie


This is pretty much how Kaya felt about the photo shoot.

The only thing I would do differently next time is add a little length to the elastic for the leg openings.  It’s hugging Kaya’s chubby thigh already and otherwise she’d be able to fit into this for awhile.  And she’s not even a particularly chubby baby!  Oh, I made the 3-6 mo. size again and it’s perfect.

Oh, I can’t wait to hit the beach and park with this cutie in her new bodysuit!  And us lucky ducks in California don’t really have to wait any longer.  Today was gorgeous and in the mid-70s!

Ok, so next week I’ll have the tutorial for the ruffle sleeve, so look out for that!  And until then, have you seen the other two new Oliver + S patterns?  There’s the Garden Party Dress + Blouse which three of my bloggy buddies all made – check out Kristin’s, Gail’s and Jessica’s.  And then, my favorite of the new patterns, is the Hide-and-Seek Dress + Tunic.  Can’t wait to sew that one up!  What’s your favorite?

*This pattern was generously given to me for this review, but all opinions are, as always, 100% my own.*

Lullaby Layette Baby Jacket

Oliver + S Lullaby Layette Jacket // by you & mie

Did you hear?  The new Oliver + S spring patterns have been released!  There are two adorable spring dresses/tops, and a baby/toddler layette pattern set.  I’m so excited to help roll out these patterns by sharing a couple of things I made.  I looove the dresses, but was eager to give the Lullaby Layette patterns a try first.  The set comes with 4 views – a bodysuit, a shirt, pants and a jacket and covers sizes 0-24 months.

Oliver + S Lullaby Layette Jacket // by you & mie

The first thing I made was the raglan style, reversible jacket (View D).  I’m always looking for cute outerwear for Kaya.  She’s got plenty of onesies, but it can get chilly in all seasons around here, so a jacket is always a must.  The pattern calls for wovens, but says knits can be used too.  So I definitely wanted to give the knits a try – it just seems like it’d be warm and cozy.

I made size 3-6 months for Kaya who is approaching 6 months.  I debated whether I should go with the 6-12 month size for longer wear, but the smaller size still has plenty of room to grow.

Oliver + S Lullaby Layette Jacket // by you & mie

The pattern, as you can expect from all Oliver + S patterns, is wonderful.  I love the glossary of sewing techniques that they include at the beginning of every pattern – you can learn a lot just by reading that part alone!  But then this set includes 3 separate patterns (one that can be made in 2 ways) and each has well written directions with great diagrams.  You always get really professional quality clothes when you use O+S patterns and you learn a ton of great sewing skills.

The construction of this jacket is pretty simple and it comes together quickly.  It is raglan style, with a simple pleat in the shoulder.  You make the jacket and the lining in the exact same way and then attach them together (in a seemingly) seamlessly way that doesn’t require any flipping inside out and hand stitching closed.  The hardest part of the whole process was attaching the snaps.  I had a helluva time with them, until I realized I was doing it wrong.  Once I figured it out it went a little better, but I had one fall off after I thought I was all done.  I used the “Easy Attacher” (affiliate link) which actually helped a lot, but Kristin said that the snap fastener pliers (affiliate link) are even better.

Oliver + S Lullaby Layette Jacket // by you & mie

One of my goals for 2014 was to try use more fabric from my stash, and though I haven’t stopped buying new fabric completely, I am trying to search through what I have before I buy more fabric and notions.  And it’s been fun finding old fabrics and giving them new life when paired with something unexpected.  Both this jacket and the bodysuit that I’ll share later this week were completely made with stuff I already had at home!  Yay me!  😛

Oliver + S Lullaby Layette Jacket // by you & mie

The mustard knit is from Stonemountain and Daughter in Berkeley and I bought it awhile back to make Yuki a cardigan.  I cut it out and everything, but it never got made.  I don’t even know what happened to those pieces, but hopefully I’ll find them again in time for Kaya to wear.  Anyways, there was enough fabric left to cut out this jacket!  It seemed perfect for baby outerwear – a sturdier, thicker knit, but still had some stretch.  Someone on Instagram asked me if it was “ponte,” and I don’t actually know what that is!  But I looked it up online and the description seems to match pretty closely.  Anyone else have a guess?

Oliver + S Lullaby Layette Jacket // by you & mie

The other side is a white/black striped knit that I’ve also had forever and used for the shirt in this outfit.  It’s pretty thin, so it was nice to be able to pair it with the thicker mustard knit.  And the pink bias tape was originally going to be used to bind a baby blanket/quilt that never happened.  I do love this kinda funky and modern combination of colors.

Oliver + S Lullaby Layette Jacket // by you & mie

So now Yuki – eek, Kaya!  I honestly just typed Yuki’s name.  Do you guys mix up your kids names all the time too!?  Anyways, Kaya has a new jacket for this transition into spring.  Oh and yes, spring!  It’s coming, can you feel it!?  Soooo exciting!

I’ll be back with a truly springy/summery bodysuit for Kaya later this week.  What are you sewing for the spring?

*This pattern was generously given to me for this review, but all opinions are, as always, 100% my own.*

More stenciling!

I didn’t realize when I had written my last post that so many people have never done, or even heard of, freezer paper stenciling or potato stamping!  They are both such fun and relatively simple ways to add a unique touch to any fabric – clothes, pillows, napkins, bags, etc.  If you want to find out more about freezer paper stenciling, there are lots of tutorials and examples you can find online, for example, Dana has a pretty in depth tutorial here.  And here’s a basic tutorial on potato stamping on paper, which is basically the same as stamping on fabric – just be sure to use permanent fabric paint and put paper or cardboard under the fabric so the paint doesn’t bleed through to the other side.  Also, be sure to read the directions for whatever fabric paint you use, because some of them need to be treated or set differently.

stenciling workshop // you & mie

Well, the workshop I did with the high schoolers last week went really really well!  I loved sharing the freezer paper stencil technique with them and they all did such a great job getting creative and having fun their projects.  They were so into the stenciling that we never actually got around to stamping!

stenciling workshop // you & mie

It was really fascinating to see how each student approached the project.  Some just dove right in and moved quickly through the process.  Some spent hours on one detailed design.  Others were able to finish several projects in one day.  Some asked lots of questions so they wouldn’t miss a step.  Others tried to figure things out for themselves.  And they all ended up with projects to be proud of.

stenciling workshop // you & mie

A couple of them mentioned that they really enjoyed having the freedom to choose whatever image they wanted and then personalize something with that image.  When you think about where high schoolers are at developmentally and how important expression of identity is, you realize that a project like this can be pretty empowering.

stenciling workshop // you & mie

But really, I’m hoping that they at least had some fun 🙂  I know I did!

stenciling workshop // you & mie

There were a couple of projects that I finished too.  The first was the cat onesie for Kaya.

Stenciled cat onesie // you & mie

Stenciled cat onesie // you & mie

In hindsight, I could have printed the cat a little higher on the onesie, but otherwise, pretty cute, right?

And I also finished my “Makers Gonna Make” shirt for me using Delia’s free printable . . .

makers gonna make shirt // you & mie

you can see the basic steps of the stenciling process here: 1. draw or trace design onto freezer paper and cut out stencil, 2. iron stencil onto fabric, 3. apply fabric paint, let dry and repeat with second coat of paint, 4. peel off stencil to reveal image and heat set paint, if necessary.

I’m so glad that I tried this technique!  It’s so fun and gives you the ability to create something truly one-of-a-kind.  The possibilities are endless!  I got my freezer paper from here and one roll will last you quite a long time.

Do you freezer paper stencil?  If you haven’t yet, do you think you will try it?

Stamping and Stenciling

Today I’m leading a workshop on fabric stamping and freezer paper stenciling for a group of local high school students!  Sounds fun, right!?  Well I’m hoping it is, but until recently there was a slight problem . . . I’d never done freezer paper stenciling before!  Crazy huh?  I mean, I’ve done stenciling with contact paper like on these t-shirts and these leggings, which is really really similar.  But everyone always raaaves about freezer paper, so I thought it was about time to give it a try.

The challenge was that freezer paper turned out to be not as readily available as everyone said it was.  I kept hearing that it’s found in the grocery store by the aluminum foil and saran wrap.  But I checked several stores and couldn’t find it!  Finally I just ordered some online.  Turned out to be easier than going to a store 😛 (I got mine from here).

freezer paper stenciling

I loved the process.  I’m not going to explain it, since there are a ton of great tutorials out there already.  But this is just the kind of thing I love to do to personalize or embellish a project.  I love adding a unique touch to an otherwise plain project.

freezer paper stenciling

I started with some onesies to go in the divided basket I made for Kristin’s baby.  I loved cutting out the stencils, but peeling off the stencil after the paint is dry and revealing the image is definitely my favorite part.

freezer paper stenciling

I’m also making a onesie for Kaya . . .

freezer paper stenciling

and this “Makers Gonna Make” stencil from Delia’s free printable is going to be a shirt for me!

freezer paper stenciling

Then last night I played around with potato stamps and made random patterns on scrap fabric.  It’s such a basic and common crafting project, but MAN is it fun!!

potato stamping

potato stamping

potato stamping

potato stamping

I wonder why I don’t do this more often!

Anyways, wish me luck with the high schoolers today.  They’ll be stamping and stenciling on shirts, tote bags and pillow cases.  Should be fun!

Camp Ivanhoe Inspired Divided Basket

So you all know Kristin from skirt as top, right?  Well, she just welcomed her third babe into the world a couple of weeks ago and I wanted to send her and her littlest one some love.  I was trying to think of the perfect handmade gift, but when I couldn’t decide what to make, Jessica of A Little Gray came up with the brilliant idea of a Noodlehead Divided Basket.  Kristin has made a few of these for other people already, it’s kind of her go-to baby shower gift, so it just made sense for her to receive one too, right?

Well, it turned out to be such a great idea, that Gail had the exact same one!  I finished making my divided basket the night before baby C was born and the same day Gail blogged her basket.  When I first saw it I thought, “NOOOOOOOOO!  Curse her and her adorable divided basket!”  Haha, just kidding (love ya, Gail)!  It wasn’t quite that dramatic, but well . . . maybe a little. 😉

But then I realized quickly that this was a great thing, because two divided baskets is certainly better than one!  With all the things you can do with a divided basket, we might as well have made one for every room in the house.

Camp Ivanhoe inspired Divided Basket by you & mie

The theme for the boys’ room is Camp Ivanhoe from the movie, Moonrise Kingdom.  I checked out Kristin’s pinterest board for some inspiration and picked this particular blanket to pull colors and style from.  I grabbed all of the “campy” fabrics from my stash and it turns out, I have quite a lot!  The main fabric is a wool remnant that I’d been holding on to for awhile and never quite knew what to use it for.

Camp Ivanhoe inspired Divided Basket by you & mie

BINGO.  I think it worked perfectly here.  The pocket and accent pieces are all solid quilting cottons.  On the pocket, I made some strips of fabric to make stripes and top stitched them on.  The lining of the basket is an awesome plaid flannel from Jo-Ann.

The pattern is great.  I’m thinking that Anna (aka Noodlehead) is a genius, because I couldn’t really imagine how this was all going to come together, but she figured it all out for us and it’s really kind of magical.  This is the first time I’ve sewn one of her patterns and I’d say it’s a really great one to start with.  I also really want to make a Super Tote and a Cargo Duffle, and well, pretty much all of her other patterns.

Camp Ivanhoe inspired Divided Basket by you & mie

In the directions, Anna recommends using fusible fleece to give the basket more structure, especially if you are using a lightweight material.  Well, I thought that the wool was thick enough and didn’t use any, but I wish I had.  The basket is pretty floppy and doesn’t really stand up on it’s own when it’s empty.  But even without the fusible fleece, my machine had trouble stitching through the thicker sections (where the handles meet the body of the basket), so I’m not sure if it would have been able to handle another layer!  So we’ll see.  If I make this basket again (and I assume that I will), I definitely will use the fusible fleece and just hope my machine can handle it.

Camp Ivanhoe inspired Divided Basket by you & mie

I also made a little flag garland for the room with craft felt and felted wool.  I used the template for the scrap flag garland from this book (affiliate link), except I cut the top 1/2 inch off the top of the flags and carefully top stitched baker’s twine to connect them all.

Felt Flag Garland by you & mie

Then I filled the basket with a bunch of other goodies (not the diapers shown here) and shipped it off to meet its new little owner.  I hope I get to meet him someday soon too!  He seems to be fitting in so well with his awesome skirt as top family 🙂  Awwww . . . you really gotta check out those sweet newborn pictures.  Is it crazy that I have baby fever already when I still have my own baby??

Birds Eye Everyday Skirt

Hey!  Enjoying your weekend!?  Hop on over to Miss Matatabi to check out my new skirt made from some goooorgeous Nani Iro Birds Eye fabric.  Can you tell I’m getting ready for spring??

Everyday Skirt in Nani Iro Birds Eye by you & mie

Miss Matatabi is my favorite online source for Nani Iro and other fantastic fabrics from Japan.  Seriously, check it out.  I just spent way too much time drooling over all of the new stuff she’s been adding to her shop.  IT’S SO GOOD.  If you don’t know, now you know.

You’re welcome.

Anyways, if you follow me on Instagram or Facebook, you may have seen a tiny preview of this skirt and the injury I sustained while making it.  It was totally worth it though!  Head on over to my guest post to catch all of the details of this skirt.

And enjoy whatever is left of your weekend!

Folding Floor Cushion {tutorial}

Phew, this week is flying by! Today’s project is one of many on a list of home improvement projects that I tend to put off. But I’m so glad I got this one done and I love how it turned out!

FloorCushionTutorial

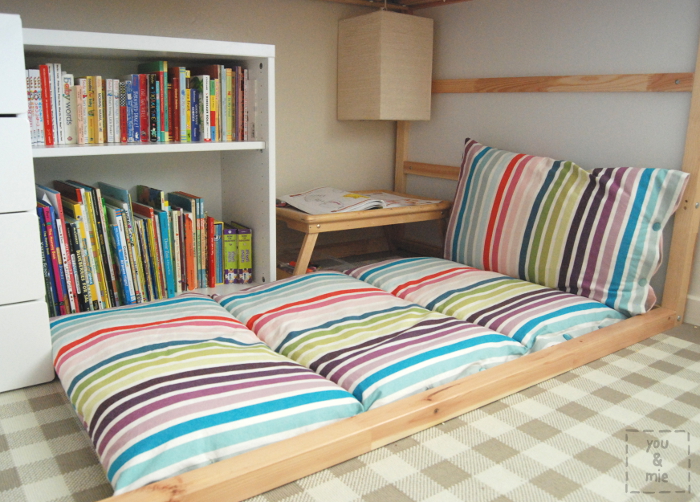
Recently, we bought Yuki the popular Ikea Kura bed, which can either be a low or high bed.  If you choose the lofted bed, it creates a nice space underneath which can be used as another bed, or you can use the space for something else.  Eventually, we imagine we’ll put another mattress underneath for Kaya, like a bunk bed, but until then, we wanted to use the space for some of Yuki’s things like her dresser and books.

So we created a little reading nook for her!  And no nook would be complete without some sort of comfy cushion situation.  Hideko and I brainstormed a few ideas, but liked the idea of something long and versatile, so I made this folding floor cushion with 4 standard pillows inside.

Floorcushion9

It’s certainly not an original idea – I remember this post circulating around awhile back.  The idea was to sew several pillow cases together as an easy way to create this folding floor pillow.  Well, I wanted to make one that was from one continuous piece of fabric, so I made an almost-as-simple tutorial for doing that.  Trust me, it’s really easy and your kid will LOOOOVE it.  In fact, I love it.  It’s the perfect size for me to snuggle up with the girls and a good book or two (or 5 if Yuki is really trying to evade bedtime).

Floorcushion11

Ok, so here’s what you need . . .

  • 2 yards of fabric that is 60″ wide (more about fabric type below)
  • coordinating thread
  • the sewing essentials, but especially some sort of fabric marking pen or chalk that is removable since we’ll be marking the right side of the fabric.
  • 8 buttons (optional)
  • 4 standard pillows (try and find really full and fluffy ones, since they flatten quickly with use)

You can really use any type of fabric that you want, but I chose a heavier home dec fabric.  I think it helps to keep the shape of the pillows and will withstand plenty of wear.  But any fabric will do!  And if you don’t have fabric that is 60 inches wide, you can sew two coordinating fabrics together for a fun “reversible” look.

I got this striped fabric at Ikea a couple of years ago and used it as a table cloth for a party.  It’s been sitting in my stash since then and every once in awhile Yuki would point to it and say that she really liked it.  But since it wasn’t suitable for clothing, I didn’t know what to do with it.  This turned out to be the perfect project for it!

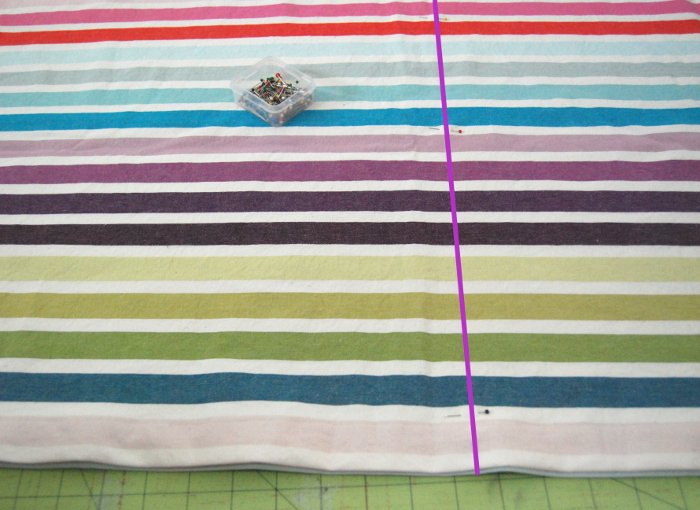
Ok, let’s get started!  Wash, dry and press your fabric.  Fold it in half lengthwise, right sides together (along the gray line in the diagram).

Floorcushion1

Pin and sew one of the short edges with a 1/2 inch seam allowance.  Trim seam allowance to 1/4 inch and finish edges as desired (pinking shears, zig zag stitch or with a serger).

Floorcushion2

So here’s where I did some of the measuring work for you 😉  Standard pillows are 20″ x 26″.  Since I wanted my pillows to remain a little fluffed, as opposed to completely flat, I tested out some measurements, but decided on making each pillow sleeve 17″.  Since there are 4 pillows, I multiplied 17 by 4 and got a finished length of 68 inches.  Measure 68 inches from your first seam and mark with your fabric pen.  Pin the two layers of fabric together before sewing to prevent any shifting.  After you sew along the line, trim and finish the edges.

The next step is to hem the entire length of the opening.  Fold the fabric toward the wrong side by 1/2 an inch and press.  Fold again 1.5 inches, press and pin.  Do this along the entire length of the opening and then stitch close to the folded edge.

Floorcushion3

So you now have a suuuper long pillow case.  The next step is to top stitch lines to create separate sleeves for the pillows.

Turn your pillow right side out and press.  With your fabric pen mark every 17 inches and draw vertical lines.

Floorcushion4

*HINT – Since you are working with a long piece of fabric, you want to sew closer to the right side and let the fabric hang off the left side of the machine.  So measure 17 inches from the right and draw one line, then flip your cover over and repeat.  For the center line, you can sew on either side of the cover since the fabric is the same length on either side.

Make sure to pin the two layers of your fabric together before sewing to they don’t slip.  Stitch along the lines that you drew and reinforce the stitching at the opening by backstitching several times.  Since the opening will receive the most stress, you want to make sure this stitching does not come undone!

Floorcushion5

And that’s it!  You can stop here with the sewing, stuff your pillows and be done!

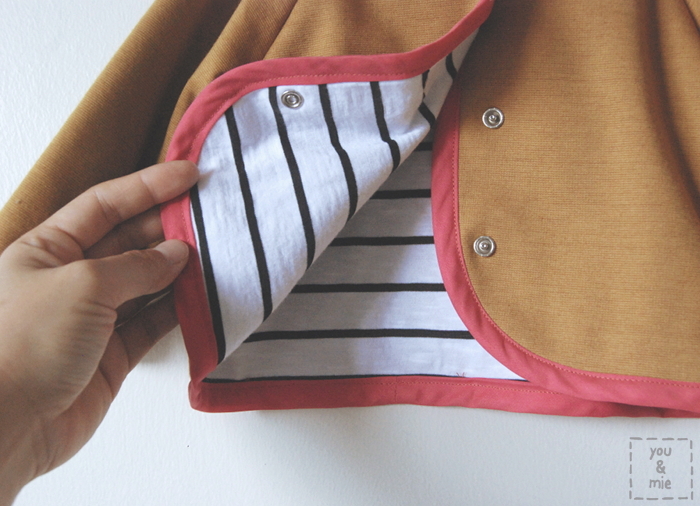
If you want to add buttons along the edge to fully enclose the pillows, then there are just a few more steps.

Floorcushion6

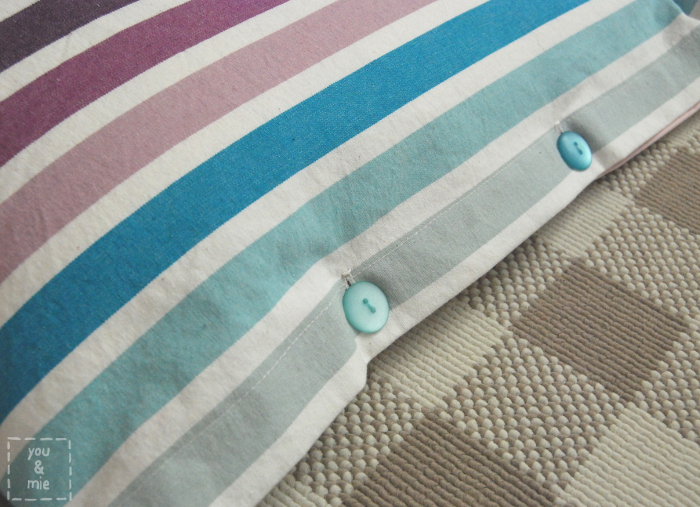
Measure and mark where you want your buttonholes to be.  Since each opening is 17 inches, I measured 5.5 inches in from each side.

Floorcushion7

Repeat for all 4 openings and sew your buttonholes.  To figure out where to sew on your button, cut your buttonhole open and use your fabric pen to mark the center of your hole on the fabric underneath it.  Sew eight buttons on the inside of your cover and you’re done!

Floorcushion8

Stuff it with pillows and enjoy!

Floorcushion12

Floorcushion13

It’s easy to remove the pillows and throw the cover in the wash, or switch out for new pillows if you need.  I know this will get so much use for years to come.

We still have a lot of work to do to finish the girls’ room, but we got this nook finished and it really felt like a mini victory!  Gotta celebrate those too, right!?

Floorcushion10

And this.  *sigh*  These two are adorable together.  Yuki insisted that her sister be in the photos with her.  Love it!

Now onto the other 387 home improvement projects on my list 😛

Figgy’s Ethereal Dress

EtherealDress1

Have you seen the new Heavenly Collection by Figgy’s?  The collection is made up of 7 super unique and stylish patterns for kids and some of them for young adults.  When Shelly contacted me about being a part of the Heavenly Tour, I jumped on board immediately.  I was drawn to the Ethereal Dress & Blouse.

EtherealDress6

And what a sweet little dress this is!  The construction is a very standard bodice with a gathered skirt – the frill is what makes it so special.  It can be made in shirt, tunic or dress length and with long sleeves, short sleeves or no sleeves.  The dress came together really easily and adding the frill was pretty straightforward.  The pattern directions were clear and easy to understand and produces such a unique little piece for your kiddo’s wardrobe.

EtherealDress3For the sleeveless and short sleeved version, the bodice is fully lined and is finished with a technique that looks great, but might be a little confusing if you’ve never done it before.  Shelly has broken it down a little bit more in this post here and Rae of Made by Rae has a fantastic video for lining a Washi dress bodice that is the same technique.  I recommend checking those out if you’ve never finished a lined bodice like the pattern instructs.  Super helpful!

EtherealDress2

And what fabric could be more ethereal than some Nani Iro double gauze??  You might recognize this Nani Iro Melody Sketch from this A-line tunic I made a couple years ago and I said it then, and I still think even now, that this is my favorite fabric ever.  I have a little bit leftover from the tunic, but not enough for a whole dress, so I used it for just the frill.  The rest of the dress is made from a really lightweight shot cotton that I used on a dress for Sanae’s daughter for the clothing swap last year.  I love these fabrics together – both so airy and soft, yet  clean and crisp.

EtherealDress4

*Edited – I wanted to mention that I decided to do some understitching along part of the front neckline.  Understitching is a line of stitching attaching the bodice lining or facing to the seam allowance and prevents the lining/facing from rolling up and becoming visible.  This helps give any garment a clean and polished look and was especially important here since the bodice and the frill are different fabrics.  Without the understitching, the bodice lining was rolling up and I could see it at the neckline.*

I’ve found that Figgy’s patterns run pretty large, so be sure to check the size chart and not just choose the size by the kid’s age.  I made the 18 month size for my 3 and a half year old and made the “full length” dress version but shortened it by a few inches.  It fits great and the bodice even has a little room for her to grow into!

The back has an opening with a button and loop closure.  So simple and so sweet!

EtherealDress5

The Ethereal Dress & Blouse pattern can be purchased individually or with the entire collection.  I like a lot of the patterns in the collection, but I definitely want to sew up the Stellar Tunic/Dress next!

Shelly is also hosting a huge giveaway on the Figgy’s blog with the prize including fabric, sewing supplies and the entire Heavenly pattern collection.  Check out all the details and entry information here!

Thanks for stopping by and be sure to visit the other stops on the Heavenly Pattern Tour throughout the month of February.

Can you believe Valentine’s Day is this week!?  Doing any special sewing for the lovely holiday?

*This pattern was generously given to me for this review, but all opinions are, as always, 100% my own.*