Hey! It’s Kids Clothes Week! It’s been awhile since I’ve fully jumped into Kids Clothes Week, but I was feeling motivated to make some new duds for the 4 year old. I had completely stopped making clothes for her at some point because she was rejecting all the stuff that I was making. But now she’s really into dresses, skirts and tank tops and all those things that I made 1-2 years ago! Lately, she’s been grabbing this skirt a lot (which makes me super happy), so I thought I should add another to the closet.
Tag Archives: oliver + s
Princess Unikitty of Cloud Cuckoo Land!
Alright, so I know Halloween is over and people are already moving on to *gasp* Christmas!? But I’m behind as always and like to drag my feet as much as possible when it comes to all things, but especially the holiday season 😛
So I’m sharing this super last minute costume that I made for Kaya for Halloween! The Nightmare Moon costume I made Yuki took up pretty much aaaall my time the last couple of weeks, but somewhere in between I got it in my head that I wanted to make another costume for Kaya too. She already had a (slightly too short) Totoro costume, but I really only made that for the tutorial and I considered it a back up costume. I know, I’m crazy like that.
Nightmare Moon
Phew! This Halloween costume has been in the works for, what feels like, fooorever. It’s ridiculous when I start thinking about just how much time (and money) I’ve spent on this kid’s Halloween costume! But it was such a fun challenge for me – I really love making Halloween costumes!! I get a lot of enjoyment out of trying to figure out ways to translate a picture or a character into something tangible, an outfit, or a costume. So here’s the back story . . . Continue reading
Making it Sleeveless {tutorial}
Ack! I can’t believe it’s the last week of July – where has the summer gone!?! *sniff sniff* So I’ve actually been suuuuper busy sewing and having all sorts of fun. Did you catch my weekend getaway on Instagram? Ridiculously fun times were had with some very awesome people. You should check out our hashtag #seamripcity. Anyways, I’ve got so much to share, but I’m still lagging with my blog posts. So here’s a tutorial on making a sleeveless bodice from a sleeved pattern that originally appeared on the Oliver + S blog as part of their “customizing” series. This top (made with super vintage nani IRO fabric that you can read more about here) is absolutely one of my favorite things I’ve made for Kaya so far.
***
Hi! I’m going to show you how to modify a sleeved pattern to a sleeveless version and finish the armholes with bias tape. I am using the Lullaby Layette Shirt pattern (View B) in this example, but you can do this with pretty much any pattern!
A Floral Baby Dress and a tutorial
Today I’m sharing a tutorial on the Oliver + S blog on how to alter a shirt pattern with sleeves to a sleeveless shirt! I modified the Lullaby Layette Shirt pattern for the tutorial, but you can use this method for pretty much any pattern.
Head over to Oliver + S to check out the full tutorial!
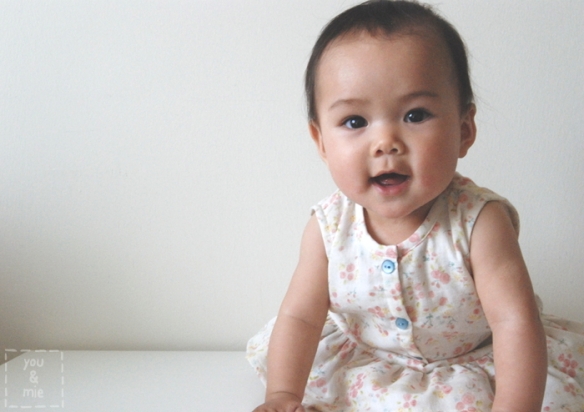
I made the Lullaby Layette Shirt pattern (View B in the 3-6 month size), but I made a few modifications. Besides making it sleeveless, I decided to add a little gathered skirt. It was actually supposed to be more of a peplum top, but I made the skirt so long that it became a dress! But that’s ok, I think this will actually fit her for awhile!
Before adding the skirt, I shortened the bodice by a couple of inches and also took the sides in a bit, so it was less A-line. I was too nervous to add snaps to this amazing fabric (the chances of me messing up and tearing a hole in the fabric was too high), plus there’s something so sweet and more vintage-y about buttons, so I went with these light blue ones. I think I made the right call.
This fabric! It was a gift from my good friend, Frances, AKA Miss Matatabi. It’s a nani IRO double gauze and it says “Fuwari Fuwari” on the selvage, but I didn’t recognize it, so I knew it must be older than a couple years. Well after I cut into it I asked Frances about it and it turns out it’s a super rare print from 2006! VINTAGE NANI IRO (yes, 2006 is vintage when it comes to a fabric line). I suddenly felt mortified that I had just cut into it!
But Frances said that it was probably a good thing that I was able to use the fabric without the pressure of having to create something “worthy,” and I think she’s right. This fabric probably would have sat in my stash forever and ever, and at least this way it was used to make something special for my daughter and maybe someday it’ll get passed on or something. Random question – do you save your handmades? When they are outgrown, do you give them away? Store them? Toss them?
In other news, Kaya is getting harder and harder to photograph. That window of time when she could sit up, but not move has been too brief. She’s already getting ready to crawl and I can barely get her to sit still for a few seconds. Oh boy!
Anyways, I’d love it if you headed over to the Oliver + S blog to check out my tutorial. It’s my first time posting over there! 🙂
Happy Monday!
Panda Raglan Tee {tutorial}
Yes! I did it! I finally made something for Yuki that she really likes!
I have to admit, I’m pretty psyched about this project. A couple of months ago I saw a little toddler wearing a tunic that was similar and definitely had an “I can make that!” moment. Well the idea has been rolling around in my head since then and I just needed the time to do it. Isn’t that what KCW is all about!?
The theme for this Kid’s Clothes Week is “Mini Me” so I decided to make one for little sister as well. Yuki loved that she and Kaya had matching shirts! Unfortunately, Kaya wasn’t really feeling the photo shoot. But I have a feeling she really loves the shirt too 😛
Yuki says, “Can you see my panda ears?” The 3D ears are definitely the most fun feature of these shirts. And though these are pandas, you can really make this shirt into almost any animal! Want to make one for your favorite animal lover? I made a tutorial!
Here’s what you’ll need:
- a raglan t-shirt pattern (I used the Oliver + S Field Trip Raglan T-shirt Pattern, but you can use any, or draft your own)
- knit fabric (refer to your pattern for amounts) and coordinating thread
- scraps of fabric for the ears (knit or woven)
- freezer paper
- precision knife/scissors
- iron
- fabric paint and brush (be sure to read all the directions on your fabric paint before you begin your project)
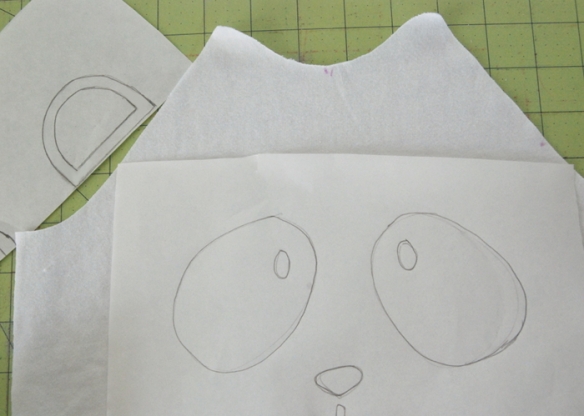
To get started, cut out all your shirt pieces as your pattern directs (shirt front, back, two sleeves and a neckband). Lay out the front shirt piece and place your freezer paper on top, shiny side down. Sketch your animal face.
Make a pattern piece for the ears. We will add a small pleat to the ear, so add a little width to the base and also 1/4 around for seam allowance.
Carefully cut out your stencil, making sure to keep any small pieces you need to place on the inside of your stencil, like the eyes.
Place your stencil where you want on the shirt (shiny side down) and iron it on using a high heat setting. Be sure to press well especially around the edges of the design.
Put your fabric on cardboard or paper, in case the paint seeps through. Apply the fabric paint in a thin and even coat. Try not to paint towards the edges of the stencil to avoid sweeping paint under the stencil. Wait till the paint is mostly dry (30 minutes) and apply another thin and even coat.
Allow the paint to dry completely before peeling off the stencil.
What a fun (and slightly nerve wracking) moment 🙂
Now for the sewing part. Cut out 4 ear pieces.
Place two ear pieces right sides together and pin. Repeat for other pair.
Sew along the curved edges with a 1/4 inch seam allowance. Leave the bottom open. Trim the curved edge to 1/8 inch.
Turn right side out and press. Add a small pleat to the center of the ear (the two ears should have pleats going the opposite direction). Pin and sew pleat in place.
Trim the bottom edge so it is straight again.
Figure out where you want your ear on the shirt front and align the raw edges, right sides together. Pin and baste the ear in place 1/8 inch from the edge).
Now we will attach the sleeve to the shirt front. Align the raw edges of the shirt front and the sleeve front, right sides together. The ear should be sandwiched in between. Pin and sew according to the pattern directions.
Finish edge if desired. Press the seam allowance towards the shirt and the ear pointing “up” towards the sleeve. On the right side of the shirt, top stitch the ear to the sleeve close to the seam.
Repeat on the other side with the second ear.
Now finish the shirt as directed in your pattern and voila! An awesome panda shirt for your little one!
Trust me, I reeeeeally think they’ll like it!
Now I’d seriously love to see what other animals you guys can make into shirts!! If you use this tutorial to make a fun animal shirt, please let me know! You can add a picture to the you & mie flickr group or just leave me a comment or email me. I imagine a whole zoo of fun animal shirts 🙂
It was so great to just make something fun, not for a specific project. Thanks for the motivation Kid’s Clothes Week! Hope you’ve been able to make something fun too!
Lullaby Layette Summery Bodysuit
I’m back with another project from the new Oliver + S Lullaby Layette Pattern Set! This time I made the bodysuit (View A) and went in a totally different direction from the cozy jacket in modern colors. I really wanted to make something sweet, vintage-inspired and summery for the upcoming months. Before you ask, no, the ruffle sleeves are not part of the pattern, BUT I have a tutorial for those coming up next week! They are really quite simple and can be added to pretty much any bodice pattern.
But back to this sweet number . . . the bodysuit features a snap placket at the neckline and also at the bottom for easy diaper changes. It has a cute pleat in the front and back and elasticized leg openings.
The bodysuit is really cute alone because it is quite roomy at the bottom. But you can easily pull pants over it as well and let the extra fabric hang over the pants like a top. Or, if you prefer it, this same pattern can be made as a top. And it has short and long sleeve options. Before I made this bodysuit, I actually made the shirt version (View B), but because of a poor fabric choice on my part, it didn’t come out that great. More on that later . . .
I don’t think I really need to say much about the quality of the pattern, do I? You all already know how awesome Oliver + S patterns are, right? Ok, good. I’ll just leave it at that.
Besides the ruffle sleeves that I added, there were a few other changes I made. Remember how I mentioned I had some difficulty attaching the snaps to the jacket? Well, this pattern called for snaps at the neck and bottom and while it would have been totally doable, I wanted to test out some other options for those who prefer to avoid snaps.
For the front closure, I decided to add buttons instead of snaps. My machine makes pretty neat buttonholes, so this was an easy option for me. Another option, which I tried for the first shirt I made, was to simply sew the bottom portion of the placket closed. I wanted to leave enough room for baby’s head to fit through, but not leave the shirt hanging wide open. So I measured how far up the placket I should sew shut (by testing it on my baby) and left just a few inches open at the top. Easy to do and easy to put on – nothing to open or close!
For the bottom of the bodysuit, snaps are really a must. So I sewed on a strip of this twill tape that already has snaps attached to it. You can find it at most fabric stores – I bought mine at Jo-Ann. If I remember correctly, it’s a bit expensive, but definitely comes in handy when you don’t want to attach your own snaps. I also think it was a good choice for this particular fabric, which even with interfacing, is very thin and delicate.
The fabric is a very lightweight swiss dot cotton that I bought at Discount Fabrics. I originally bought it to make myself a Staple Dress, which I almost finished, but abandoned because I didn’t think it was very flattering on me. I found the unfinished dress recently and I think with a few modifications, it might work, so maybe I’ll try and work on that for the spring. But I had enough left in my stash for this little number. And I think it’s perfect!
The fabric is so thin that it is a little sheer. Perfect for hot weather and appropriate for babies, since they don’t really have to worry much about modesty. Because it’s so thin, it’s very comfortable. The problem with the first shirt that I made was that I had used a quilting cotton that was a bit too stiff for a baby’s shirt. I would recommend sticking with lightweight fabrics and knits, especially for the wee littlest ones. I also chose a crazy print that ended up looking kind of like a miniature bad Hawaiian shirt. 😛
This is pretty much how Kaya felt about the photo shoot.
The only thing I would do differently next time is add a little length to the elastic for the leg openings. It’s hugging Kaya’s chubby thigh already and otherwise she’d be able to fit into this for awhile. And she’s not even a particularly chubby baby! Oh, I made the 3-6 mo. size again and it’s perfect.
Oh, I can’t wait to hit the beach and park with this cutie in her new bodysuit! And us lucky ducks in California don’t really have to wait any longer. Today was gorgeous and in the mid-70s!
Ok, so next week I’ll have the tutorial for the ruffle sleeve, so look out for that! And until then, have you seen the other two new Oliver + S patterns? There’s the Garden Party Dress + Blouse which three of my bloggy buddies all made – check out Kristin’s, Gail’s and Jessica’s. And then, my favorite of the new patterns, is the Hide-and-Seek Dress + Tunic. Can’t wait to sew that one up! What’s your favorite?
*This pattern was generously given to me for this review, but all opinions are, as always, 100% my own.*
Lullaby Layette Baby Jacket
Did you hear? The new Oliver + S spring patterns have been released! There are two adorable spring dresses/tops, and a baby/toddler layette pattern set. I’m so excited to help roll out these patterns by sharing a couple of things I made. I looove the dresses, but was eager to give the Lullaby Layette patterns a try first. The set comes with 4 views – a bodysuit, a shirt, pants and a jacket and covers sizes 0-24 months.
The first thing I made was the raglan style, reversible jacket (View D). I’m always looking for cute outerwear for Kaya. She’s got plenty of onesies, but it can get chilly in all seasons around here, so a jacket is always a must. The pattern calls for wovens, but says knits can be used too. So I definitely wanted to give the knits a try – it just seems like it’d be warm and cozy.
I made size 3-6 months for Kaya who is approaching 6 months. I debated whether I should go with the 6-12 month size for longer wear, but the smaller size still has plenty of room to grow.
The pattern, as you can expect from all Oliver + S patterns, is wonderful. I love the glossary of sewing techniques that they include at the beginning of every pattern – you can learn a lot just by reading that part alone! But then this set includes 3 separate patterns (one that can be made in 2 ways) and each has well written directions with great diagrams. You always get really professional quality clothes when you use O+S patterns and you learn a ton of great sewing skills.
The construction of this jacket is pretty simple and it comes together quickly. It is raglan style, with a simple pleat in the shoulder. You make the jacket and the lining in the exact same way and then attach them together (in a seemingly) seamlessly way that doesn’t require any flipping inside out and hand stitching closed. The hardest part of the whole process was attaching the snaps. I had a helluva time with them, until I realized I was doing it wrong. Once I figured it out it went a little better, but I had one fall off after I thought I was all done. I used the “Easy Attacher” (affiliate link) which actually helped a lot, but Kristin said that the snap fastener pliers (affiliate link) are even better.
One of my goals for 2014 was to try use more fabric from my stash, and though I haven’t stopped buying new fabric completely, I am trying to search through what I have before I buy more fabric and notions. And it’s been fun finding old fabrics and giving them new life when paired with something unexpected. Both this jacket and the bodysuit that I’ll share later this week were completely made with stuff I already had at home! Yay me! 😛
The mustard knit is from Stonemountain and Daughter in Berkeley and I bought it awhile back to make Yuki a cardigan. I cut it out and everything, but it never got made. I don’t even know what happened to those pieces, but hopefully I’ll find them again in time for Kaya to wear. Anyways, there was enough fabric left to cut out this jacket! It seemed perfect for baby outerwear – a sturdier, thicker knit, but still had some stretch. Someone on Instagram asked me if it was “ponte,” and I don’t actually know what that is! But I looked it up online and the description seems to match pretty closely. Anyone else have a guess?
The other side is a white/black striped knit that I’ve also had forever and used for the shirt in this outfit. It’s pretty thin, so it was nice to be able to pair it with the thicker mustard knit. And the pink bias tape was originally going to be used to bind a baby blanket/quilt that never happened. I do love this kinda funky and modern combination of colors.
So now Yuki – eek, Kaya! I honestly just typed Yuki’s name. Do you guys mix up your kids names all the time too!? Anyways, Kaya has a new jacket for this transition into spring. Oh and yes, spring! It’s coming, can you feel it!? Soooo exciting!
I’ll be back with a truly springy/summery bodysuit for Kaya later this week. What are you sewing for the spring?
*This pattern was generously given to me for this review, but all opinions are, as always, 100% my own.*
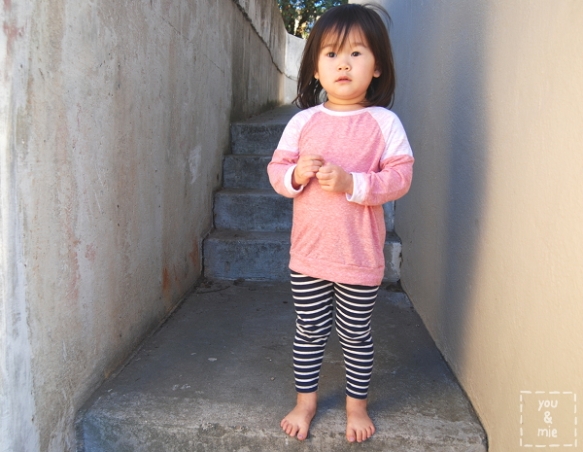
KCW Day 5 – Burnout Raglan Tee
Ok, so technically today is Day 6, but this tee was made mostly on Day 4 and finished and photographed yesterday, so we’re calling it Day 5, ok? OK!
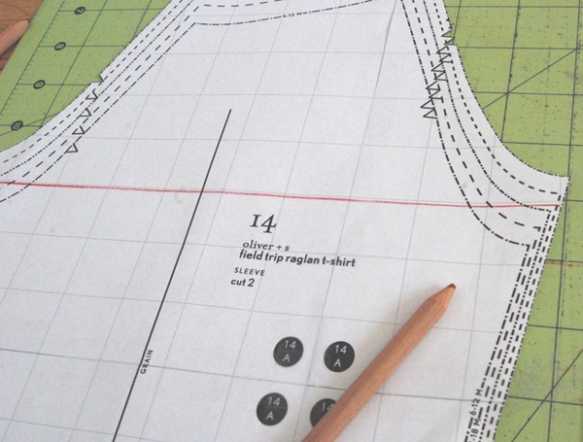
The pattern is the Oliver + S Field Trip Raglan T-shirt which is now available as an individual PDF pattern! I’ve had my eye on this raglan shirt pattern for awhile, but couldn’t fork over the cash for the set, knowing I’d probably never make the cargo pants. But Oliver + S have started offering some of their basic pieces as separates! And a good raglan pattern seems like a staple for any collection. This one doesn’t disappoint and I already have several ideas for more raglans and remixes that I can’t wait to try.
I made the shirt in size 3T and it is a little large for Yuki, which isn’t much of a surprise considering her petite size. I probably could have gone down a size, but this is great because I know it’ll fit her for awhile. It’s definitely a looser fitting shirt than the Flashback Skinny Tee, which, of course, is supposed to be a skinnier/tighter fit. I had to shorten the sleeves a bit.
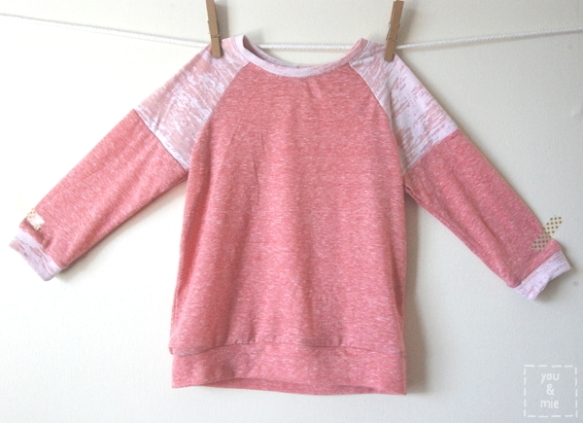
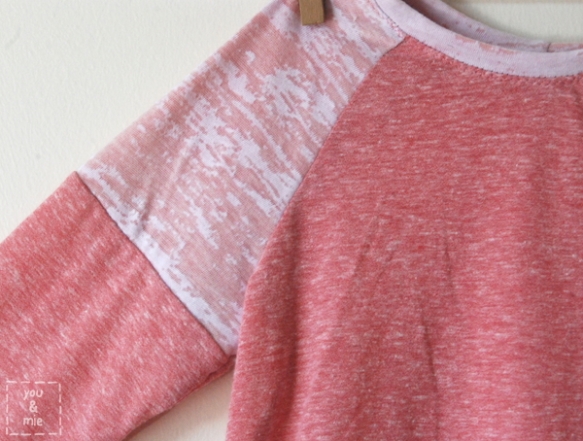
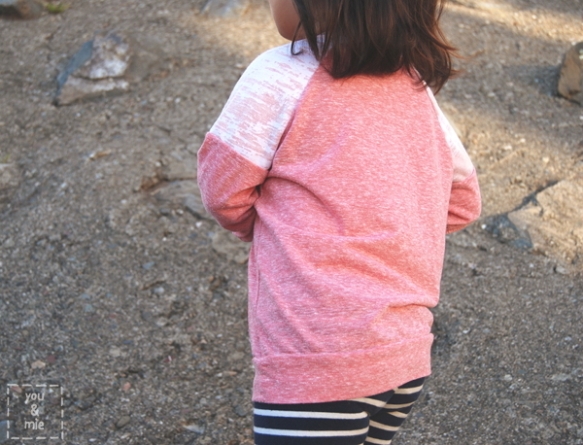
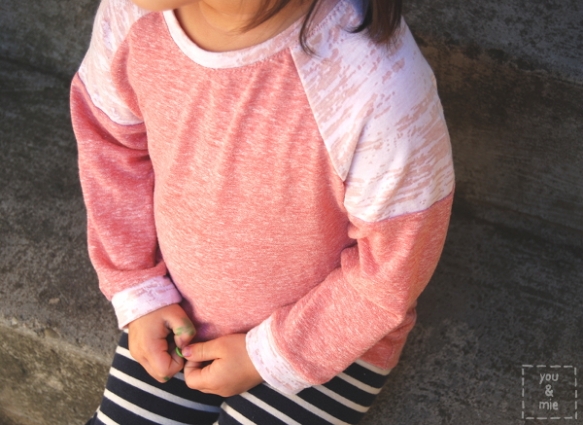
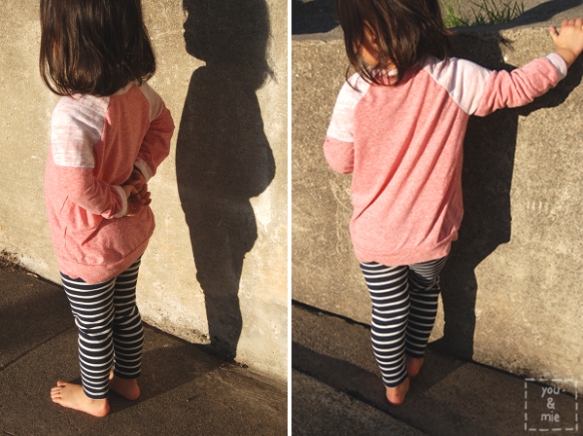
The biggest adjustment I made to the pattern was adding color blocking to the sleeves. It was super simple to do and I love the finished look. I also decided to finish the sleeves and bottom with bands/cuffs instead of just hemming it and omitted the pocket.
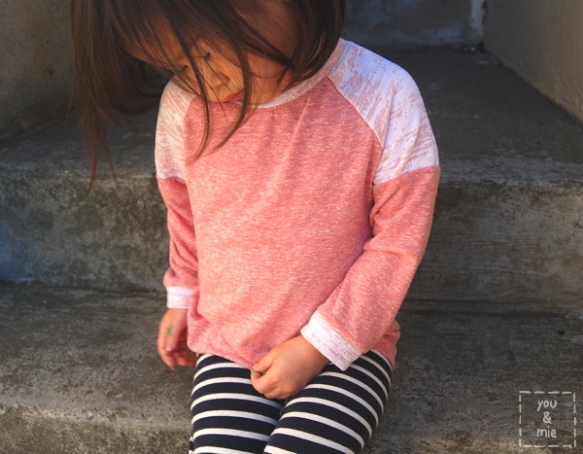
The main fabric is a suuuuper thin and soft heather red knit. It’s so heathered that it looks pink. I bought it from the remnant bin at Discount Fabrics awhile back. I picked it out because it is really soft and comfortable, but I don’t think I realized just how thin it is. I wasn’t sure if it’d be stable enough or opaque enough for a shirt, but it worked out fine, it just isn’t very warm. But definitely soft and comfy. The color blocked shoulder, neckband and arm cuffs are actually two layers. An ever MORE suuuuuuuper thin and see through, burnout tissue knit in white on top of the heather red knit. I don’t even know why I bought this burnout knit since it’s pretty impractical on it’s own (unless you can pull off the see through top look, which unfortunately, I cannot). I actually had thrown it in my “get rid of” pile because I didn’t think I was going to use it, and then fished it out for this. Turns out, it looks great layered!
You can kind of see how see through the top is here, over Yuki’s striped leggings.
I knew that these knits, being as thin as they are, were going to be a bit of a challenge to sew. In fact, they were a challenge to cut! They are so stretchy that if you’re not really careful, your pieces can come out a little misshapen. I tried the stretch stitch with a ballpoint needle and my walking foot, but even with all that, the fabric was getting sucked into the machine and stretched out. I probably could have busted out the tissue paper trick and been fine, but instead I switched over to my serger and it sewed up so easily. So I constructed the entire top using only my serger – this is my first time doing that – and I loved it! The only time I used my sewing machine was to topstitch the neckband down with a stretch stitch. I would have used it to hem the sleeves and bottom, but since I finished those with cuffs instead, I didn’t need it. SO EASY.
Doing a color blocked shoulder panel/sleeve is a very simple pattern adjustment, but if you’re not sure how to do it, I’ll tell ya!
First, I cut out my sleeve pattern in the appropriate size. Then I drew a line horizontally across the sleeve where I wanted to add the contrast fabric. My line is 1/2 an inch below the bottom of the armhole.
Place a piece of tracing paper on top of your sleeve pattern piece and trace the top of the pattern up to the line you created. You’ll want to add a 1/4 inch for seam allowance.
On a separate piece, you’ll need to do the same for the bottom part of the sleeve. Trace around the bottom of the sleeve up to the line you created and then add a 1/4 inch for seam allowance above the line. Now you have your two sleeve pieces!
The first thing I did after cutting out my fabric was sew the two sleeve pieces together with a 1/4 inch seam allowance and press. Then I followed the rest of the pattern instructions as directed! An easy alteration that makes a pretty big statement 🙂
This Oliver + S pattern, like all Oliver + S patterns, is really well written, with clear directions and diagrams and helpful tips. I can never speak highly enough of their patterns. They are just so reliable and . . . GOOD. The shirt comes together really quickly and is a great first-knit-project, if you’re looking for something to get you started. It’s a great basic for boys and girls and now that it’s offered as a separate pattern, there’s no reason NOT to get it.
So that’s a wrap for my Kids Clothes Week. I made two things, this and the Knit Baby Vest. Back in the day I might have tackled 6 projects, but I’m just not that same young sprightly thing I used to be! 😛 I love both of the things I made and that makes me feel happy.
How did your week go? I haven’t actually had a chance to do much browsing of other people’s projects unfortunately, but maybe that’s what I’ll do today and tomorrow. But if you sewed along, leave me a link to your favorite project from your week and I’ll be sure to check it out!
*This pattern was generously given to me for this review, but all opinions are 100% my own.*
Oliver + S Art Museum Vest
Hey! I’m still here! No baby yet, so I’m keeping busy by checking things off my “stuff I gotta do before the baby comes” list. One of those things was obviously sewing up another new Oliver + S pattern 😛
Haha, ok, so maybe I should be spending my time doing other things, but seriously, who could resist the Art Museum Vest + Trousers pattern? This is part of the recent Oliver + S fall pattern release and I was so excited to have the opportunity to get my hands on this pattern early. I love a good unisex/boy pattern and this look is so darn snappy looking! The pattern is available in both PDF and paper form and in sizes 6M-4 and 5-12.
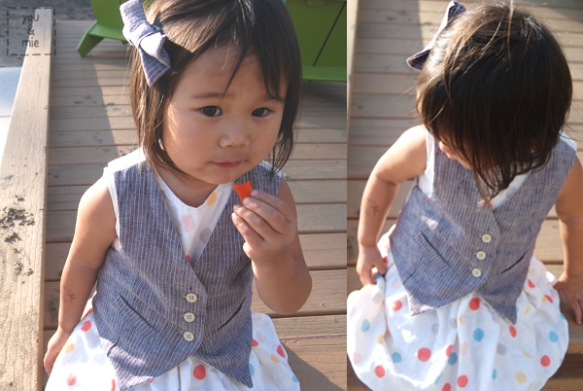
Though the trousers look totally awesome, I opted to just sew the vest this time around because Yuki will not wear any pants that aren’t knit. And I love this vest! I was going to pair it with jeggings and a white t-shirt for more of a gender neutral look, but love that it can be taken in so many directions – dressed up, or down, totally feminine, boyish or gender neutral!
My favorite thing about sewing with Oliver + S patterns is how professional looking your garments come out because of their precise patterns, reliable sewing techniques and awesome instructions.
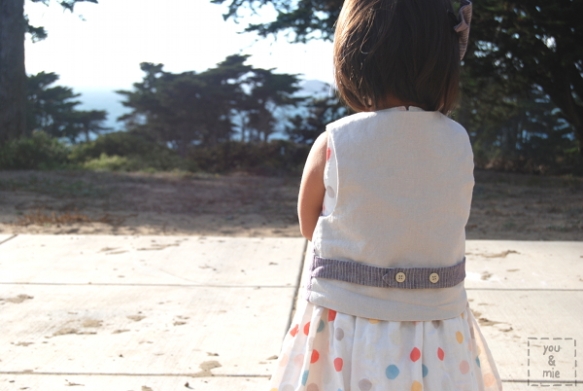
I made my vest in two linens, both from Joann’s. The main fabric is soft, striped and, though it’s hard to tell, a subtle purple. I actually bought it to make something for myself, but thought it’d look pretty awesome as a vest too. I used a basic off-white linen for the rest.
Check out my tiny welt pockets! This is the most difficult/time consuming part of the pattern. If you’ve never sewn welt pockets before, they can be a little intimidating, but the pattern does a good job of walking you through the steps and before you know it, you’ll have some sweet looking pockets. Even with the great directions, there was one part I got a little hung up on, but reading carefully, taking it slow and asking friends for help got me through it 🙂
Once you get through the welt pockets, the rest of the vest comes together super quickly!
 Yuki is wearing the vest with her Sweetheart Bubble Dress. It’s surprisingly become one of her favorites! Which makes me happy because a lot of the stuff I make for her barely gets worn! She actually got mad at me just for touching “her favorite dress!” This girl is starting to get an attitude . . .
So I can only speak for the vest part of this pattern, but I highly recommend it! If you want to check out the trousers, be sure to head over to skirt as top to see Kristin’s dapper vest and trouser set and probably actually for Gail’s adorable baby trousers. The pants pattern looks super professional and again, I can imagine them being made for everything from special occasion to everyday school wear. If you’re interested, you can buy your pattern from the Oliver + S shop here!
And if you haven’t seen it yet, go check out Gail and Kristin‘s versions of the new Library Dress also!
Now go off and enjoy your weekend! Happy sewing!
*The Art Museum Vest + Trousers pattern was generously given to me for this review, but all opinions are 100% my own.*


